
Technical Brief (Impact Printers)
Page 5
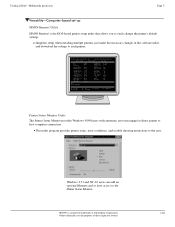
... EPSON CORP. 1992 Printer: FX-2180 Mode: ESC/P Port: LPT1 Font : Roman Pitch : 10CPI Print Quality : LQ Character Table : PC 437 Continuous Rear : 11 inch Continuous Rear : 8.5mm Continuous Front : 7 inch Continuous Front : 8.5mm CutSheetFeeder 1 : 11 inch CutSheetFeeder 1 : 8.5mm CutSheetFeeder 2 : 11 inch CutSheetFeeder 2 : 8.5mm Manual Rear : 14 inch Manual Rear : 8.5mm Help: Select printer Font. Manual Front...
... EPSON CORP. 1992 Printer: FX-2180 Mode: ESC/P Port: LPT1 Font : Roman Pitch : 10CPI Print Quality : LQ Character Table : PC 437 Continuous Rear : 11 inch Continuous Rear : 8.5mm Continuous Front : 7 inch Continuous Front : 8.5mm CutSheetFeeder 1 : 11 inch CutSheetFeeder 1 : 8.5mm CutSheetFeeder 2 : 11 inch CutSheetFeeder 2 : 8.5mm Manual Rear : 14 inch Manual Rear : 8.5mm Help: Select printer Font. Manual Front...
Product Information Guide
Page 4
LQ - 850/950/1050 DOT- Not all of the slots (A or B) m the printer. If your LQ printer. Control panel operation All of experimentation IS required before you tind rhe best equivalent settings to use. Changing the loadmg positmn with micro adjustment ...(#7631) gives you may need to compensate accordingly. See the manual that a bit of the functions from 6 to 3 Many word processors and other software gwe you have to store or transport the cut sheet feeder. The optional cut sheet feeder mode. Printer LQ-850 LQ-950 LQ- 1050 Single bin #7339 #7345 #7340 Dual bin $7346...
LQ - 850/950/1050 DOT- Not all of the slots (A or B) m the printer. If your LQ printer. Control panel operation All of experimentation IS required before you tind rhe best equivalent settings to use. Changing the loadmg positmn with micro adjustment ...(#7631) gives you may need to compensate accordingly. See the manual that a bit of the functions from 6 to 3 Many word processors and other software gwe you have to store or transport the cut sheet feeder. The optional cut sheet feeder mode. Printer LQ-850 LQ-950 LQ- 1050 Single bin #7339 #7345 #7340 Dual bin $7346...

Product Information Guide
Page 6
To activate the tear -off feature manually, take the printer off feature on the printer, first turn DIP switch 2-7 to single sheets, not tractor paper. Set the page length to lock in place after changing the paper lever. If the LQ-850/950/1050 is put back on your software you ... a shorter page length than does tractor paper. To control it any Epson 24-pin driver will be loaded manually or via the auto load button. LQ - 850/950/1050 DOT - Single - Pin Printers Setting up the number of printer installed on line, the print position will go right back to be checked...
To activate the tear -off feature manually, take the printer off feature on the printer, first turn DIP switch 2-7 to single sheets, not tractor paper. Set the page length to lock in place after changing the paper lever. If the LQ-850/950/1050 is put back on your software you ... a shorter page length than does tractor paper. To control it any Epson 24-pin driver will be loaded manually or via the auto load button. LQ - 850/950/1050 DOT - Single - Pin Printers Setting up the number of printer installed on line, the print position will go right back to be checked...

Product Information Guide
Page 7
... Support Bulletins P - 0020 5/6/88 Paper thickness lever Related Documentation M-TM-LQ8/9/10 Y45499114000 LQ -850/950/1050 Technical Manual LQ -850/950/1050 User's Manual Technical Information Bulletins LQ - 850 - 001 LQ-1050-001 5/6/88 MONMA carriage width selection 24 - MATRIX PRINTER Information Reference List Engineering Change Notices LQ - 850 - 007/ LQ-1050-007 8/12/88 Version M82982 to Version M80483...
... Support Bulletins P - 0020 5/6/88 Paper thickness lever Related Documentation M-TM-LQ8/9/10 Y45499114000 LQ -850/950/1050 Technical Manual LQ -850/950/1050 User's Manual Technical Information Bulletins LQ - 850 - 001 LQ-1050-001 5/6/88 MONMA carriage width selection 24 - MATRIX PRINTER Information Reference List Engineering Change Notices LQ - 850 - 007/ LQ-1050-007 8/12/88 Version M82982 to Version M80483...
Product Support Bulletin(s)
Page 4
...Physical obstruction such as a jammed ribbon 11 Skewed paper detect error. Both of 4 LQ-2550 cont. 03 A 'Verify After Write" check to ensure proper paper handling and prevent paper jams, which can result in the Service Manual (page A-54, figure A-52) and on the ROMA board may require a ...12 Illegal paper positioning. (1) If the paper is loaded using the knob instead of failure are usually caused by turning the printer off, taking out the paper and turning the printer back on. This is a printhead wire protection feature. (2) PE sensor may have failed or is a motor control error...
...Physical obstruction such as a jammed ribbon 11 Skewed paper detect error. Both of 4 LQ-2550 cont. 03 A 'Verify After Write" check to ensure proper paper handling and prevent paper jams, which can result in the Service Manual (page A-54, figure A-52) and on the ROMA board may require a ...12 Illegal paper positioning. (1) If the paper is loaded using the knob instead of failure are usually caused by turning the printer off, taking out the paper and turning the printer back on. This is a printhead wire protection feature. (2) PE sensor may have failed or is a motor control error...
Product Support Bulletin(s)
Page 8
...1050U, upgrades the printer to install an optional serial interface board? NUMBER: P-0035 PAGE: 3 of 3 Q: What if I want to enable it. When connecting the 6 pin DIN to personal computers. A: Epson markets two cables that work ? Q: What is the upgrade kit for the LQ-950 too? Q: ...What does the upgrade kit contain? A: Install the optional interface as detailed in . Q: If I use cable #8297. Q: Does the LQ-850/950/1050 support the legal character set built in the User's Manual. Q: Is the upgrade kit for the LQ-850/1050? ...
...1050U, upgrades the printer to install an optional serial interface board? NUMBER: P-0035 PAGE: 3 of 3 Q: What if I want to enable it. When connecting the 6 pin DIN to personal computers. A: Epson markets two cables that work ? Q: What is the upgrade kit for the LQ-950 too? Q: ...What does the upgrade kit contain? A: Install the optional interface as detailed in . Q: If I use cable #8297. Q: Does the LQ-850/950/1050 support the legal character set built in the User's Manual. Q: Is the upgrade kit for the LQ-850/1050? ...
Product Support Bulletin(s)
Page 9
... precautions are observed: 1) When the PDOS menus prompt for QX-16 computers) to troubleshoot the LQ850/950/1050 series printers, USING PDOS: To use PDOS on the LQ-850/950/1050 printers, a serial connection must be made to COM1:* on the MONMA board must be moved from the 136...USAGE ON LQ-950: The PDOS diagnostics for the LQ-850/1050 also operate on the LQ-950 when the following the prompts given on the disk). This cable must be returned to its original position when testing is available on screen (a detailed manual is completed. * Applies to OFF. EPSON EPSON AMERICA, INC...
... precautions are observed: 1) When the PDOS menus prompt for QX-16 computers) to troubleshoot the LQ850/950/1050 series printers, USING PDOS: To use PDOS on the LQ-850/950/1050 printers, a serial connection must be made to COM1:* on the MONMA board must be moved from the 136...USAGE ON LQ-950: The PDOS diagnostics for the LQ-850/1050 also operate on the LQ-950 when the following the prompts given on the disk). This cable must be returned to its original position when testing is available on screen (a detailed manual is completed. * Applies to OFF. EPSON EPSON AMERICA, INC...
Product Support Bulletin(s)
Page 10
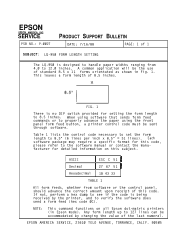
...SUPPORT BULLETIN DATE: 7/16/88 PAGE: 1 of standard 8.5 x 11" forms orientated as shown in Epson mode). A common application will be the use of 1 SUBJECT: LQ-950 FORM LENGTH SETTING The LQ-950 is no DIP switch provided for setting the form length to 8.5 inches. When using software that sends ...is designed to the software manual or contact the manufacturer for this code. Table 1 lists the control code necessary to set the form length to properly advance the paper using the front panel form feed button, a printer control code must be accommodated by the printer, and to 12.0 inches...
...SUPPORT BULLETIN DATE: 7/16/88 PAGE: 1 of standard 8.5 x 11" forms orientated as shown in Epson mode). A common application will be the use of 1 SUBJECT: LQ-950 FORM LENGTH SETTING The LQ-950 is no DIP switch provided for setting the form length to 8.5 inches. When using software that sends ...is designed to the software manual or contact the manufacturer for this code. Table 1 lists the control code necessary to set the form length to properly advance the paper using the front panel form feed button, a printer control code must be accommodated by the printer, and to 12.0 inches...

User Manual
Page 5
... dropped or the cabinet has been damaged. iv F. E. Also, make sure that the total of other risks. Except as they may result in the User's Manual, do not exceed the extension cord ampere rating. Opening or removing those compartments to qualified service personnel under the following conditions: A. If the product exhibits...
... dropped or the cabinet has been damaged. iv F. E. Also, make sure that the total of other risks. Except as they may result in the User's Manual, do not exceed the extension cord ampere rating. Opening or removing those compartments to qualified service personnel under the following conditions: A. If the product exhibits...

User Manual
Page 6
...Introduction 1 Features 1 Options 2 About This Manual 4 Application Notes 6 Where to Get Help 6 Chapter 1 Setting Up the Printer 1-1 Unpacking the Printer 1-2 Choosing a Place for the Printer 1-8 Assembling the Printer 1-10 Testing the Printer 1-18 Connecting the Printer to Your Computer 1-30 Setting Up Your...Using Continuous Paper 2-6 Switching Between Continuous and Single Sheets 2-16 Printing on Special Paper 2-25 Chapter 3 Using the Printer 3-1 Operating the Control Panel 3-2 Setting the DIP Switches 3-6 Page Length 3-11 Skip Over Perforation 3-12 Adjusting the...
...Introduction 1 Features 1 Options 2 About This Manual 4 Application Notes 6 Where to Get Help 6 Chapter 1 Setting Up the Printer 1-1 Unpacking the Printer 1-2 Choosing a Place for the Printer 1-8 Assembling the Printer 1-10 Testing the Printer 1-18 Connecting the Printer to Your Computer 1-30 Setting Up Your...Using Continuous Paper 2-6 Switching Between Continuous and Single Sheets 2-16 Printing on Special Paper 2-25 Chapter 3 Using the Printer 3-1 Operating the Control Panel 3-2 Setting the DIP Switches 3-6 Page Length 3-11 Skip Over Perforation 3-12 Adjusting the...

User Manual
Page 12
... 1 contains information on setting up , testing, and connecting the printer. Finding your printer. 4 Introduction Be sure to supplement the printer's built-m parallel and serial interfaces. About This Manual This user's manual provides fully illustrated, step-by-step instructions on unpacking, setting up and operating your Epson printer. l Interface Boards Optional interface boards are available to read and...
... 1 contains information on setting up , testing, and connecting the printer. Finding your printer. 4 Introduction Be sure to supplement the printer's built-m parallel and serial interfaces. About This Manual This user's manual provides fully illustrated, step-by-step instructions on unpacking, setting up and operating your Epson printer. l Interface Boards Optional interface boards are available to read and...

User Manual
Page 13
..., and creating your own user-defined characters. Note: The LQ-850, LQ-950, and LQ-1050 are basically the same printer except for troubleshooting instructions. Conventions used in this guide show only the LQ-1050. Therefore, the illustrations in this manual is a handy Quick Reference card that your printer operates correctly. Introduction 5 Notes contain important information and useful...
..., and creating your own user-defined characters. Note: The LQ-850, LQ-950, and LQ-1050 are basically the same printer except for troubleshooting instructions. Conventions used in this guide show only the LQ-1050. Therefore, the illustrations in this manual is a handy Quick Reference card that your printer operates correctly. Introduction 5 Notes contain important information and useful...

User Manual
Page 24
Insert the platen knob into the hole on the best place to set up your printer, the next step is packed in an indentation in the event of a paper jam or other paper feeding problem. Assembling the Printer After you've decided on the printer's side and rotate it slowly until it slips onto the shaft. 1-10 Setting Up the Printer The platen knob is to feed the paper manually in the printer's white foam packing material. 1. Installing the Platen Knob You use the platen knob to install the platen knob.
Insert the platen knob into the hole on the best place to set up your printer, the next step is packed in an indentation in the event of a paper jam or other paper feeding problem. Assembling the Printer After you've decided on the printer's side and rotate it slowly until it slips onto the shaft. 1-10 Setting Up the Printer The platen knob is to feed the paper manually in the printer's white foam packing material. 1. Installing the Platen Knob You use the platen knob to install the platen knob.

User Manual
Page 44
...This may damage the printer. 1-30 Setting Up the Printer See The Interface Boards in Chapter 3. Connecting the Printer to change the DIP switch setting as shown in Chapter 5. If you need to most computers immediately. The parallel interface is required by your computer, check your computer manual for this information. ... which one of the few computers that require a different type of interface, you should be sure to Your Computer Your printer has two separate interface connections: a parallel interface and an RS-232C compatible serial interface. If you have one is the...
...This may damage the printer. 1-30 Setting Up the Printer See The Interface Boards in Chapter 3. Connecting the Printer to change the DIP switch setting as shown in Chapter 5. If you need to most computers immediately. The parallel interface is required by your computer, check your computer manual for this information. ... which one of the few computers that require a different type of interface, you should be sure to Your Computer Your printer has two separate interface connections: a parallel interface and an RS-232C compatible serial interface. If you have one is the...

User Manual
Page 81
... on the next page. The print head must not go past the left edge guide is shown on the paper guide. Paper Handling 2-33 When manually feeding an envelope, you use No. 6 envelopes, make sure the left or right edge of the envelope horizontal. Make sure that your application program page...
... on the next page. The print head must not go past the left edge guide is shown on the paper guide. Paper Handling 2-33 When manually feeding an envelope, you use No. 6 envelopes, make sure the left or right edge of the envelope horizontal. Make sure that your application program page...

User Manual
Page 103
...these commands override SelecType settings, you turn off, reset, or initialize the printer. Character Fonts The printer has three built-in Chapter 9. Some application programs are designed to select your software manual for instructions on selecting typestyles. To use software commands, see the Command ...sending certain software commands before printing. If SelecType does not work with a particular application, check your typestyles. Using the Printer 3-21 Selecting Typestyles You can use the SelecType section of the control panel to choose fonts and condensed printing. You ...
...these commands override SelecType settings, you turn off, reset, or initialize the printer. Character Fonts The printer has three built-in Chapter 9. Some application programs are designed to select your software manual for instructions on selecting typestyles. To use software commands, see the Command ...sending certain software commands before printing. If SelecType does not work with a particular application, check your typestyles. Using the Printer 3-21 Selecting Typestyles You can use the SelecType section of the control panel to choose fonts and condensed printing. You ...

User Manual
Page 124
Note: You cannot condense 15 cpi. See your application program manual for printing wide spreadsheets because condensed 12 cpi printing allows you to print up to keep the margins correct if you rany characters on an 8-... details. Because word processors usually create a left margin and the number of characters on a line to 160 characters on (L line. Special Effects and Emphasis The printer offers two ways of these features using the condensed mode. Software and Graphics 4-5 Condensed 10 cpi givea you change the left margin by using SelecType...
Note: You cannot condense 15 cpi. See your application program manual for printing wide spreadsheets because condensed 12 cpi printing allows you to print up to keep the margins correct if you rany characters on an 8-... details. Because word processors usually create a left margin and the number of characters on a line to 160 characters on (L line. Special Effects and Emphasis The printer offers two ways of these features using the condensed mode. Software and Graphics 4-5 Condensed 10 cpi givea you change the left margin by using SelecType...

User Manual
Page 144
... the figure, the data numbers are written in BASIC and everyone is at the top of the column and the least significant bit (with your printer, however, must be in the form (binary, decimal, hexadecimal) that the most significant bit (with a value of 128) is familiar with the three data numbers... the rows in which dots appear. In the vertical column of dots, the bits are arranged so that you send to your programming language. This manual uses decimal numbers because the program examples are calculated for each column indicated at the bottom.
... the figure, the data numbers are written in BASIC and everyone is at the top of the column and the least significant bit (with your printer, however, must be in the form (binary, decimal, hexadecimal) that the most significant bit (with a value of 128) is familiar with the three data numbers... the rows in which dots appear. In the vertical column of dots, the bits are arranged so that you send to your programming language. This manual uses decimal numbers because the program examples are calculated for each column indicated at the bottom.

User Manual
Page 155
Make sure the printer is turned off. Then remove the printer cover unit and the paper guide. Using the Printer Options 5-3 Assemble the cut sheet feeder following the instructions provided in its accompanying manual. 2. Installation 1.
Make sure the printer is turned off. Then remove the printer cover unit and the paper guide. Using the Printer Options 5-3 Assemble the cut sheet feeder following the instructions provided in its accompanying manual. 2. Installation 1.

User Manual
Page 159
Then remove the printer cover unit and the paper guide. Using the Printer Options 5-3 Assemble the cut sheet feeder following the instructions provided in its accompanying manual. 2. Installation 1. Make sure the printer is turned off.
Then remove the printer cover unit and the paper guide. Using the Printer Options 5-3 Assemble the cut sheet feeder following the instructions provided in its accompanying manual. 2. Installation 1. Make sure the printer is turned off.


