
Technical Brief (Digital Cameras)
Page 4
...battery power L L EPSON Sales Training EPSON and EPSON Stylus are registered trademarks and Print Image Matching is a registered trademark of Epson America, Inc. PhotoPC is a 5/01 trademark of Seiko Epson Corporation. Other trademarks are different types and sizes of CompactFlash cards. disk, then transfer... It allows you to view the LCD when using it in larger capacities than SmartMedia cards, which type each EPSON camera requires. The benefits of CompactFlash memory cards are available in parallel and USB configurations) L Optional IOMEGA Clik!™ digital camera...
...battery power L L EPSON Sales Training EPSON and EPSON Stylus are registered trademarks and Print Image Matching is a registered trademark of Epson America, Inc. PhotoPC is a 5/01 trademark of Seiko Epson Corporation. Other trademarks are different types and sizes of CompactFlash cards. disk, then transfer... It allows you to view the LCD when using it in larger capacities than SmartMedia cards, which type each EPSON camera requires. The benefits of CompactFlash memory cards are available in parallel and USB configurations) L Optional IOMEGA Clik!™ digital camera...

Product Brochure
Page 1
... optional close-up to 11" x 14" • Maximum 6X zoom 3X optical zoom and 2X digital zoom; The 16MB CompactFlash™ memory card included stores up to a 10-second voice message per second (320 x 240 pixels) • Built-in panoramic mode. charger recharges batteries... automatic or manually control. Clarity, flexibility, and convenience. When used with an EPSON Stylus® Color printer or EPSON Stylus Photo printer and our popular EPSON Photo Quality Paper and EPSON Inks, the EPSON PhotoPC 3000Z can save setting selection allows you the time and expense of going to an...
... optional close-up to 11" x 14" • Maximum 6X zoom 3X optical zoom and 2X digital zoom; The 16MB CompactFlash™ memory card included stores up to a 10-second voice message per second (320 x 240 pixels) • Built-in panoramic mode. charger recharges batteries... automatic or manually control. Clarity, flexibility, and convenience. When used with an EPSON Stylus® Color printer or EPSON Stylus Photo printer and our popular EPSON Photo Quality Paper and EPSON Inks, the EPSON PhotoPC 3000Z can save setting selection allows you the time and expense of going to an...

Product Brochure
Page 2
... video output signal Power Includes four EPSON AA sized rechargeable NiMH batteries and charger Accepts four AA sized batteries (alkaline, lithium, Ni-Cd and NiMH) Optional AC adapter Contents EPSON PhotoPC 3000Z digital camera, 16MB CompactFlash memory card, serial and USB communications cables, ...video cable, lens cap and strap, soft case, lens adapter, neck strap, User's Guide, four EPSON AA sized rechargeable NiMH batteries and charger ...
... video output signal Power Includes four EPSON AA sized rechargeable NiMH batteries and charger Accepts four AA sized batteries (alkaline, lithium, Ni-Cd and NiMH) Optional AC adapter Contents EPSON PhotoPC 3000Z digital camera, 16MB CompactFlash memory card, serial and USB communications cables, ...video cable, lens cap and strap, soft case, lens adapter, neck strap, User's Guide, four EPSON AA sized rechargeable NiMH batteries and charger ...

Quick Reference Guide
Page 3
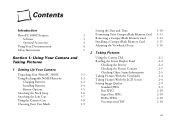
Contents Installing Batteries 1 Camera Dial Settings 3 Status Display Panel 4 Formatting Your CompactFlash Memory Card 6 Removing a CompactFlash Memory Card 7 Installing a CompactFlash Memory Card 8 Taking Pictures 10 Taking Pictures With the Viewfinder 11 Taking Pictures With the LCD Screen 13 Playing Back Pictures 16 Deleting Pictures 17 Capturing Video Clips 18 Playing Back Video Clips 20 Deleting Video Clips 21 Tips for Getting Great Pictures From Your Camera 21 Using the LCD Setup and View Screens
Contents Installing Batteries 1 Camera Dial Settings 3 Status Display Panel 4 Formatting Your CompactFlash Memory Card 6 Removing a CompactFlash Memory Card 7 Installing a CompactFlash Memory Card 8 Taking Pictures 10 Taking Pictures With the Viewfinder 11 Taking Pictures With the LCD Screen 13 Playing Back Pictures 16 Deleting Pictures 17 Capturing Video Clips 18 Playing Back Video Clips 20 Deleting Video Clips 21 Tips for Getting Great Pictures From Your Camera 21 Using the LCD Setup and View Screens
Quick Reference Guide
Page 9
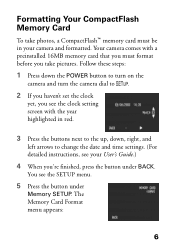
... appears: 6 Your camera comes with the year highlighted in your User's Guide.) 4 When you take photos, a CompactFlash™ memory card must format before you 're finished, press the button under Memory SETUP. Follow these steps: 1 Press down the POWER button to turn on the camera and turn the camera dial to . 2... If you haven't set the clock yet, you see the clock setting screen with a preinstalled 16MB memory card that you must be in red. 3 Press the buttons next to the up, down, right, and left arrows to change the date and time settings...
... appears: 6 Your camera comes with the year highlighted in your User's Guide.) 4 When you take photos, a CompactFlash™ memory card must format before you 're finished, press the button under Memory SETUP. Follow these steps: 1 Press down the POWER button to turn on the camera and turn the camera dial to . 2... If you haven't set the clock yet, you see the clock setting screen with a preinstalled 16MB memory card that you must be in red. 3 Press the buttons next to the up, down, right, and left arrows to change the date and time settings...
Quick Reference Guide
Page 10
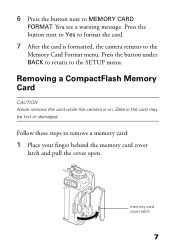
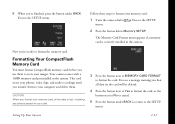
Press the button next to Yes to format the card. 7 After the card is on. memory card cover latch 7 Press the button under BACK to return to remove a memory card: 1 Place your finger behind the memory card cover latch and pull the cover open. Removing a CompactFlash Memory Card CAUTION Never remove the card while the camera is formatted, the camera returns to MEMORY CARD FORMAT. Follow these steps to the SETUP menu. 6 Press the button next to the Memory Card Format menu. Data in the card may be lost or damaged. You see a warning message.
Press the button next to Yes to format the card. 7 After the card is on. memory card cover latch 7 Press the button under BACK to return to remove a memory card: 1 Place your finger behind the memory card cover latch and pull the cover open. Removing a CompactFlash Memory Card CAUTION Never remove the card while the camera is formatted, the camera returns to MEMORY CARD FORMAT. Follow these steps to the SETUP menu. 6 Press the button next to the Memory Card Format menu. Data in the card may be lost or damaged. You see a warning message.
Quick Reference Guide
Page 11
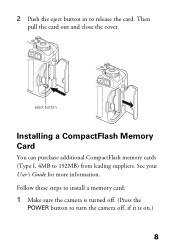
See your User's Guide for more information. Follow these steps to install a memory card: 1 Make sure the camera is turned off. (Press the POWER button to 192MB) from leading suppliers. Then pull the card out and close the cover. eject button Installing a CompactFlash Memory Card You can purchase additional CompactFlash memory cards (Type I, 4MB to turn the camera off, if it is on.) 8 2 Push the eject button in to release the card.
See your User's Guide for more information. Follow these steps to install a memory card: 1 Make sure the camera is turned off. (Press the POWER button to 192MB) from leading suppliers. Then pull the card out and close the cover. eject button Installing a CompactFlash Memory Card You can purchase additional CompactFlash memory cards (Type I, 4MB to turn the camera off, if it is on.) 8 2 Push the eject button in to release the card.
Quick Reference Guide
Page 12
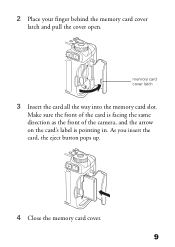
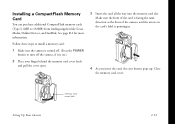
2 Place your finger behind the memory card cover latch and pull the cover open. memory card cover latch 3 Insert the card all the way into the memory card slot. Make sure the front of the card is facing the same direction as the front of the camera, and the arrow on the card's label is pointing in. As you insert the card, the eject button pops up. 4 Close the memory card cover. 9
2 Place your finger behind the memory card cover latch and pull the cover open. memory card cover latch 3 Insert the card all the way into the memory card slot. Make sure the front of the card is facing the same direction as the front of the camera, and the arrow on the card's label is pointing in. As you insert the card, the eject button pops up. 4 Close the memory card cover. 9
Quick Reference Guide
Page 13
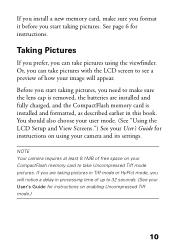
...camera and its settings. If you are installed and fully charged, and the CompactFlash memory card is removed, the batteries are taking pictures in Tiff mode or HyPict mode, you will appear. If you install a new memory card, make sure the lens cap is installed and formatted, as described earlier in this... book. NOTE Your camera requires at least 9.1MB of up to 32 seconds. (See your CompactFlash memory card to make sure you format it before you start taking pictures, you need to take pictures with the LCD screen to see a preview of ...
...camera and its settings. If you are installed and fully charged, and the CompactFlash memory card is removed, the batteries are taking pictures in Tiff mode or HyPict mode, you will appear. If you install a new memory card, make sure the lens cap is installed and formatted, as described earlier in this... book. NOTE Your camera requires at least 9.1MB of up to 32 seconds. (See your CompactFlash memory card to make sure you format it before you start taking pictures, you need to take pictures with the LCD screen to see a preview of ...
Quick Reference Guide
Page 27
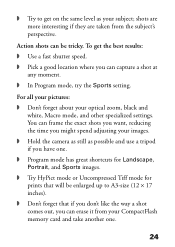
... same level as possible and use a tripod if you can frame the exact shots you want, reducing the time you might spend adjusting your CompactFlash memory card and take another one . ◗ Program mode has great shortcuts for Landscape, Portrait, and Sports images. ◗ Try HyPict mode or Uncompressed Tiff mode for...
... same level as possible and use a tripod if you can frame the exact shots you want, reducing the time you might spend adjusting your CompactFlash memory card and take another one . ◗ Program mode has great shortcuts for Landscape, Portrait, and Sports images. ◗ Try HyPict mode or Uncompressed Tiff mode for...
User Manual
Page 5
... Documentation Safety Instructions Setting the Date and Time 1-10 2 Formatting Your CompactFlash Memory Card 1-11 3 Removing a CompactFlash Memory Card 1-12 4 Installing a CompactFlash Memory Card 1-13 4 Adjusting the Viewfinder Focus 1-14 5 2 Taking Pictures Section 1: Using Your Camera and Taking Pictures 1 Setting Up Your Camera Unpacking Your PhotoPC 3000Z 1-1 Using Rechargeable NiMH Batteries 1-2 Charging Batteries 1-2 Installing Batteries 1-4 Battery Options 1-5 Attaching...
... Documentation Safety Instructions Setting the Date and Time 1-10 2 Formatting Your CompactFlash Memory Card 1-11 3 Removing a CompactFlash Memory Card 1-12 4 Installing a CompactFlash Memory Card 1-13 4 Adjusting the Viewfinder Focus 1-14 5 2 Taking Pictures Section 1: Using Your Camera and Taking Pictures 1 Setting Up Your Camera Unpacking Your PhotoPC 3000Z 1-1 Using Rechargeable NiMH Batteries 1-2 Charging Batteries 1-2 Installing Batteries 1-4 Battery Options 1-5 Attaching...

User Manual
Page 8
...System 14-1 14-2 14-4 14-6 14-7 14-7 14-9 14-10 14-12 12 Printing Your Photos Opening Photos in the Camera's Memory Card 12-2 Opening Photos Saved on the Computer 12-3 Printing Photos 12-4 Section 3: Troubleshooting and Reference A Maintenance and Troubleshooting 13 Operating the ...Camera From Your Computer Taking Pictures From Your Computer With Image Expert 13-1 Using the Self Timer 13-3 Taking Pictures With EPSON Photo!3 13-4 Caring for the Camera and Battery Charger A-1 Handling the Camera A-1 Cleaning the Camera and Battery Charger A-2 Storing the ...
...System 14-1 14-2 14-4 14-6 14-7 14-7 14-9 14-10 14-12 12 Printing Your Photos Opening Photos in the Camera's Memory Card 12-2 Opening Photos Saved on the Computer 12-3 Printing Photos 12-4 Section 3: Troubleshooting and Reference A Maintenance and Troubleshooting 13 Operating the ...Camera From Your Computer Taking Pictures From Your Computer With Image Expert 13-1 Using the Self Timer 13-3 Taking Pictures With EPSON Photo!3 13-4 Caring for the Camera and Battery Charger A-1 Handling the Camera A-1 Cleaning the Camera and Battery Charger A-2 Storing the ...

User Manual
Page 9
... Problems A-13 NiMH Battery Charger C-5 Where To Get Help A-17 Physical Dimensions C-5 EPSON Accessories A-18 Technical C-5 Software Support A-18 NiMH Batteries C-5 Software Licensing A-18 Optional Universal AC Adapter C-5 Physical Dimensions C-5 B Optional Accessories Technical C-5 Using the Optional AC Adapter B-2 CompactFlash Memory Card C-6 Using a Tripod B-4 Storage Capacity C-6 Attaching an Optional Converter Lens or Filter B-4 Physical...
... Problems A-13 NiMH Battery Charger C-5 Where To Get Help A-17 Physical Dimensions C-5 EPSON Accessories A-18 Technical C-5 Software Support A-18 NiMH Batteries C-5 Software Licensing A-18 Optional Universal AC Adapter C-5 Physical Dimensions C-5 B Optional Accessories Technical C-5 Using the Optional AC Adapter B-2 CompactFlash Memory Card C-6 Using a Tripod B-4 Storage Capacity C-6 Attaching an Optional Converter Lens or Filter B-4 Physical...

User Manual
Page 11
... camera. Your PhotoPC 3000Z comes complete with software and utilities for downloading, uploading, editing, organizing, and printing your pictures. It also includes a CD-ROM with cables, batteries, battery charger, neck strap, soft case, lens cap, and 16MB CompactFlash™ memory card. You can be... interpolated to 2544 × 1904 pixels (interpolated) using a 3.34 megapixel CCD sensor. With EPSON's HyPict™ image enhancement technology, the images can also capture uncompressed Tiff ...
... camera. Your PhotoPC 3000Z comes complete with software and utilities for downloading, uploading, editing, organizing, and printing your pictures. It also includes a CD-ROM with cables, batteries, battery charger, neck strap, soft case, lens cap, and 16MB CompactFlash™ memory card. You can be... interpolated to 2544 × 1904 pixels (interpolated) using a 3.34 megapixel CCD sensor. With EPSON's HyPict™ image enhancement technology, the images can also capture uncompressed Tiff ...

User Manual
Page 13
..., Computer download photos, upload photos, or Video Device present photos, and print photos. Introduction 4 Using Your Documentation Your EPSON PhotoPC 3000Z documentation gives you all the information you need to use your camera, and Taking Pictures taking pictures and video clips, and.... (See Chapter 9 for specialized shots. You can find instructions for using Image Expert in places that can also obtain additional CompactFlash memory cards (Type I) and PCMCIA adapters made by leading suppliers, such as Lexar Media™, Delkin Devices,™ and SanDisk. Troubleshooting...
..., Computer download photos, upload photos, or Video Device present photos, and print photos. Introduction 4 Using Your Documentation Your EPSON PhotoPC 3000Z documentation gives you all the information you need to use your camera, and Taking Pictures taking pictures and video clips, and.... (See Chapter 9 for specialized shots. You can find instructions for using Image Expert in places that can also obtain additional CompactFlash memory cards (Type I) and PCMCIA adapters made by leading suppliers, such as Lexar Media™, Delkin Devices,™ and SanDisk. Troubleshooting...
User Manual
Page 17
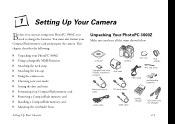
...; Setting the date and time ◗ Formatting your CompactFlash memory card and prepare the camera. This chapter describes the following: Unpacking Your PhotoPC 3000Z Make sure you need to charge the batteries. You must also format your CompactFlash memory card ◗ Removing a CompactFlash memory card ◗ Installing a CompactFlash memory card ◗ Adjusting the viewfinder focus software camera lens cap lens...
...; Setting the date and time ◗ Formatting your CompactFlash memory card and prepare the camera. This chapter describes the following: Unpacking Your PhotoPC 3000Z Make sure you need to charge the batteries. You must also format your CompactFlash memory card ◗ Removing a CompactFlash memory card ◗ Installing a CompactFlash memory card ◗ Adjusting the viewfinder focus software camera lens cap lens...
User Manual
Page 27
... button under BACK. Formatting Your CompactFlash Memory Card You must format CompactFlash memory cards before you format your card. 3 Press the button next to MEMORY CARD FORMAT to format the card. CAUTION When you use them . You see the SETUP 2 Press the button below Memory SETUP. Setting Up Your Camera 1-11.... You see a message warning you 're finished, press the button under BACK to return to store your memory card: 1 Turn the camera dial to format the memory card. Now you transfer them to your photos, video clips, and audio recordings until you 're ready to menu...
... button under BACK. Formatting Your CompactFlash Memory Card You must format CompactFlash memory cards before you format your card. 3 Press the button next to MEMORY CARD FORMAT to format the card. CAUTION When you use them . You see the SETUP 2 Press the button below Memory SETUP. Setting Up Your Camera 1-11.... You see a message warning you 're finished, press the button under BACK to return to store your memory card: 1 Turn the camera dial to format the memory card. Now you transfer them to your photos, video clips, and audio recordings until you 're ready to menu...
User Manual
Page 28
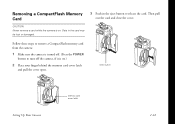
Data in the card may be lost or damaged. 3 Push in the eject button to turn off the camera, if it is on .) 2 Place your finger behind the memory card cover latch and pull the cover open. Follow these steps to remove a CompactFlash memory card from the camera: 1 Make sure the camera is turned off. (Press the POWER button to release the card. Then pull out the card and close the cover. Removing a CompactFlash Memory Card CAUTION Never remove a card while the camera is on . eject button Setting Up Your Camera memory card cover latch 1-12
Data in the card may be lost or damaged. 3 Push in the eject button to turn off the camera, if it is on .) 2 Place your finger behind the memory card cover latch and pull the cover open. Follow these steps to remove a CompactFlash memory card from the camera: 1 Make sure the camera is turned off. (Press the POWER button to release the card. Then pull out the card and close the cover. Removing a CompactFlash Memory Card CAUTION Never remove a card while the camera is on . eject button Setting Up Your Camera memory card cover latch 1-12
User Manual
Page 29
See page B-2 for more information. Setting Up Your Camera memory card cover latch 1-13 Follow these steps to install a memory card: 1 Make sure the camera is turned off the camera, if it is on the card's label is facing the same direction as the front of the camera, ... cover open. 3 Insert the card all the way into the memory card slot. Make sure the front of the card is pointing in. 4 As you insert the card, the eject button pops up. Close the memory card cover. Installing a CompactFlash Memory Card You can purchase additional CompactFlash memory cards (Type I, 4MB to turn ...
See page B-2 for more information. Setting Up Your Camera memory card cover latch 1-13 Follow these steps to install a memory card: 1 Make sure the camera is turned off the camera, if it is on the card's label is facing the same direction as the front of the camera, ... cover open. 3 Insert the card all the way into the memory card slot. Make sure the front of the card is pointing in. 4 As you insert the card, the eject button pops up. Close the memory card cover. Installing a CompactFlash Memory Card You can purchase additional CompactFlash memory cards (Type I, 4MB to turn ...

User Manual
Page 33
...other information appears in Chapter 10). Low temperatures-especially below 50 °F (10 °C)-drain batteries faster. This number is displayed. When the memory card is full, the number on the display panel reads 0, the camera status light on the right when you can no longer use . Checking the...speed appears on the back of the camera flashes red, and you can take any audio and/or video recordings stored on your memory card, the number on the memory card. (See page 6-3 for battery use the camera with low batteries, it needs full battery power to operate reliably. NOTE Several...
...other information appears in Chapter 10). Low temperatures-especially below 50 °F (10 °C)-drain batteries faster. This number is displayed. When the memory card is full, the number on the display panel reads 0, the camera status light on the right when you can no longer use . Checking the...speed appears on the back of the camera flashes red, and you can take any audio and/or video recordings stored on your memory card, the number on the memory card. (See page 6-3 for battery use the camera with low batteries, it needs full battery power to operate reliably. NOTE Several...


