

Users Guide
Page 3
...Parts - Front/Top ...20 Projector Parts - Control Panel ...24 Projector Parts - Rear ...21 Projector Parts - Contents Pro L1490U/L1490UNL/L1495U/L1495UNL/L1500UH/ L1500UHNL/L1505UH/L1505UHNL/ L1715SNL/L1750UNL/L1755UNL User's Guide 11 Introduction to Your Projector ...12 Projector Features...12 ...Product Box Contents...13 Additional Components ...14 Additional Projector Software and Manuals 16 Optional Equipment and...
...Parts - Front/Top ...20 Projector Parts - Control Panel ...24 Projector Parts - Rear ...21 Projector Parts - Contents Pro L1490U/L1490UNL/L1495U/L1495UNL/L1500UH/ L1500UHNL/L1505UH/L1505UHNL/ L1715SNL/L1750UNL/L1755UNL User's Guide 11 Introduction to Your Projector ...12 Projector Features...12 ...Product Box Contents...13 Additional Components ...14 Additional Projector Software and Manuals 16 Optional Equipment and...
Users Guide
Page 4
... ...58 Installing the Wireless LAN Module 58 Using a QR Code to Connect a Mobile Device 61 Using Quick Wireless Connection (Windows 63 Selecting Wireless Network Settings Manually 64 Wireless LAN Menu Settings ...67 Selecting Wireless Network Settings in Windows 68 Selecting Wireless Network Settings on Mac 69 Setting Up Wireless Network Security...
... ...58 Installing the Wireless LAN Module 58 Using a QR Code to Connect a Mobile Device 61 Using Quick Wireless Connection (Windows 63 Selecting Wireless Network Settings Manually 64 Wireless LAN Menu Settings ...67 Selecting Wireless Network Settings in Windows 68 Selecting Wireless Network Settings on Mac 69 Setting Up Wireless Network Security...

Users Guide
Page 7
...Projector ID ...178 Setting the Remote Control ID 178 Tiling Images into One Image ...180 Configuring Tiling Automatically 180 Configuring Tiling Manually...183 Blending the Image Edges ...185 Adjusting the Black Level ...187 Matching Tint and Brightness (Screen Matching 191 Matching the Screens... Automatically 192 Matching the Screens Manually 193 Scaling an Image...195 Enabling Protocol Emulation ...197 Viewing 3D Images ...198 Saving Settings to Memory and Using Saved Settings ...
...Projector ID ...178 Setting the Remote Control ID 178 Tiling Images into One Image ...180 Configuring Tiling Automatically 180 Configuring Tiling Manually...183 Blending the Image Edges ...185 Adjusting the Black Level ...187 Matching Tint and Brightness (Screen Matching 191 Matching the Screens... Automatically 192 Matching the Screens Manually 193 Scaling an Image...195 Enabling Protocol Emulation ...197 Viewing 3D Images ...198 Saving Settings to Memory and Using Saved Settings ...

Users Guide
Page 12
... in accordance with ISO 21118. Visit epson.com/lenssupport (U.S.) or epson.com/soutienobjectifs (Canada) for details. • Pro L1490U/L1490UNL/L1495U/L1495UNL/L1500UH/L1500UHNL/L1505UH/L1505UHNL/L1750UNL/L1 755UNL: Native resolution of 1920 × 1200 pixels (WUXGA) Pro L1715SNL: Native resolution of 1400 ×...more about your projector and this manual. Color light output measured in accordance with IDMS 15.4; Introduction to Your Projector Refer to these special features: Bright, high-resolution projection system • Pro L1490U/L1490UNL/L1495U/L1495UNL: Up to 9000 lumens...
... in accordance with ISO 21118. Visit epson.com/lenssupport (U.S.) or epson.com/soutienobjectifs (Canada) for details. • Pro L1490U/L1490UNL/L1495U/L1495UNL/L1500UH/L1500UHNL/L1505UH/L1505UHNL/L1750UNL/L1 755UNL: Native resolution of 1920 × 1200 pixels (WUXGA) Pro L1715SNL: Native resolution of 1400 ×...more about your projector and this manual. Color light output measured in accordance with IDMS 15.4; Introduction to Your Projector Refer to these special features: Bright, high-resolution projection system • Pro L1490U/L1490UNL/L1495U/L1495UNL: Up to 9000 lumens...

Users Guide
Page 13
...; Create one large seamless display when projecting from multiple projectors using Edge Blending • Epson's Instant Off and Direct Power On features for quick setup and shut down • ...all networked projectors (Windows only) Product Box Contents Additional Components Additional Projector Software and Manuals Optional Equipment and Replacement Parts Warranty and Registration Information Parent topic: Introduction to Your ...including HDMI, BNC, DVI-D, SDI (not available for Pro L1715SNL), and HDBaseT • Ports for connecting an external monitor and external speakers Easy-to ship ...
...; Create one large seamless display when projecting from multiple projectors using Edge Blending • Epson's Instant Off and Direct Power On features for quick setup and shut down • ...all networked projectors (Windows only) Product Box Contents Additional Components Additional Projector Software and Manuals Optional Equipment and Replacement Parts Warranty and Registration Information Parent topic: Introduction to Your ...including HDMI, BNC, DVI-D, SDI (not available for Pro L1715SNL), and HDBaseT • Ports for connecting an external monitor and external speakers Easy-to ship ...

Users Guide
Page 16
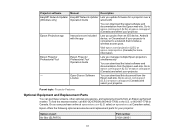
.../support (U.S.) or epson.ca/support (Canada) and select your projector through the network. For details, see "Where to get help after checking this manual and the sources listed here, you can install the projector software programs listed here and view their manuals for Pro L1715SNL) Additional component necessary Compatible BNC video cable Parent topic...
.../support (U.S.) or epson.ca/support (Canada) and select your projector through the network. For details, see "Where to get help after checking this manual and the sources listed here, you can install the projector software programs listed here and view their manuals for Pro L1715SNL) Additional component necessary Compatible BNC video cable Parent topic...
Users Guide
Page 17
... (Canada) and select your projector. To find the nearest reseller, call 800-GO-EPSON (800-463-7766) in Canada. Projector software Manual Description EasyMP Network Updater EasyMP Network Updater Lets you update firmware for more information. Visit epson.com/iprojection (U.S.) or epson.ca/iprojection (Canada) for a projector over a (Windows only) Operation Guide wired LAN...
... (Canada) and select your projector. To find the nearest reseller, call 800-GO-EPSON (800-463-7766) in Canada. Projector software Manual Description EasyMP Network Updater EasyMP Network Updater Lets you update firmware for more information. Visit epson.com/iprojection (U.S.) or epson.ca/iprojection (Canada) for a projector over a (Windows only) Operation Guide wired LAN...

Users Guide
Page 19
...projector. For details, see the warranty that lets you can use the Epson PrivateLine Support service to your equipment. • Notes contain important information about your product online at this manual and any other sources listed here, you project with your projector? Registering... help system Press the Home button on new accessories, products, and services. Parent topic: Introduction to Get Help." In addition, Epson offers free Extra Care Road Service. Warranty and Registration Information Your projector comes with a basic warranty that came with confidence. For ...
...projector. For details, see the warranty that lets you can use the Epson PrivateLine Support service to your equipment. • Notes contain important information about your product online at this manual and any other sources listed here, you project with your projector? Registering... help system Press the Home button on new accessories, products, and services. Parent topic: Introduction to Get Help." In addition, Epson offers free Extra Care Road Service. Warranty and Registration Information Your projector comes with a basic warranty that came with confidence. For ...
Users Guide
Page 52
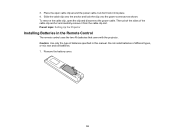
... cable clip around the power cable, but don't lock it from the cable clip slot. Parent topic: Setting Up the Projector Installing Batteries in this manual. Caution: Use only the type of batteries specified in the Remote Control The remote control uses the two AA batteries that came with the projector.
... cable clip around the power cable, but don't lock it from the cable clip slot. Parent topic: Setting Up the Projector Installing Batteries in this manual. Caution: Use only the type of batteries specified in the Remote Control The remote control uses the two AA batteries that came with the projector.
Users Guide
Page 54
... Connect one end of the network cable to your projector for network projection. To do this, you can project through the access point using the Epson network software. Note: If your projector is connected via a LAN (Ethernet) cable to a network that includes a wireless access point, you connect... instructions in these sections to set up your projector and computer for use on a Network Related references Additional Projector Software and Manuals Connecting to a Wired Network To connect the projector to a wired local area network (LAN), use a Category 5 shielded cable or better. 1.
... Connect one end of the network cable to your projector for network projection. To do this, you can project through the access point using the Epson network software. Note: If your projector is connected via a LAN (Ethernet) cable to a network that includes a wireless access point, you connect... instructions in these sections to set up your projector and computer for use on a Network Related references Additional Projector Software and Manuals Connecting to a Wired Network To connect the projector to a wired local area network (LAN), use a Category 5 shielded cable or better. 1.

Users Guide
Page 57
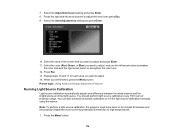
... the IP address on the remote control. • Display LAN Info lets you must set addresses manually, turn off IP Address Display. 10. Press the arrow buttons on -screen instructions to the network using the Epson iProjection app. Select the Wired LAN menu and press Enter. 8. Note: To highlight the numbers you...
... the IP address on the remote control. • Display LAN Info lets you must set addresses manually, turn off IP Address Display. 10. Press the arrow buttons on -screen instructions to the network using the Epson iProjection app. Select the Wired LAN menu and press Enter. 8. Note: To highlight the numbers you...

Users Guide
Page 58
... may damage the module or lose data. 1. Note: The Epson 802.11b/g/n wireless LAN module is optional. Note: If your projector is on a Network Related references Additional Projector Software and Manuals Optional Equipment and Replacement Parts Installing the Wireless LAN Module To ... the projector software. You may need to Connect a Mobile Device Using Quick Wireless Connection (Windows) Selecting Wireless Network Settings Manually Selecting Wireless Network Settings in Windows Selecting Wireless Network Settings on Mac Setting Up Wireless Network Security Parent topic: Using the ...
... may damage the module or lose data. 1. Note: The Epson 802.11b/g/n wireless LAN module is optional. Note: If your projector is on a Network Related references Additional Projector Software and Manuals Optional Equipment and Replacement Parts Installing the Wireless LAN Module To ... the projector software. You may need to Connect a Mobile Device Using Quick Wireless Connection (Windows) Selecting Wireless Network Settings Manually Selecting Wireless Network Settings in Windows Selecting Wireless Network Settings on Mac Setting Up Wireless Network Security Parent topic: Using the ...

Users Guide
Page 64
Select Network Configuration and press Enter. 64 12. Parent topic: Wireless Network Projection Selecting Wireless Network Settings Manually Before you can share the USB key with other computers without disconnecting your computer. Note: You can project from your computer. Select the Network menu ...
Select Network Configuration and press Enter. 64 12. Parent topic: Wireless Network Projection Selecting Wireless Network Settings Manually Before you can share the USB key with other computers without disconnecting your computer. Note: You can project from your computer. Select the Network menu ...

Users Guide
Page 68
set to Off to manually enter the network's IP Address, Subnet Mask, and Gateway Address (some options are only available when the Connection Mode setting is set up on an ... on the network standby screen Selects the IPv6 settings when you connect the projector to the network using IPv6 Parent topic: Selecting Wireless Network Settings Manually Selecting Wireless Network Settings in Windows Before connecting to the projector, select the correct wireless network on your network assigns addresses automatically; Do one of...
set to Off to manually enter the network's IP Address, Subnet Mask, and Gateway Address (some options are only available when the Connection Mode setting is set up on an ... on the network standby screen Selects the IPv6 settings when you connect the projector to the network using IPv6 Parent topic: Selecting Wireless Network Settings Manually Selecting Wireless Network Settings in Windows Before connecting to the projector, select the correct wireless network on your network assigns addresses automatically; Do one of...

Users Guide
Page 99
... Setting the Screen Type You can use the Screen Type setting to match the aspect ratio of the following lenses, you need to manually adjust the image distortion, manually rotate the distortion ring counterclockwise. Note: If you installed the optional ELPLU02 short throw lens and you see a message prompting you to select...
... Setting the Screen Type You can use the Screen Type setting to match the aspect ratio of the following lenses, you need to manually adjust the image distortion, manually rotate the distortion ring counterclockwise. Note: If you installed the optional ELPLU02 short throw lens and you see a message prompting you to select...

Users Guide
Page 170
... or Esc to align. 1. otherwise the adjustment grids are difficult to exit the menus. Press Enter and select On. 170 Note: Allow your projector to manually adjust the color convergence (the alignment of the effect. 6. Select the Extended menu and press Enter. 3. Parent topic: Using Advanced Image Adjustment Features Adjusting the...
... or Esc to align. 1. otherwise the adjustment grids are difficult to exit the menus. Press Enter and select On. 170 Note: Allow your projector to manually adjust the color convergence (the alignment of the effect. 6. Select the Extended menu and press Enter. 3. Parent topic: Using Advanced Image Adjustment Features Adjusting the...

Users Guide
Page 172
... any box on the remote control to highlight the corner of the following: • If your projector's panel alignment is misaligned and press Enter to manually adjust the color tone balance in the projected image. 1. You see this step as necessary. Use the arrow keys on the screen that is now...
... any box on the remote control to highlight the corner of the following: • If your projector's panel alignment is misaligned and press Enter to manually adjust the color tone balance in the projected image. 1. You see this step as necessary. Use the arrow keys on the screen that is now...
Users Guide
Page 174
You can also schedule automatic calibration or run the light source calibration manually using the menus. Press the right and left arrow button to weaken the color tone and the right arrow button to strengthen the color tone. ...
You can also schedule automatic calibration or run the light source calibration manually using the menus. Press the right and left arrow button to weaken the color tone and the right arrow button to strengthen the color tone. ...
Users Guide
Page 176
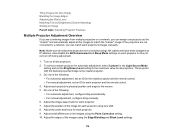
...: Adjusting Projector Features Multiple Projector Adjustment Overview If you are not connected to a network, you can match each projector's images manually. Turn on each projector so they do not turn off during adjustment. 1. Adjust each projector's physical position and angle to ...to the screen. 5. Adjust the position of the following : • For automatic adjustment, configure tiling automatically. • For manual adjustment, configure tiling manually. 6. Do one of the images using LAN cables and have been assigned an IP address. To select a master projector for ...
...: Adjusting Projector Features Multiple Projector Adjustment Overview If you are not connected to a network, you can match each projector's images manually. Turn on each projector so they do not turn off during adjustment. 1. Adjust each projector's physical position and angle to ...to the screen. 5. Adjust the position of the following : • For automatic adjustment, configure tiling automatically. • For manual adjustment, configure tiling manually. 6. Do one of the images using LAN cables and have been assigned an IP address. To select a master projector for ...
Users Guide
Page 180
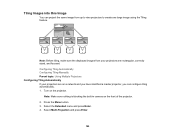
... to create one large image using the Tiling feature. Turn on the front of the projector. 2. Press the Menu button. 3. Configuring Tiling Automatically Configuring Tiling Manually Parent topic: Using Multiple Projectors Configuring Tiling Automatically If your projectors are on a network and you have identified a master projector, you can configure tiling automatically...
... to create one large image using the Tiling feature. Turn on the front of the projector. 2. Press the Menu button. 3. Configuring Tiling Automatically Configuring Tiling Manually Parent topic: Using Multiple Projectors Configuring Tiling Automatically If your projectors are on a network and you have identified a master projector, you can configure tiling automatically...

