
User's Guide
Page 2
... Installing the Plate Guide on the Printer 13 Setting Up the RIP 18 Loading a Plate in the Printer 19 Unloading a Plate from the Printer 21 Using the PCU 21 Using Epson DirectPlate Aluminum Plates 23 Plate Curing Tips 23 Punching the Plate 23 Press Tips 23 Cleaning Plates 24 Correcting Plates 25 Reusing Plates 25 Washing the Press 25 Maintenance 25 PCU Specifications...
... Installing the Plate Guide on the Printer 13 Setting Up the RIP 18 Loading a Plate in the Printer 19 Unloading a Plate from the Printer 21 Using the PCU 21 Using Epson DirectPlate Aluminum Plates 23 Plate Curing Tips 23 Punching the Plate 23 Press Tips 23 Cleaning Plates 24 Correcting Plates 25 Reusing Plates 25 Washing the Press 25 Maintenance 25 PCU Specifications...
User's Guide
Page 4
...cool before removing from the tray. • Make sure the plate is dry when feeding it could result in a shortening of the life of the unit. 4 | PCU Safety Instructions PCU Safety Instructions Before using your PCU, read the following safety instructions to turn off the PCU by the main power switch in ... the PCU with the protective cover open or removed. • Place the PCU on a flat, level, stable surface that moves the plate through the PCU. • The PCU heater reaches high temperatures during plate curing. See additional safety instructions for the printer in the box and is...
...cool before removing from the tray. • Make sure the plate is dry when feeding it could result in a shortening of the life of the unit. 4 | PCU Safety Instructions PCU Safety Instructions Before using your PCU, read the following safety instructions to turn off the PCU by the main power switch in ... the PCU with the protective cover open or removed. • Place the PCU on a flat, level, stable surface that moves the plate through the PCU. • The PCU heater reaches high temperatures during plate curing. See additional safety instructions for the printer in the box and is...

User's Guide
Page 7
Setting Up Pre-installation Checklist You will need the following components: • Epson Stylus Pro 7900 printer Setting Up | 7 • Plate curing unit (PCU) • Plate guide • Epson DirectPlate Aluminum sample pack (12 × 18 inches) • EFI™ eXpress CTP software RIP CD • Hexagonal (Allen) (2.5 mm/0.10 inch) wrench • Teflon® tape for use on plate guide • THERMAX® temperature strips
Setting Up Pre-installation Checklist You will need the following components: • Epson Stylus Pro 7900 printer Setting Up | 7 • Plate curing unit (PCU) • Plate guide • Epson DirectPlate Aluminum sample pack (12 × 18 inches) • EFI™ eXpress CTP software RIP CD • Hexagonal (Allen) (2.5 mm/0.10 inch) wrench • Teflon® tape for use on plate guide • THERMAX® temperature strips
User's Guide
Page 8
... page 6) (not included) • Ethernet® (CAT-5) network cable or USB cable for easy reference. Attach it to your printer for connecting computer and printer (not included) • Metric ruler (with half-millimeter increments) (not included) Before you begin, make sure you have sufficient space to set up and using your printer, replacing ink cartridges, maintaining your printer, and troubleshooting tips. • The Epson Stylus Pro 7900/9900 Quick...
... page 6) (not included) • Ethernet® (CAT-5) network cable or USB cable for easy reference. Attach it to your printer for connecting computer and printer (not included) • Metric ruler (with half-millimeter increments) (not included) Before you begin, make sure you have sufficient space to set up and using your printer, replacing ink cartridges, maintaining your printer, and troubleshooting tips. • The Epson Stylus Pro 7900/9900 Quick...
User's Guide
Page 10
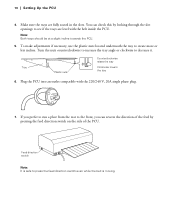
To make adjustments if necessary, use the plastic nuts located underneath the tray to decrease it. If you prefer to run a plate from the rear to the front, you can check this by pressing the feed direction switch on the side of the PCU. Turn the nuts counterclockwise to increase the tray angle or clockwise to create more or less incline. 10 | Setting Up...
To make adjustments if necessary, use the plastic nuts located underneath the tray to decrease it. If you prefer to run a plate from the rear to the front, you can check this by pressing the feed direction switch on the side of the PCU. Turn the nuts counterclockwise to increase the tray angle or clockwise to create more or less incline. 10 | Setting Up...
User's Guide
Page 11
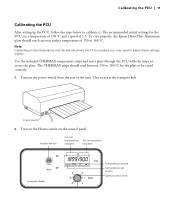
... set button Speed control knob This activates the transport belt. To cure properly, the Epson DirectPlate Aluminum plate should read between 150 to 160 °C for the PCU are a temperature of 190 °C and a speed of the unit. Note: Depending on the temperature and the altitude where the PCU is located, you may need to calibrate it. Power switch 2. Turn...
... set button Speed control knob This activates the transport belt. To cure properly, the Epson DirectPlate Aluminum plate should read between 150 to 160 °C for the PCU are a temperature of 190 °C and a speed of the unit. Note: Depending on the temperature and the altitude where the PCU is located, you may need to calibrate it. Power switch 2. Turn...
User's Guide
Page 12
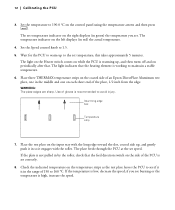
... the temperature strips as the test plate leaves the PCU to see if it in green) the temperature you see burning or the temperature is set temperature; If the temperature is in by the roller, check that the feed direction switch on the input tray with the long edge toward the slot, coated side up to maintain a stable temperature...
... the temperature strips as the test plate leaves the PCU to see if it in green) the temperature you see burning or the temperature is set temperature; If the temperature is in by the roller, check that the feed direction switch on the input tray with the long edge toward the slot, coated side up to maintain a stable temperature...

User's Guide
Page 13
... recommended to avoid burns. Installing the Plate Guide on the Printer To assure proper registration when printing on Epson DirectPlate Aluminum plates, you turn off the Heater switch on the control panel before turning off the main power switch. Use of the roll paper cover, aligning it from the tray to avoid injury. Let the plate cool before removing it snugly with the black edge of the transport belt...
... recommended to avoid burns. Installing the Plate Guide on the Printer To assure proper registration when printing on Epson DirectPlate Aluminum plates, you turn off the Heater switch on the control panel before turning off the main power switch. Use of the roll paper cover, aligning it from the tray to avoid injury. Let the plate cool before removing it snugly with the black edge of the transport belt...
User's Guide
Page 14
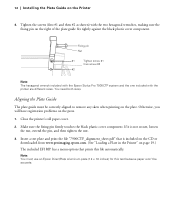
... or downloaded from www.proimaging.epson.com. (See "Loading a Plate in the Printer" on the plate. Insert a test plate and print the file "7900CTP_alignment_sheet.pdf" that prints this file automatically. Note: You must be accurate. Close the printer's roll paper cover. 2. You need both sizes. Otherwise, you will have registration problems on the right of the plate guide fits tightly against the black plastic cover component. Make sure the fixing pin...
... or downloaded from www.proimaging.epson.com. (See "Loading a Plate in the Printer" on the plate. Insert a test plate and print the file "7900CTP_alignment_sheet.pdf" that prints this file automatically. Note: You must be accurate. Close the printer's roll paper cover. 2. You need both sizes. Otherwise, you will have registration problems on the right of the plate guide fits tightly against the black plastic cover component. Make sure the fixing pin...

User's Guide
Page 16
... aligned, you need to confirm the alignment. Loosen Tighten Alignment screw 6. Repeat steps 3 and 4 and, if required, step 5 until the measurements are nearly equal, within 1.0 mm. 7. Once the plate guide is greater than 1.0 mm. Use the hexagonal wrench included with the Epson Stylus Pro 7900CTP system to print a test pattern (see "Loading a Plate in the Printer" on page 19), then print the test pattern...
... aligned, you need to confirm the alignment. Loosen Tighten Alignment screw 6. Repeat steps 3 and 4 and, if required, step 5 until the measurements are nearly equal, within 1.0 mm. 7. Once the plate guide is greater than 1.0 mm. Use the hexagonal wrench included with the Epson Stylus Pro 7900CTP system to print a test pattern (see "Loading a Plate in the Printer" on page 19), then print the test pattern...

User's Guide
Page 17
... markings on the Printer | 17 Applying the Guide Strip After the plate guide is recommended because long-term use of the roll paper cover. Installing the Plate Guide on the aluminum roll paper cover with clear packing tape. This is aligned correctly, attach the Teflon guide strip to the printer to the bottom edge of the plates may wear the markings off. Remove the adhesive...
... markings on the Printer | 17 Applying the Guide Strip After the plate guide is recommended because long-term use of the roll paper cover. Installing the Plate Guide on the aluminum roll paper cover with clear packing tape. This is aligned correctly, attach the Teflon guide strip to the printer to the bottom edge of the plates may wear the markings off. Remove the adhesive...
User's Guide
Page 18
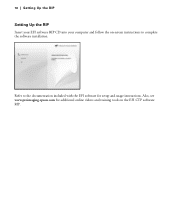
Refer to the documentation included with the EFI software for additional online videos and training tools on -screen instructions to complete the software installation. Also, see www.proimaging.epson.com for setup and usage instructions. 18 | Setting Up the RIP Setting Up the RIP Insert your EFI software RIP CD into your computer and follow the on the EFI CTP software RIP.
Refer to the documentation included with the EFI software for additional online videos and training tools on -screen instructions to complete the software installation. Also, see www.proimaging.epson.com for setup and usage instructions. 18 | Setting Up the RIP Setting Up the RIP Insert your EFI software RIP CD into your computer and follow the on the EFI CTP software RIP.

User's Guide
Page 20
... printer is turned on, the P power light is not flashing, and the roll paper cover is firmly closed . Set the printer to increase the suction. 6. This will help load the plate. Top alignment point Bottom alignment point 7. Press the l Paper Source button until you feel the suction holding the plate against the two alignment points along the top and bottom of the plate guide. The PRESS PAUSE message...
... printer is turned on, the P power light is not flashing, and the roll paper cover is firmly closed . Set the printer to increase the suction. 6. This will help load the plate. Top alignment point Bottom alignment point 7. Press the l Paper Source button until you feel the suction holding the plate against the two alignment points along the top and bottom of the plate guide. The PRESS PAUSE message...

User's Guide
Page 21
... the printer in the same direction each time. Using the PCU After a plate is best to punching or loading it doesn't fall. Note: Since you see PAPER SETTINGS > ARE THESE SETTINGS OK? Power switch To avoid injury remove your hand from the Printer | 21 WARNING: The plate edges are sharp. Press the Pause/reset button and let go of the unit. When you will use multiple plates...
... the printer in the same direction each time. Using the PCU After a plate is best to punching or loading it doesn't fall. Note: Since you see PAPER SETTINGS > ARE THESE SETTINGS OK? Power switch To avoid injury remove your hand from the Printer | 21 WARNING: The plate edges are sharp. Press the Pause/reset button and let go of the unit. When you will use multiple plates...

User's Guide
Page 22
... roller assembly, check that the heating element is turned on page 11). Note: You should be kept moving when the heater is working to warm up , and then turns off the power switch. Wait for the direction you experience a problem on periodically after that. The light indicates that the feed direction switch on the input tray and push it so it cool to the set button Speed control...
... roller assembly, check that the heating element is turned on page 11). Note: You should be kept moving when the heater is working to warm up , and then turns off the power switch. Wait for the direction you experience a problem on periodically after that. The light indicates that the feed direction switch on the input tray and push it so it cool to the set button Speed control...

User's Guide
Page 23
... aluminum plates, and require a longer time and more water to obtain a properly wetted surface. If you may need to adjust the cure rate. Epson DirectPlate Aluminum plates have a offline punch. See "Calibrating the PCU" on optimizing use an offline punch to create necessary guides on the ink rollers. See your press documentation or contact your Epson Authorized Reseller if you don't have...
... aluminum plates, and require a longer time and more water to obtain a properly wetted surface. If you may need to adjust the cure rate. Epson DirectPlate Aluminum plates have a offline punch. See "Calibrating the PCU" on optimizing use an offline punch to create necessary guides on the ink rollers. See your press documentation or contact your Epson Authorized Reseller if you don't have...

User's Guide
Page 24
... the life of transferred ink at a low level and decrease the scumming effect. • For optimum printing quality, do not mix ink with care to keep the amount of the plate. 24 | Cleaning Plates Dampening Tips • If a transition roller connects the dampening system and the inking system (e.g., ALCOLOR and other similar continuous-feed dampening systems), deactivate the transition roller. • If the...
... the life of transferred ink at a low level and decrease the scumming effect. • For optimum printing quality, do not mix ink with care to keep the amount of the plate. 24 | Cleaning Plates Dampening Tips • If a transition roller connects the dampening system and the inking system (e.g., ALCOLOR and other similar continuous-feed dampening systems), deactivate the transition roller. • If the...

User's Guide
Page 25
... Copyrapid Correction Pen. this is turned off. Remove ink from it removes the image. Reusing Plates Epson DirectPlate Aluminum plates can also use again to see if it by rubbing a little on a plate to reprint the job. Make sure the PCU is normal. Gumming or other special treatment is not required for printer maintenance. • Keep the PCU trays clean to delete a small section...
... Copyrapid Correction Pen. this is turned off. Remove ink from it removes the image. Reusing Plates Epson DirectPlate Aluminum plates can also use again to see if it by rubbing a little on a plate to reprint the job. Make sure the PCU is normal. Gumming or other special treatment is not required for printer maintenance. • Keep the PCU trays clean to delete a small section...
User's Guide
Page 26
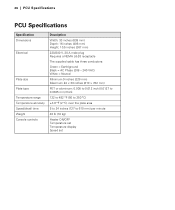
26 | PCU Specifications PCU Specifications Specification Dimensions Electrical Plate size Plate type Temperature range Temperature accuracy Speed/dwell time Weight Console controls Description Width: 33 inches (838 mm) Depth: 16 inches (406 mm) Height: 10.5 inches (267 mm) 220/240 V, 20 A male plug Requires a NEMA L6-20 receptacle The supplied cable has three conductors: Green = Earth/ground Black = AC Phase... °C) ±3.6 °F (2 °C) over the plate area 5 to 24 inches (127 to 610 mm) per minute 40 lb (18 kg) Heater ON/OFF Temperature set Temperature display Speed set
26 | PCU Specifications PCU Specifications Specification Dimensions Electrical Plate size Plate type Temperature range Temperature accuracy Speed/dwell time Weight Console controls Description Width: 33 inches (838 mm) Depth: 16 inches (406 mm) Height: 10.5 inches (267 mm) 220/240 V, 20 A male plug Requires a NEMA L6-20 receptacle The supplied cable has three conductors: Green = Earth/ground Black = AC Phase... °C) ±3.6 °F (2 °C) over the plate area 5 to 24 inches (127 to 610 mm) per minute 40 lb (18 kg) Heater ON/OFF Temperature set Temperature display Speed set
User's Guide
Page 27
... herein is subject to strictly comply with Seiko Epson Corporation's operating and maintenance instructions. General Notice: Other product names used herein are registered trademarks, and Epson Exceed Your Vision is a service mark of this product, or (excluding the U.S.) failure to change without the prior written permission of their respective owners. Trademarks Epson and Epson Stylus are for identification purposes only and...
... herein is subject to strictly comply with Seiko Epson Corporation's operating and maintenance instructions. General Notice: Other product names used herein are registered trademarks, and Epson Exceed Your Vision is a service mark of this product, or (excluding the U.S.) failure to change without the prior written permission of their respective owners. Trademarks Epson and Epson Stylus are for identification purposes only and...


