User Manual
Page 6
... 5 Using Printer Options 5-1 The Cut Sheet Feeder 5-2 The Pull Tractor 5-21 Interface Boards 5-31 Chapter 6 Maintenance 6-l Cleaning the Printer 6-2 Cleaning the Print Head 6-4 Replacing the Ink Cartridge 6-6 Transporting the Printer 6-9 iv Contents
... 5 Using Printer Options 5-1 The Cut Sheet Feeder 5-2 The Pull Tractor 5-21 Interface Boards 5-31 Chapter 6 Maintenance 6-l Cleaning the Printer 6-2 Cleaning the Print Head 6-4 Replacing the Ink Cartridge 6-6 Transporting the Printer 6-9 iv Contents
User Manual
Page 13
... parts 1-3 Removing the protective materials 1-4 Choosing a Place for the Printer 1-7 Assembling the Printer 1-9 Attaching the paper guide 1-9 Installing the ink cartridge 1-10 Testing the Printer 1-14 Connecting to a power supply 1-14 Charging the ink cartridge 1-16 Running the self test 1-19 Checking the operation 1-26 Connecting the Printer to Your Computer 1-28 The parallel...
... parts 1-3 Removing the protective materials 1-4 Choosing a Place for the Printer 1-7 Assembling the Printer 1-9 Attaching the paper guide 1-9 Installing the ink cartridge 1-10 Testing the Printer 1-14 Connecting to a power supply 1-14 Charging the ink cartridge 1-16 Running the self test 1-19 Checking the operation 1-26 Connecting the Printer to Your Computer 1-28 The parallel...
User Manual
Page 14
... the printer on line or when it off with other types of children. they cannot be sure to set the printer off when the ink cartridge is not installed. Even if you transport the printer, make sure that the head is capped and that the print head is capped before... the printer is printing. Do not turn off line state. Ink cartridges are good up to ensure their safe and efficient operation. Ink Jet Precautions Because the SQ-850 and SQ-2550 are the ink jet printers, certain precautions are necessary to the date printed on the...
... the printer on line or when it off with other types of children. they cannot be sure to set the printer off when the ink cartridge is not installed. Even if you transport the printer, make sure that the head is capped and that the print head is capped before... the printer is printing. Do not turn off line state. Ink cartridges are good up to ensure their safe and efficient operation. Ink Jet Precautions Because the SQ-850 and SQ-2550 are the ink jet printers, certain precautions are necessary to the date printed on the...
User Manual
Page 21
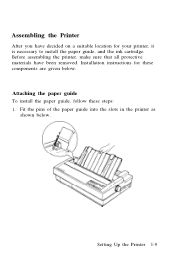
Attaching the paper guide To install the paper guide, follow these components are given below . Fit the pins of the paper guide into the slots in the printer as shown below . Setting Up the Printer l-9 Before assembling the printer, make sure that all protective materials have decided on a suitable location for these steps: 1. Assembling the Printer After you have been removed. Installation instructions for your printer, it is necessary to install the paper guide, and the ink cartridge.
Attaching the paper guide To install the paper guide, follow these components are given below . Fit the pins of the paper guide into the slots in the printer as shown below . Setting Up the Printer l-9 Before assembling the printer, make sure that all protective materials have decided on a suitable location for these steps: 1. Assembling the Printer After you have been removed. Installation instructions for your printer, it is necessary to install the paper guide, and the ink cartridge.
User Manual
Page 22
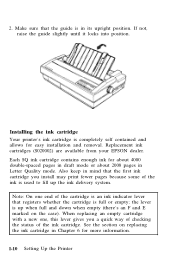
... mode or about 2000 pages in mind that registers whether the cartridge is an ink indicator lever that the first ink cartridge you a quick way of checking the status of the ink cartridge. Replacement ink cartridges (S020002) are available from your EPSON dealer. See the section on the case). When replacing an... cartridge is full or empty; the lever is used to fill up when full and down when empty (there's an F and E marked on replacing the ink cartridge in its upright position. If not, raise the guide slightly until it locks into position. Each SQ ink cartridge contains enough ink ...
... mode or about 2000 pages in mind that registers whether the cartridge is an ink indicator lever that the first ink cartridge you a quick way of checking the status of the ink cartridge. Replacement ink cartridges (S020002) are available from your EPSON dealer. See the section on the case). When replacing an... cartridge is full or empty; the lever is used to fill up when full and down when empty (there's an F and E marked on replacing the ink cartridge in its upright position. If not, raise the guide slightly until it locks into position. Each SQ ink cartridge contains enough ink ...

User Manual
Page 23
...: l Avoid contact with water and contact a physician. Wash all traces of children. l Keep the cartridge out of reach of ink from your skin thoroughly with skin and eyes. Install the ink cartridge as follows: 1. WARNING: Skin and Eye Irritant This ink contains potassium hydroxide and may cause irritation on the area marked by pressing once...
...: l Avoid contact with water and contact a physician. Wash all traces of children. l Keep the cartridge out of reach of ink from your skin thoroughly with skin and eyes. Install the ink cartridge as follows: 1. WARNING: Skin and Eye Irritant This ink contains potassium hydroxide and may cause irritation on the area marked by pressing once...
User Manual
Page 24
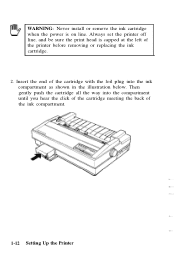
Then gently push the cartridge all the way into the ink compartment as shown in the illustration below. Insert the end of the cartridge with the foil plug into the compartment until you hear the click of the cartridge meeting the back of the printer before removing or replacing the ink cartridge. 2. WARNING: Never install or remove the ink cartridge when the power is capped at the left of the ink compartment. 1-12 Setting Up the Printer Always set the printer off line, and be sure the print head is on line.
Then gently push the cartridge all the way into the ink compartment as shown in the illustration below. Insert the end of the cartridge with the foil plug into the compartment until you hear the click of the cartridge meeting the back of the printer before removing or replacing the ink cartridge. 2. WARNING: Never install or remove the ink cartridge when the power is capped at the left of the ink compartment. 1-12 Setting Up the Printer Always set the printer off line, and be sure the print head is on line.
User Manual
Page 25
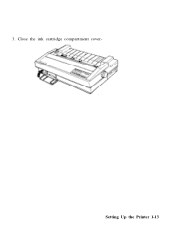
3. Close the ink cartridge compartment coverSetting Up the Printer 1-13
3. Close the ink cartridge compartment coverSetting Up the Printer 1-13
User Manual
Page 26
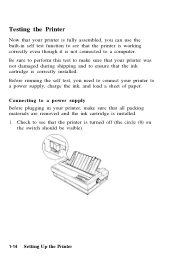
Connecting to a power supply Before plugging in self test function to see that the ink cartridge is turned off (the circle (0) on the switch should be visible). 1-14 Setting Up the Printer Testing the Printer Now that your printer is fully ..., you need to connect your printer was not damaged during shipping and to a power supply, charge the ink, and load a sheet of paper. Check to see that all packing materials are removed and the ink cartridge is installed. 1. Be sure to perform this test to make sure that the printer is working correctly...
Connecting to a power supply Before plugging in self test function to see that the ink cartridge is turned off (the circle (0) on the switch should be visible). 1-14 Setting Up the Printer Testing the Printer Now that your printer is fully ..., you need to connect your printer was not damaged during shipping and to a power supply, charge the ink, and load a sheet of paper. Check to see that all packing materials are removed and the ink cartridge is installed. 1. Be sure to perform this test to make sure that the printer is working correctly...
User Manual
Page 28
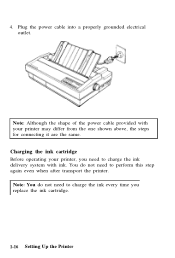
Charging the ink cartridge Before operating your printer may differ from the one shown above, the steps for connecting it are the same. Plug the power cable into a properly grounded electrical outlet. Note: You do not need to charge the ink every time you need to perform this step again even when after transport the printer. 4. You do not need to charge the ink delivery system with your printer, you replace the ink cartridge. 1-16 Setting Up the Printer Note: Although the shape of the power cable provided with ink.
Charging the ink cartridge Before operating your printer may differ from the one shown above, the steps for connecting it are the same. Plug the power cable into a properly grounded electrical outlet. Note: You do not need to charge the ink every time you need to perform this step again even when after transport the printer. 4. You do not need to charge the ink delivery system with your printer, you replace the ink cartridge. 1-16 Setting Up the Printer Note: Although the shape of the power cable provided with ink.
User Manual
Page 29
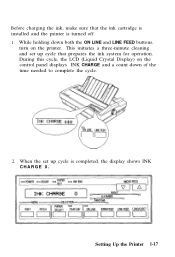
While holding down both the ON LINE and LINE FEED buttons, turn on the control panel displays INK CHARGE and a count down of the time needed to complete the cycle. 2. During this cycle, the LCD (Liquid Crystal Display) on the printer. When the set up cycle is turned off. 1. Before charging the ink, make sure that prepares the ink system for operation. Setting Up the Printer 1-17 This initiates a three-minute cleaning and set up cycle that the ink cartridge is installed and the printer is completed, the display shows INK CHARGE 0.
While holding down both the ON LINE and LINE FEED buttons, turn on the control panel displays INK CHARGE and a count down of the time needed to complete the cycle. 2. During this cycle, the LCD (Liquid Crystal Display) on the printer. When the set up cycle is turned off. 1. Before charging the ink, make sure that prepares the ink system for operation. Setting Up the Printer 1-17 This initiates a three-minute cleaning and set up cycle that the ink cartridge is installed and the printer is completed, the display shows INK CHARGE 0.
User Manual
Page 38
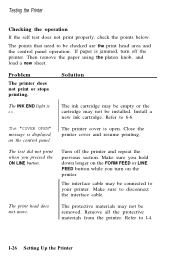
... l-26 Setting Up the Printer Close the printer cover and resume printing. Make sure you hold down longer on the printer. Install a new ink cartridge. The print head does not move. Turn off the printer. Testing the Printer Checking the operation If the self test does not print properly,...points that need to disconnect the interface cable. Problem The printer does not print or stops printing. Refer to l-4. The ink cartridge may be empty or the cartridge may not be checked are the print head area and the control panel operation. Remove all the protective materials from the printer...
... l-26 Setting Up the Printer Close the printer cover and resume printing. Make sure you hold down longer on the printer. Install a new ink cartridge. The print head does not move. Turn off the printer. Testing the Printer Checking the operation If the self test does not print properly,...points that need to disconnect the interface cable. Problem The printer does not print or stops printing. Refer to l-4. The ink cartridge may be empty or the cartridge may not be checked are the print head area and the control panel operation. Remove all the protective materials from the printer...

User Manual
Page 77
I NK END The ink supply is low or the ink cartridge is out of paper. PAPER OUT The printer is removed. The indicator lights and display let you monitor the current status of the printer, and ... buttons). COVER OPEN The printer cover is made up of the following states occur, the display shows the corresponding message. Operating the Control Panel The SQ-850 or SQ-2550 control panel is open. 3-2 Using the Printer
I NK END The ink supply is low or the ink cartridge is out of paper. PAPER OUT The printer is removed. The indicator lights and display let you monitor the current status of the printer, and ... buttons). COVER OPEN The printer cover is made up of the following states occur, the display shows the corresponding message. Operating the Control Panel The SQ-850 or SQ-2550 control panel is open. 3-2 Using the Printer

User Manual
Page 78
The lights Operating the Control Panel POWER (green): READY (green): PAPER OUT (red): INK END (red): ON LINE (green): TEAR OFF (orange): On when the printer is turned on and power is received. Using the Printer 3-3 This light flickers while data is supplied. On when the paper-out sensor detects that the printer is selected. On when short tear-off mode is out of paper. On when the ink cartridge is ready to accept input data. On when the printer can receive and print data from the computer. On when the printer is low.
The lights Operating the Control Panel POWER (green): READY (green): PAPER OUT (red): INK END (red): ON LINE (green): TEAR OFF (orange): On when the printer is turned on and power is received. Using the Printer 3-3 This light flickers while data is supplied. On when the paper-out sensor detects that the printer is selected. On when short tear-off mode is out of paper. On when the ink cartridge is ready to accept input data. On when the printer can receive and print data from the computer. On when the printer is low.
User Manual
Page 188
Chapter 6 Maintenance Cleaning the Printer 6-2 Cleaning the Print Head 6-4 Replacing the Ink Cartridge 6-6 Transporting the Printer 6-9 Maintenance 6-3
Chapter 6 Maintenance Cleaning the Printer 6-2 Cleaning the Print Head 6-4 Replacing the Ink Cartridge 6-6 Transporting the Printer 6-9 Maintenance 6-3

User Manual
Page 193
... the exclusive SO20002 EPSON ink cartridge. If irritation occurs, contact a physician. Replacing the Ink Cartridge When the INK END light comes on contact with skin and eyes. Note: The INK END light is also lit whenever the ink cartridge is set back on , you must replace the cartridge before you can...you turn off line. Always replace the old ink cartridge with water and contact a physician. l Keep the cartridge out of reach of ink from skin thoroughly with skin and eyes. WARNING - Once the cartridge is completely empty, the INK END message is displayed and the printer is...
... the exclusive SO20002 EPSON ink cartridge. If irritation occurs, contact a physician. Replacing the Ink Cartridge When the INK END light comes on contact with skin and eyes. Note: The INK END light is also lit whenever the ink cartridge is set back on , you must replace the cartridge before you can...you turn off line. Always replace the old ink cartridge with water and contact a physician. l Keep the cartridge out of reach of ink from skin thoroughly with skin and eyes. WARNING - Once the cartridge is completely empty, the INK END message is displayed and the printer is...
User Manual
Page 194
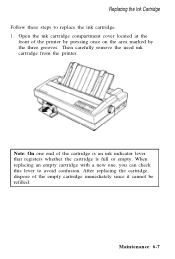
... area marked by the three grooves. Note: On one , you can check this lever to replace the ink cartridge. 1. Open the ink cartridge compartment cover located at the front of the empty cartridge immediately since it cannot be refilled. Then carefully remove the used ink cartridge from the printer. Replacing the Ink Cartridge Follow these steps to avoid confusion.
... area marked by the three grooves. Note: On one , you can check this lever to replace the ink cartridge. 1. Open the ink cartridge compartment cover located at the front of the empty cartridge immediately since it cannot be refilled. Then carefully remove the used ink cartridge from the printer. Replacing the Ink Cartridge Follow these steps to avoid confusion.
User Manual
Page 195
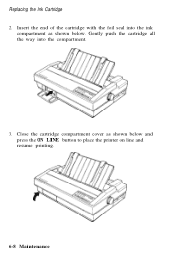
Replacing the Ink Cartridge 2. Close the cartridge compartment cover as shown below and press the ON LINE button to place the printer on line and resume printing. 6-8 Maintenance Insert the end of the cartridge with the foil seal into the compartment. 3. Gently push the cartridge all the way into the ink compartment as shown below .
Replacing the Ink Cartridge 2. Close the cartridge compartment cover as shown below and press the ON LINE button to place the printer on line and resume printing. 6-8 Maintenance Insert the end of the cartridge with the foil seal into the compartment. 3. Gently push the cartridge all the way into the ink compartment as shown below .
User Manual
Page 197
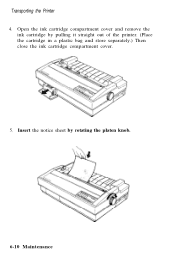
Insert the notice sheet by pulling it straight out of the printer. (Place the cartridge in a plastic bag and store separately.) Then close the ink cartridge compartment cover. 5. Open the ink cartridge compartment cover and remove the ink cartridge by rotating the platen knob. 6-10 Maintenance Transporting the Printer 4.
Insert the notice sheet by pulling it straight out of the printer. (Place the cartridge in a plastic bag and store separately.) Then close the ink cartridge compartment cover. 5. Open the ink cartridge compartment cover and remove the ink cartridge by rotating the platen knob. 6-10 Maintenance Transporting the Printer 4.
User Manual
Page 203
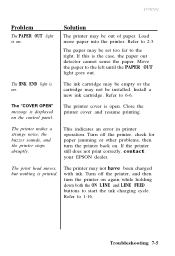
...cannot sense the paper. Close the printer cover and resume printing. The printer may be out of paper. The ink cartridge may be empty or the cartridge may be installed. The INK END light is on again while holding down both the ON LINE and LINE FEED buttons to the right. Turn... off the printer, check for paper jamming or other problems, then turn the printer on . Install a new ink cartridge. If the printer still does not print correctly, contact your EPSON dealer. The "COVER OPEN" message is displayed on . Problem The PAPER OUT light is on the control panel. The...
...cannot sense the paper. Close the printer cover and resume printing. The printer may be out of paper. The ink cartridge may be empty or the cartridge may be installed. The INK END light is on again while holding down both the ON LINE and LINE FEED buttons to the right. Turn... off the printer, check for paper jamming or other problems, then turn the printer on . Install a new ink cartridge. If the printer still does not print correctly, contact your EPSON dealer. The "COVER OPEN" message is displayed on . Problem The PAPER OUT light is on the control panel. The...


