
Basics
Page 5
... your equipment. Tip: Tips contain hints for virtually any kind of glossy and matte papers in many sizes. Introduction Your Epson Stylus® Photo R3000 Series printer gives you read your R3000 Series. Your outstanding printouts result from these guidelines as you exhibition quality prints on a wide variety of print up to 13 × 44 inches, with or without borders ■ Resolutions up...
... your equipment. Tip: Tips contain hints for virtually any kind of glossy and matte papers in many sizes. Introduction Your Epson Stylus® Photo R3000 Series printer gives you read your R3000 Series. Your outstanding printouts result from these guidelines as you exhibition quality prints on a wide variety of print up to 13 × 44 inches, with or without borders ■ Resolutions up...
Basics
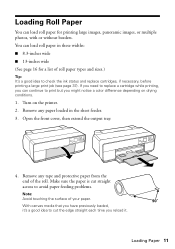
Page 11
... images, panoramic images, or multiple photos, with or without borders. If you need to replace a cartridge while printing, you can continue to print but you reload it. Make sure the paper is cut the edge straight each time you might notice a color difference depending on the printer. 2. Loading Roll Paper You can load roll paper for a list of roll paper types and sizes.) Tip: It's a good idea to check the ink status and replace cartridges, if necessary, before printing a large print job...
... images, panoramic images, or multiple photos, with or without borders. If you need to replace a cartridge while printing, you can continue to print but you reload it. Make sure the paper is cut the edge straight each time you might notice a color difference depending on the printer. 2. Loading Roll Paper You can load roll paper for a list of roll paper types and sizes.) Tip: It's a good idea to check the ink status and replace cartridges, if necessary, before printing a large print job...

Basics
Page 14
Turn on the printer. 2. Note: Be sure to leave at least 13 inches (32 cm) of the manual feed tray to feed through. 1. Remove any roll paper or paper loaded in the sheet feeder. Close the rear support if it . 14 Loading Paper Open the front cover, then push the center of space behind the printer for the media to extend it 's open. 3. Loading Thick Media Use the manual feed tray to load 13 × 19-inch media that is 0.7 to 1.3 mm thick.
Turn on the printer. 2. Note: Be sure to leave at least 13 inches (32 cm) of the manual feed tray to feed through. 1. Remove any roll paper or paper loaded in the sheet feeder. Close the rear support if it . 14 Loading Paper Open the front cover, then push the center of space behind the printer for the media to extend it 's open. 3. Loading Thick Media Use the manual feed tray to load 13 × 19-inch media that is 0.7 to 1.3 mm thick.
Basics
Page 20
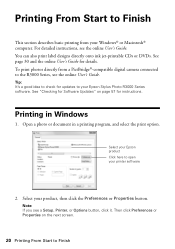
... the online User's Guide. To print photos directly from your Epson Stylus Photo R3000 Series software. Open a photo or document in Windows 1. Printing in a printing program, and select the print option. Select your Epson product Click here to open your product, then click the Preferences or Properties button. Tip: It's a good idea to check for Software Updates" on the next screen. 20 Printing From Start to your Windows® or Macintosh® computer. See page 30 and the online User's Guide for instructions...
... the online User's Guide. To print photos directly from your Epson Stylus Photo R3000 Series software. Open a photo or document in Windows 1. Printing in a printing program, and select the print option. Select your Epson product Click here to open your product, then click the Preferences or Properties button. Tip: It's a good idea to check for Software Updates" on the next screen. 20 Printing From Start to your Windows® or Macintosh® computer. See page 30 and the online User's Guide for instructions...

Basics
Page 26
... for instructions. 9. To print black-and-white photos using Advanced B&W Photo mode, see page 28). Note: For color management instructions, see page 43). 8. For more information about print settings, click the ? Select one of photographic printing. Select an Output Resolution setting (available settings depend on the size and type of black ink you loaded (see your online User's Guide for any type of the following as the Color Mode setting: ■ Epson Standard (sRGB) increases the contrast in Adobe RGB. button...
... for instructions. 9. To print black-and-white photos using Advanced B&W Photo mode, see page 28). Note: For color management instructions, see page 43). 8. For more information about print settings, click the ? Select one of photographic printing. Select an Output Resolution setting (available settings depend on the size and type of black ink you loaded (see your online User's Guide for any type of the following as the Color Mode setting: ■ Epson Standard (sRGB) increases the contrast in Adobe RGB. button...
Basics
Page 30
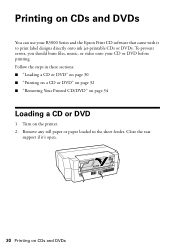
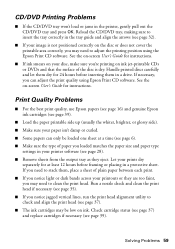
To prevent errors, you should burn files, music, or video onto your R3000 Series and the Epson Print CD software that came with it 's open. 30 Printing on CDs and DVDs Close the rear support if it to print label designs directly onto ink jet-printable CDs or DVDs. Remove any roll paper or paper loaded in these sections: ■ "Loading a CD or DVD" on page 30 ■ "Printing on a CD or...
To prevent errors, you should burn files, music, or video onto your R3000 Series and the Epson Print CD software that came with it 's open. 30 Printing on CDs and DVDs Close the rear support if it to print label designs directly onto ink jet-printable CDs or DVDs. Remove any roll paper or paper loaded in these sections: ■ "Loading a CD or DVD" on page 30 ■ "Printing on a CD or...
Basics
Page 37
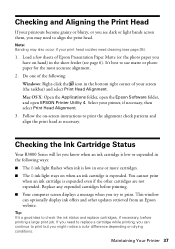
... H ink light flashes when ink is low in one or more cartridges. ■ The H ink light stays on drying conditions. If you need cleaning (see page 35). 1. Load a few sheets of your screen (the taskbar) and select Print Head Alignment. Mac OS X: Open the Applications folder, open the Epson Software folder, and open EPSON Printer Utility 4. Replace any expended cartridges before printing a large print job. It's best to print the alignment check patterns and align the print head as necessary. Select your printer, if necessary, then select Print Head Alignment. 3. Checking the Ink...
... H ink light flashes when ink is low in one or more cartridges. ■ The H ink light stays on drying conditions. If you need cleaning (see page 35). 1. Load a few sheets of your screen (the taskbar) and select Print Head Alignment. Mac OS X: Open the Applications folder, open the Epson Software folder, and open EPSON Printer Utility 4. Replace any expended cartridges before printing a large print job. It's best to print the alignment check patterns and align the print head as necessary. Select your printer, if necessary, then select Print Head Alignment. 3. Checking the Ink...

Basics
Page 43
The printer will switch ink automatically, depending on . To conserve ink, you can use only one type of media you usually print on the type of ink, so you load. Switching Black Ink Types Your printer comes with that is available by default (see page 44). Although both must be installed for Epson ■ Epson Hot Press Bright ■ Epson Hot Press Natural ■ Epson Cold Press Bright ■ Epson Cold Press Natural Maintaining Your Printer 43...
The printer will switch ink automatically, depending on . To conserve ink, you can use only one type of media you usually print on the type of ink, so you load. Switching Black Ink Types Your printer comes with that is available by default (see page 44). Although both must be installed for Epson ■ Epson Hot Press Bright ■ Epson Hot Press Natural ■ Epson Cold Press Bright ■ Epson Cold Press Natural Maintaining Your Printer 43...

Basics
Page 46
... first installation only. Temporary use the buttons on the product to select wireless settings instead. Network Setup Make sure you follow the instructions on the Start Here sheet to set up your network connection. The on-screen instructions during the installation process help : ■ For wireless network setup, see below. ■ For wired network (Ethernet) setup, see "Setting Up Additional Computers" on page 52. 46 Network Setup After the product is recommended for setting up additional computers to print...
... first installation only. Temporary use the buttons on the product to select wireless settings instead. Network Setup Make sure you follow the instructions on the Start Here sheet to set up your network connection. The on-screen instructions during the installation process help : ■ For wireless network setup, see below. ■ For wired network (Ethernet) setup, see "Setting Up Additional Computers" on page 52. 46 Network Setup After the product is recommended for setting up additional computers to print...

Basics
Page 51
..., use the printer buttons to your computer. When installation is installed, then follow the on page 60. 5. Then go to enter them correctly. Network Setup 51 If your password has uppercase (ABC) or lowercase (abc) letters, or numbers (123), be sure to step 4. ■ If your network password. 4. Do not select Ask Me Later, Keep Blocking, or Block. 3. Note: If you see "Network setup failed" on -screen instructions. 6. When...
..., use the printer buttons to your computer. When installation is installed, then follow the on page 60. 5. Then go to enter them correctly. Network Setup 51 If your password has uppercase (ABC) or lowercase (abc) letters, or numbers (123), be sure to step 4. ■ If your network password. 4. Do not select Ask Me Later, Keep Blocking, or Block. 3. Note: If you see "Network setup failed" on -screen instructions. 6. When...

Basics
Page 55
... first-time installation only: Connect the product to step 15. 9. Mac OS X 10.6: Skip to your router, access point, or hub with an Ethernet network cable, then click Next. 8. When you see the Network Setup screen, do one of the following: ■ For a first-time installation, select Set up printer for the first time, then click Next. ■ If the printer has already been set up for network printing...
... first-time installation only: Connect the product to step 15. 9. Mac OS X 10.6: Skip to your router, access point, or hub with an Ethernet network cable, then click Next. 8. When you see the Network Setup screen, do one of the following: ■ For a first-time installation, select Set up printer for the first time, then click Next. ■ If the printer has already been set up for network printing...

Basics
Page 57
... troubleshooting suggestions below if you're having trouble using the sheet feeder, don't load paper above the arrow mark on -screen User's Guide and select Download the Latest Software or visit Epson's support website at epson.com/support (U.S.) or epson.ca/support (Canada). Problems and Solutions Check the solutions below or in the printer settings window. Printing Problems ■ Make sure your printer. You can also click Start or , select Programs or All Programs, select EPSON, and click Epson Stylus Photo R3000 Driver Update...
... troubleshooting suggestions below if you're having trouble using the sheet feeder, don't load paper above the arrow mark on -screen User's Guide and select Download the Latest Software or visit Epson's support website at epson.com/support (U.S.) or epson.ca/support (Canada). Problems and Solutions Check the solutions below or in the printer settings window. Printing Problems ■ Make sure your printer. You can also click Start or , select Programs or All Programs, select EPSON, and click Epson Stylus Photo R3000 Driver Update...
Basics
Page 59
... you may need to clean the print head. See the on-screen User's Guide for instructions. ■ If ink smears on your disc, make sure you're printing on the disc or does not cover the printable area correctly, you notice light or dark bands across your printouts or they eject. Print Quality Problems ■ For the best print quality, use Epson papers (see page 16) and genuine Epson ink cartridges (see page 39). ■ Load the paper printable side up...
... you may need to clean the print head. See the on-screen User's Guide for instructions. ■ If ink smears on your disc, make sure you're printing on the disc or does not cover the printable area correctly, you notice light or dark bands across your printouts or they eject. Print Quality Problems ■ For the best print quality, use Epson papers (see page 16) and genuine Epson ink cartridges (see page 39). ■ Load the paper printable side up...

Basics
Page 61
... common problems. You can download drivers and documentation, get FAQs and troubleshooting advice, or e-mail Epson with your product for support, please have the following information ready: ■ Product name (Epson Stylus Photo R3000 Series) ■ Product serial number (located on the label in back) ■ Proof of purchase (such as a store receipt) and date of purchase ■ Computer configuration ■ Description of the problem Then...
... common problems. You can download drivers and documentation, get FAQs and troubleshooting advice, or e-mail Epson with your product for support, please have the following information ready: ■ Product name (Epson Stylus Photo R3000 Series) ■ Product serial number (located on the label in back) ■ Proof of purchase (such as a store receipt) and date of purchase ■ Computer configuration ■ Description of the problem Then...

Product Brochure
Page 4
... Dale Epson Professional Media Advanced Media Handling allows the Epson Stylus Photo R3000 to smoothly feed virtually any type of the Epson Stylus Photo R3000 is utilized, this level of use to ensure precision placement of Epson's PreciseColor manufacturing. Much of the advanced technology found on Epson professional printers has been integrated into the Epson Stylus Photo R3000, making it results in smooth, grain-free images. Additionally, the roll paper capability enables you the most wide-ranging media support ever...
... Dale Epson Professional Media Advanced Media Handling allows the Epson Stylus Photo R3000 to smoothly feed virtually any type of the Epson Stylus Photo R3000 is utilized, this level of use to ensure precision placement of Epson's PreciseColor manufacturing. Much of the advanced technology found on Epson professional printers has been integrated into the Epson Stylus Photo R3000, making it results in smooth, grain-free images. Additionally, the roll paper capability enables you the most wide-ranging media support ever...

Product Brochure
Page 5
.... The Epson Stylus Photo R3000 automatically switches between two different Black ink modes - Then, once you had to buy a much larger professional level printer to streamline your own custom setting, it is usually available within two or three business days and optional one year of coverage and toll-free telephone support is loaded with custom controls and a color toning wheel. Advanced Black-and-White Photo Mode The Advanced Black-and-White Photo Mode is only found on Epson printers.
.... The Epson Stylus Photo R3000 automatically switches between two different Black ink modes - Then, once you had to buy a much larger professional level printer to streamline your own custom setting, it is usually available within two or three business days and optional one year of coverage and toll-free telephone support is loaded with custom controls and a color toning wheel. Advanced Black-and-White Photo Mode The Advanced Black-and-White Photo Mode is only found on Epson printers.
Product Brochure
Page 6
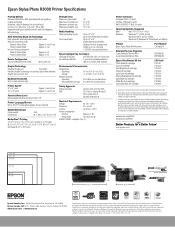
... USB 2.0 (1 port) 100Base-T Ethernet (1 port) Wi-Fi CERTIFIED™ (802.11n only) Operating Systems Supported Mac® Mac OS® X, 10.5.x - 10.6.x Windows Windows® 7 (32-bit, 64-bit), Windows Vista® (32-bit, 64-bit), Windows XP, Windows XP Professional x64 Edition Product Epson Stylus Photo R3000 printer Part Number C11CA86201 Extended Service Programs 1-year Extended Service Plan 2-year Extended Service Plan EPPSNVIJE1 EPPSNVIJE2 Epson UltraChrome K3 Ink Photo Black ink cartridge Cyan ink cartridge Vivid Magenta ink cartridge Yellow ink cartridge Light...
... USB 2.0 (1 port) 100Base-T Ethernet (1 port) Wi-Fi CERTIFIED™ (802.11n only) Operating Systems Supported Mac® Mac OS® X, 10.5.x - 10.6.x Windows Windows® 7 (32-bit, 64-bit), Windows Vista® (32-bit, 64-bit), Windows XP, Windows XP Professional x64 Edition Product Epson Stylus Photo R3000 printer Part Number C11CA86201 Extended Service Programs 1-year Extended Service Plan 2-year Extended Service Plan EPPSNVIJE1 EPPSNVIJE2 Epson UltraChrome K3 Ink Photo Black ink cartridge Cyan ink cartridge Vivid Magenta ink cartridge Yellow ink cartridge Light...
Start Here
Page 1
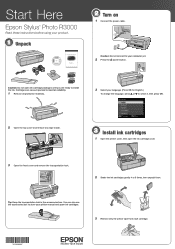
Start Here Epson Stylus® Photo R3000 Read these instructions before using your computer yet. 2 Press the power button. Caution: Do not connect to maintain reliability. 1 Remove all protective materials. 3 Select your printer manual and spare ink cartridges. 3 Remove only the yellow tape from each cartridge. *412036900* *412036900* Caution: Do not open ink cartridge packages until you are vacuum packed to your product. 1 Unpack 2 Turn on 1 Connect the power cable. Cartridges are ready to select it...
Start Here Epson Stylus® Photo R3000 Read these instructions before using your computer yet. 2 Press the power button. Caution: Do not connect to maintain reliability. 1 Remove all protective materials. 3 Select your printer manual and spare ink cartridges. 3 Remove only the yellow tape from each cartridge. *412036900* *412036900* Caution: Do not open ink cartridge packages until you are vacuum packed to your product. 1 Unpack 2 Turn on 1 Connect the power cable. Cartridges are ready to select it...

Start Here
Page 3
... both color and black-and-white. Macintosh: Select the items you see the AutoPlay window, click Run Setup.exe. Any questions? On-screen help , see a Found New Hardware screen, click Cancel and disconnect the USB cable. See below for loading paper, printing, maintenance, and network setup. when you have a USB cable, you will need additional help with the installation, you want to simplify wireless setup. You can also watch a video tutorial at: epson.com/support/wireless. Wired...
... both color and black-and-white. Macintosh: Select the items you see the AutoPlay window, click Run Setup.exe. Any questions? On-screen help , see a Found New Hardware screen, click Cancel and disconnect the USB cable. See below for loading paper, printing, maintenance, and network setup. when you have a USB cable, you will need additional help with the installation, you want to simplify wireless setup. You can also watch a video tutorial at: epson.com/support/wireless. Wired...

Start Here
Page 4
... a USB cable. Press to find my printer after connecting it . When you enter them at Epson Supplies Central at www.epson.com/ink3 (U.S. Make sure it has uppercase (ABC) or lowercase (abc) letters, make sure you enter your needs; Photo Noir ® Epson Stylus Photo R3000 Series Ink Cartridges Color Light Light Black Light Black Photo Black Matte Black Vivid Light Magenta Vivid Magenta Light Cyan Cyan Yellow Part number 157 157 157 157 157 157 157 157 157 Epson, Epson Stylus, and Epson UltraChrome...
... a USB cable. Press to find my printer after connecting it . When you enter them at Epson Supplies Central at www.epson.com/ink3 (U.S. Make sure it has uppercase (ABC) or lowercase (abc) letters, make sure you enter your needs; Photo Noir ® Epson Stylus Photo R3000 Series Ink Cartridges Color Light Light Black Light Black Photo Black Matte Black Vivid Light Magenta Vivid Magenta Light Cyan Cyan Yellow Part number 157 157 157 157 157 157 157 157 157 Epson, Epson Stylus, and Epson UltraChrome...


