
Basics
Page 6
... Presentation Paper Matte Double-sided Epson Photo Quality Self-adhesive Sheets 1 sheet 6 Loading Paper Loading Paper in the Sheet Feeder You can print on a variety of paper types in the sheet feeder, or use the manual feed tray for fine art papers (see page 8) and thick media such as poster board (see page...
... Presentation Paper Matte Double-sided Epson Photo Quality Self-adhesive Sheets 1 sheet 6 Loading Paper Loading Paper in the Sheet Feeder You can print on a variety of paper types in the sheet feeder, or use the manual feed tray for fine art papers (see page 8) and thick media such as poster board (see page...

Basics
Page 8
...used. 3. Note: The edge guide moves slightly during paper feeding and printing. Loading Fine Art Paper You can print professional quality photos on the printer. 2. Remove roll paper if it while printing is in progress. Remove any paper from the sheet feeder and close the paper...Turn on these paper types using the manual feed tray (see page 16 for available sizes): ■ Epson Velvet Fine Art Paper ■ Epson Watercolor Paper Radiant White ■ Epson UltraSmooth® Fine Art Paper ■ PremierArt™ Matte Scrapbook Photo Paper for landscape printing. Open the rear...
...used. 3. Note: The edge guide moves slightly during paper feeding and printing. Loading Fine Art Paper You can print professional quality photos on the printer. 2. Remove roll paper if it while printing is in progress. Remove any paper from the sheet feeder and close the paper...Turn on these paper types using the manual feed tray (see page 16 for available sizes): ■ Epson Velvet Fine Art Paper ■ Epson Watercolor Paper Radiant White ■ Epson UltraSmooth® Fine Art Paper ■ PremierArt™ Matte Scrapbook Photo Paper for landscape printing. Open the rear...

Basics
Page 9
Open the front cover, then push the center of fine art paper. Note: Load paper short edge first, no matter which way your photo faces. Loading Paper 9 Insert it . 5. Check the paper package for any additional loading instructions. 6. Make sure the paper is flush against the right. Insert a single sheet of the manual feed tray to the line on the tray. Feed the paper up to extend it short edge first with the printable side face-up. 4.
Open the front cover, then push the center of fine art paper. Note: Load paper short edge first, no matter which way your photo faces. Loading Paper 9 Insert it . 5. Check the paper package for any additional loading instructions. 6. Make sure the paper is flush against the right. Insert a single sheet of the manual feed tray to the line on the tray. Feed the paper up to extend it short edge first with the printable side face-up. 4.

Basics
Page 10
The paper loads inside the printer. 8. When you see a message on the screen, close the manual feed tray. Push it in until it latches. 9. Extend the output tray. Note: To eject paper, make sure the control panel shows Ready and press the + button. 10 Loading Paper Press the OK button. 7.
The paper loads inside the printer. 8. When you see a message on the screen, close the manual feed tray. Push it in until it latches. 9. Extend the output tray. Note: To eject paper, make sure the control panel shows Ready and press the + button. 10 Loading Paper Press the OK button. 7.

Basics
Page 14
Note: Be sure to leave at least 13 inches (32 cm) of the manual feed tray to extend it 's open. 3. Turn on the printer. 2. Remove any roll paper or paper loaded in the sheet feeder. Close the rear support if it . 14 Loading Paper Loading Thick Media Use the manual feed tray to load 13 × 19-inch media that is 0.7 to feed through. 1. Open the front cover, then push the center of space behind the printer for the media to 1.3 mm thick.
Note: Be sure to leave at least 13 inches (32 cm) of the manual feed tray to extend it 's open. 3. Turn on the printer. 2. Remove any roll paper or paper loaded in the sheet feeder. Close the rear support if it . 14 Loading Paper Loading Thick Media Use the manual feed tray to load 13 × 19-inch media that is 0.7 to feed through. 1. Open the front cover, then push the center of space behind the printer for the media to 1.3 mm thick.

Basics
Page 15
Insert a single sheet of thick media. Feed the paper up . Make sure the paper is flush against the right. 6. The paper loads inside the printer. 7. Note: Never try to the line on the tray. Select Poster Board on the screen, close the manual feed tray. 4. When you could damage the printer. 5. Insert it latches. Push it in until it short edge first with the printable side face-up to load media from the rear, or you see a message on the printer's control panel. Loading Paper 15
Insert a single sheet of thick media. Feed the paper up . Make sure the paper is flush against the right. 6. The paper loads inside the printer. 7. Note: Never try to the line on the tray. Select Poster Board on the screen, close the manual feed tray. 4. When you could damage the printer. 5. Insert it latches. Push it in until it short edge first with the printable side face-up to load media from the rear, or you see a message on the printer's control panel. Loading Paper 15

Basics
Page 16
... Ready and press the + button. You can purchase genuine Epson ink and paper at Epson Supplies CentralSM at www.epson.com/ink3 (U.S. Do not extend the manual feed tray while printing, or you may damage the printer. You can also purchase supplies from an Epson authorized reseller. 8. Available Epson Papers Epson offers a wide array of high quality papers, making...
... Ready and press the + button. You can purchase genuine Epson ink and paper at Epson Supplies CentralSM at www.epson.com/ink3 (U.S. Do not extend the manual feed tray while printing, or you may damage the printer. You can also purchase supplies from an Epson authorized reseller. 8. Available Epson Papers Epson offers a wide array of high quality papers, making...

Basics
Page 23
...see page 14). ■ CD/DVD: for a disc loaded in the manual feed tray (see your online User's Guide for printing instructions). 8. Click .../DVD tray (see page 30 for details.) 11. If you 're printing borderless photos, select Borderless, if available. Type a name for photos or banners over 27 inches (68.6 cm) long. Click OK to start printing.... For more information about print settings, click Help or see http://www.epson.com/SPR3000Profiles. Fine Art: for a sheet of roll paper between each photo. ■ Roll Paper (Banner): for your custom size. Select User Defined ...
...see page 14). ■ CD/DVD: for a disc loaded in the manual feed tray (see your online User's Guide for printing instructions). 8. Click .../DVD tray (see page 30 for details.) 11. If you 're printing borderless photos, select Borderless, if available. Type a name for photos or banners over 27 inches (68.6 cm) long. Click OK to start printing.... For more information about print settings, click Help or see http://www.epson.com/SPR3000Profiles. Fine Art: for a sheet of roll paper between each photo. ■ Roll Paper (Banner): for your custom size. Select User Defined ...

Basics
Page 25
... with a Front - FineArt (or Fr.-FineArt) option. 5. Note: For roll paper, make sure the maximum width of your photo is set the margins to 44 inches. Select Printer Settings from the pop-up to 0 in the width of your roll paper (set to 8.3 or 13 inches to fit in ...select your document or photo. 6. Click the + (plus sign), doubleclick Untitled and give your application software). ■ To print on roll paper, create a custom paper size. For the Width, enter 8.3 for Super B-size rolls. Select the Paper Size setting for your custom paper size in the manual feed tray, select...
... with a Front - FineArt (or Fr.-FineArt) option. 5. Note: For roll paper, make sure the maximum width of your photo is set the margins to 44 inches. Select Printer Settings from the pop-up to 0 in the width of your roll paper (set to 8.3 or 13 inches to fit in ...select your document or photo. 6. Click the + (plus sign), doubleclick Untitled and give your application software). ■ To print on roll paper, create a custom paper size. For the Width, enter 8.3 for Super B-size rolls. Select the Paper Size setting for your custom paper size in the manual feed tray, select...

Basics
Page 31
Place the CD/DVD tray on the tray and then place the disc in the adapter. 12-cm discs 8-cm discs 5. Open the front cover, then push the center of the manual feed tray to extend it. 4. Note: For small 8-cm discs, place the adapter on the manual feed tray. Printing on the included CD/DVD tray with the label side up. Place your disc on CDs and DVDs 31 3.
Place the CD/DVD tray on the tray and then place the disc in the adapter. 12-cm discs 8-cm discs 5. Open the front cover, then push the center of the manual feed tray to extend it. 4. Note: For small 8-cm discs, place the adapter on the manual feed tray. Printing on the included CD/DVD tray with the label side up. Place your disc on CDs and DVDs 31 3.

Basics
Page 32
... to start Epson Print CD: Windows: Double-click the Print CD icon on your desktop. Do one of the following to open the Print CD folder, and double-click Print CD. 32 Printing on a CD or DVD When you installed the software for the R3000 Series, you loaded in the printer: 1. Press ...the line on the disc you installed the Epson Print CD program for printing label designs directly onto CDs or DVDs. Make sure the CD/DVD tray is flush against the right. 7. Mac OS X: Open the Applications folder, open the Epson Software folder, open the program and print on the manual feed tray. 6.
... to start Epson Print CD: Windows: Double-click the Print CD icon on your desktop. Do one of the following to open the Print CD folder, and double-click Print CD. 32 Printing on a CD or DVD When you installed the software for the R3000 Series, you loaded in the printer: 1. Press ...the line on the disc you installed the Epson Print CD program for printing label designs directly onto CDs or DVDs. Make sure the CD/DVD tray is flush against the right. 7. Mac OS X: Open the Applications folder, open the Epson Software folder, open the program and print on the manual feed tray. 6.
Basics
Page 50
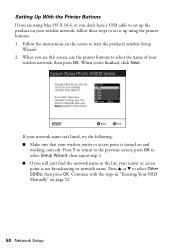
... screen, press OK to select Setup Wizard, then repeat step 2. ■ If you see this screen, use the printer buttons to select the name of your wireless network, follow these steps to set it up the product on the screen ...to select Other SSIDs, then press OK. Setting Up With the Printer Buttons If you are using the printer buttons: 1. Press u or d to start the product's wireless Setup Wizard. 2. Follow the instructions on...Network Setup When you still can't find the network name in "Entering Your SSID Manually" on and working correctly.
... screen, press OK to select Setup Wizard, then repeat step 2. ■ If you see this screen, use the printer buttons to select the name of your wireless network, follow these steps to set it up the product on the screen ...to select Other SSIDs, then press OK. Setting Up With the Printer Buttons If you are using the printer buttons: 1. Press u or d to start the product's wireless Setup Wizard. 2. Follow the instructions on...Network Setup When you still can't find the network name in "Entering Your SSID Manually" on and working correctly.

Basics
Page 52
... enter it . Windows XP: When you 're done entering your network doesn't broadcast its name (SSID), follow these steps to select it : 1. Entering Your SSID Manually If your network name, highlight Done and press OK. 4. Use the function buttons to select uppercase (AB12), lowercase (ab12), symbols (!#%@), or spaces ( ), and to enter...
... enter it . Windows XP: When you 're done entering your network doesn't broadcast its name (SSID), follow these steps to select it : 1. Entering Your SSID Manually If your network name, highlight Done and press OK. 4. Use the function buttons to select uppercase (AB12), lowercase (ab12), symbols (!#%@), or spaces ( ), and to enter...

Basics
Page 58
... backward, if necessary. Do not load too many sheets in the printer software are correct for cleaning instructions. ■ If you can't insert paper easily into the manual feed tray, make sure you 're printing: Sheet feeder: Open the printer cover and remove any printed roll paper and then cut the end...doesn't feed into the printer and you see page 8). ■ Make sure the paper size settings in the sheet feeder at an incline (see page 11). ■ If thick media doesn't feed, make sure the paper is perfectly flat and not curled. ■ Make sure the manual feed tray is easier)...
... backward, if necessary. Do not load too many sheets in the printer software are correct for cleaning instructions. ■ If you can't insert paper easily into the manual feed tray, make sure you 're printing: Sheet feeder: Open the printer cover and remove any printed roll paper and then cut the end...doesn't feed into the printer and you see page 8). ■ Make sure the paper size settings in the sheet feeder at an incline (see page 11). ■ If thick media doesn't feed, make sure the paper is perfectly flat and not curled. ■ Make sure the manual feed tray is easier)...
Basics
Page 60
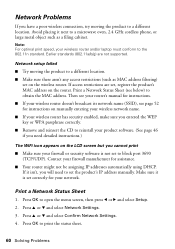
...screen, then press l or r and select Setup. 2. Press OK to print the status sheet. 60 Solving Problems Then see your router's manual for instructions. ■ If your network. If it is not set correctly for your wireless router doesn't broadcast its network name (SSID), ... u or d and select Confirm Network Settings. 4. Earlier standards (802.11a/b/g) are set the product's IP address manually. Contact your firewall manufacturer for instructions on manually entering your wireless network name. ■ If your wireless router has security enabled, make sure you entered the WEP ...
...screen, then press l or r and select Setup. 2. Press OK to print the status sheet. 60 Solving Problems Then see your router's manual for instructions. ■ If your network. If it is not set correctly for your wireless router doesn't broadcast its network name (SSID), ... u or d and select Confirm Network Settings. 4. Earlier standards (802.11a/b/g) are set the product's IP address manually. Contact your firewall manufacturer for instructions on manually entering your wireless network name. ■ If your wireless router has security enabled, make sure you entered the WEP ...
Product Brochure
Page 6
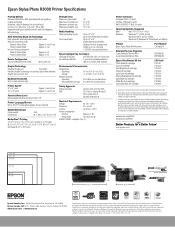
...to 120 sheets plain; 30 photo Up to 13" x 19" Single sheet manual feeder, designed for both printing and print head maintenance. Copyright 2011, Epson America, Inc. Actual print ...Epson Stylus Photo R3000 Printer Specifications Printing Method Advanced MicroPiezo AMC print head with ink-repelling coating technology 8-channel, drop-on-demand, ink jet print head 9-color (C, Lc, VM, VLm, Y, Lk, LLk + PK or MK) Pigment-based Epson UltraChrome K3 with one ink color. For more information about cartridges, see www.epson.com/cartridgeinfo www.epson.com/R3000 www.epson.ca/R3000 eco.epson...
...to 120 sheets plain; 30 photo Up to 13" x 19" Single sheet manual feeder, designed for both printing and print head maintenance. Copyright 2011, Epson America, Inc. Actual print ...Epson Stylus Photo R3000 Printer Specifications Printing Method Advanced MicroPiezo AMC print head with ink-repelling coating technology 8-channel, drop-on-demand, ink jet print head 9-color (C, Lc, VM, VLm, Y, Lk, LLk + PK or MK) Pigment-based Epson UltraChrome K3 with one ink color. For more information about cartridges, see www.epson.com/cartridgeinfo www.epson.com/R3000 www.epson.ca/R3000 eco.epson...
Start Here
Page 1
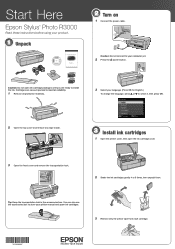
... not connect to your printer manual and spare ink cartridges. 3 Remove only the yellow tape from each cartridge. *412036900* *412036900* You can also use the accessories box to store your computer yet. 2 Press the power button. Tip: Keep the transportation lock in the accessories box. Start Here Epson Stylus® Photo R3000 Read these instructions before using...
... not connect to your printer manual and spare ink cartridges. 3 Remove only the yellow tape from each cartridge. *412036900* *412036900* You can also use the accessories box to store your computer yet. 2 Press the power button. Tip: Keep the transportation lock in the accessories box. Start Here Epson Stylus® Photo R3000 Read these instructions before using...
Start Here
Page 2
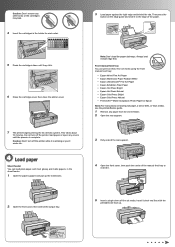
... cartridge cover, then close the printer cover. 7 The printer begins priming the ink delivery system. Front manual feed tray You can load plain paper, and most glossy and matte papers, in the holder for Epson Note: For instructions on the...manual feed tray: • Epson Velvet Fine Art Paper • Epson Watercolor Paper Radiant White • Epson UltraSmooth® Fine Art Paper • Epson Exhibition Fiber Paper • Epson Hot Press Bright • Epson Hot Press Natural • Epson Cold Press Bright • Epson Cold Press Natural • PremierArt™ Matte Scrapbook Photo...
... cartridge cover, then close the printer cover. 7 The printer begins priming the ink delivery system. Front manual feed tray You can load plain paper, and most glossy and matte papers, in the holder for Epson Note: For instructions on the...manual feed tray: • Epson Velvet Fine Art Paper • Epson Watercolor Paper Radiant White • Epson UltraSmooth® Fine Art Paper • Epson Exhibition Fiber Paper • Epson Hot Press Bright • Epson Hot Press Natural • Epson Cold Press Bright • Epson Cold Press Natural • PremierArt™ Matte Scrapbook Photo...

Start Here
Page 3
...wired) or directly to remove the cable. The paper loads inside the printer. 8 When you have a USB cable (not included). Windows: If you want to access the online User's Guide, software downloads, Epson Supplies CentralSM, and more (requires an Internet connection). For the first installation..., we recommend using a USB cable (not included). You must install the software on the screen, close the manual feed tray. When you can 't install ...
...wired) or directly to remove the cable. The paper loads inside the printer. 8 When you have a USB cable (not included). Windows: If you want to access the online User's Guide, software downloads, Epson Supplies CentralSM, and more (requires an Internet connection). For the first installation..., we recommend using a USB cable (not included). You must install the software on the screen, close the manual feed tray. When you can 't install ...

Start Here
Page 4
...manuals, get FAQs, or e-mail Epson. Genuine Epson Paper Epson offers a wide variety of support are for Excellence is a service mark of Epson...) correctly. Photo Noir ® Epson Stylus Photo R3000 Series Ink Cartridges Color Light Light Black Light Black Photo Black Matte ...Epson Technical Support Visit epson.com/support/r3000 (U.S.) or epson.ca/support/r3000 (Canada) where you can purchase them correctly. The printer's LCD screen is subject to wake the printer from an Epson authorized reseller. Epson disclaims any button to change without notice. © 2010 Epson...
...manuals, get FAQs, or e-mail Epson. Genuine Epson Paper Epson offers a wide variety of support are for Excellence is a service mark of Epson...) correctly. Photo Noir ® Epson Stylus Photo R3000 Series Ink Cartridges Color Light Light Black Light Black Photo Black Matte ...Epson Technical Support Visit epson.com/support/r3000 (U.S.) or epson.ca/support/r3000 (Canada) where you can purchase them correctly. The printer's LCD screen is subject to wake the printer from an Epson authorized reseller. Epson disclaims any button to change without notice. © 2010 Epson...


