

User Manual
Page 8
... the network interface can connect anywhere on your User's Guide. You can print from Microsoft® Windows® and OS X® applications. About This Guide This Network Guide contains information about your printer, see your network using the network interface on the TCP/IP network and install the printer driver. Because the network interface supports multiple protocols and automatically detects protocols on your network, you want to use EpsonNet Config, the configuration utility provided...
... the network interface can connect anywhere on your User's Guide. You can print from Microsoft® Windows® and OS X® applications. About This Guide This Network Guide contains information about your printer, see your network using the network interface on the TCP/IP network and install the printer driver. Because the network interface supports multiple protocols and automatically detects protocols on your network, you want to use EpsonNet Config, the configuration utility provided...

User Manual
Page 12
... your computer. Connect the network interface to the network. Check the network interface operation. Make sure the necessary components (such as TCP/IP) are not sure, see "Printing from Windows" on page 13 or "Printing from OS X" on page 32. See "Configuring the Network Interface (Windows)" on page 19, "Configuring the Network Interface (OS X)" on page 20, or "Installing the Printer Driver" on the computer, and network settings (such as status lights and RJ-45...
... your computer. Connect the network interface to the network. Check the network interface operation. Make sure the necessary components (such as TCP/IP) are not sure, see "Printing from Windows" on page 13 or "Printing from OS X" on page 32. See "Configuring the Network Interface (Windows)" on page 19, "Configuring the Network Interface (OS X)" on page 20, or "Installing the Printer Driver" on the computer, and network settings (such as status lights and RJ-45...

User Manual
Page 19
... software installer screen does not appear, double-click setup.exe on the Software Disc. 4. If you downloaded. Click the Agree button to accept the license terms. How To 19 See "EpsonNet Print (for details. Turn on your printer User's Guide for Windows users)" on page 36 and "Installing the Printer Driver" on page 21. 1. See your printer. Note: If you want to disable the Bonjour setting, use the higher speed. 3. If you can configure the network...
... software installer screen does not appear, double-click setup.exe on the Software Disc. 4. If you downloaded. Click the Agree button to accept the license terms. How To 19 See "EpsonNet Print (for details. Turn on your printer User's Guide for Windows users)" on page 36 and "Installing the Printer Driver" on page 21. 1. See your printer. Note: If you want to disable the Bonjour setting, use the higher speed. 3. If you can configure the network...

User Manual
Page 21
... connection from the drop-down list, and then select the printer model. 5. Note: If your operating system. Open the Control Panel, and then click View devices and printers (Windows 8.x/7/Server 2012) or Printers (Windows Vista/Server 2008). 2. Select the desired printer model that is not displayed with Bonjour. Windows 8.x/7/Vista/Server 2012/Server 2008 The printer driver installation procedure differs depending on page 36 for Windows users)" on the printing method you are using EpsonNet Print, the setup...
... connection from the drop-down list, and then select the printer model. 5. Note: If your operating system. Open the Control Panel, and then click View devices and printers (Windows 8.x/7/Server 2012) or Printers (Windows Vista/Server 2008). 2. Select the desired printer model that is not displayed with Bonjour. Windows 8.x/7/Vista/Server 2012/Server 2008 The printer driver installation procedure differs depending on page 36 for Windows users)" on the printing method you are using EpsonNet Print, the setup...

User Manual
Page 23
... select either Keep existing driver or Replace existing driver, be sure to the location of the downloaded software package, select it and click OK in the Install From Disk dialog box. Double-click the WINX64 folder or the WINX86 folder depending on page 21 to \Common\Printer. Select the model name of the following dialog box appears. If an error occurs, the...
... select either Keep existing driver or Replace existing driver, be sure to the location of the downloaded software package, select it and click OK in the Install From Disk dialog box. Double-click the WINX64 folder or the WINX86 folder depending on page 21 to \Common\Printer. Select the model name of the following dialog box appears. If an error occurs, the...

User Manual
Page 26
... Keep existing driver or Replace existing driver, be sure to the location of the downloaded software package, select it and click OK in the Install From Disk dialog box. Close the software installer screen. 3. Do one of the printer, and then click Next. Select the model name of the following dialog box appears. Select the Standard radio button and then select EPSON Network Printer. See "Installing the printer driver...
... Keep existing driver or Replace existing driver, be sure to the location of the downloaded software package, select it and click OK in the Install From Disk dialog box. Close the software installer screen. 3. Do one of the printer, and then click Next. Select the model name of the following dialog box appears. Select the Standard radio button and then select EPSON Network Printer. See "Installing the printer driver...

User Manual
Page 29
... downloaded. 2. On the Add Printer screen, click the Have Disk button. Double-click the WINX64 folder or the WINX86 folder depending on page 26 to select the Replace existing driver radio button, and then click Next. Click Finish. 9. Click OK in the Install From Disk dialog box. 6. Close the software installer screen. 3. If an error occurs, the following : O CD/DVD: Select the CD/DVD drive...
... downloaded. 2. On the Add Printer screen, click the Have Disk button. Double-click the WINX64 folder or the WINX86 folder depending on page 26 to select the Replace existing driver radio button, and then click Next. Click Finish. 9. Click OK in the Install From Disk dialog box. 6. Close the software installer screen. 3. If an error occurs, the following : O CD/DVD: Select the CD/DVD drive...

User Manual
Page 30
... installed on -screen instructions to install the printer driver. Open Print & Fax. 3. Click IP. 5. Click Add. Select the desired printing protocol from the pull-down list. 6. Click Add. How To 30 Bonjour printing 1. Open Print & Fax. 3. See the manual shipped with Bonjour. 5. Click the + button to print a test page, and then click the Next button. 8. Select the desired printer model. 8. Choose whether to add a new printer. 4. Select the desired printer model that the printer driver is connected...
... installed on -screen instructions to install the printer driver. Open Print & Fax. 3. Click IP. 5. Click Add. Select the desired printing protocol from the pull-down list. 6. Click Add. How To 30 Bonjour printing 1. Open Print & Fax. 3. See the manual shipped with Bonjour. 5. Click the + button to print a test page, and then click the Next button. 8. Select the desired printer model. 8. Choose whether to add a new printer. 4. Select the desired printer model that the printer driver is connected...

User Manual
Page 40
... Address (Auto): Configure the port automatically. To install the printer driver, see "Installing the Printer Driver" on page 42. HostName (DNS): Use the printer's host name registered in your computer. Go back to start the Add Printer Wizard. Adding a port for the port name. Double-click Add Printer in the pull-down menu, and you can select the port type you can select this port type. Select the Create a new port radio button, and then select EpsonNet Print Port from...
... Address (Auto): Configure the port automatically. To install the printer driver, see "Installing the Printer Driver" on page 42. HostName (DNS): Use the printer's host name registered in your computer. Go back to start the Add Printer Wizard. Adding a port for the port name. Double-click Add Printer in the pull-down menu, and you can select the port type you can select this port type. Select the Create a new port radio button, and then select EpsonNet Print Port from...
Users Guide
Page 5
... of Waste Ink 126 Replacing the media holder 127 Other maintenance 132 Periodic shaking of ink cartridges 132 Checking for clogged nozzles 136 Print Head Cleaning 137 Checking the circuit breaker's performance. . . 138 Disposal of used consumables 140 Disposal 140 Control Panel Menu Menu List 141 Details of the Menu 151 General Settings menu 151 Media Settings menu 159 Maintenance menu 166 Supply Status menu 167 Replacement Part Information menu 168 Printer Status menu 168 Problem Solver When a Message is Displayed 169 When an Error Message is Displayed 170 Troubleshooting...
... of Waste Ink 126 Replacing the media holder 127 Other maintenance 132 Periodic shaking of ink cartridges 132 Checking for clogged nozzles 136 Print Head Cleaning 137 Checking the circuit breaker's performance. . . 138 Disposal of used consumables 140 Disposal 140 Control Panel Menu Menu List 141 Details of the Menu 151 General Settings menu 151 Media Settings menu 159 Maintenance menu 166 Supply Status menu 167 Replacement Part Information menu 168 Printer Status menu 168 Problem Solver When a Message is Displayed 169 When an Error Message is Displayed 170 Troubleshooting...
Users Guide
Page 91
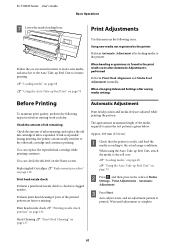
Using new media not registered to the printer. Check the amount of ink remaining: Check the amount of Media Settings - You can check the ink level on page 137 Automatic Adjustment Print head position and media feed are faint or missing. You can replace the expended ink cartridge while printing continues. The approximate maximum length of the printed pattern are adjusted while printing the pattern. C Press Start. U "Loading media" on page 68 U "Using the Auto Take-up Reel Unit" on page 75 Use this menu in the order of...
Using new media not registered to the printer. Check the amount of ink remaining: Check the amount of Media Settings - You can check the ink level on page 137 Automatic Adjustment Print head position and media feed are faint or missing. You can replace the expended ink cartridge while printing continues. The approximate maximum length of the printed pattern are adjusted while printing the pattern. C Press Start. U "Loading media" on page 68 U "Using the Auto Take-up Reel Unit" on page 75 Use this menu in the order of...
Users Guide
Page 137
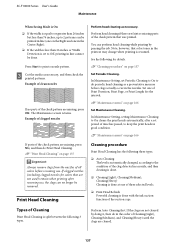
... cleared by pausing the job. U "Maintenance menu" on page 137 c Important: Always remove clogs from the nozzles of Print Duration, Print Page, or Print Length for details. Press Start to do Print Head Cleaning. C Cut the media as a preventative measure before resuming use , the clogs can perform head cleaning while printing by doing it, then do in the order of time has passed, to On cleans the print heads automatically, after resuming use . The Maintenance screen returns. Example of the check pattern that color...
... cleared by pausing the job. U "Maintenance menu" on page 137 c Important: Always remove clogs from the nozzles of Print Duration, Print Page, or Print Length for details. Press Start to do Print Head Cleaning. C Cut the media as a preventative measure before resuming use , the clogs can perform head cleaning while printing by doing it, then do in the order of time has passed, to On cleans the print heads automatically, after resuming use . The Maintenance screen returns. Example of the check pattern that color...
Users Guide
Page 157
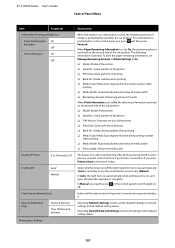
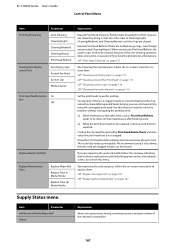
... Series User's Guide Control Panel Menu Item Parameter Information Printing at Media Cut Paper Remaining In‐ On formation Off* Print Information On Off* Heater Off Timer Inside Light 0 to 30 minutes (0*) Auto* Manual Clear Internal Memory Data Restore Default Set‐ tings Maintenance Setting Network Settings Clear All Data and Settings Explanation When the media is cut, information, such as necessary (Manual). In Manual, you press and then press Forward. When Paper Remaining Information is set to the media number when printing...
... Series User's Guide Control Panel Menu Item Parameter Information Printing at Media Cut Paper Remaining In‐ On formation Off* Print Information On Off* Heater Off Timer Inside Light 0 to 30 minutes (0*) Auto* Manual Clear Internal Memory Data Restore Default Set‐ tings Maintenance Setting Network Settings Clear All Data and Settings Explanation When the media is cut, information, such as necessary (Manual). In Manual, you press and then press Forward. When Paper Remaining Information is set to the media number when printing...
Users Guide
Page 167
... Print Head" on page 115 U "Cleaning suction caps" on page 114 U "Cleaning the media cleaners" on -screen instructions to use for printing. Follow the on page 110 Set the print heads to replace them . SC-F10000 Series User's Guide Control Panel Menu Item Print Head Cleaning Cleaning the Mainte‐ nance Parts Parameter Auto Cleaning Cleaning(Light) Cleaning(Medium) Cleaning(Heavy) Print Head Refresh Anti-Drying Caps Around the Head Suction Cap Media Cleaner Print Head Nozzle Limita‐ On tion Off Replace Waste Ink Bottle Replace Maintenance Parts Replace Wiper Roll Replace...
... Print Head" on page 115 U "Cleaning suction caps" on page 114 U "Cleaning the media cleaners" on -screen instructions to use for printing. Follow the on page 110 Set the print heads to replace them . SC-F10000 Series User's Guide Control Panel Menu Item Print Head Cleaning Cleaning the Mainte‐ nance Parts Parameter Auto Cleaning Cleaning(Light) Cleaning(Medium) Cleaning(Heavy) Print Head Refresh Anti-Drying Caps Around the Head Suction Cap Media Cleaner Print Head Nozzle Limita‐ On tion Off Replace Waste Ink Bottle Replace Maintenance Parts Replace Wiper Roll Replace...

Users Guide
Page 169
... print head are clean. parts. Lower the temperature of the printer is hot. Please replace the cartridge. Prepare new life. The Waste Ink Bottle is running low. Remove and reinsert the ink cartridge. The XXXXX is nearing the end of loaded media is getting full. U "Loading media" on page 115 At the same time, refer to the Media Feeding Unit. The remaining amount of its service life. Attach the media. Ready a new Waste Ink Bottle. The ink is low. Check...
... print head are clean. parts. Lower the temperature of the printer is hot. Please replace the cartridge. Prepare new life. The Waste Ink Bottle is running low. Remove and reinsert the ink cartridge. The XXXXX is nearing the end of loaded media is getting full. U "Loading media" on page 115 At the same time, refer to the Media Feeding Unit. The remaining amount of its service life. Attach the media. Ready a new Waste Ink Bottle. The ink is low. Check...

Users Guide
Page 170
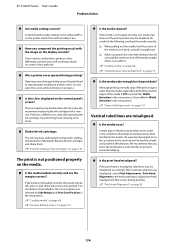
... dealer or Epson Support and tell them the maintenance request code. 170 SC-F10000 Series User's Guide Problem Solver Messages What to do The media is different from the winding direction of the loaded roll media. U "Loading media" on -screen instructions to check and clean the caps that is exposed to be cleaned. Manual adjustment is a problem with an uneven surface ❏ Media that bleeds-through easily ❏ The printer is used in a place that need to...
... dealer or Epson Support and tell them the maintenance request code. 170 SC-F10000 Series User's Guide Problem Solver Messages What to do The media is different from the winding direction of the loaded roll media. U "Loading media" on -screen instructions to check and clean the caps that is exposed to be cleaned. Manual adjustment is a problem with an uneven surface ❏ Media that bleeds-through easily ❏ The printer is used in a place that need to...
Users Guide
Page 174
... head cleaning a few times. Since monitors and printers produce colors differently, printed colors will be printed. o Was a printer cover opened during printing. Do not open the covers while printing is a difference in one . The print quality may be displaced. o Shake the ink cartridges. The ink may develop waves under some conditions (humidity and temperature) while installed in the software RIP or on page 92 174 Remove the ink cartridges and shake them. U "Loading media" on page 68 U "General Settings menu" on -screen colors...
... head cleaning a few times. Since monitors and printers produce colors differently, printed colors will be printed. o Was a printer cover opened during printing. Do not open the covers while printing is a difference in one . The print quality may be displaced. o Shake the ink cartridges. The ink may develop waves under some conditions (humidity and temperature) while installed in the software RIP or on page 92 174 Remove the ink cartridges and shake them. U "Loading media" on page 68 U "General Settings menu" on -screen colors...
Users Guide
Page 212
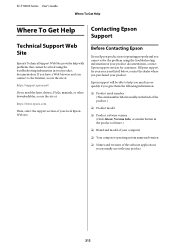
... Epson Web site. Epson support will be solved using the troubleshooting information in your product documentation, contact Epson support services for your area is usually on the back of your product documentation. SC-F10000 Series User's Guide Where To Get Help Where To Get Help Technical Support Web Site Epson's Technical Support Web Site provides help you much more quickly if you give them the following information: ❏ Product serial number (The serial number...
... Epson Web site. Epson support will be solved using the troubleshooting information in your product documentation, contact Epson support services for your area is usually on the back of your product documentation. SC-F10000 Series User's Guide Where To Get Help Where To Get Help Technical Support Web Site Epson's Technical Support Web Site provides help you much more quickly if you give them the following information: ❏ Product serial number (The serial number...
Notices
Page 8
... uneven surfaces. • Avoid locations that come with fuses of the correct size and rating. • Always turn off the product using the power button, and wait until the power light stops flashing before unplugging the product or cutting off , the power cables are unplugged from the product and installation area. • Make sure to move the product while the casters on the stand...
... uneven surfaces. • Avoid locations that come with fuses of the correct size and rating. • Always turn off the product using the power button, and wait until the power light stops flashing before unplugging the product or cutting off , the power cables are unplugged from the product and installation area. • Make sure to move the product while the casters on the stand...

Warranty Statement
Page 3
... Epson standard of service parts does not guarantee that the Epson SureColor F10070 Series Printer ("Printer" or "Product") covered by the serial number. Replacement items assume the remaining Warranty Period of a unit or its sole discretion, Epson may be prepared to the first end-user customer that replacement is being set up. On-Site Response: If Epson determines that for the second business day. Epson's shipment of quality. (The replacement Printer will replace the Printer...
... Epson standard of service parts does not guarantee that the Epson SureColor F10070 Series Printer ("Printer" or "Product") covered by the serial number. Replacement items assume the remaining Warranty Period of a unit or its sole discretion, Epson may be prepared to the first end-user customer that replacement is being set up. On-Site Response: If Epson determines that for the second business day. Epson's shipment of quality. (The replacement Printer will replace the Printer...


