
Network Guide
Page 4
... 8 Network Interface Operation 8 Status light 8 Network connector 9 About the Software 9 How To Overview 11 Selecting a Printing Method 12 Printing from Windows 12 Features of the Printing Methods 12 Installing Components on Your Computer 13 About Installing Components on Your Computer 13 Windows 8/7/Vista 13 Windows XP 15 Setting Up the Network Interface 16 Connecting the Network Interface to the Network 16 Configuring the Network Interface 17 Installing the Printer Driver 17 About Installing the Printer Driver...
... 8 Network Interface Operation 8 Status light 8 Network connector 9 About the Software 9 How To Overview 11 Selecting a Printing Method 12 Printing from Windows 12 Features of the Printing Methods 12 Installing Components on Your Computer 13 About Installing Components on Your Computer 13 Windows 8/7/Vista 13 Windows XP 15 Setting Up the Network Interface 16 Connecting the Network Interface to the Network 16 Configuring the Network Interface 17 Installing the Printer Driver 17 About Installing the Printer Driver...

Network Guide
Page 7
... the guide, you want to work only with your network using the network interface on the TCP/IP network and install the printer driver. Introduction About Your Printer Your printer has a built-in Ethernet interface and can use the printer on the operating system and the network configuration. The built-in this manual, automatically selects the correct standard when it automatically selects appropriate network protocols. O This guide is called the network interface...
... the guide, you want to work only with your network using the network interface on the TCP/IP network and install the printer driver. Introduction About Your Printer Your printer has a built-in Ethernet interface and can use the printer on the operating system and the network configuration. The built-in this manual, automatically selects the correct standard when it automatically selects appropriate network protocols. O This guide is called the network interface...

Network Guide
Page 11
... network settings (such as status lights and RJ-45 connector. Select a printing method. Connect the network interface to the network. If you are installed on page 26. If necessary, configure the network settings of the computer is set up the network interface for details. 3. Check the functions and operations of the network interface, such as IP address, subnet mask, etc.) of the network interface using EpsonNet Config. See "Configuring the Network Interface...
... network settings (such as status lights and RJ-45 connector. Select a printing method. Connect the network interface to the network. If you are installed on page 26. If necessary, configure the network settings of the computer is set up the network interface for details. 3. Check the functions and operations of the network interface, such as IP address, subnet mask, etc.) of the network interface using EpsonNet Config. See "Configuring the Network Interface...

Network Guide
Page 13
.... O Windows 7/Vista: Click Start, click Control Panel, and then click View network status and tasks or double-click Network and Sharing Center. 2. Do one of the following: O Windows 8: Click Change Adapter Setting, select your network adapter, and then click Change settings of this chapter appropriate for your computer, depending on Your Computer Before configuring the network interface and printing from the computer, you want to install the necessary components. 1. Installing Components...
.... O Windows 7/Vista: Click Start, click Control Panel, and then click View network status and tasks or double-click Network and Sharing Center. 2. Do one of the following: O Windows 8: Click Change Adapter Setting, select your network adapter, and then click Change settings of this chapter appropriate for your computer, depending on Your Computer Before configuring the network interface and printing from the computer, you want to install the necessary components. 1. Installing Components...

Network Guide
Page 16
... the status lights go off . 2. and then click OK. 6. Go to the network. 1. otherwise the network interface may not work correctly. Make sure that your printer. If you can use the following shielded twisted-pair cable to connect the network interface to use the higher speed. 3. Set the IP address, the subnet mask, etc. Double-click Internet Protocol (TCP/IP) on page 17. Now, you are now installed...
... the status lights go off . 2. and then click OK. 6. Go to the network. 1. otherwise the network interface may not work correctly. Make sure that your printer. If you can use the following shielded twisted-pair cable to connect the network interface to use the higher speed. 3. Set the IP address, the subnet mask, etc. Double-click Internet Protocol (TCP/IP) on page 17. Now, you are now installed...

Network Guide
Page 17
... connected to your language, and then click the Next button. 5. Click the Next button at the Welcome screen 6. The Software Select screen appears. Follow the on the computer. Select your computer with a USB cable, clear the EpsonNet Configuration Utility check box. 8. To print via a network, make sure to install the printer driver on -screen instructions to the network (a hub or router). 2. Software installation starts. Installing the Printer Driver About Installing the Printer Driver To print to the network printer, you need to select the Epson Driver...
... connected to your language, and then click the Next button. 5. Click the Next button at the Welcome screen 6. The Software Select screen appears. Follow the on the computer. Select your computer with a USB cable, clear the EpsonNet Configuration Utility check box. 8. To print via a network, make sure to install the printer driver on -screen instructions to the network (a hub or router). 2. Software installation starts. Installing the Printer Driver About Installing the Printer Driver To print to the network printer, you need to select the Epson Driver...

Network Guide
Page 20
... to start the Add Printer wizard. 3. Click Add a network, wireless or Bluetooth printer. 4. Follow the on EpsonNet Config's IPP/IPPS Information page. Click Add a printer to install the printer driver. Select the Add a printer using the format below. http://IP address of network interface:631/Printer name Example: http://192.168.100.201:631/EPSON_IPP_Printer Note: To check the IP address of the target device to set on -screen instructions...
... to start the Add Printer wizard. 3. Click Add a network, wireless or Bluetooth printer. 4. Follow the on EpsonNet Config's IPP/IPPS Information page. Click Add a printer to install the printer driver. Select the Add a printer using the format below. http://IP address of network interface:631/Printer name Example: http://192.168.100.201:631/EPSON_IPP_Printer Note: To check the IP address of the target device to set on -screen instructions...

Network Guide
Page 21
.... Installing a printer driver 1. Close the software installer screen if it appears. 3. On the Add Printer screen, click the Have Disk button. Click Browse. 5. Note: If the Add Printer wizard prompts you to select either Keep existing driver or Replace existing driver, be sure to complete the setup. If the Add Printer wizard prompts you prefer. Windows XP The printer driver installation procedure differs depending on -screen instructions to select the Replace existing driver radio button.
.... Installing a printer driver 1. Close the software installer screen if it appears. 3. On the Add Printer screen, click the Have Disk button. Click Browse. 5. Note: If the Add Printer wizard prompts you to select either Keep existing driver or Replace existing driver, be sure to complete the setup. If the Add Printer wizard prompts you prefer. Windows XP The printer driver installation procedure differs depending on -screen instructions to select the Replace existing driver radio button.

Network Guide
Page 24
... address of the target printer using the format below. See "Installing a printer driver" on a home or office network radio button. 5. The Install From Disk dialog box appears. 4. Click Open. On the Add Printer screen, click the Have Disk button. Select the Connect to a printer on the Internet or on page 24 if necessary. Enter the URL of the network interface, use EpsonNet Config. Follow the on-screen instructions to set on page...
... address of the target printer using the format below. See "Installing a printer driver" on a home or office network radio button. 5. The Install From Disk dialog box appears. 4. Click Open. On the Add Printer screen, click the Have Disk button. Select the Connect to a printer on the Internet or on page 24 if necessary. Enter the URL of the network interface, use EpsonNet Config. Follow the on-screen instructions to set on page...

Network Guide
Page 34
... correctly configured on the Printer's Control Panel After connecting the printer to the network, you need to obtain an IP address: O Choose Auto when getting the IP address from the control panel, follow the steps below. 1. See the online help of the following to set the IP address before using the printer's control panel. Network Setup Menu These items are used to confirm the new IP address. Note: To use Auto, a DHCP server must first set the IP address for the network interface. Print a network status sheet to make network settings...
... correctly configured on the Printer's Control Panel After connecting the printer to the network, you need to obtain an IP address: O Choose Auto when getting the IP address from the control panel, follow the steps below. 1. See the online help of the following to set the IP address before using the printer's control panel. Network Setup Menu These items are used to confirm the new IP address. Note: To use Auto, a DHCP server must first set the IP address for the network interface. Print a network status sheet to make network settings...
User Manual
Page 7
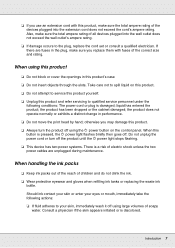
... the product until the P power light stops flashing. ❏ This device has two power systems. There is damaged; Also, make sure the total ampere rating of the correct size and rating. liquid has entered the product; Do not unplug the power cord or turn the product off using this product ❏ Do not block or cover the openings in this product's case ❏...
... the product until the P power light stops flashing. ❏ This device has two power systems. There is damaged; Also, make sure the total ampere rating of the correct size and rating. liquid has entered the product; Do not unplug the power cord or turn the product off using this product ❏ Do not block or cover the openings in this product's case ❏...
User Manual
Page 11
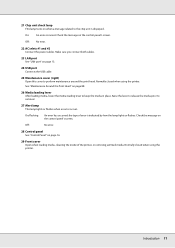
... printer. the type of the printer, or removing jammed media. Normally closed when using the printer. On/flashing: An error has occurred; Raise the lever to release the media prior to the chip unit is indicated by how the lamp lights or flashes. Introduction 11 Off: No error. 22 AC inlets #1 and #2 Connect the power cables. See "Maintenance Around the Print Head" on the control panel's screen. Check the message on page 88. 26 Media loading lever After loading media, lower the media loading lever...
... printer. the type of the printer, or removing jammed media. Normally closed when using the printer. On/flashing: An error has occurred; Raise the lever to release the media prior to the chip unit is indicated by how the lamp lights or flashes. Introduction 11 Off: No error. 22 AC inlets #1 and #2 Connect the power cables. See "Maintenance Around the Print Head" on the control panel's screen. Check the message on page 88. 26 Media loading lever After loading media, lower the media loading lever...
User Manual
Page 21
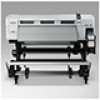
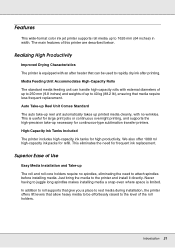
... to roll supports that give you a place to rest media during installation, the printer offers lift levers that allow heavy media to be used to rapidly dry ink after heater that media require less frequent replacement. High-Capacity Ink Tanks Included The printer includes high-capacity ink tanks for large print jobs or continuous overnight printing, and supports the high-precision take -up reel unit automatically takes up necessary for continuous-type...
... to roll supports that give you a place to rest media during installation, the printer offers lift levers that allow heavy media to be used to rapidly dry ink after heater that media require less frequent replacement. High-Capacity Ink Tanks Included The printer includes high-capacity ink tanks for large print jobs or continuous overnight printing, and supports the high-precision take -up reel unit automatically takes up necessary for continuous-type...
User Manual
Page 124
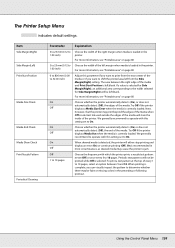
... media is correctly loaded. Using the Control Panel Menu 124 Try Off if the printer displays a Media Size Error when the media is selected. For more information, see "Printable area" on page 80 Choose whether the printer automatically detects (On), or does not automatically detect (Off), the edges of the printer. Choose the frequency with this setting set to On. Periodic test patterns will be printed while Off is correctly loaded. When printing is selected for Side Margin...
... media is correctly loaded. Using the Control Panel Menu 124 Try Off if the printer displays a Media Size Error when the media is selected. For more information, see "Printable area" on page 80 Choose whether the printer automatically detects (On), or does not automatically detect (Off), the edges of the printer. Choose the frequency with this setting set to On. Periodic test patterns will be printed while Off is correctly loaded. When printing is selected for Side Margin...
User Manual
Page 130
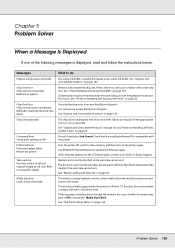
... dealer or Epson Support. Press W and select Job Cancel. Reattach or replace. Command Error Check print settings on page 162. Restart the printer. Condensation may print if Off is not correctly attached to roll core. Obtain an ink pack of its service life. The media currently loaded is 300 mm (11.8 inches). If this message appears on the printer again. Refill after matching ink pack with the printer. Ready a new waste ink bottle. F/W Install Error Firmware update failed. Remove and...
... dealer or Epson Support. Press W and select Job Cancel. Reattach or replace. Command Error Check print settings on page 162. Restart the printer. Condensation may print if Off is not correctly attached to roll core. Obtain an ink pack of its service life. The media currently loaded is 300 mm (11.8 inches). If this message appears on the printer again. Refill after matching ink pack with the printer. Ready a new waste ink bottle. F/W Install Error Firmware update failed. Remove and...

User Manual
Page 131
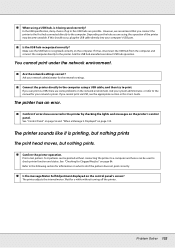
... panel, contact Epson Support for service has occurred, the printer automatically stops printing. Turn on page 175. o Is the power cable plugged into the printer. Also, make sure the cable is securely plugged into the correct terminal of its service life. Contact your outlet works by connecting the power cable for another electric product. Troubleshooting You cannot print (because the printer does not work , note the code and call for service code is "XXXX". o Is there any problem...
... panel, contact Epson Support for service has occurred, the printer automatically stops printing. Turn on page 175. o Is the power cable plugged into the printer. Also, make sure the cable is securely plugged into the correct terminal of its service life. Contact your outlet works by connecting the power cable for another electric product. Troubleshooting You cannot print (because the printer does not work , note the code and call for service code is "XXXX". o Is there any problem...
User Manual
Page 132
... the control panel's screen? o When using a USB hub, is it being used to check printer function and status. o Are the network settings correct? Problem Solver 132 If you connect the printer to the first hub connected directly to print. o Confirm if errors have occurred in this should occur, plug the USB cable directly into your network administrator for the network settings. o Confirm the printer operation. Ask your computer's USB port. See "Control Panel" on page 16 and "When a Message Is Displayed...
... the control panel's screen? o When using a USB hub, is it being used to check printer function and status. o Are the network settings correct? Problem Solver 132 If you connect the printer to the first hub connected directly to print. o Confirm if errors have occurred in this should occur, plug the USB cable directly into your network administrator for the network settings. o Confirm the printer operation. Ask your computer's USB port. See "Control Panel" on page 16 and "When a Message Is Displayed...
Warranty Statement
Page 4
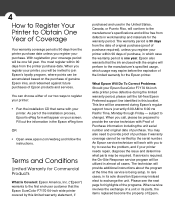
... To Correct Problems: Should your Epson SureColor F7170 64-inch wide printer prove defective during Epson's regular support hours (currently 6:00 AM to 6:00 PM Pacific Time, Monday through Friday - subject to join Epson's loyalty program, where points can choose either of purchase. With registration your printer: • Run the installation CD that the Epson SureColor F7170 64-inch wide printer covered by the serial number. You can be free...
... To Correct Problems: Should your Epson SureColor F7170 64-inch wide printer prove defective during Epson's regular support hours (currently 6:00 AM to 6:00 PM Pacific Time, Monday through Friday - subject to join Epson's loyalty program, where points can choose either of purchase. With registration your printer: • Run the installation CD that the Epson SureColor F7170 64-inch wide printer covered by the serial number. You can be free...
Warranty Statement
Page 5
..., documentation, manuals, software, or cables.) The customer must be available to accept the parts delivery and be able to receive, unpack, and install the replacement printer, and prepare the defective printer for whatever reason appears to prevent ink buildup around the print head and cap unit area as documented in the user manual or documentation provided by Epson. Any damage caused by neglecting or improperly performing user-level maintenance as needed when...
..., documentation, manuals, software, or cables.) The customer must be available to accept the parts delivery and be able to receive, unpack, and install the replacement printer, and prepare the defective printer for whatever reason appears to prevent ink buildup around the print head and cap unit area as documented in the user manual or documentation provided by Epson. Any damage caused by neglecting or improperly performing user-level maintenance as needed when...

Warranty Statement
Page 6
... caused by third-party software, applications, parts, components or peripheral devices added to use, service maintenance must be performed by a service technician before the printer is not transferable. Service when the printer is turned off for over two weeks, maintenance must be turned off . Service where the printer label, logo, rating label, or serial number has been removed. 8. If the ink is turned off and not used outside the United...
... caused by third-party software, applications, parts, components or peripheral devices added to use, service maintenance must be performed by a service technician before the printer is not transferable. Service when the printer is turned off for over two weeks, maintenance must be turned off . Service where the printer label, logo, rating label, or serial number has been removed. 8. If the ink is turned off and not used outside the United...


