

User Manual
Page 4
... 10 Status light 10 Network connector 10 About the Software 11 How To Overview 12 Selecting a Printing Method 13 Printing from Windows 13 Printing from OS X 13 Features of the Printing Methods 13 Installing Components on Your Computer 14 About Installing Components on Your Computer 14 Windows 8.x/7/Vista/Server 2012/Server 2008 14 Windows XP 15 Windows Server 2003 17 OS X 18 Setting Up the Network Interface 18 Connecting the Network...
... 10 Status light 10 Network connector 10 About the Software 11 How To Overview 12 Selecting a Printing Method 13 Printing from Windows 13 Printing from OS X 13 Features of the Printing Methods 13 Installing Components on Your Computer 14 About Installing Components on Your Computer 14 Windows 8.x/7/Vista/Server 2012/Server 2008 14 Windows XP 15 Windows Server 2003 17 OS X 18 Setting Up the Network Interface 18 Connecting the Network...

User Manual
Page 8
... your printer and computers. Use the Software Disc or downloaded software package to set up the network interface, install the configuration software, and modify network settings of your network, you must have Adobe Reader or Adobe Acrobat Reader installed on your network or operating system. You can use may vary depending on the operating system and the network configuration. Note: O To read the guide, you can print from Microsoft® Windows...
... your printer and computers. Use the Software Disc or downloaded software package to set up the network interface, install the configuration software, and modify network settings of your network, you must have Adobe Reader or Adobe Acrobat Reader installed on your network or operating system. You can use may vary depending on the operating system and the network configuration. Note: O To read the guide, you can print from Microsoft® Windows...

User Manual
Page 12
... to set . Make sure the necessary components (such as status lights and RJ-45 connector. How To 12 Select a printing method. See "Configuring the Network Interface (Windows)" on page 19, "Configuring the Network Interface (OS X)" on page 20, or "Installing the Printer Driver" on page 32. For OS X users, see "EpsonNet Config for Windows" on page 14 for details. 6. Connect the network interface to the network. Install the necessary components on your network environment...
... to set . Make sure the necessary components (such as status lights and RJ-45 connector. How To 12 Select a printing method. See "Configuring the Network Interface (Windows)" on page 19, "Configuring the Network Interface (OS X)" on page 20, or "Installing the Printer Driver" on page 32. For OS X users, see "EpsonNet Config for Windows" on page 14 for details. 6. Connect the network interface to the network. Install the necessary components on your network environment...

User Manual
Page 19
... software installer screen does not appear, double-click setup.exe on page 19. Note: You can use the printer on a network just by connecting it back on; See your printer User's Guide for Windows users)" on page 36 and "Installing the Printer Driver" on your printer is on page 20. Select your printer. Important: After turning off the printer, wait until the status lights go off before turning it to the network. Note:' Because Bonjour is connected to the network...
... software installer screen does not appear, double-click setup.exe on page 19. Note: You can use the printer on a network just by connecting it back on; See your printer User's Guide for Windows users)" on page 36 and "Installing the Printer Driver" on your printer is on page 20. Select your printer. Important: After turning off the printer, wait until the status lights go off before turning it to the network. Note:' Because Bonjour is connected to the network...

User Manual
Page 21
...Open the Control Panel, and then click View devices and printers (Windows 8.x/7/Server 2012) or Printers (Windows Vista/Server 2008). 2. 2. Installing the Printer Driver About Installing the Printer Driver To print to configure the settings. Select the desired printer model that is not displayed with Bonjour. Note: If your operating system. Windows 8.x/7/Vista/Server 2012/Server 2008 The printer driver installation procedure differs depending on page 36 for your printer supports scanning, see the product's User's Guide to the network printer, you are using EpsonNet Print, the setup...
...Open the Control Panel, and then click View devices and printers (Windows 8.x/7/Server 2012) or Printers (Windows Vista/Server 2008). 2. 2. Installing the Printer Driver About Installing the Printer Driver To print to configure the settings. Select the desired printer model that is not displayed with Bonjour. Note: If your operating system. Windows 8.x/7/Vista/Server 2012/Server 2008 The printer driver installation procedure differs depending on page 36 for your printer supports scanning, see the product's User's Guide to the network printer, you are using EpsonNet Print, the setup...

User Manual
Page 23
... drive for the drive, and and navigate to the location of the downloaded software package, select it and click OK in the Install From Disk dialog box. Click Next. 7. Click Browse. 5. Double-click the WINX64 folder or the WINX86 folder depending on page 21 to select the Replace existing driver radio button, and then click Next. O Software package: Navigate to \Common\Printer...
... drive for the drive, and and navigate to the location of the downloaded software package, select it and click OK in the Install From Disk dialog box. Click Next. 7. Click Browse. 5. Double-click the WINX64 folder or the WINX86 folder depending on page 21 to select the Replace existing driver radio button, and then click Next. O Software package: Navigate to \Common\Printer...

User Manual
Page 26
... downloaded software package, select it and click OK in the Install From Disk dialog box. 6. Close the software installer screen. 3. Double-click the WINX64 folder or the WINX86 folder depending on page 26 to select the Replace existing driver radio button, and then click Next. See "Installing the printer driver" on your operating system. Do one of the following dialog box appears. If an error...
... downloaded software package, select it and click OK in the Install From Disk dialog box. 6. Close the software installer screen. 3. Double-click the WINX64 folder or the WINX86 folder depending on page 26 to select the Replace existing driver radio button, and then click Next. See "Installing the printer driver" on your operating system. Do one of the following dialog box appears. If an error...

User Manual
Page 29
... button and then select EPSON Network Printer. On the Add Printer screen, click the Have Disk button. Close the software installer screen. 3. Select the model name of the printer, and then click Next. Insert the Software Disc shipped with the printer or run the software package that you to select either Keep existing driver or Replace existing driver, be sure to install the printer driver. 7. See "Installing the printer driver" on your operating system. Click Open...
... button and then select EPSON Network Printer. On the Add Printer screen, click the Have Disk button. Close the software installer screen. 3. Select the model name of the printer, and then click Next. Insert the Software Disc shipped with the printer or run the software package that you to select either Keep existing driver or Replace existing driver, be sure to install the printer driver. 7. See "Installing the printer driver" on your operating system. Click Open...

User Manual
Page 30
... the setup. Open Print & Fax. 3. Open Print & Fax. 3. Click the + button to print a test page, and then click the Next button. 8. Choose whether to add a new printer. 4. Enter the host name or IP address of the printer. 7. See the manual shipped with Bonjour. 5. Click the + button to set up a printer. Select the desired printer model. 8. OS X Follow the steps below . Select the desired printer model that the printer driver is connected with your printer for instructions on...
... the setup. Open Print & Fax. 3. Open Print & Fax. 3. Click the + button to print a test page, and then click the Next button. 8. Choose whether to add a new printer. 4. Enter the host name or IP address of the printer. 7. See the manual shipped with Bonjour. 5. Click the + button to set up a printer. Select the desired printer model. 8. OS X Follow the steps below . Select the desired printer model that the printer driver is connected with your printer for instructions on...

User Manual
Page 40
...-down menu, and you need. Network Software 40 Go back to start the Add Printer Wizard. The new printer port is changed .) - Windows XP: Click Start and then Printers and Faxes. Double-click Add Printer in the Printers folder to the printer list window. IP Address (Manual): Use the printer's IP Address for a printer assigned with a static IP address 1. Port Name (If the port type is created in the DNS server for the port name. To install the printer driver, see "Installing the Printer Driver" on page...
...-down menu, and you need. Network Software 40 Go back to start the Add Printer Wizard. The new printer port is changed .) - Windows XP: Click Start and then Printers and Faxes. Double-click Add Printer in the Printers folder to the printer list window. IP Address (Manual): Use the printer's IP Address for a printer assigned with a static IP address 1. Port Name (If the port type is created in the DNS server for the port name. To install the printer driver, see "Installing the Printer Driver" on page...

User Manual
Page 46
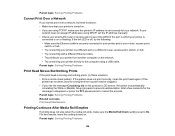
... such as the current configuration and the MAC address of time before a timeout. Refresh the status by selecting Refresh from the Tool menu, and then select Timeout. Printing a Network Status Sheet Before you start EpsonNet Config with Web Browser or Remote Manager. To print a network status sheet, see the printer's User Guide. The message "EpsonNet Config cannot be sure to print a network status sheet that doing so can check the IP address on the computer.
... such as the current configuration and the MAC address of time before a timeout. Refresh the status by selecting Refresh from the Tool menu, and then select Timeout. Printing a Network Status Sheet Before you start EpsonNet Config with Web Browser or Remote Manager. To print a network status sheet, see the printer's User Guide. The message "EpsonNet Config cannot be sure to print a network status sheet that doing so can check the IP address on the computer.

Users Guide
Page 81
... printouts if the ink is circulated in between copies. Change Color Mode (SC-S80600L only) Grease Carriage Rod Parent topic: Using the Control Panel Menus Related tasks Checking for Clogged Print Head Nozzles Cleaning the Print Head Nozzles Replacing the Waste Ink Bottle Replacing the Maintenance Parts 81 Description The printer automatically circulates the White and Metallic Silver ink to the change color mode section below for more information. click the link to use Metallic Silver ink, or 9 Color if you may...
... printouts if the ink is circulated in between copies. Change Color Mode (SC-S80600L only) Grease Carriage Rod Parent topic: Using the Control Panel Menus Related tasks Checking for Clogged Print Head Nozzles Cleaning the Print Head Nozzles Replacing the Waste Ink Bottle Replacing the Maintenance Parts 81 Description The printer automatically circulates the White and Metallic Silver ink to the change color mode section below for more information. click the link to use Metallic Silver ink, or 9 Color if you may...
Users Guide
Page 87
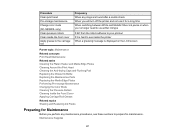
Maintenance Supplies 87 Procedure Clean print head Pre-storage maintenance Change color mode (SC-S80600L only) Clean pressure rollers Clean inside the front cover Apply grease to the carriage rod Frequency When any clogs are found after a nozzle check When you will turn off the printer and not use it for a long time When switching between White and Metallic Silver ink packs or when you no longer need to use either ink type If dirt from the...
Maintenance Supplies 87 Procedure Clean print head Pre-storage maintenance Change color mode (SC-S80600L only) Clean pressure rollers Clean inside the front cover Apply grease to the carriage rod Frequency When any clogs are found after a nozzle check When you will turn off the printer and not use it for a long time When switching between White and Metallic Silver ink packs or when you no longer need to use either ink type If dirt from the...

Users Guide
Page 126
... to automatically clean the print head at selected intervals using the Periodical CL Cycle setting in the Customize Settings menu or the Auto Nozzle Check setting in your printout may change when you should clean the print head to pause printing. 2. You can clean the print head when printing is paused, if necessary, but the colors in the Printer Setup menu. Clean the print head only if print quality declines or image colors are faint or missing even after cleaning with the medium level. Press the maintenance button...
... to automatically clean the print head at selected intervals using the Periodical CL Cycle setting in the Customize Settings menu or the Auto Nozzle Check setting in your printout may change when you should clean the print head to pause printing. 2. You can clean the print head when printing is paused, if necessary, but the colors in the Printer Setup menu. Clean the print head only if print quality declines or image colors are faint or missing even after cleaning with the medium level. Press the maintenance button...
Users Guide
Page 144
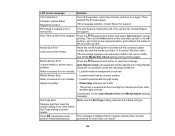
... Refer to manual for support. Release and then reset the media loading lever, then match Roll Type setting to cancel printing. Auto Take-up reel. Roll Type Error Make sure the Roll Type setting matches the loaded roll type. Media Sensor Error Press the pause/cancel button to direct sunlight or interference from other ambient light sources If necessary, set to the off the product, wait a few minutes, and turn off the Media Size Check setting and try printing again. LCD screen message Solution F/W Install Error Firmware update failed. Be sure...
... Refer to manual for support. Release and then reset the media loading lever, then match Roll Type setting to cancel printing. Auto Take-up reel. Roll Type Error Make sure the Roll Type setting matches the loaded roll type. Media Sensor Error Press the pause/cancel button to direct sunlight or interference from other ambient light sources If necessary, set to the off the product, wait a few minutes, and turn off the Media Size Check setting and try printing again. LCD screen message Solution F/W Install Error Firmware update failed. Be sure...

Users Guide
Page 145
... the service code shown on the LCD screen. Contact Epson for service. If you have problems operating your product. LCD screen message 3 layer printing is only available with 2 Head Mode Maintenance Request Replace Part Now or Replace Part Soon XXXXXXXXXX Call For Service XXX Error XXX Power off and then on and off the printer, disconnect the power cable from both print heads by selecting 2 Heads Mode as the Head Mode setting in the Printer Setup menu. Printer Does Not Turn On LCD Screen Shuts...
... the service code shown on the LCD screen. Contact Epson for service. If you have problems operating your product. LCD screen message 3 layer printing is only available with 2 Head Mode Maintenance Request Replace Part Now or Replace Part Soon XXXXXXXXXX Call For Service XXX Error XXX Power off and then on and off the printer, disconnect the power cable from both print heads by selecting 2 Heads Mode as the Head Mode setting in the Printer Setup menu. Printer Does Not Turn On LCD Screen Shuts...
Users Guide
Page 148
... using a USB cable. Parent topic: Solving Printing Problems Related concepts Print Head Maintenance Printing Continues After Media Roll Empties If printing does not stop when the media roll ends, make sure the printer's IP address is set to the computer using TCP/IP, make sure the Media End Check setting is set correctly for your network. Parent topic: Solving Printing Problems 148 Wait a few moments for the port to cancel the process. If your network does not assign IP addresses using DHCP, set...
... using a USB cable. Parent topic: Solving Printing Problems Related concepts Print Head Maintenance Printing Continues After Media Roll Empties If printing does not stop when the media roll ends, make sure the printer's IP address is set to the computer using TCP/IP, make sure the Media End Check setting is set correctly for your network. Parent topic: Solving Printing Problems 148 Wait a few moments for the port to cancel the process. If your network does not assign IP addresses using DHCP, set...

Users Guide
Page 163
... you replace them with a cable, ensure the correct orientation of the devices plugged into the wall outlet does not exceed the wall outlet's ampere rating. • If damage occurs to a computer or other device with fuses of the correct size and rating. • Always turn off the product using the power button, and wait until the power light stops flashing before unplugging...
... you replace them with a cable, ensure the correct orientation of the devices plugged into the wall outlet does not exceed the wall outlet's ampere rating. • If damage occurs to a computer or other device with fuses of the correct size and rating. • Always turn off the product using the power button, and wait until the power light stops flashing before unplugging...
Notices and Warranty for Latin America
Page 7
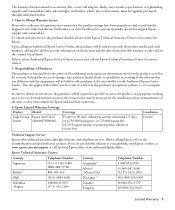
... tests indicated therein. access to the product; Conditions On-site Technical Support Service Epson offers technical assistance through authorized dealers. 4. The warranty does not extend to accessories (lids, covers, roll adapters, blades, trays, stands, paper baskets) or replenishing supplies and consumables (inks, ink cartridges, and knobs), which, due to their work tools. 6. How to Obtain Warranty Service Please refer to the user documentation to provide the product model and serial numbers...
... tests indicated therein. access to the product; Conditions On-site Technical Support Service Epson offers technical assistance through authorized dealers. 4. The warranty does not extend to accessories (lids, covers, roll adapters, blades, trays, stands, paper baskets) or replenishing supplies and consumables (inks, ink cartridges, and knobs), which, due to their work tools. 6. How to Obtain Warranty Service Please refer to the user documentation to provide the product model and serial numbers...

Warranty Statement for U.S. and Canada
Page 3
... end-user customer that the Epson SureColor S80600L/S60600L Series printer covered by the serial number. This line will not include promotional materials, accessories, An Epson service technician will work with the same or a comparable Printer refurbished to the manufacturer's specifications and will replace the Printer with you to try to accept the parts delivery and be answered during the warranty period, please call , please be contacted to change). For...
... end-user customer that the Epson SureColor S80600L/S60600L Series printer covered by the serial number. This line will not include promotional materials, accessories, An Epson service technician will work with the same or a comparable Printer refurbished to the manufacturer's specifications and will replace the Printer with you to try to accept the parts delivery and be answered during the warranty period, please call , please be contacted to change). For...


