
Quick Start
Page 1
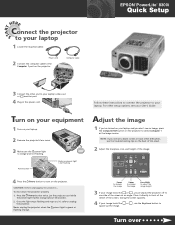
.... Focus to sharpen the image Zoom to enlarge the image Lens Shift to adjust the image height 3 If your laptop. Turn on your equipment 1 Turn on , it directly in the power cord. Power button Make sure power light is green or flashing orange. Place it 's safe to unplug the projector. TART HERE Connect the projector to your laptop 1 Locate the required cables: Power cord 2 Connect the computer cable to the Computer 1 port on the projector to select Computer 1 as the image source. For...
.... Focus to sharpen the image Zoom to enlarge the image Lens Shift to adjust the image height 3 If your laptop. Turn on your equipment 1 Turn on , it directly in the power cord. Power button Make sure power light is green or flashing orange. Place it 's safe to unplug the projector. TART HERE Connect the projector to your laptop 1 Locate the required cables: Power cord 2 Connect the computer cable to the Computer 1 port on the projector to select Computer 1 as the image source. For...

Quick Start
Page 2
... the Windows Control Panel, open the Display utility. If you toggle between the LCD screen and the projector, or display on the projector to click a Monitor tab, then make sure the external Monitor port is set up after turning on your image displays either on the projector or laptop, but not on the projector is green and not flashing, and the lens cover is off. Electronic Support Services EPSON provides technical assistance through electronic support services 24 hours...
... the Windows Control Panel, open the Display utility. If you toggle between the LCD screen and the projector, or display on the projector to click a Monitor tab, then make sure the external Monitor port is set up after turning on your image displays either on the projector or laptop, but not on the projector is green and not flashing, and the lens cover is off. Electronic Support Services EPSON provides technical assistance through electronic support services 24 hours...

User Manual
Page 2
... light can severely injure you replace the lamp, never touch the new lamp with your bare hands; Keep plastic bags away from the use with SEIKO EPSON CORPORATION's operating and maintenance instructions. No part of this publication may be liable to the purchaser of this EPSON product. EPSON is turned on; Neither SEIKO EPSON CORPORATION nor its accessories come packaged in any risk of SEIKO EPSON...
... light can severely injure you replace the lamp, never touch the new lamp with your bare hands; Keep plastic bags away from the use with SEIKO EPSON CORPORATION's operating and maintenance instructions. No part of this publication may be liable to the purchaser of this EPSON product. EPSON is turned on; Neither SEIKO EPSON CORPORATION nor its accessories come packaged in any risk of SEIKO EPSON...
User Manual
Page 4
... Focusing and Zooming Your Image 38 Adjusting the Height of Your Image 39 Adjusting the Image Shape 40 Correcting Computer Images 42 Shutting Down the Projector 43 Giving Your Presentation 45 Activating and Using the Remote Control 46 Using the Navigation Buttons 47 Controlling Multiple Projectors 48 Replacing the Batteries 50 Controlling the Picture and Sound 51 Switching Between Picture Sources 51 Previewing Picture Sources 52 Turning Off the Picture and Sound 53 Stopping Action 53 Zooming Your Image 53 Displaying a Picture-in-Picture Video...
... Focusing and Zooming Your Image 38 Adjusting the Height of Your Image 39 Adjusting the Image Shape 40 Correcting Computer Images 42 Shutting Down the Projector 43 Giving Your Presentation 45 Activating and Using the Remote Control 46 Using the Navigation Buttons 47 Controlling Multiple Projectors 48 Replacing the Batteries 50 Controlling the Picture and Sound 51 Switching Between Picture Sources 51 Previewing Picture Sources 52 Turning Off the Picture and Sound 53 Stopping Action 53 Zooming Your Image 53 Displaying a Picture-in-Picture Video...

User Manual
Page 5
... Using the Menu System 62 Restoring the Default Settings 63 Adjusting the Image Quality 64 Adjusting Computer Images 65 Adjusting the Image Size, Shape, and Position 67 Adjusting the Color 68 Adjusting the Sound 69 Customizing Projector Features 70 Image Setup Options 70 Communication Setup Options 71 Miscellaneous Setup Options 72 Managing the Projector from a Remote Computer 73 Installing the EasyManagement Software 74 System Requirements 74 Installing the Software 74 Connecting and Configuring the Projector 76 Using EMP Monitor 78 Opening...
... Using the Menu System 62 Restoring the Default Settings 63 Adjusting the Image Quality 64 Adjusting Computer Images 65 Adjusting the Image Size, Shape, and Position 67 Adjusting the Color 68 Adjusting the Sound 69 Customizing Projector Features 70 Image Setup Options 70 Communication Setup Options 71 Miscellaneous Setup Options 72 Managing the Projector from a Remote Computer 73 Installing the EasyManagement Software 74 System Requirements 74 Installing the Software 74 Connecting and Configuring the Projector 76 Using EMP Monitor 78 Opening...
User Manual
Page 6
... Replacing the Filters 91 Cleaning the Lamp Filter 91 Cleaning the Air Intake Filters 92 Replacing the Lamp 94 Resetting the Lamp Timer 96 Transporting the Projector 97 Solving Problems 99 Checking the Projector Status 100 What To Do When the Lights Flash 100 Viewing the 'About' Menu Screen 103 Solving Problems with the Image or Sound 104 Solving Problems with the Remote Control 109 Where To Get Help 110 Telephone Support Services 110 Appendix A: Projector Installation 111 Placement and Mounting Guidelines 111 Image Size and Projection Distance 112 Image Size...
... Replacing the Filters 91 Cleaning the Lamp Filter 91 Cleaning the Air Intake Filters 92 Replacing the Lamp 94 Resetting the Lamp Timer 96 Transporting the Projector 97 Solving Problems 99 Checking the Projector Status 100 What To Do When the Lights Flash 100 Viewing the 'About' Menu Screen 103 Solving Problems with the Image or Sound 104 Solving Problems with the Remote Control 109 Where To Get Help 110 Telephone Support Services 110 Appendix A: Projector Installation 111 Placement and Mounting Guidelines 111 Image Size and Projection Distance 112 Image Size...
User Manual
Page 32
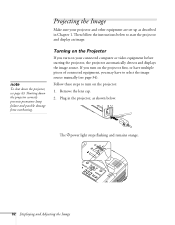
... To shut down the projector correctly prevents premature lamp failure and possible damage from overheating. If you turn on your projector and other equipment are set up as shown below to start the projector and display an image. Remove the lens cap. 2. Shutting down the projector, see page 34). Follow these steps to select the image source manually (see page 43. The Ppower light stops flashing and remains orange. 32 Displaying and Adjusting the Image Turning...
... To shut down the projector correctly prevents premature lamp failure and possible damage from overheating. If you turn on your projector and other equipment are set up as shown below to start the projector and display an image. Remove the lens cap. 2. Shutting down the projector, see page 34). Follow these steps to select the image source manually (see page 43. The Ppower light stops flashing and remains orange. 32 Displaying and Adjusting the Image Turning...

User Manual
Page 33
warning Never look into the lens when the lamp is ready for children. if so, click Cancel. Displaying and Adjusting the Image 33 see a New Hardware Wizard saying your first time using the remote control, make sure the batteries are installed and the power switch on ; If you've connected a Windows-based computer to the projector, you may see page 46.) Power button Turn on remote The Ppower light flashes green as the projector warms up...
warning Never look into the lens when the lamp is ready for children. if so, click Cancel. Displaying and Adjusting the Image 33 see a New Hardware Wizard saying your first time using the remote control, make sure the batteries are installed and the power switch on ; If you've connected a Windows-based computer to the projector, you may see page 46.) Power button Turn on remote The Ppower light flashes green as the projector warms up...
User Manual
Page 43
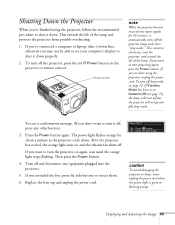
... connected a computer or laptop, shut it off, press any input signals for about a minute as the projector cools down first; To turn off but the projector will turn off the projector, press the red PPower button on the projector or remote control. Replace the lens cap and unplug the power cord. If Standby Mode has been set to start projecting again, press the Power button. The power light flashes orange for 30 minutes, it down properly. 2. Displaying and Adjusting the Image 43 Turn off...
... connected a computer or laptop, shut it off, press any input signals for about a minute as the projector cools down first; To turn off but the projector will turn off the projector, press the red PPower button on the projector or remote control. Replace the lens cap and unplug the power cord. If Standby Mode has been set to start projecting again, press the Power button. The power light flashes orange for 30 minutes, it down properly. 2. Displaying and Adjusting the Image 43 Turn off...

User Manual
Page 71
... These options let you view images on the port note When this setting is required, as described in Chapter 5, when it's in standby mode (plugged in the Advanced2 menu) Used for communicating with a computer running EMP Link21L utility software. This setting also lets you set up the projector so it can be monitored and controlled over a network, as for a switcher, change the projector's network settings. Select RS-232C or...
... These options let you view images on the port note When this setting is required, as described in Chapter 5, when it's in standby mode (plugged in the Advanced2 menu) Used for communicating with a computer running EMP Link21L utility software. This setting also lets you set up the projector so it can be monitored and controlled over a network, as for a switcher, change the projector's network settings. Select RS-232C or...

User Manual
Page 84
... settings for each projector you 've already registered using EMP Monitor, click Import. If you'd like to monitor the projectors you want to monitor. To open the program, select EMP NetworkManager from a Remote Computer Using EMP NetworkManager You can use EMP NetworkManager to send out messages by e-mail, notifying you 've installed the software as shown: 84 Managing the Projector from the Start menu. Your imported projectors are displayed as...
... settings for each projector you 've already registered using EMP Monitor, click Import. If you'd like to monitor the projectors you want to monitor. To open the program, select EMP NetworkManager from a Remote Computer Using EMP NetworkManager You can use EMP NetworkManager to send out messages by e-mail, notifying you 've installed the software as shown: 84 Managing the Projector from the Start menu. Your imported projectors are displayed as...

User Manual
Page 94
... projected image gets darker or starts to deteriorate. ■ The message LAMP REPLACE appears on the ceiling, remove the rear cover. Contact your dealer or call (800) 463-7766 for a replacement lamp. Turn off when not in use may be present and should be removed carefully to 3000 hours, depending on the Brightness Control setting used (see page 96). If the projector is mounted on the screen and the lamp warning light flashes orange. ■ The lamp warning light flashes red...
... projected image gets darker or starts to deteriorate. ■ The message LAMP REPLACE appears on the ceiling, remove the rear cover. Contact your dealer or call (800) 463-7766 for a replacement lamp. Turn off when not in use may be present and should be removed carefully to 3000 hours, depending on the Brightness Control setting used (see page 96). If the projector is mounted on the screen and the lamp warning light flashes orange. ■ The lamp warning light flashes red...

User Manual
Page 102
.... Replace it as specifically explained in and press the Power button. Status lights Light Red Red Red Red = on = flashing = off the lamp automatically. Red If these lights come on after replacing the lamp, make sure the lamp is fully inserted and the lamp cover is not clogged. Red Red 102 Solving Problems Verify that the air filter is attached. Unplug the power cord and contact EPSON for help (see page 94). Green Orange When the power light is green and the lamp light is flashing orange, the lamp...
.... Replace it as specifically explained in and press the Power button. Status lights Light Red Red Red Red = on = flashing = off the lamp automatically. Red If these lights come on after replacing the lamp, make sure the lamp is fully inserted and the lamp cover is not clogged. Red Red 102 Solving Problems Verify that the air filter is attached. Unplug the power cord and contact EPSON for help (see page 94). Green Orange When the power light is green and the lamp light is flashing orange, the lamp...
User Manual
Page 112
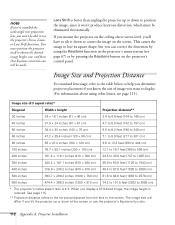
... A: Projector Installation note If you've installed the wide-angle rear projection lens, you won 't produce keystone distortion, which must position the projector itself to center the image on the screen. Image Size and Projection Distance For standard lens usage, refer to the table below to help you determine projector placement if you know the size of image you want to display. (For information about using the Keystone function in the projector's menu...
... A: Projector Installation note If you've installed the wide-angle rear projection lens, you won 't produce keystone distortion, which must position the projector itself to center the image on the screen. Image Size and Projection Distance For standard lens usage, refer to the table below to help you determine projector placement if you know the size of image you want to display. (For information about using the Keystone function in the projector's menu...
User Manual
Page 125
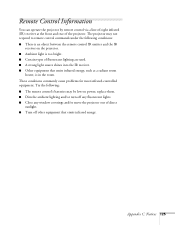
... receiver on power; Remote Control Information You can operate the projector by remote control via a line-of-sight infrared (IR) receiver at the front and rear of fluorescent lighting are used. ■ A strong light source shines into the IR receiver. ■ Other equipment that emits infrared energy. The projector may be low on the projector. ■ Ambient light is in the room. replace them. ■...
... receiver on power; Remote Control Information You can operate the projector by remote control via a line-of-sight infrared (IR) receiver at the front and rear of fluorescent lighting are used. ■ A strong light source shines into the IR receiver. ■ Other equipment that emits infrared energy. The projector may be low on the projector. ■ Ambient light is in the room. replace them. ■...

User Manual
Page 128
... the warranty period is not responsible for warranty service should the EPSON label or logo or the rating label or serial number be removed or should the product fail to be new or previously refurbished to your EPSON product for parts or labor. This warranty is not considered normal use. However, each replacement lamp carries the limited 90-day warranty stated...
... the warranty period is not responsible for warranty service should the EPSON label or logo or the rating label or serial number be removed or should the product fail to be new or previously refurbished to your EPSON product for parts or labor. This warranty is not considered normal use. However, each replacement lamp carries the limited 90-day warranty stated...
User Manual
Page 131
..., 22 to 27 mouse, 27 USB, 10, 27 video, 10 to 12, 16 Capturing image, 59 to 60 Ceiling mount, 12, 111 to 116 Cleaning air filters, 91 to 93 lens, 90 projector, 90 Color problems, 108 settings, 68 Communication setup options, 71 Component video cable, 16 selecting input signal, 19, 70 Composite (RCA) video cable, 16 Computer connector pin assignments, 119 Computers supported, 120 Connecting projector to audio source, 29 to computer, 22 to...
..., 22 to 27 mouse, 27 USB, 10, 27 video, 10 to 12, 16 Capturing image, 59 to 60 Ceiling mount, 12, 111 to 116 Cleaning air filters, 91 to 93 lens, 90 projector, 90 Color problems, 108 settings, 68 Communication setup options, 71 Component video cable, 16 selecting input signal, 19, 70 Composite (RCA) video cable, 16 Computer connector pin assignments, 119 Computers supported, 120 Connecting projector to audio source, 29 to computer, 22 to...

User Manual
Page 132
... 102 Lamp timer, resetting, 96 Laptop computer, displaying on, 35 to 37 Lens cleaning, 90 options, 12 specifications, 112 to 115, 117 Lens shift, 39 Lights, status, 100 to 102 Logo, saving on projector, 59 to 60 M Macintosh desktop adapter, 26 Manuals, 8 Menus About, 96, 103 Audio, 69 changing settings, 62 to 63 User's Logo, 59 to 60 using, 62 to 63 Video, 64 to 66 Monitor, connecting, 28 Monitoring projector EMP Monitor...
... 102 Lamp timer, resetting, 96 Laptop computer, displaying on, 35 to 37 Lens cleaning, 90 options, 12 specifications, 112 to 115, 117 Lens shift, 39 Lights, status, 100 to 102 Logo, saving on projector, 59 to 60 M Macintosh desktop adapter, 26 Manuals, 8 Menus About, 96, 103 Audio, 69 changing settings, 62 to 63 User's Logo, 59 to 60 using, 62 to 63 Video, 64 to 66 Monitor, connecting, 28 Monitoring projector EMP Monitor...

User Manual
Page 133
... Power button, 33 specifications, 118 status light, 100 to 102 PowerPoint files, viewing with remote control, 7, 27, 58 Presentations computer, 22 to 27 video, 16 to 27 Presenters Online, 8, 110 Preview function, 52 PrivateLine Support, 8, 110 Problems color, 108 image, 35 to 37, 104 to 108 remote control, 109 sound, 108 Projection lamp, see Lamp Projector cleaning, 90 connections, see Connecting projector customizing features, 70 to 72 distance from screen, 14, 112 to 115, 117 feet, adjusting...
... Power button, 33 specifications, 118 status light, 100 to 102 PowerPoint files, viewing with remote control, 7, 27, 58 Presentations computer, 22 to 27 video, 16 to 27 Presenters Online, 8, 110 Preview function, 52 PrivateLine Support, 8, 110 Problems color, 108 image, 35 to 37, 104 to 108 remote control, 109 sound, 108 Projection lamp, see Lamp Projector cleaning, 90 connections, see Connecting projector customizing features, 70 to 72 distance from screen, 14, 112 to 115, 117 feet, adjusting...
User Manual
Page 134
... different images on laptop and screen, 35 image and sound problems, 35 to 37, 104 to 108 projector problems, 99 to 108 remote control problems, 109 tapered image, 40 to 41 Turning off picture (using A/V Mute), 53 Turning off projector, 43 U Unpacking projector, 10 USB cable, 10, 27 User's Logo menu, 59 to 60 V Video cables, 10 to 12, 16 display settings, viewing, 103 formats, supported, 120 to 122 menu, 64 to 66 selecting source, 34, 51 to 52 Video port pin...
... different images on laptop and screen, 35 image and sound problems, 35 to 37, 104 to 108 projector problems, 99 to 108 remote control problems, 109 tapered image, 40 to 41 Turning off picture (using A/V Mute), 53 Turning off projector, 43 U Unpacking projector, 10 USB cable, 10, 27 User's Logo menu, 59 to 60 V Video cables, 10 to 12, 16 display settings, viewing, 103 formats, supported, 120 to 122 menu, 64 to 66 selecting source, 34, 51 to 52 Video port pin...


