
Quick Reference
Page 2
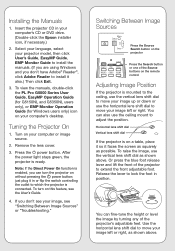
... your image up or down or use the horizontal lens shift dial to extend the front adjustable foot. Turning the Projector On 1. Select your language, select your projector model, then click User's Guide, EasyMP Guide, EMP Monitor Guide to install the manuals. (If you are using Windows and you don't see your computer's CD or DVD drive. (Double-click the Epson installer icon, if necessary.) 2. Remove the lens cover. 3. Or press the blue...
... your image up or down or use the horizontal lens shift dial to extend the front adjustable foot. Turning the Projector On 1. Select your language, select your projector model, then click User's Guide, EasyMP Guide, EMP Monitor Guide to install the manuals. (If you are using Windows and you don't see your computer's CD or DVD drive. (Double-click the Epson installer icon, if necessary.) 2. Remove the lens cover. 3. Or press the blue...

Quick Reference
Page 4
... included Epson PrivateLine Support card. Troubleshooting If you see the display on the projector is green and not flashing, and the lens cover is removed. • Make sure the cables are subject to change the image source. See your questions. Speak to access tips, templates, and training for the duration of support are connected correctly. (See the User's Guide.) • You may need to change without notice. This service is...
... included Epson PrivateLine Support card. Troubleshooting If you see the display on the projector is green and not flashing, and the lens cover is removed. • Make sure the cables are subject to change the image source. See your questions. Speak to access tips, templates, and training for the duration of support are connected correctly. (See the User's Guide.) • You may need to change without notice. This service is...

User's Guide
Page 2
... their respective owners. Never open any means, electronic, mechanical, photocopying, recording, or otherwise, without notice. © 2008 Epson America, Inc. 4/08 2 The information contained herein is a logomark of Epson America, Inc. SizeWise is a service mark of Seiko Epson Corporation. the bright light can severely injure you replace the lamp, never touch the new lamp with Seiko Epson Corporation's operating and maintenance instructions. PowerLite and PrivateLine...
... their respective owners. Never open any means, electronic, mechanical, photocopying, recording, or otherwise, without notice. © 2008 Epson America, Inc. 4/08 2 The information contained herein is a logomark of Epson America, Inc. SizeWise is a service mark of Seiko Epson Corporation. the bright light can severely injure you replace the lamp, never touch the new lamp with Seiko Epson Corporation's operating and maintenance instructions. PowerLite and PrivateLine...

User's Guide
Page 5
... Validation 89 Projecting Over a Network 90 Connecting With Windows Vista 90 Vista Network Projector Limitations 92 5 Fine-Tuning the Projector 93 Using the Menu System 94 Restoring the Default Settings 95 Adjusting the Image 96 Six-Axis Color Adjustment 97 Adjusting Signal Settings 98 Customizing Projector Features 100 Using the Projector Security Features 102 Enabling Password Protection 102 Creating Your Own Startup Screen 104 Disabling the Projector's Buttons 106 Customizing Power and Operation 107 Multi-screen Color Adjustment 109 Projector Menu and...
... Validation 89 Projecting Over a Network 90 Connecting With Windows Vista 90 Vista Network Projector Limitations 92 5 Fine-Tuning the Projector 93 Using the Menu System 94 Restoring the Default Settings 95 Adjusting the Image 96 Six-Axis Color Adjustment 97 Adjusting Signal Settings 98 Customizing Projector Features 100 Using the Projector Security Features 102 Enabling Password Protection 102 Creating Your Own Startup Screen 104 Disabling the Projector's Buttons 106 Customizing Power and Operation 107 Multi-screen Color Adjustment 109 Projector Menu and...

User's Guide
Page 6
... PowerLite Pro G5200WNL 118 7 Maintaining the Projector 121 Cleaning the Lens 122 Cleaning the Projector Case 122 Cleaning the Air Filter 122 Replacing the Air Filter 125 Replacing the Lamp 126 Resetting the Lamp Timer 129 Checking Lamp Usage 130 Replacing the Batteries 130 Transporting the Projector 131 8 Solving Problems 133 Using On-Screen Help 134 Checking Projector Status 135 What To Do When the Lights Flash 135 Solving Projector Operation Problems 137 Solving Problems With the Image or Sound 137 Solving Network Problems 143 Solving Problems With the Remote Control...
... PowerLite Pro G5200WNL 118 7 Maintaining the Projector 121 Cleaning the Lens 122 Cleaning the Projector Case 122 Cleaning the Air Filter 122 Replacing the Air Filter 125 Replacing the Lamp 126 Resetting the Lamp Timer 129 Checking Lamp Usage 130 Replacing the Batteries 130 Transporting the Projector 131 8 Solving Problems 133 Using On-Screen Help 134 Checking Projector Status 135 What To Do When the Lights Flash 135 Solving Projector Operation Problems 137 Solving Problems With the Image or Sound 137 Solving Network Problems 143 Solving Problems With the Remote Control...

User's Guide
Page 9
... shut down ■ Quick Corner® for easy image shape/size adjustment ■ 1.8x optical zoom lens for an optional Kensington® security lock, and a lens theft deterrent screw 9 You can project from a USB or SD™ storage device, or over an 802.11g, 802.11b, or 802.11a wireless network (G5150NL and G5350NL only). It offers up to -use, lightweight projector. WWelcome The PowerLite® Pro...
... shut down ■ Quick Corner® for easy image shape/size adjustment ■ 1.8x optical zoom lens for an optional Kensington® security lock, and a lens theft deterrent screw 9 You can project from a USB or SD™ storage device, or over an 802.11g, 802.11b, or 802.11a wireless network (G5150NL and G5350NL only). It offers up to -use, lightweight projector. WWelcome The PowerLite® Pro...

User's Guide
Page 11
... of Epson's automated support services 24 hours a day. Here's where you can look for help: ■ Quick Reference sheet Provides information for setting up your projector at all times. ■ Built-in this section, you still need help after checking this User's Guide, the EasyMP® Operation Guide, the EMP Monitor Operation Guide, your questions to Epson support. ■ If you can use the Epson PrivateLine Support service to use on the projector or the remote control...
... of Epson's automated support services 24 hours a day. Here's where you can look for help: ■ Quick Reference sheet Provides information for setting up your projector at all times. ■ Built-in this section, you still need help after checking this User's Guide, the EasyMP® Operation Guide, the EMP Monitor Operation Guide, your questions to Epson support. ■ If you can use the Epson PrivateLine Support service to use on the projector or the remote control...

User's Guide
Page 17
... a signal from your video equipment. ■ To receive a component video signal from a VCR or other settings. note You can purchase one from Epson. One may be provided with your computer's USB port, you'll need a USB cable. Try to leave as much space as possible between the projector and the screen to help you determine placement. See page 149 for rear projection. Image size increases with distance...
... a signal from your video equipment. ■ To receive a component video signal from a VCR or other settings. note You can purchase one from Epson. One may be provided with your computer's USB port, you'll need a USB cable. Try to leave as much space as possible between the projector and the screen to help you determine placement. See page 149 for rear projection. Image size increases with distance...

User's Guide
Page 35
... a USB hub. Setting Up the Projector 35 Follow the instructions beginning on page 37 to the USB port on the projector. 2. Connecting to a Digital Camera or Other USB Device You can use the AC adapter to power the hard drive. See the EasyMP Operation Guide for your camera or other device directly to your device. The indicator light turns orange when a USB device is connected and green when PC Free is running. Indicator light note Use a cable...
... a USB hub. Setting Up the Projector 35 Follow the instructions beginning on page 37 to the USB port on the projector. 2. Connecting to a Digital Camera or Other USB Device You can use the AC adapter to power the hard drive. See the EasyMP Operation Guide for your camera or other device directly to your device. The indicator light turns orange when a USB device is connected and green when PC Free is running. Indicator light note Use a cable...

User's Guide
Page 37
... area network (LAN), use a Category 5 shielded cable or better. Do not remove the card when the light is in use. Connect the cable to select the image source manually (see page 42). To remove the card, gently press the inserted SD card. To ensure proper data transmission, use a commercially available 100BaseTX or 10BaseT network cable. The indicator light above the slot comes on or flashes when the SD card is flashing. Setting...
... area network (LAN), use a Category 5 shielded cable or better. Do not remove the card when the light is in use. Connect the cable to select the image source manually (see page 42). To remove the card, gently press the inserted SD card. To ensure proper data transmission, use a commercially available 100BaseTX or 10BaseT network cable. The indicator light above the slot comes on or flashes when the SD card is flashing. Setting...

User's Guide
Page 76
... click Start > Control Panel > Network and Internet Connections. For example, in the previous section. Access your access point), make sure the wireless connection to Present Through a Network Right-click the Wireless Network Connection icon and select Status. 76 Preparing the Projector to the access point is currently active, as described in Windows XP you cannot identify the gateway address using this : Right-click and select Status 2. Checking the...
... click Start > Control Panel > Network and Internet Connections. For example, in the previous section. Access your access point), make sure the wireless connection to Present Through a Network Right-click the Wireless Network Connection icon and select Status. 76 Preparing the Projector to the access point is currently active, as described in Windows XP you cannot identify the gateway address using this : Right-click and select Status 2. Checking the...

User's Guide
Page 98
... select Manual and specify a resolution. 98 Fine-Tuning the Projector You see a screen similar to one of the input signal. Turn it as the lamp in your projector changes over time. In addition to changing the position of the image is missing, for video images. 1. Press the Menu button and select the Signal menu. If necessary (because some of the projected image, you are projecting from.) Computer/RGB Video Component Video/S-Video 2. Use the pointer button to...
... select Manual and specify a resolution. 98 Fine-Tuning the Projector You see a screen similar to one of the input signal. Turn it as the lamp in your projector changes over time. In addition to changing the position of the image is missing, for video images. 1. Press the Menu button and select the Signal menu. If necessary (because some of the projected image, you are projecting from.) Computer/RGB Video Component Video/S-Video 2. Use the pointer button to...

User's Guide
Page 129
... screen: 3. Use the pointer button on the remote control (or the arrow buttons on the projector's control panel. Maintaining the Projector 129 Replace the lamp cover, then tighten its screws. 9. Resetting the Lamp Timer After you replace the lamp, you see the prompt, select Yes and press Enter. 5. You see the main menu. 2. When you need to reset the lamp timer using the projector's menu. 1. When you're finished, press Menu to highlight Reset, then press Enter. Select Reset Lamp Hours...
... screen: 3. Use the pointer button on the remote control (or the arrow buttons on the projector's control panel. Maintaining the Projector 129 Replace the lamp cover, then tighten its screws. 9. Resetting the Lamp Timer After you replace the lamp, you see the prompt, select Yes and press Enter. 5. You see the main menu. 2. When you need to reset the lamp timer using the projector's menu. 1. When you're finished, press Menu to highlight Reset, then press Enter. Select Reset Lamp Hours...

User's Guide
Page 130
... the following precautions: ■ Replace the batteries as soon as described below: 1. The life span of the lamp is about 2000 hours if the Brightness Control setting in the Settings menu is set to High (default), and 3000 hours if the Brightness Control setting is set to Low. Turn the remote control over. 2. You see a screen like this: note The information displayed depends on the battery cover as you have a spare...
... the following precautions: ■ Replace the batteries as soon as described below: 1. The life span of the lamp is about 2000 hours if the Brightness Control setting in the Settings menu is set to High (default), and 3000 hours if the Brightness Control setting is set to Low. Turn the remote control over. 2. You see a screen like this: note The information displayed depends on the battery cover as you have a spare...

User's Guide
Page 135
...projector indicate the projector's status. Red or flashing red There is in and turn on the projector. Solving Problems 135 Temperature light Lamp light Wireless LAN status light (G5150NL and G5350NL only) Power light Refer to the following table for the image to turn it . Checking Projector Status If your projector isn't working correctly, first turn it off and unplug it on top of the projector's status lights: Status lights Light Status Orange Flashing green Description The projector is a problem with the projector. Then plug the power cord back in sleep or standby mode...
...projector indicate the projector's status. Red or flashing red There is in and turn on the projector. Solving Problems 135 Temperature light Lamp light Wireless LAN status light (G5150NL and G5350NL only) Power light Refer to the following table for the image to turn it . Checking Projector Status If your projector isn't working correctly, first turn it off and unplug it on top of the projector's status lights: Status lights Light Status Orange Flashing green Description The projector is a problem with the projector. Then plug the power cord back in sleep or standby mode...

User's Guide
Page 136
... cooling fan or temperature sensor. If this is plenty of these suggestions resolves the problem, contact Epson as described on High Altitude Mode in progress. If the projector continues to 126. Contact Epson for ventilation. Unplug the power cord and contact Epson for instructions. Wait until the projector switches to replace the lamp. Clean or replace the air filter as described on High Altitude Mode in this product yourself. Flashing red Power is overheating, which turns the lamp...
... cooling fan or temperature sensor. If this is plenty of these suggestions resolves the problem, contact Epson as described on High Altitude Mode in progress. If the projector continues to 126. Contact Epson for ventilation. Unplug the power cord and contact Epson for instructions. Wait until the projector switches to replace the lamp. Clean or replace the air filter as described on High Altitude Mode in this product yourself. Flashing red Power is overheating, which turns the lamp...

User's Guide
Page 141
... position it may need to focus the entire image. Solving Problems 141 Adjust the Tracking to have any effect. Press the Auto button on the remote control or the Enter button on the projector to reset the projector's Tracking, Sync, and Position settings. ■ If further adjustment is not fogged by condensation. You may not be projecting an image for the Auto button to eliminate vertical bands. note You...
... position it may need to focus the entire image. Solving Problems 141 Adjust the Tracking to have any effect. Press the Auto button on the remote control or the Enter button on the projector to reset the projector's Tracking, Sync, and Position settings. ■ If further adjustment is not fogged by condensation. You may not be projecting an image for the Auto button to eliminate vertical bands. note You...

User's Guide
Page 172
..., 67, 73, 78 Ethernet connection, 114 to 116 Extended menu, 107 to 108 External monitor, connecting, 31 E-Zoom button, 54 F FCC compliance statement, 168 Filter, see Air filter Focusing image, 46 Freeze button, 53 G Game color mode, 49 Gateway address, checking, 76 H HDMI cable, 25 HDTV images, video formats, 161, 163 Height of image, adjusting, 45 to 46 Help, 146 to 147 Help system, using, 134 Help, Epson, 11 High altitude, 108, 136 I Image adjusting, 44 to 50, 96...
..., 67, 73, 78 Ethernet connection, 114 to 116 Extended menu, 107 to 108 External monitor, connecting, 31 E-Zoom button, 54 F FCC compliance statement, 168 Filter, see Air filter Focusing image, 46 Freeze button, 53 G Game color mode, 49 Gateway address, checking, 76 H HDMI cable, 25 HDTV images, video formats, 161, 163 Height of image, adjusting, 45 to 46 Help, 146 to 147 Help system, using, 134 Help, Epson, 11 High altitude, 108, 136 I Image adjusting, 44 to 50, 96...
User's Guide
Page 173
Info menu, 130 Infrastructure mode, see Access Point mode Input Signal setting, 99 Input signal, selecting, 42, 52 Installing cable cover, 151 to 152 projector, 149 to 150 Instant Off, 40 K Kensington anti-theft device, 13, 19, 150 Keystone correction, 47 to 48, 100, 140, 157 Keyword, 61 L Lamp number of hours used, 130 ordering, 12 replacing, 126 to 129 specifications, 157 status light, 135 to 136 Lamp timer, resetting, 129 Language setting, 108 Laptop computer connecting to...
Info menu, 130 Infrastructure mode, see Access Point mode Input Signal setting, 99 Input signal, selecting, 42, 52 Installing cable cover, 151 to 152 projector, 149 to 150 Instant Off, 40 K Kensington anti-theft device, 13, 19, 150 Keystone correction, 47 to 48, 100, 140, 157 Keyword, 61 L Lamp number of hours used, 130 ordering, 12 replacing, 126 to 129 specifications, 157 status light, 135 to 136 Lamp timer, resetting, 129 Language setting, 108 Laptop computer connecting to...

User's Guide
Page 175
Remote control A/V Mute button, 53 as wireless mouse, 56 battery used, 157 controlling multiple projectors, 57 to 58 correcting color, 49, 96 to 98 E-Zoom button, 54 Freeze button, 53 ID, 58 numeric keypad, using, 103 pointer tool, using, 55 problems, 145 range, 157 specifications, 157 switching sources, 52 troubleshooting, 145 Remote Receiver setting, 101 Replacing lamp, 126 to 129 Request code, password, 104 Resetting lamp timer, 129 Resetting menu options, 95 Resize image, 50 Resolution, 50, 139, 155 Resolution setting, 98 S Safety instructions, 165...
Remote control A/V Mute button, 53 as wireless mouse, 56 battery used, 157 controlling multiple projectors, 57 to 58 correcting color, 49, 96 to 98 E-Zoom button, 54 Freeze button, 53 ID, 58 numeric keypad, using, 103 pointer tool, using, 55 problems, 145 range, 157 specifications, 157 switching sources, 52 troubleshooting, 145 Remote Receiver setting, 101 Replacing lamp, 126 to 129 Request code, password, 104 Resetting lamp timer, 129 Resetting menu options, 95 Resize image, 50 Resolution, 50, 139, 155 Resolution setting, 98 S Safety instructions, 165...


