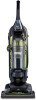
Quick Start Guide
Page 1
... TOOLS FLOORS Air path knob TOOLS FLOORS Pull out cord to reinstall. Friday 10 a.m. Some models: Snap D turbo cover straight on power switch to use . Pull out bottom of wand. Place over wand 1. How to turn carpet or bare floors. Do not pull past red line; Attach tool to snap into position. Remove dust cup. press down to end of lower hose retainer and position hose. Printed in order to assemble vacuum. 6 Place handle on some models WAND 1 WAND 1 Turbo nozzle WAND 2 WAND 2 Vacuum cleaner Handle Carry handle Turbo...
... TOOLS FLOORS Air path knob TOOLS FLOORS Pull out cord to reinstall. Friday 10 a.m. Some models: Snap D turbo cover straight on power switch to use . Pull out bottom of wand. Place over wand 1. How to turn carpet or bare floors. Do not pull past red line; Attach tool to snap into position. Remove dust cup. press down to end of lower hose retainer and position hose. Printed in order to assemble vacuum. 6 Place handle on some models WAND 1 WAND 1 Turbo nozzle WAND 2 WAND 2 Vacuum cleaner Handle Carry handle Turbo...

Owner's Guide
Page 2
.... How to find important vacuum information Keep this symbol. Before you see this information Write the model, type and serial number here: Date of your new Eureka vacuum cleaner for assembly and use accessories 3 Automatic cord rewind, wand, crevice tool, dusting brush, turbo nozzle and stair hose. Where to maintain turbo nozzle 5 Eureka limited warranty information 5 Thermal cut-off and problem solving 6 Spanish owner's guide 7-13 French owner's guide 14-20 Order forms and parts list 21-22 ! Refer to Quick Start Guide for shipping damage.
.... How to find important vacuum information Keep this symbol. Before you see this information Write the model, type and serial number here: Date of your new Eureka vacuum cleaner for assembly and use accessories 3 Automatic cord rewind, wand, crevice tool, dusting brush, turbo nozzle and stair hose. Where to maintain turbo nozzle 5 Eureka limited warranty information 5 Thermal cut-off and problem solving 6 Spanish owner's guide 7-13 French owner's guide 14-20 Order forms and parts list 21-22 ! Refer to Quick Start Guide for shipping damage.

Owner's Guide
Page 3
... dust cup, filter and screen, and HEPA exhaust filter in any time. To prevent burns, avoid touching the belt pulley when servicing the drive belt. • Do not use outdoors or on wet surfaces. ! • Do not leave vacuum cleaner when plugged in a polarized outlet only one blade is not working as the brush roll may reduce airflow. • This vacuum cleaner creates suction and contains a revolving brush roll. keep free of electric shock, this manual...
... dust cup, filter and screen, and HEPA exhaust filter in any time. To prevent burns, avoid touching the belt pulley when servicing the drive belt. • Do not use outdoors or on wet surfaces. ! • Do not leave vacuum cleaner when plugged in a polarized outlet only one blade is not working as the brush roll may reduce airflow. • This vacuum cleaner creates suction and contains a revolving brush roll. keep free of electric shock, this manual...
Owner's Guide
Page 4
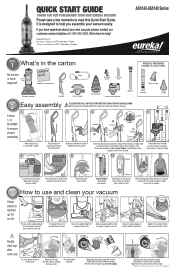
...identify parts of vacuum cleaner Handle SPECIAL FEATURES Available on some models Air path selector knob Power cord Cord reel Turbo nozzle (on some models) Dust cup release Filter and screen (located inside dust cup) Dust cup Exhaust/HEPA filter compartment (located behind dust cup) Height adjustment knob Brush roll cover Turbo nozzle WAND 2 Hose Wand 2 Turbo cover Crevice tool Dusting brush Cord rewind switch Power switch Handle release Cord clip Carry handle Wand Lower hose retainer Base hose Maintenance schedule Maintenance Schedule is also located on some models) U belt Remove...
...identify parts of vacuum cleaner Handle SPECIAL FEATURES Available on some models Air path selector knob Power cord Cord reel Turbo nozzle (on some models) Dust cup release Filter and screen (located inside dust cup) Dust cup Exhaust/HEPA filter compartment (located behind dust cup) Height adjustment knob Brush roll cover Turbo nozzle WAND 2 Hose Wand 2 Turbo cover Crevice tool Dusting brush Cord rewind switch Power switch Handle release Cord clip Carry handle Wand Lower hose retainer Base hose Maintenance schedule Maintenance Schedule is also located on some models) U belt Remove...
Owner's Guide
Page 5
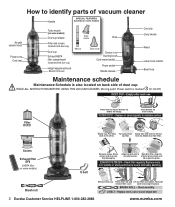
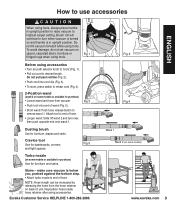
... while using accessories • Turn air path selector knob to 'tools' (Fig. 1). • Pull out cord to desired length. Fig. 5 Turbo nozzle (on carpet, carpeted stairs, furniture or fringed rugs when using accessories. Eureka Customer Service HELPLINE 1-800-282-2886 WAND 1 WAND 1 WAND 2 FLOORS Fig. 2 Fig. 4 Wand 1 Wand 2 (on some models) www.eureka.com 3 TOOLS Fig. 1 Before using tools. Attach tool to end of unit. How to use accessories ENGLISH WAND 2 CAUTION When using tools, always place handle in upright position. Brush roll...
... while using accessories • Turn air path selector knob to 'tools' (Fig. 1). • Pull out cord to desired length. Fig. 5 Turbo nozzle (on carpet, carpeted stairs, furniture or fringed rugs when using accessories. Eureka Customer Service HELPLINE 1-800-282-2886 WAND 1 WAND 1 WAND 2 FLOORS Fig. 2 Fig. 4 Wand 1 Wand 2 (on some models) www.eureka.com 3 TOOLS Fig. 1 Before using tools. Attach tool to end of unit. How to use accessories ENGLISH WAND 2 CAUTION When using tools, always place handle in upright position. Brush roll...
Owner's Guide
Page 6
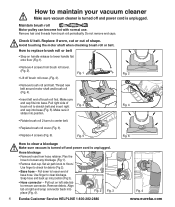
Make sure vacuum cleaner is turned off and power cord is unplugged. Do not remove end caps. ! Snap hose end back up into place (Fig. 4). How to check for debris (Fig 2). • Base hose - Avoid touching the motor shaft when checking brush roll or belt. Make sure vacuum is turned off brush roll cover. (Fig. 3). Use finger to maintain your vacuum cleaner ! Remove debris. Check U belt. Thread new belt around motor shaft and brush roll (Fig. 4). • Insert left side...
Make sure vacuum cleaner is turned off and power cord is unplugged. Do not remove end caps. ! Snap hose end back up into place (Fig. 4). How to check for debris (Fig 2). • Base hose - Avoid touching the motor shaft when checking brush roll or belt. Make sure vacuum is turned off brush roll cover. (Fig. 3). Use finger to maintain your vacuum cleaner ! Remove debris. Check U belt. Thread new belt around motor shaft and brush roll (Fig. 4). • Insert left side...

Owner's Guide
Page 7
... above . under normal use such as disposable dust bags, filters, drive belts, light bulbs, brush roll, bristles, impellers and cleaning. • Damages or malfunctions caused by Electrolux Home Care Products, Inc. ENGLISH The Eureka limited warranty Eureka warrants this vacuum cleaner to be implied in material and workmanship for a term of three years for repair, please include the model, type and serial number located on the rating plate on some models) 1) Turn nozzle onto back side...
... above . under normal use such as disposable dust bags, filters, drive belts, light bulbs, brush roll, bristles, impellers and cleaning. • Damages or malfunctions caused by Electrolux Home Care Products, Inc. ENGLISH The Eureka limited warranty Eureka warrants this vacuum cleaner to be implied in material and workmanship for a term of three years for repair, please include the model, type and serial number located on the rating plate on some models) 1) Turn nozzle onto back side...
Owner's Guide
Page 8
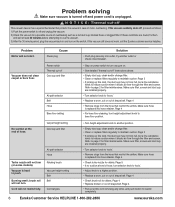
... a full dust cup, blocked hose or clogged filter. If these conditions are installed properly. • Turn selector knob to reduce suction when it blocks air flow through the filter and screen. If the vacuum still does not work, call the Eureka customer service helpline. Page 4 • For bare floor cleaning, turn (on some models). Page 4 • Check turbo nozzle for filter maintenance. Power switch Thermal cut or out of shape belt. Page 4 • Pull out entire cord removing any...
... a full dust cup, blocked hose or clogged filter. If these conditions are installed properly. • Turn selector knob to reduce suction when it blocks air flow through the filter and screen. If the vacuum still does not work, call the Eureka customer service helpline. Page 4 • For bare floor cleaning, turn (on some models). Page 4 • Check turbo nozzle for filter maintenance. Power switch Thermal cut or out of shape belt. Page 4 • Pull out entire cord removing any...


