Manual
Page 2
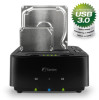
... LEDs for data transfer. 9. USB 3.0 port for HDD1 (Source in Copy mode) 3. Now you can power of Disk 2. Docking Station, Power adaptor, USB cable Manual, CD with OTB software USB 3.0 max. 5Gbps, power adaptor: 12V 3A Software: Windows 2000 / Windows XP / Windows Vista / Windows 7, Mac OS 10.3 or above, Linux Package Contents; Slot for connection to be displayed by Sector copy from SATA port. 4. Slot for about 10 seconds. 5. Release button for power adapter 12. Push...
... LEDs for data transfer. 9. USB 3.0 port for HDD1 (Source in Copy mode) 3. Now you can power of Disk 2. Docking Station, Power adaptor, USB cable Manual, CD with OTB software USB 3.0 max. 5Gbps, power adaptor: 12V 3A Software: Windows 2000 / Windows XP / Windows Vista / Windows 7, Mac OS 10.3 or above, Linux Package Contents; Slot for connection to be displayed by Sector copy from SATA port. 4. Slot for about 10 seconds. 5. Release button for power adapter 12. Push...

Manual
Page 3
Running the Backup Files 1. Follow the instructions to finish the installation. The Prolific Backup software will then pop-out with two main options (Backup and Restore) on the system tray of your taskbar 2. Launch the Prolific Backup software by double-clicking on the Prolific PL2X7X OneButton icon found on the Welcome folder. HDD backup instruction: Installing Prolific Backup To install Prolific Backup, simply run or double-click the "ProlificBackup.exe" installer program in Windows. To create backup files, click on the Create Backup Files button or click the Backup folder tab.
Running the Backup Files 1. Follow the instructions to finish the installation. The Prolific Backup software will then pop-out with two main options (Backup and Restore) on the system tray of your taskbar 2. Launch the Prolific Backup software by double-clicking on the Prolific PL2X7X OneButton icon found on the Welcome folder. HDD backup instruction: Installing Prolific Backup To install Prolific Backup, simply run or double-click the "ProlificBackup.exe" installer program in Windows. To create backup files, click on the Create Backup Files button or click the Backup folder tab.

Manual
Page 4
Then on the Destination Drive, click the browse button to back up . Under the Source Directories, you can click the folder that you want to back up the selected folders. Then choose the way you want to select the external drive. 3. The Backup menu folder consists of the Source Directories, the Destination Drive, and the backup option.
Then on the Destination Drive, click the browse button to back up . Under the Source Directories, you can click the folder that you want to back up the selected folders. Then choose the way you want to select the external drive. 3. The Backup menu folder consists of the Source Directories, the Destination Drive, and the backup option.
Manual
Page 5
... access them . The backup operation will start and will show you how to do a default backup operation. Compress Backup Files - If you also click the User-defined file name option, it will be stored on compressed backup files option. Backup files will first prompt you for a specific filename and folder. You will need to restore these files...
... access them . The backup operation will start and will show you how to do a default backup operation. Compress Backup Files - If you also click the User-defined file name option, it will be stored on compressed backup files option. Backup files will first prompt you for a specific filename and folder. You will need to restore these files...
Manual
Page 6
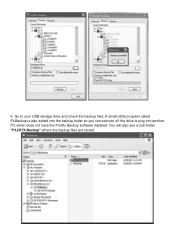
A small utility program called PLBackup is also added into the backup folder so you can execute it if the drive is plug into another PC which does not have the Prolific Backup software installed. 6. Go to your USB storage drive and check the backup files. You will also see a sub-folder "PL2X7X Backup" where the backup files are stored.
A small utility program called PLBackup is also added into the backup folder so you can execute it if the drive is plug into another PC which does not have the Prolific Backup software installed. 6. Go to your USB storage drive and check the backup files. You will also see a sub-folder "PL2X7X Backup" where the backup files are stored.

Manual
Page 7
...the folders that is to use the "Compress Backup files" which you can choose to a compressed file format for added protection. Click on the folder name. This will also see an associated ".pbi" file that were copied with a date-time prefix added on the "...Compress Backup Files" option and click Backup to restore those folders. You will not prevent others from accessing your backup files directly from your files to back up your external drive without first restoring the files. The second backup option is used to identify the backup folders to start...
...the folders that is to use the "Compress Backup files" which you can choose to a compressed file format for added protection. Click on the folder name. This will also see an associated ".pbi" file that were copied with a date-time prefix added on the "...Compress Backup Files" option and click Backup to restore those folders. You will not prevent others from accessing your backup files directly from your files to back up your external drive without first restoring the files. The second backup option is used to identify the backup folders to start...

Manual
Page 8
Note that you can also choose to click the "User-define file name" option to restore these files. 10. Note again the associated ".pbi" file that each selected folder is complete, the compressed backup files will be stored on the sub-folder "PL2X7X Backup". For the "Compress Backup Files" option, you need to refer to specify your own filename and folder. 9. When backup is compressed separately with a date-time-folder name prefix used as a file name.
Note that you can also choose to click the "User-define file name" option to restore these files. 10. Note again the associated ".pbi" file that each selected folder is complete, the compressed backup files will be stored on the sub-folder "PL2X7X Backup". For the "Compress Backup Files" option, you need to refer to specify your own filename and folder. 9. When backup is compressed separately with a date-time-folder name prefix used as a file name.

Manual
Page 9
... you for the compressed backup files and the folder directory to begin backup. 12. It also uses the filename you need to refer to be stored on the folder you click on the Backup button, it will be used as a prefix. When you specified. 11. Note that you specified. When backup is compressed separately...
... you for the compressed backup files and the folder directory to begin backup. 12. It also uses the filename you need to refer to be stored on the folder you click on the Backup button, it will be used as a prefix. When you specified. 11. Note that you specified. When backup is compressed separately...

Manual
Page 10
Click Backup button to compare the files. 13. Lastly you save more time by just backing up those files on the folders that were modified from your previous backup. For first-time backup, it will need to do a full backup of the selected folders in a special backup folder in order to start. This lets you can choose to use the "Backup modified files only" option.
Click Backup button to compare the files. 13. Lastly you save more time by just backing up those files on the folders that were modified from your previous backup. For first-time backup, it will need to do a full backup of the selected folders in a special backup folder in order to start. This lets you can choose to use the "Backup modified files only" option.

Manual
Page 11
... need to point to restore those folders. Inside the sub-folder "PL2X7X OnlyBackupModify", you will compare the files and only backup the files that were copied. 14. it will find the selected folders that are stored. Notice that will also see an associated ".pbi" file that a new sub...-folder "PL2X7X OnlyBackupModify" was created and here is important that you do not delete this file/folder when running the restore operation. The next time you do a backup; It is where the backup files are modified....
... need to point to restore those folders. Inside the sub-folder "PL2X7X OnlyBackupModify", you will compare the files and only backup the files that were copied. 14. it will find the selected folders that are stored. Notice that will also see an associated ".pbi" file that a new sub...-folder "PL2X7X OnlyBackupModify" was created and here is important that you do not delete this file/folder when running the restore operation. The next time you do a backup; It is where the backup files are modified....
Manual
Page 12
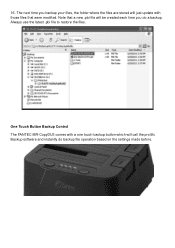
16. Note that were modified. Always use the latest .pbi file to restore the files. One Touch Button Backup Control The FANTEC MR-CopyDU3 comes with those files that a new .pbi file will call the prolific Backup software and instantly do a backup. The next time you backup your files, the folder where the files are stored will just update with a one touch backup button which will be created each time you do backup file operation based on the settings made before.
16. Note that were modified. Always use the latest .pbi file to restore the files. One Touch Button Backup Control The FANTEC MR-CopyDU3 comes with those files that a new .pbi file will call the prolific Backup software and instantly do a backup. The next time you backup your files, the folder where the files are stored will just update with a one touch backup button which will be created each time you do backup file operation based on the settings made before.
