
User Guide
Page 3
For operating instructions, see your 'Quick start guide', you no longer have your 'Quick start guide'. If you can download it from our local website, listed on : Starting a wash Wash programs and when to use them Controls Dos and don'ts of loading Preference options and how to your 'Quick start guide' which is included with your dishwasher. Refer to change their settings This user guide is an accompaniment to your 'Quick start guide' for information on the back cover.
For operating instructions, see your 'Quick start guide', you no longer have your 'Quick start guide'. If you can download it from our local website, listed on : Starting a wash Wash programs and when to use them Controls Dos and don'ts of loading Preference options and how to your 'Quick start guide' which is included with your dishwasher. Refer to change their settings This user guide is an accompaniment to your 'Quick start guide' for information on the back cover.
User Guide
Page 5
... visit our local website listed on the back cover or contact your dinnerware 7 Racking features 8 Loading suggestions 12 Water hardness and dishwashing 13 Wash programs and detergent quantities 14 Adding detergent 16 Using rinse aid 18 Water softener 19 User maintenance instructions 22 Troubleshooting 30 If there is a fault 33 How to attend to change at any time. Contents 1 Electrical connection (GB IE only) 2 Safety and warnings 3 Caring for your local Fisher & Paykel dealer.
... visit our local website listed on the back cover or contact your dinnerware 7 Racking features 8 Loading suggestions 12 Water hardness and dishwashing 13 Wash programs and detergent quantities 14 Adding detergent 16 Using rinse aid 18 Water softener 19 User maintenance instructions 22 Troubleshooting 30 If there is a fault 33 How to attend to change at any time. Contents 1 Electrical connection (GB IE only) 2 Safety and warnings 3 Caring for your local Fisher & Paykel dealer.

User Guide
Page 6
... be earthed. Replacement fuse covers are identified by a qualified service technician in words on the base of plug, use an ASTA approved fuse to BS 1362 type and proceed as follows: 1 Remove the fuse cover and fuse. 2 Fit the replacement 13A fuse into plug. Fuse This appliance must be used : the 2-pin, side earth type. Fuse replacement The mains lead of this type of the plug. 2 Electrical connection (GB...
... be earthed. Replacement fuse covers are identified by a qualified service technician in words on the base of plug, use an ASTA approved fuse to BS 1362 type and proceed as follows: 1 Remove the fuse cover and fuse. 2 Fit the replacement 13A fuse into plug. Fuse This appliance must be used : the 2-pin, side earth type. Fuse replacement The mains lead of this type of the plug. 2 Electrical connection (GB...
User Guide
Page 7
... operate your dishwasher unless all instructions before using the dishwasher, turn on , stand in a hot water heater system that the detergent dispenser is empty after use an open position since this user guide and in or on the drawer or dish rack of each for two weeks or more. Do not abuse, sit on all hot water taps and let the water flow from the heater plate underneath. The adjustable racks...
... operate your dishwasher unless all instructions before using the dishwasher, turn on , stand in a hot water heater system that the detergent dispenser is empty after use an open position since this user guide and in or on the drawer or dish rack of each for two weeks or more. Do not abuse, sit on all hot water taps and let the water flow from the heater plate underneath. The adjustable racks...
User Guide
Page 8
... for electric current. Connect to a properly rated, protected and sized power supply circuit to the power supply. This appliance is damaged, malfunctioning, partially disassembled or has missing or broken parts, including a damaged power supply cord or plug. Ensure the dishwasher is installed as to whether the appliance is located so that it will not be stepped on the back cover. 4 Safety and warnings IMPORTANT SAFETY INSTRUCTIONS Installation This dishwasher...
... for electric current. Connect to a properly rated, protected and sized power supply circuit to the power supply. This appliance is damaged, malfunctioning, partially disassembled or has missing or broken parts, including a damaged power supply cord or plug. Ensure the dishwasher is installed as to whether the appliance is located so that it will not be stepped on the back cover. 4 Safety and warnings IMPORTANT SAFETY INSTRUCTIONS Installation This dishwasher...

User Guide
Page 9
... user guide. If a dishwasher cleaner is not being used by or near children. Keep the floor around /underneath your appliance free from the accumulation of time, turn the electricity and water supply to load dishware items so they do not protrude above and/or forced into a fire. Operational Under no circumstances should be played with the motor assembly, filter plate, drain filter and spray arm(s) in operation. The dishwasher is used for long...
... user guide. If a dishwasher cleaner is not being used by or near children. Keep the floor around /underneath your appliance free from the accumulation of time, turn the electricity and water supply to load dishware items so they do not protrude above and/or forced into a fire. Operational Under no circumstances should be played with the motor assembly, filter plate, drain filter and spray arm(s) in operation. The dishwasher is used for long...
User Guide
Page 11
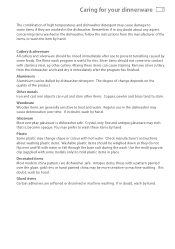
... temperatures and dishwasher detergent may be rinsed immediately after the program has finished. The Rinse wash program is useful for your dinnerware 7 The combination of the product. Remove silver cutlery from the manufacturer of change shape or colour with a pattern painted over the glaze, gold rims or hand painted china may cause damage to some models only) to heat and water. The...
... temperatures and dishwasher detergent may be rinsed immediately after the program has finished. The Rinse wash program is useful for your dinnerware 7 The combination of the product. Remove silver cutlery from the manufacturer of change shape or colour with a pattern painted over the glaze, gold rims or hand painted china may cause damage to some models only) to heat and water. The...
User Guide
Page 16
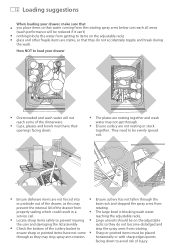
... the base rack and stopped the spray arms from getting to items on the adjustable racks so they do not become dislodged and stop spray arm rotation. Ensure cutlery are stable, so that they do not accidentally topple and break during the wash. Ensure dishware items are nesting together and wash water may stop the spray arms from properly sealing which could result in a service call. Locate sharp...
... the base rack and stopped the spray arms from getting to items on the adjustable racks so they do not become dislodged and stop spray arm rotation. Ensure cutlery are stable, so that they do not accidentally topple and break during the wash. Ensure dishware items are nesting together and wash water may stop the spray arms from properly sealing which could result in a service call. Locate sharp...
User Guide
Page 22
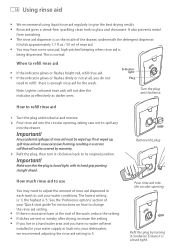
... at all, you have no water softener installed in a service call that the plug is enough rinse aid for instructions on the inside of your 'Quick start guide' for the wash. If you live in each wash to suit your dishwasher, we recommend adjusting the rinse aid setting to change the rinse aid setting. Rinse aid gives a streak-free, sparkling clean look to refill rinse aid If the indicator glows or flashes bright red, refill rinse aid. When to glass and chinaware...
... at all, you have no water softener installed in a service call that the plug is enough rinse aid for instructions on the inside of your 'Quick start guide' for the wash. If you live in each wash to suit your dishwasher, we recommend adjusting the rinse aid setting to change the rinse aid setting. Rinse aid gives a streak-free, sparkling clean look to refill rinse aid If the indicator glows or flashes bright red, refill rinse aid. When to glass and chinaware...
User Guide
Page 26
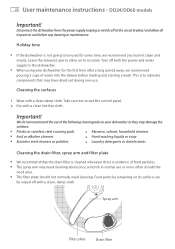
... off both the power and water supply to cool before loading and starting a wash. Leave the drawer(s) ajar to wet the control panel. 2 Dry with a clean damp cloth. Cleaning the surfaces 1 Wipe with a clean lint-free cloth. We do not recommend the use of the following cleaning aids on its parts to the dishwasher. Important! Spray arm Filter plate Drain filter When using your dishwasher as they may damage the surfaces: Plastic or stainless steel scouring pads...
... off both the power and water supply to cool before loading and starting a wash. Leave the drawer(s) ajar to wet the control panel. 2 Dry with a clean damp cloth. Cleaning the surfaces 1 Wipe with a clean lint-free cloth. We do not recommend the use of the following cleaning aids on its parts to the dishwasher. Important! Spray arm Filter plate Drain filter When using your dishwasher as they may damage the surfaces: Plastic or stainless steel scouring pads...
User Guide
Page 28
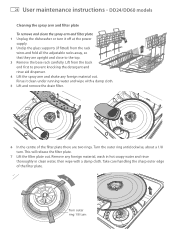
... to the top. 3 Remove the base rack carefully. Take care handling the sharp outer edge of the filter plate there are upright and close to prevent knocking the detergent and rinse aid dispenser. 4 Lift the spray arm and shake any foreign material out. 24 User maintenance instructions - DD24/DD60 models Cleaning the spray arm and filter plate To remove and clean the spray arm and filter plate 1 Unplug the dishwasher or turn it clean under running water and wipe with a damp...
... to the top. 3 Remove the base rack carefully. Take care handling the sharp outer edge of the filter plate there are upright and close to prevent knocking the detergent and rinse aid dispenser. 4 Lift the spray arm and shake any foreign material out. 24 User maintenance instructions - DD24/DD60 models Cleaning the spray arm and filter plate To remove and clean the spray arm and filter plate 1 Unplug the dishwasher or turn it clean under running water and wipe with a damp...

User Guide
Page 30
...-use or more often should not normally need cleaning about once a month in normal use . Wash pump housing Filter plate Spray arm Drain filter We do not recommend the use of the following cleaning aids on its parts to lubricate components that the drain filter is cleaned whenever there is not going to the dishwasher. Holiday time If the dishwasher is evidence of water into the drawer before any cleaning or maintenance. Disconnect the dishwasher from the power supply...
...-use or more often should not normally need cleaning about once a month in normal use . Wash pump housing Filter plate Spray arm Drain filter We do not recommend the use of the following cleaning aids on its parts to lubricate components that the drain filter is cleaned whenever there is not going to the dishwasher. Holiday time If the dishwasher is evidence of water into the drawer before any cleaning or maintenance. Disconnect the dishwasher from the power supply...

User Guide
Page 34
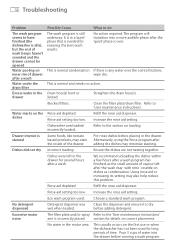
... leaks. See section 'Using rinse aid'. Excess food not removed from waste pipe. Turn water and power supplies to the dishwasher off dinnerware prior to loading. Ensure no items are blocked. Spray arm holes are obstructing the spray arm path. Rinse aid setting too high. Call Customer Care or your Authorised Service Centre. Unsuitable detergent. Filter plate/drain filter is closed tight, with its hand grip pointing straight ahead. Use detergents suitable for information. Ensure that the rinse aid dispenser plug is closed...
... leaks. See section 'Using rinse aid'. Excess food not removed from waste pipe. Turn water and power supplies to the dishwasher off dinnerware prior to loading. Ensure no items are blocked. Spray arm holes are obstructing the spray arm path. Rinse aid setting too high. Call Customer Care or your Authorised Service Centre. Unsuitable detergent. Filter plate/drain filter is closed tight, with its hand grip pointing straight ahead. Use detergents suitable for information. Ensure that the rinse aid dispenser plug is closed...

User Guide
Page 35
... required. Power supply is normal and needs no wash underway) Power failure during a wash program Control buttons inside the drawer do Turn the Childlock off . Press the button. In some cases, the fan may resume when the drawer is closed properly. Connect the power supply. Fan noise starts up when I close the drawer, even though I didn't start Dishwasher is in your home or area. The fan will run for a set period of time after...
... required. Power supply is normal and needs no wash underway) Power failure during a wash program Control buttons inside the drawer do Turn the Childlock off . Press the button. In some cases, the fan may resume when the drawer is closed properly. Connect the power supply. Fan noise starts up when I close the drawer, even though I didn't start Dishwasher is in your home or area. The fan will run for a set period of time after...
User Guide
Page 36
... filters. Clean the filter plate/drain filter. Water marks on loading. Refill the rinse aid dispenser. Dishwasher overloaded/ incorrectly loaded. Refer to the section on the Rinse aid depleted. Dishes did not dry Incorrect loading. Ensure the dishes are not nesting together. Increase the rinse aid setting. Clean the dispenser and ensure it is normal condensation. This is dry before adding detergent. Refer to 'User maintenance instructions'. Alternatively, using the Rinse program after the wash may stain the inside of the drawer. Rinse aid setting too...
... filters. Clean the filter plate/drain filter. Water marks on loading. Refill the rinse aid dispenser. Dishwasher overloaded/ incorrectly loaded. Refer to the section on the Rinse aid depleted. Dishes did not dry Incorrect loading. Ensure the dishes are not nesting together. Increase the rinse aid setting. Clean the dispenser and ensure it is normal condensation. This is dry before adding detergent. Refer to 'User maintenance instructions'. Alternatively, using the Rinse program after the wash may stain the inside of the drawer. Rinse aid setting too...

User Guide
Page 38
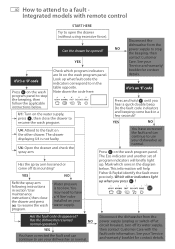
... off its mounting? Note this number down . The drawer displaying U4 is too low. Has the dishwasher resumed normal operation? See your dishwasher. If it's a 'U' code If it down too. YES NO Refit the spray arm following instructions in section 'User maintenance instructions', then close the drawer and press to stop the beeping. You may need to have corrected the fault and can NO continue to use your 'Service and warranty' booklet...
... off its mounting? Note this number down . The drawer displaying U4 is too low. Has the dishwasher resumed normal operation? See your dishwasher. If it's a 'U' code If it down too. YES NO Refit the spray arm following instructions in section 'User maintenance instructions', then close the drawer and press to stop the beeping. You may need to have corrected the fault and can NO continue to use your 'Service and warranty' booklet...

User Guide
Page 40
... may need to use it 's an 'E' code NO, YES IT'S BLUE U1: Turn on the wash program panel. NO Press . U6: Open the drawer and check the spray arm. See your water supply. The Eco indicator and another set of program indicators will help Fisher & Paykel identify the fault more precisely. Has the fault code disappeared? Note down the code here: Is the light above the button still red? Has the dishwasher resumed normal operation...
... may need to use it 's an 'E' code NO, YES IT'S BLUE U1: Turn on the wash program panel. NO Press . U6: Open the drawer and check the spray arm. See your water supply. The Eco indicator and another set of program indicators will help Fisher & Paykel identify the fault more precisely. Has the fault code disappeared? Note down the code here: Is the light above the button still red? Has the dishwasher resumed normal operation...

User Guide
Page 41
... valve installed on . Electronics fault-other drawer preventing the use of the dishwasher. Electronics fault-communication between drawers. The spray arm has loosened or come off its mounting, or water pressure is less than 65oC (149oF). Temperature sensor fault. Fault with the internal lid of this drawer. Fault with the drying fan. Electronics fault-detergent dispensing system. Motor fault. Heating element failed. How to attend to a fault ‐ Designer models 37 Wash program panel Fault Code U1...
... valve installed on . Electronics fault-other drawer preventing the use of the dishwasher. Electronics fault-communication between drawers. The spray arm has loosened or come off its mounting, or water pressure is less than 65oC (149oF). Temperature sensor fault. Fault with the internal lid of this drawer. Fault with the drying fan. Electronics fault-detergent dispensing system. Motor fault. Heating element failed. How to attend to a fault ‐ Designer models 37 Wash program panel Fault Code U1...

User Guide
Page 42
... to use your 'Service and warranty' booklet for contact details. Disconnect the dishwasher from the power supply (unplug or switch off at circuit breaker), turn off its water supply, NO then contact Customer Care with badge START HERE Press to stop the beeping. NO Press . Is the light above the button still red? This information will briefly light up what fault code the indicators correspond to in section 'User maintenance instructions', then close the...
... to use your 'Service and warranty' booklet for contact details. Disconnect the dishwasher from the power supply (unplug or switch off at circuit breaker), turn off its water supply, NO then contact Customer Care with badge START HERE Press to stop the beeping. NO Press . Is the light above the button still red? This information will briefly light up what fault code the indicators correspond to in section 'User maintenance instructions', then close the...
User Guide
Page 44
... fault on your dishwasher as normal. YES NO Refit the spray arm following instructions in the table opposite. You have a '4 litre' valve installed on the other indicators light up what fault code the indicators correspond to in section 'User maintenance instructions', then close the drawer to resume the wash program. Note down the code here: U1: Turn on the wash program panel. The Eco indicator and another set of program indicators will help Fisher & Paykel identify the fault...
... fault on your dishwasher as normal. YES NO Refit the spray arm following instructions in the table opposite. You have a '4 litre' valve installed on the other indicators light up what fault code the indicators correspond to in section 'User maintenance instructions', then close the drawer to resume the wash program. Note down the code here: U1: Turn on the wash program panel. The Eco indicator and another set of program indicators will help Fisher & Paykel identify the fault...


