
User Guide
Page 2
English Français Page 1 - 48 Page 50 - 98 Important! This will ensure that the new owner can familiarize themselves with the appliance. Should the appliance be sold or transferred to another owner, please ensure that this User Guide is left with the information and warnings contained within the Guide. It is important that the User Guide is retained with your refrigerator for future reference.
English Français Page 1 - 48 Page 50 - 98 Important! This will ensure that the new owner can familiarize themselves with the appliance. Should the appliance be sold or transferred to another owner, please ensure that this User Guide is left with the information and warnings contained within the Guide. It is important that the User Guide is retained with your refrigerator for future reference.

User Guide
Page 3
... this User Guide may not be available in all models) 30 Cleaning and caring for your refrigerator 33 Storing food in your refrigerator 37 Storing food in your local Fisher & Paykel dealer. For current details about the external display (Ice & Water models only) 24 Using your water dispenser (Ice & Water models only) 25 Water...
... this User Guide may not be available in all models) 30 Cleaning and caring for your refrigerator 33 Storing food in your refrigerator 37 Storing food in your local Fisher & Paykel dealer. For current details about the external display (Ice & Water models only) 24 Using your water dispenser (Ice & Water models only) 25 Water...
User Guide
Page 4
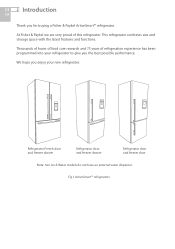
... & Water models do not have an external water dispenser. This refrigerator combines size and storage space with the latest features and functions. At Fisher & Paykel we are very proud of refrigeration experience has been programmed into your refrigerator to give you enjoy your new refrigerator. Thousands of hours of food care research and 75 years of...
... & Water models do not have an external water dispenser. This refrigerator combines size and storage space with the latest features and functions. At Fisher & Paykel we are very proud of refrigeration experience has been programmed into your refrigerator to give you enjoy your new refrigerator. Thousands of hours of food care research and 75 years of...

User Guide
Page 5
... may produce arcs, sparks or flames in structure, clear of your refrigerator. Do not operate electrical equipment or any other means to accelerate the defrosting process. ■■ Do not damage the refrigerant circuit. ■■ In case of your Fisher & Paykel Authorized Service Agent immediately to arrange for its intended purpose as described...
... may produce arcs, sparks or flames in structure, clear of your refrigerator. Do not operate electrical equipment or any other means to accelerate the defrosting process. ■■ Do not damage the refrigerant circuit. ■■ In case of your Fisher & Paykel Authorized Service Agent immediately to arrange for its intended purpose as described...
User Guide
Page 6
...adequately trained service technician or qualified electrician. All electrical repairs must be carried out by your Fisher & Paykel Authorized Service Agent as soon as your refrigerator or use extension cords or double adapters. ■■ Repair or replace immediately all food.... installed in accordance with the installation instructions before use. ■■ Never unplug your refrigerator by Fisher & Paykel Authorized Service Agents. This can be replaced by your Fisher & Paykel Authorized Service Agent because special purpose tools are required. ■■ When moving your ...
...adequately trained service technician or qualified electrician. All electrical repairs must be carried out by your Fisher & Paykel Authorized Service Agent as soon as your refrigerator or use extension cords or double adapters. ■■ Repair or replace immediately all food.... installed in accordance with the installation instructions before use. ■■ Never unplug your refrigerator by Fisher & Paykel Authorized Service Agents. This can be replaced by your Fisher & Paykel Authorized Service Agent because special purpose tools are required. ■■ When moving your ...

User Guide
Page 7
... Please follow the installation steps below to water leaks. ■■ Fisher & Paykel Appliances does not accept responsibility for damage (including water damage) caused by faulty installation or plumbing. Ice & Water (Ice & Water models only) ■■ Your Ice & Water refrigerator must be located in any heat generating appliance such as incorrect plumbing...
... Please follow the installation steps below to water leaks. ■■ Fisher & Paykel Appliances does not accept responsibility for damage (including water damage) caused by faulty installation or plumbing. Ice & Water (Ice & Water models only) ■■ Your Ice & Water refrigerator must be located in any heat generating appliance such as incorrect plumbing...
User Guide
Page 8
... PROFILE VIEW C P PROFILE VIEW Note: these drawings and dimensions are also true for Ice & Water models. FULL DOOR ROTATION FLUSH WITH REFRIGERATOR CHASSIS - FULL DOOR ROTATION G P M N PLAN FLUSH WITH REFRIGERATOR P M Flush with refrigerator chassis - FULL DOOFRLURSOHTAWTIITOHNREFRIGERATOR DOOFRLU- 9S0H°WDIOTOHRRERFORTIAGTEIROANTOR DOOR - 90° DOOR ROTATION P M P NM NP M P OM O B C P FRONT VIEW PROFILE VIEW H/I H/I Q S S Q B R D A FRONT...
... PROFILE VIEW C P PROFILE VIEW Note: these drawings and dimensions are also true for Ice & Water models. FULL DOOR ROTATION FLUSH WITH REFRIGERATOR CHASSIS - FULL DOOR ROTATION G P M N PLAN FLUSH WITH REFRIGERATOR P M Flush with refrigerator chassis - FULL DOOFRLURSOHTAWTIITOHNREFRIGERATOR DOOFRLU- 9S0H°WDIOTOHRRERFORTIAGTEIROANTOR DOOR - 90° DOOR ROTATION P M P NM NP M P OM O B C P FRONT VIEW PROFILE VIEW H/I H/I Q S S Q B R D A FRONT...
User Guide
Page 9
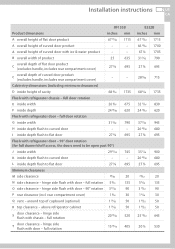
...- - full rotation 5 5/16 135 O side clearance - rear compartment cover) 1 3/16 30 Q vent - around top of curved door with refrigerator chassis - B overall width of product 25 635 C overall depth of flat door product (excludes handle, includes rear compartment cover) 27 3/8 695 C... hinge side flush with door - 90° rotation 3 17/32 90 P rear clearance (incl. hinge side flush with chassis - above refrigerator cabinet 1 31/32 50 S door clearance - hinge side flush with door - hinge side flush with door - Cabinetry dimensions (including minimum ...
...- - full rotation 5 5/16 135 O side clearance - rear compartment cover) 1 3/16 30 Q vent - around top of curved door with refrigerator chassis - B overall width of product 25 635 C overall depth of flat door product (excludes handle, includes rear compartment cover) 27 3/8 695 C... hinge side flush with door - 90° rotation 3 17/32 90 P rear clearance (incl. hinge side flush with chassis - above refrigerator cabinet 1 31/32 50 S door clearance - hinge side flush with door - hinge side flush with door - Cabinetry dimensions (including minimum ...
User Guide
Page 10
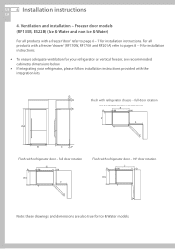
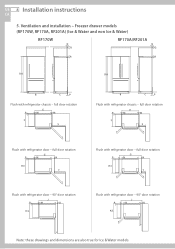
full door rotation P P F Q F QQ Q E ME M M M S S R R Flush with refrigerator doGor - full door rotation FluJsh with refrigerator chassis - Ventilation and installation - full door rotation Q QQ Q E P ME M P M M F F S S R R Flush with refrigerator chassis - Freezer drawer models (RF170W, RF170A, RF201A) (Ice & WPater aMnd Enon IcMe & Water) RF170W F Q Q RF170A/RF201A F S Q Q R R DA B P H/I C P G M DA N T B P K/L J M O H/I T K/L T C P Note: these drawings and dimensions are also ...
full door rotation P P F Q F QQ Q E ME M M M S S R R Flush with refrigerator doGor - full door rotation FluJsh with refrigerator chassis - Ventilation and installation - full door rotation Q QQ Q E P ME M P M M F F S S R R Flush with refrigerator chassis - Freezer drawer models (RF170W, RF170A, RF201A) (Ice & WPater aMnd Enon IcMe & Water) RF170W F Q Q RF170A/RF201A F S Q Q R R DA B P H/I C P G M DA N T B P K/L J M O H/I T K/L T C P Note: these drawings and dimensions are also ...
User Guide
Page 11
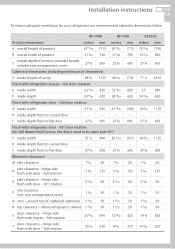
...compartment cover) 27 3/8 695 27 3/8 695 Cabinetry dimensions (including minimum air clearances) D inside depth 24 13/32 620 24 13/32 620 Flush with refrigerator chassis - full rotation 5 5/16 135 5 5/16 135 O side clearance - hinge side flush with door - full door rotation E inside width 32 ...11/16 830 32 11/16 830 F inside height of cavity 68 5/16 1735 68 5/16 1735 Flush with refrigerator door - full rotation 25 13/32 645 12 25/32 325 T door clearance - RF170W RF170A Product dimensions inches mm inches mm A overall...
...compartment cover) 27 3/8 695 27 3/8 695 Cabinetry dimensions (including minimum air clearances) D inside depth 24 13/32 620 24 13/32 620 Flush with refrigerator chassis - full rotation 5 5/16 135 5 5/16 135 O side clearance - hinge side flush with door - full door rotation E inside width 32 ...11/16 830 32 11/16 830 F inside height of cavity 68 5/16 1735 68 5/16 1735 Flush with refrigerator door - full rotation 25 13/32 645 12 25/32 325 T door clearance - RF170W RF170A Product dimensions inches mm inches mm A overall...

User Guide
Page 12
...the location of pipes during installation. ■■ DO NOT use with the refrigerator are to be used, old tubings from old Ice & Water connections should always be struck by an authorized plumber or Fisher & Paykel Authorized Service Agent. ■■ The water connection instructions below 22 psi ...not fitted to the connection line, the Ice & Water features may not function in some circumstances. ■■ The water connection to the refrigerator. ■■ DO NOT install the filter or any length of tube shorter than 8" (200 mm). ■■ DO NOT install ...
...the location of pipes during installation. ■■ DO NOT use with the refrigerator are to be used, old tubings from old Ice & Water connections should always be struck by an authorized plumber or Fisher & Paykel Authorized Service Agent. ■■ The water connection instructions below 22 psi ...not fitted to the connection line, the Ice & Water features may not function in some circumstances. ■■ The water connection to the refrigerator. ■■ DO NOT install the filter or any length of tube shorter than 8" (200 mm). ■■ DO NOT install ...
User Guide
Page 13
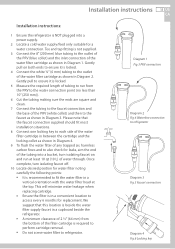
...replacing cartridge. ■■ Ensure the filter is required to perform cartridge removal. ■■ Do not screw water filter to refrigerator. Gently pull on and run from the bottom of the filter cartridge is in a convenient location to access every 6 months for... replacement. Gently pull to ensure it is locked. 4 Connect the white ¼" (6 mm) tubing to refrigerator Diagram 3 Fig.5 Faucet connection Diagram 4 Fig.6 Locking key INLET Diagram 1 Fig.3 PRV connection Diagram 2 Fig.4 Waterline connection to the outlet of...
...replacing cartridge. ■■ Ensure the filter is required to perform cartridge removal. ■■ Do not screw water filter to refrigerator. Gently pull on and run from the bottom of the filter cartridge is in a convenient location to access every 6 months for... replacement. Gently pull to ensure it is locked. 4 Connect the white ¼" (6 mm) tubing to refrigerator Diagram 3 Fig.5 Faucet connection Diagram 4 Fig.6 Locking key INLET Diagram 1 Fig.3 PRV connection Diagram 2 Fig.4 Waterline connection to the outlet of...

User Guide
Page 14
...Diagram 6 14 Insert the tubing marked 5/8" (16 mm) into the water (solenoid) valve. 19 Read pages 13 - 14 carefully and then turn refrigerator on. Remove the double sided foam backing PART:838587 6 7 and attach the filter to the desired position, reinforcing the filter with the Diagram 5 ...7 DRAWING: 838587 8 9 Diagram 5. Write the date to be replaced on tubing to ensure it is enough tubing to pull the refrigerator out for service. 13 Using the measurement guide located on the rear compartment cover as shown6 in Diagram 9. 16 The completed installation should ...
...Diagram 6 14 Insert the tubing marked 5/8" (16 mm) into the water (solenoid) valve. 19 Read pages 13 - 14 carefully and then turn refrigerator on. Remove the double sided foam backing PART:838587 6 7 and attach the filter to the desired position, reinforcing the filter with the Diagram 5 ...7 DRAWING: 838587 8 9 Diagram 5. Write the date to be replaced on tubing to ensure it is enough tubing to pull the refrigerator out for service. 13 Using the measurement guide located on the rear compartment cover as shown6 in Diagram 9. 16 The completed installation should ...

User Guide
Page 15
... from connection points first turn off the isolating faucet. The tube should push in 5/8" (16 mm) before reaching the stop water flow), clear of the refrigerator rear compartment and not in a location where it can be fully inserted to avoid leaks. ■■ To remove tube from sharp objects, sharp corners...
... from connection points first turn off the isolating faucet. The tube should push in 5/8" (16 mm) before reaching the stop water flow), clear of the refrigerator rear compartment and not in a location where it can be fully inserted to avoid leaks. ■■ To remove tube from sharp objects, sharp corners...

User Guide
Page 16
... tray will be illuminated when the ice maker is on. ■■ Press and hold the , and buttons together for your refrigerator to remove trapped air in excessive dripping from your dispenser. US 14 Installation instructions CA Before you start using your Ice & Water... refrigerator ■■ Check your refrigerator is switched on. ■■ Check that the isolation tap has been connected and turned on. ■■ Run through and ...
... tray will be illuminated when the ice maker is on. ■■ Press and hold the , and buttons together for your refrigerator to remove trapped air in excessive dripping from your dispenser. US 14 Installation instructions CA Before you start using your Ice & Water... refrigerator ■■ Check your refrigerator is switched on. ■■ Check that the isolation tap has been connected and turned on. ■■ Run through and ...

User Guide
Page 17
...to page 6). C Adjust the front feet down until it touches the floor and takes a small amount of refrigerator doors (French door models only) ■■ For uneven surfaces, front feet can be used to align ...product in the forwards and backwards direction. Lower the front of the refrigerator Raise the front of the refrigerator Fig.11 Refrigerator feet B Roll the refrigerator into its final position making sure there is leaning backward with the...12 Uneven door alignment 8. Installation (all models) Your Fisher & Paykel ActiveSmart™ refrigerator is rocking or stable.
...to page 6). C Adjust the front feet down until it touches the floor and takes a small amount of refrigerator doors (French door models only) ■■ For uneven surfaces, front feet can be used to align ...product in the forwards and backwards direction. Lower the front of the refrigerator Raise the front of the refrigerator Fig.11 Refrigerator feet B Roll the refrigerator into its final position making sure there is leaning backward with the...12 Uneven door alignment 8. Installation (all models) Your Fisher & Paykel ActiveSmart™ refrigerator is rocking or stable.
User Guide
Page 18
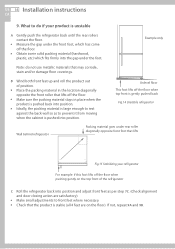
...to front feet where necessary. ■■ Check that lifts off the floor when pushing gently on the top front of the refrigerator C Roll the refrigerator back into position and adjust front feet as to do not use metallic materials that may corrode, stain and/or damage floor coverings.... US 16 Installation instructions CA 9. Example only Note: do if your refrigerator For example: if this foot lifts off the floor. ■■ Make sure the packing material stays in the location diagonally opposite the ...
...to front feet where necessary. ■■ Check that lifts off the floor when pushing gently on the top front of the refrigerator C Roll the refrigerator back into position and adjust front feet as to do not use metallic materials that may corrode, stain and/or damage floor coverings.... US 16 Installation instructions CA 9. Example only Note: do if your refrigerator For example: if this foot lifts off the floor. ■■ Make sure the packing material stays in the location diagonally opposite the ...
User Guide
Page 19
...the cabinet sides. ■■ Ensure you vacuum around the appliance to remove dust and possible pet hair accumulation. Cleaning and caring for your refrigerator: Rear compartment cover). ■■ Allow good clearances in front of air ducts within the cabinet for 2 - 3 hours to allow ...the appropriate temperature. ■■ The appliance may have an odor on its initial operation, but this will prevent air from the refrigerator. Installation instructions 17 US CA Before placing food in the fresh food or freezer compartments ■■ Remove all transit clips are small...
...the cabinet sides. ■■ Ensure you vacuum around the appliance to remove dust and possible pet hair accumulation. Cleaning and caring for your refrigerator: Rear compartment cover). ■■ Allow good clearances in front of air ducts within the cabinet for 2 - 3 hours to allow ...the appropriate temperature. ■■ The appliance may have an odor on its initial operation, but this will prevent air from the refrigerator. Installation instructions 17 US CA Before placing food in the fresh food or freezer compartments ■■ Remove all transit clips are small...
User Guide
Page 20
...adjustable feet to the right as far as you are on its side (the right hand side when viewed from the power point. Storing your refrigerator ■■ When storing your cleaned appliance, leave the doors open. This will turn (refer to equalize before restarting. Holiday time We ...recommend you leave your refrigerator operating while you can (a few hours) before turning it back on . Tuck the power cord away, tape the shelves in place and tape ...
...adjustable feet to the right as far as you are on its side (the right hand side when viewed from the power point. Storing your refrigerator ■■ When storing your cleaned appliance, leave the doors open. This will turn (refer to equalize before restarting. Holiday time We ...recommend you leave your refrigerator operating while you can (a few hours) before turning it back on . Tuck the power cord away, tape the shelves in place and tape ...
User Guide
Page 21
...conversion 19 US CA ActiveSmart™ refrigerator models with silver handles need to be interchanged. Soft closing refrigerator door feature (where fitted) The fresh food compartment of closing door feature. If a problem occurs, please contact your Fisher & Paykel Authorized Service Agent or Dealer. This ...is fitted with a soft closing . All other models need to have an appropriate conversion kit for . If you call your refrigerator has been fitted with an additional mechanism...
...conversion 19 US CA ActiveSmart™ refrigerator models with silver handles need to be interchanged. Soft closing refrigerator door feature (where fitted) The fresh food compartment of closing door feature. If a problem occurs, please contact your Fisher & Paykel Authorized Service Agent or Dealer. This ...is fitted with a soft closing . All other models need to have an appropriate conversion kit for . If you call your refrigerator has been fitted with an additional mechanism...
