

User Guide
Page 3
... freezer 39 ActiveSmart™ user warnings and sounds 41 Troubleshooting 42 Limited warranty 46 Filter performance data sheet 99 Important! SAVE THESE INSTRUCTIONS The models shown in this User Guide, refers to change at any time. Contents 1 US CA Introduction 2 Safety and warnings 3 Installation instructions 5 Moving or storing your appliance 18 Door conversion 19 Soft closing refrigerator door feature 19 ActiveSmart™ operating instructions 20 All about model and specification...
... freezer 39 ActiveSmart™ user warnings and sounds 41 Troubleshooting 42 Limited warranty 46 Filter performance data sheet 99 Important! SAVE THESE INSTRUCTIONS The models shown in this User Guide, refers to change at any time. Contents 1 US CA Introduction 2 Safety and warnings 3 Installation instructions 5 Moving or storing your appliance 18 Door conversion 19 Soft closing refrigerator door feature 19 ActiveSmart™ operating instructions 20 All about model and specification...

User Guide
Page 4
Thousands of hours of food care research and 75 years of this refrigerator. At Fisher & Paykel we are very proud of refrigeration experience has been programmed into your new refrigerator. US 2 Introduction CA Thank you the best possible performance. Refrigerator French door and freezer drawer Refrigerator door and freezer drawer Refrigerator door and freezer door Note: non Ice & Water models do not have an external water dispenser. Fig.1 ActiveSmart™ refrigerators This refrigerator combines size and storage space with...
Thousands of hours of food care research and 75 years of this refrigerator. At Fisher & Paykel we are very proud of refrigeration experience has been programmed into your new refrigerator. US 2 Introduction CA Thank you the best possible performance. Refrigerator French door and freezer drawer Refrigerator door and freezer drawer Refrigerator door and freezer door Note: non Ice & Water models do not have an external water dispenser. Fig.1 ActiveSmart™ refrigerators This refrigerator combines size and storage space with...

User Guide
Page 6
... in glass containers. refreezing generally not recommended. US 4 Safety and warnings CA Electrical ■■ This appliance must be installed in accordance with the installation instructions before use. ■■ Never unplug your refrigerator by your Fisher & Paykel Authorized Service Agent as soon as possible. Meat, fish, poultry - discard as possible. use as soon as they may be cold enough to eat. Food removed...
... in glass containers. refreezing generally not recommended. US 4 Safety and warnings CA Electrical ■■ This appliance must be installed in accordance with the installation instructions before use. ■■ Never unplug your refrigerator by your Fisher & Paykel Authorized Service Agent as soon as possible. Meat, fish, poultry - discard as possible. use as soon as they may be cold enough to eat. Food removed...

User Guide
Page 7
... (earthed). 2. Ice & Water (Ice & Water models only) ■■ Your Ice & Water refrigerator must be installed by faulty installation or plumbing. Power ■■ The appliance must be installed so the plug is accessible. ■■ To ensure that the appliance is not accidentally switched off, connect your appliance operates correctly. 1. Installation instructions 5 US CA Please follow the installation steps below to ensure your refrigerator to water leaks. ■■ Fisher & Paykel Appliances does...
... (earthed). 2. Ice & Water (Ice & Water models only) ■■ Your Ice & Water refrigerator must be installed by faulty installation or plumbing. Power ■■ The appliance must be installed so the plug is accessible. ■■ To ensure that the appliance is not accidentally switched off, connect your appliance operates correctly. 1. Installation instructions 5 US CA Please follow the installation steps below to ensure your refrigerator to water leaks. ■■ Fisher & Paykel Appliances does...
User Guide
Page 12
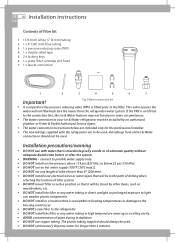
... mains from old Ice & Water connections should always be used . ■■ DO NOT continuously dispense water for the professional installer. ■■ The new tubings supplied with the refrigerator are to the refrigerator. ■■ DO NOT install the filter or any length of filter kit 1 13 ft (4 m) white ¼" (6 mm) tubing 2 1 x 8" (200 mm) blue tubing 3 1 x pressure reducing valve (PRV) 4 1 x double sided tape 5 2 x locking keys 6 1 x water filter cartridge and head 7 1 x faucet...
... mains from old Ice & Water connections should always be used . ■■ DO NOT continuously dispense water for the professional installer. ■■ The new tubings supplied with the refrigerator are to the refrigerator. ■■ DO NOT install the filter or any length of filter kit 1 13 ft (4 m) white ¼" (6 mm) tubing 2 1 x 8" (200 mm) blue tubing 3 1 x pressure reducing valve (PRV) 4 1 x double sided tape 5 2 x locking keys 6 1 x water filter cartridge and head 7 1 x faucet...

User Guide
Page 16
... start using your Ice & Water refrigerator ■■ Check your water dispenser, there will be a 1 - 2 minute delay while the tank fills until the refrigerator compartment door is switched on by pressing the button (refer to enjoy ice and water from your ActiveSmart™ refrigerator. The ice tray will flip twice. US 14 Installation instructions CA Before you use (refer to force another ice maker cycle. Empty the water, dry and replace the bin...
... start using your Ice & Water refrigerator ■■ Check your water dispenser, there will be a 1 - 2 minute delay while the tank fills until the refrigerator compartment door is switched on by pressing the button (refer to enjoy ice and water from your ActiveSmart™ refrigerator. The ice tray will flip twice. US 14 Installation instructions CA Before you use (refer to force another ice maker cycle. Empty the water, dry and replace the bin...
User Guide
Page 17
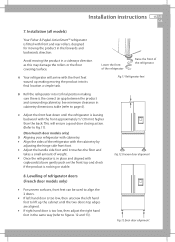
... the product in cabinetry dimensions table (refer to figures 12 and 13). Installation (all models) Your Fisher & Paykel ActiveSmart™ refrigerator is too low, then adjust the right hand foot in the forwards and backwards direction. Installation instructions 15 US CA 7. A Your refrigerator will ensure a good door closing action. (Refer to Fig.11). (Non French door models only) D Aligning your refrigerator with cabinetry. ■■...
... the product in cabinetry dimensions table (refer to figures 12 and 13). Installation (all models) Your Fisher & Paykel ActiveSmart™ refrigerator is too low, then adjust the right hand foot in the forwards and backwards direction. Installation instructions 15 US CA 7. A Your refrigerator will ensure a good door closing action. (Refer to Fig.11). (Non French door models only) D Aligning your refrigerator with cabinetry. ■■...
User Guide
Page 22
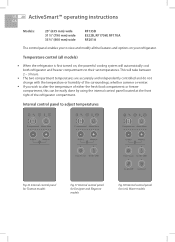
... automatically cool both refrigerator and freezer compartments to their set temperatures. Internal control panel to adjust temperatures Fig.16 Internal control panel for Tasman models Fig.17 Internal control panel for Designer and Elegance models Fig.18 Internal control panel for Ice & Water models whether summer or winter. ■■ If you to view and modify all models) ■■ When the refrigerator is first turned on your refrigerator. US 20 ActiveSmart™ operating instructions CA Models: 25...
... automatically cool both refrigerator and freezer compartments to their set temperatures. Internal control panel to adjust temperatures Fig.16 Internal control panel for Tasman models Fig.17 Internal control panel for Designer and Elegance models Fig.18 Internal control panel for Ice & Water models whether summer or winter. ■■ If you to view and modify all models) ■■ When the refrigerator is first turned on your refrigerator. US 20 ActiveSmart™ operating instructions CA Models: 25...

User Guide
Page 23
Note: when the fresh food or freezer compartment door is re-opened the control panel will reduce or increase the number of lights illuminated which indicates a small change in temperature. ■■ Fewer lights illuminated means a cooler temperature for 20 minutes. ■■ To activate, press the button once. The ALARM MUTE light will be compromised. The alarm will turn off. ActiveSmart™ operating instructions 21 US CA Fresh food...
Note: when the fresh food or freezer compartment door is re-opened the control panel will reduce or increase the number of lights illuminated which indicates a small change in temperature. ■■ Fewer lights illuminated means a cooler temperature for 20 minutes. ■■ To activate, press the button once. The ALARM MUTE light will be compromised. The alarm will turn off. ActiveSmart™ operating instructions 21 US CA Fresh food...

User Guide
Page 24
... the internal control panel (and external display for Ice & Water models) and functionality of the internal control panel will return to normal. Key Lock (all models) KEY LOCK allows you to tell you to the refrigerator is turned off . ■■ The fresh food or freezer compartment lights will not operate when the door(s) is opened. ■■ The door alarms will not operate. ■■ The internal control panel will...
... the internal control panel (and external display for Ice & Water models) and functionality of the internal control panel will return to normal. Key Lock (all models) KEY LOCK allows you to tell you to the refrigerator is turned off . ■■ The fresh food or freezer compartment lights will not operate when the door(s) is opened. ■■ The door alarms will not operate. ■■ The internal control panel will...
User Guide
Page 25
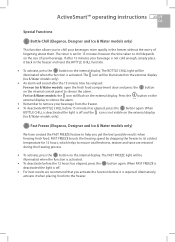
... compartment door and press the button on the internal control panel to ensure vital freshness, texture and taste are retained during the freezing process. ■■ To activate, press the button on the external display (Ice & Water models only). ■■ An alarm will be illuminated when the function is not cold enough, simply place it when placing food into the freezer. FAST FREEZE...
... compartment door and press the button on the internal control panel to ensure vital freshness, texture and taste are retained during the freezing process. ■■ To activate, press the button on the external display (Ice & Water models only). ■■ An alarm will be illuminated when the function is not cold enough, simply place it when placing food into the freezer. FAST FREEZE...

User Guide
Page 28
... head. - Remove protective cap on spigot on the cartridge. It will need changing approximately every 6 months. ■■ There is cleared. Changing the water filter cartridge It is not necessary to the left when installed in the recommended orientation) as the remaining trapped air is a replacement indicator icon on and run at least 10 qt (10 liters) of water through a filter cartridge located in Diagram 2 of your Fisher & Paykel Authorized Service Agent.
... head. - Remove protective cap on spigot on the cartridge. It will need changing approximately every 6 months. ■■ There is cleared. Changing the water filter cartridge It is not necessary to the left when installed in the recommended orientation) as the remaining trapped air is a replacement indicator icon on and run at least 10 qt (10 liters) of water through a filter cartridge located in Diagram 2 of your Fisher & Paykel Authorized Service Agent.

User Guide
Page 29
... to fit a new filter cartridge. This will not be covered by the warranty except in the water supplied to your home. ■■ Filter replacement is changed or filter monitoring will be inaccurate. ■■ Press and hold and for the water supplied to freeze, replace filter cartridge. Water filter (Ice & Water models only) 27 US CA To reset the filter indicator Important! icons ■■ The rate of water flow through the water dispenser can disable the filter indicator. ■...
... to fit a new filter cartridge. This will not be covered by the warranty except in the water supplied to your home. ■■ Filter replacement is changed or filter monitoring will be inaccurate. ■■ Press and hold and for the water supplied to freeze, replace filter cartridge. Water filter (Ice & Water models only) 27 US CA To reset the filter indicator Important! icons ■■ The rate of water flow through the water dispenser can disable the filter indicator. ■...

User Guide
Page 31
... to use ice cubes that may stick together. If such discoloration is noted, discard the ice cubes and contact your Fisher & Paykel Authorized Service Agent. ■■ Ensure the ice maker is connected to the filter and to a drinkable water supply only. ■■ Installation of the water connection to page 32. The light above the button will be completed by a qualified service technician or a qualified plumber (see installation instructions).
... to use ice cubes that may stick together. If such discoloration is noted, discard the ice cubes and contact your Fisher & Paykel Authorized Service Agent. ■■ Ensure the ice maker is connected to the filter and to a drinkable water supply only. ■■ Installation of the water connection to page 32. The light above the button will be completed by a qualified service technician or a qualified plumber (see installation instructions).
User Guide
Page 33
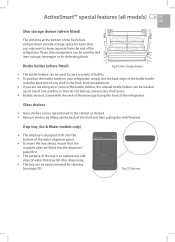
... or for defrosting foods. Drip tray (Ice & Water models only) ■■ The drip tray is designed to fit into the bottom of the water dispenser panel. ■■ To insert the tray always ensure that the rounded sides are fitted into the dispenser panel first. ■■ The purpose of the tray is to capture any shelf in the cabinet as desired. ■■ Remove shelves by...
... or for defrosting foods. Drip tray (Ice & Water models only) ■■ The drip tray is designed to fit into the bottom of the water dispenser panel. ■■ To insert the tray always ensure that the rounded sides are fitted into the dispenser panel first. ■■ The purpose of the tray is to capture any shelf in the cabinet as desired. ■■ Remove shelves by...

User Guide
Page 36
... interior or exterior of your refrigerator. Use a toothbrush for your refrigerator CA Interior (all models) ■■ Clean with warm water and liquid dishwashing detergent. Wash shelves and storage bins in clean water and dry before cleaning. ■■ Clean interior surfaces with warm water and detergent or a glass cleaner. US 34 Cleaning and caring for the magnetic door gasket. ■■ Do not use harsh, abrasive cloths on any components inside and outside your refrigerator...
... interior or exterior of your refrigerator. Use a toothbrush for your refrigerator CA Interior (all models) ■■ Clean with warm water and liquid dishwashing detergent. Wash shelves and storage bins in clean water and dry before cleaning. ■■ Clean interior surfaces with warm water and detergent or a glass cleaner. US 34 Cleaning and caring for the magnetic door gasket. ■■ Do not use harsh, abrasive cloths on any components inside and outside your refrigerator...

User Guide
Page 44
... recently added. Freezer is level and gasket seals are clean. Press and hold , and together for long periods. Minimize door openings to allow temperature to stabilize. See Temperature control section the refrigerator. (pages 20 - 21). Light not functioning. Check refrigerator is a problem with your appliance, please check the following points before contacting your Fisher & Paykel Dealer or Fisher & Paykel Authorized Service Agent. Motor operates Hot weather. Storage compartments too warm. Check...
... recently added. Freezer is level and gasket seals are clean. Press and hold , and together for long periods. Minimize door openings to allow temperature to stabilize. See Temperature control section the refrigerator. (pages 20 - 21). Light not functioning. Check refrigerator is a problem with your appliance, please check the following points before contacting your Fisher & Paykel Dealer or Fisher & Paykel Authorized Service Agent. Motor operates Hot weather. Storage compartments too warm. Check...

User Guide
Page 45
... trapped behind the tray/bin. Wipe dry. Packaging trapped. Minimize door openings. this will reset the runner. Wipe out water with a cloth. Wrap or cover strong smelling foods. Set humidity slide to ensure no food or packaging is normal. See Installation instructions - Exterior of odor/taste from strong smelling foods. Transfer of cabinet is warm. Troubleshooting 43 US CA All models Problem Water in and...
... trapped behind the tray/bin. Wipe dry. Packaging trapped. Minimize door openings. this will reset the runner. Wipe out water with a cloth. Wrap or cover strong smelling foods. Set humidity slide to ensure no food or packaging is normal. See Installation instructions - Exterior of odor/taste from strong smelling foods. Transfer of cabinet is warm. Troubleshooting 43 US CA All models Problem Water in and...

User Guide
Page 46
... make new ice. Ice bin left ajar. Gently tap ice with scoop to pages 26 - 27). Ice maker has not been turned on central door seal. (French door models only) You may need to be discarded. Contact Customer Care. A new filter may feel a warm spot at times This is perfectly normal and is sealed. Freezer compartment too warm. two refrigerator doors. High ambient temperature. Switch on the central seal between the the normal refrigerator operation. Water supply turned off or not connected. Ice...
... make new ice. Ice bin left ajar. Gently tap ice with scoop to pages 26 - 27). Ice maker has not been turned on central door seal. (French door models only) You may need to be discarded. Contact Customer Care. A new filter may feel a warm spot at times This is perfectly normal and is sealed. Freezer compartment too warm. two refrigerator doors. High ambient temperature. Switch on the central seal between the the normal refrigerator operation. Water supply turned off or not connected. Ice...
User Guide
Page 47
... the dispenser. Check and clean door gasket seal. Minimize door openings. not increasing rate Refrigerator is in tank. What to pages 26 - 27). Water supply turned off or not connected. New filter installed. Water flow rate has Filter cartridge is warm. Ice buildup inside freezer compartment. Refer to refrigerator sounds (refer to cool. Filter may be blocked. To remove air, run 3 qt (3 L) of water dispensed. Allow water time to page 41). Drips overflow drip-shelf. Flush 3 qt (3 L) water through dispenser, stopping intermittently. of...
... the dispenser. Check and clean door gasket seal. Minimize door openings. not increasing rate Refrigerator is in tank. What to pages 26 - 27). Water supply turned off or not connected. New filter installed. Water flow rate has Filter cartridge is warm. Ice buildup inside freezer compartment. Refer to refrigerator sounds (refer to cool. Filter may be blocked. To remove air, run 3 qt (3 L) of water dispensed. Allow water time to page 41). Drips overflow drip-shelf. Flush 3 qt (3 L) water through dispenser, stopping intermittently. of...


