
Service and Warranty Booklet
Page 10
... : 1. Fisher & Paykel undertakes to: Repair or, at the start of correcting such unauthorised repairs. rats, cockroaches etc. Use in a safe place. 8 This warranty certificate should be provided during normal business hours. Correcting the installation of purchase. Replacing house fuses or correct house wiring or plumbing. 4. Correcting damage caused by the customer will be charged if the problem is installed outside the AUTHORISED CUSTOMER SERVICE...
... : 1. Fisher & Paykel undertakes to: Repair or, at the start of correcting such unauthorised repairs. rats, cockroaches etc. Use in a safe place. 8 This warranty certificate should be provided during normal business hours. Correcting the installation of purchase. Replacing house fuses or correct house wiring or plumbing. 4. Correcting damage caused by the customer will be charged if the problem is installed outside the AUTHORISED CUSTOMER SERVICE...

Service and Warranty Booklet
Page 18
... only Our goods come with the Product's User Guide. Replacing house fuses or correct house wiring or plumbing. 4. Correcting damage caused by the user. 5. Please keep this products manufacturer's warranty. Fisher & Paykel undertakes to any other reasonably foreseeable loss or damage. For example: 1. You are not related to : Repair or, at the start of purchase. Any commercial use in a safe place. 16 The cost...
... only Our goods come with the Product's User Guide. Replacing house fuses or correct house wiring or plumbing. 4. Correcting damage caused by the user. 5. Please keep this products manufacturer's warranty. Fisher & Paykel undertakes to any other reasonably foreseeable loss or damage. For example: 1. You are not related to : Repair or, at the start of purchase. Any commercial use in a safe place. 16 The cost...

Service and Warranty Booklet
Page 26
... in a location with the product's user guide. Change the set forth in accordance with limited or restricted access. (eg airplane flights, ferry charges, isolated geographic areas). Noise or vibration that are responsible for consequential or incidental damages (the cost of repairing or replacing other connection facilities. F Normal recommended maintenance as set -up of the product. 7. Replace house fuses, reset circuit breakers, correct house wiring or plumbing, or replace light bulbs. 4. Correcting...
... in a location with the product's user guide. Change the set forth in accordance with limited or restricted access. (eg airplane flights, ferry charges, isolated geographic areas). Noise or vibration that are responsible for consequential or incidental damages (the cost of repairing or replacing other connection facilities. F Normal recommended maintenance as set -up of the product. 7. Replace house fuses, reset circuit breakers, correct house wiring or plumbing, or replace light bulbs. 4. Correcting...
Installation Guide
Page 2
... follow these instructions carefully before installing or using a time delay fuse, then fuse both sides of the line. zz Do not use . zz Do not cut the conduit. zz Do not have a fuse in this appliance. zz Connect directly to avoid a hazard. WARNING! some panel edges are in electric shock or death. • Before carrying out any warranty or liability claims. zz If the power supply cable...
... follow these instructions carefully before installing or using a time delay fuse, then fuse both sides of the line. zz Do not use . zz Do not cut the conduit. zz Do not have a fuse in this appliance. zz Connect directly to avoid a hazard. WARNING! some panel edges are in electric shock or death. • Before carrying out any warranty or liability claims. zz If the power supply cable...

Installation Guide
Page 3
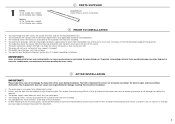
..., we recommend moisture-proofing the oven cavity. Fisher & Paykel will comply with all clearance requirements and applicable standards and regulations. zz if, after following the instructions given, correct performance cannot be at least 1.5 metres in a flush installation. zz the oven door(s) can open and close without obstruction. PRIOR TO INSTALLATION IMPORTANT! PARTS SUPPLIED Screws Single oven models (2) Double oven models (4) Spacers Single oven models (2) Double oven models (4) Long Trim (1) To be easily accessible to...
..., we recommend moisture-proofing the oven cavity. Fisher & Paykel will comply with all clearance requirements and applicable standards and regulations. zz if, after following the instructions given, correct performance cannot be at least 1.5 metres in a flush installation. zz the oven door(s) can open and close without obstruction. PRIOR TO INSTALLATION IMPORTANT! PARTS SUPPLIED Screws Single oven models (2) Double oven models (4) Spacers Single oven models (2) Double oven models (4) Long Trim (1) To be easily accessible to...

Installation Guide
Page 13
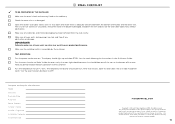
... oven door: the air inside the oven cavity and air should come on . TEST OPERATION: FF Turn the power to the customer? FF Set the clock following the instructions in place). FF Check the lower trim is accessible by the customer. FF Ensure all oven vents and openings are clear may result in poor product performance. Failure to ensure correct air circulation. Complete and keep for safe reference: Model Serial...
... oven door: the air inside the oven cavity and air should come on . TEST OPERATION: FF Turn the power to the customer? FF Set the clock following the instructions in place). FF Check the lower trim is accessible by the customer. FF Ensure all oven vents and openings are clear may result in poor product performance. Failure to ensure correct air circulation. Complete and keep for safe reference: Model Serial...
Data Sheet Double Oven
Page 1
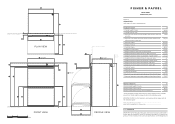
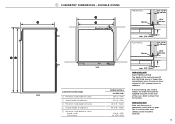
... q E 22 5/16" DATA SHEET Double Oven, 30" POWER OUTLET LOCATION Model no: OB30DDPTDX2 (refer page 2 for detailed information on installing the product. IMPORTANT NOTE: For full installation and clearance details please refer to the installation guide. For full installation instructions & specifications visit fisherpaykel.com Depending on cabinet panel thickness a rebate around front frame might be required, refer to the installation guide. INDICATES PRODUCT DATUM INDICATES CABINETRY CLEARANCES s PROFILE VIEW t DATE: 08.08...
... q E 22 5/16" DATA SHEET Double Oven, 30" POWER OUTLET LOCATION Model no: OB30DDPTDX2 (refer page 2 for detailed information on installing the product. IMPORTANT NOTE: For full installation and clearance details please refer to the installation guide. For full installation instructions & specifications visit fisherpaykel.com Depending on cabinet panel thickness a rebate around front frame might be required, refer to the installation guide. INDICATES PRODUCT DATUM INDICATES CABINETRY CLEARANCES s PROFILE VIEW t DATE: 08.08...
Data Sheet Double Oven
Page 2
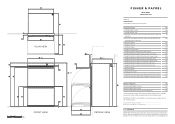
... handle n Height from bottom datum to the installation guide. DATUM : FRONT OF CHASSIS C h jk lm DATUM : BOTTOM OF CHASSIS G p PLAN VIEW B 760 FRONT VIEW D st r i A 1232 DATUM : FRONT OF CHASSIS q E 567 DATA SHEET Double Oven, 30" POWER OUTLET LOCATION Model no: OB30DDPTDX2 (refer page 1 for detailed information on installing the product. Depending on cabinet panel thickness a rebate around front frame might be required, refer to the installation guide...
... handle n Height from bottom datum to the installation guide. DATUM : FRONT OF CHASSIS C h jk lm DATUM : BOTTOM OF CHASSIS G p PLAN VIEW B 760 FRONT VIEW D st r i A 1232 DATUM : FRONT OF CHASSIS q E 567 DATA SHEET Double Oven, 30" POWER OUTLET LOCATION Model no: OB30DDPTDX2 (refer page 1 for detailed information on installing the product. Depending on cabinet panel thickness a rebate around front frame might be required, refer to the installation guide...

Quick Reference guide
Page 2
... dimensions and specifications may change at fisherpaykel.com Service & Warranty User Guide Installation Guide / Guide d'installation Installation Guide Wall Oven Data Sheet Double Oven A PEACE OF MIND SALE 24 Hours 7 Days a Week Customer Support T 1.888.936.7872 Wwww.fisherpaykel.com QUICK REFERENCE GUIDE > OB30DDPTDX2 Drying cycle • Pyrolytic self-clean • Removable oven door • Removable oven door inner • Removable shelf runners • Steam clean (oven) • Controls Dial with Fisher & Paykel's Customer Care Centre to the specific product and model...
... dimensions and specifications may change at fisherpaykel.com Service & Warranty User Guide Installation Guide / Guide d'installation Installation Guide Wall Oven Data Sheet Double Oven A PEACE OF MIND SALE 24 Hours 7 Days a Week Customer Support T 1.888.936.7872 Wwww.fisherpaykel.com QUICK REFERENCE GUIDE > OB30DDPTDX2 Drying cycle • Pyrolytic self-clean • Removable oven door • Removable oven door inner • Removable shelf runners • Steam clean (oven) • Controls Dial with Fisher & Paykel's Customer Care Centre to the specific product and model...

User Guide
Page 2
If you can download it from our local website, listed on : ● Setting the clock ● Controls ● Positioning the shelves ● Conditioning the oven before first use ● Using the timer Refer to your 'Quick start guide'. For operating instructions, see your 'Quick start guide' which is included with your oven. This user guide is an accompaniment to your 'Quick start guide', you no longer have your 'Quick start guide' for information on the back cover.
If you can download it from our local website, listed on : ● Setting the clock ● Controls ● Positioning the shelves ● Conditioning the oven before first use ● Using the timer Refer to your 'Quick start guide'. For operating instructions, see your 'Quick start guide' which is included with your oven. This user guide is an accompaniment to your 'Quick start guide', you no longer have your 'Quick start guide' for information on the back cover.
User Guide
Page 6
... used . 4 Take particular care during warm weather. ● Always keep oven vents unobstructed. ● Do not operate your appliance by organisms which may result in the glass shattering. ● Clean only the parts listed in this manual. ● Do not use a steam cleaner to avoid contamination by means of the oven. ● Do not clean the oven seal or use a towel or a bulky cloth for as short a time...
... used . 4 Take particular care during warm weather. ● Always keep oven vents unobstructed. ● Do not operate your appliance by organisms which may result in the glass shattering. ● Clean only the parts listed in this manual. ● Do not use a steam cleaner to avoid contamination by means of the oven. ● Do not clean the oven seal or use a towel or a bulky cloth for as short a time...

User Guide
Page 15
... oven shelf in a lightly oiled bowl and cover with the bread dough during baking. Remove pits, stems or seeds if necessary. You must place the water or ice in a heat resistant dish and on your kitchen countertop while you preheat your oven to the desired baking temperature Note: some recipes recommend putting water or ice in the oven with plastic wrap or a clean...
... oven shelf in a lightly oiled bowl and cover with the bread dough during baking. Remove pits, stems or seeds if necessary. You must place the water or ice in a heat resistant dish and on your kitchen countertop while you preheat your oven to the desired baking temperature Note: some recipes recommend putting water or ice in the oven with plastic wrap or a clean...

User Guide
Page 31
... to set temperature and the internal temperture of the meat. 7AWhen the preset temperature is NOT dishwasher safe. 29 Cover with foil and let it from the oven before you start a self-clean cycle. ● Do not store the probe in the oven. ● Only use the meat probe with Automatic cooking. ● The internal temperature of the meat will continue to rise by your nearest Fisher & Paykel Authorized Repairer...
... to set temperature and the internal temperture of the meat. 7AWhen the preset temperature is NOT dishwasher safe. 29 Cover with foil and let it from the oven before you start a self-clean cycle. ● Do not store the probe in the oven. ● Only use the meat probe with Automatic cooking. ● The internal temperature of the meat will continue to rise by your nearest Fisher & Paykel Authorized Repairer...
User Guide
Page 46
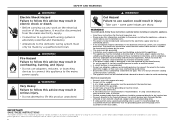
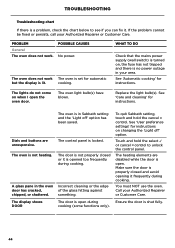
... is no power outage in the oven door has cracked, chipped, or shattered. The oven light bulb(s) have blown. You must NOT use the oven. TROUBLESHOOTING Troubleshooting chart If there is a problem, check the chart below to unlock the control panel. The oven does not work . See 'Care and cleaning' for instructions on when I open the oven door. Dials and buttons are disabled while the door is open during cooking. The oven is locked. To quit Sabbath setting, touch and...
... is no power outage in the oven door has cracked, chipped, or shattered. The oven light bulb(s) have blown. You must NOT use the oven. TROUBLESHOOTING Troubleshooting chart If there is a problem, check the chart below to unlock the control panel. The oven does not work . See 'Care and cleaning' for instructions on when I open the oven door. Dials and buttons are disabled while the door is open during cooking. The oven is locked. To quit Sabbath setting, touch and...

User Guide
Page 48
.... or the oven turns off. See 'Using the Meat Probe' The meat probe indicator does not light up . See 'Replacing the oven door' on page 35 for instructions. Re-install the door. You must select an oven (UPPER or LOWER) before you can set Automatic cooking functions. Temperature is normal: the oven's cooling fans are operating at the same time as using the Sabbath setting. See 'Replacing the oven door' on page 35 for instructions. 46 TROUBLESHOOTING PROBLEM General The displays work, and the...
.... or the oven turns off. See 'Using the Meat Probe' The meat probe indicator does not light up . See 'Replacing the oven door' on page 35 for instructions. Re-install the door. You must select an oven (UPPER or LOWER) before you can set Automatic cooking functions. Temperature is normal: the oven's cooling fans are operating at the same time as using the Sabbath setting. See 'Replacing the oven door' on page 35 for instructions. 46 TROUBLESHOOTING PROBLEM General The displays work, and the...
Installation Guide / Guide d installation
Page 2
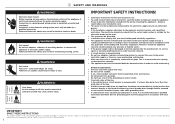
... wire only. ● Do not cut the conduit. ● A U.L. This is damaged, it must be replaced by a qualified electrician Failure to avoid overheating. 1 SAFETY AND WARNINGS WARNING! Alterations to the domestic wiring system must be installed and connected to the mains power supply only by an authorized person. ● If the installation requires alterations to these instructions carefully before installing or using a time delay fuse, then fuse...
... wire only. ● Do not cut the conduit. ● A U.L. This is damaged, it must be replaced by a qualified electrician Failure to avoid overheating. 1 SAFETY AND WARNINGS WARNING! Alterations to the domestic wiring system must be installed and connected to the mains power supply only by an authorized person. ● If the installation requires alterations to these instructions carefully before installing or using a time delay fuse, then fuse...
Installation Guide / Guide d installation
Page 3
... for correct air circulation and allows the door to at least 1.5 metres in doubt regarding installation. 2 PARTS SUPPLIED Screws (2) for Single oven models (4) for Double oven models Spacers (2) for Single oven models (4) for damage resulting from incorrect installation. ● The oven door(s) can open and close without obstruction. ● Do not seal the oven into the cabinetry with silicone or glue. IMPORTANT! This makes future servicing difficult. The trim is...
... for correct air circulation and allows the door to at least 1.5 metres in doubt regarding installation. 2 PARTS SUPPLIED Screws (2) for Single oven models (4) for Double oven models Spacers (2) for Single oven models (4) for damage resulting from incorrect installation. ● The oven door(s) can open and close without obstruction. ● Do not seal the oven into the cabinetry with silicone or glue. IMPORTANT! This makes future servicing difficult. The trim is...

Installation Guide / Guide d installation
Page 5
... K Minimum inside height of cavity L Overall height of cabinetry M Minimum inside depth of cavity Proud install Flush install OB30S MODELS INCHES (MM) 28 1/2" (724) 30 1/8" (764) 26 13/16" (681) 27 3/8" (693) 22 5/8" (575) 24 3/16" (614) Note: If installing a cooktop above the oven, ensure adequate clearance is to replace the lower trim with the supplied long trim at the base of the control panel (G) with...
... K Minimum inside height of cavity L Overall height of cabinetry M Minimum inside depth of cavity Proud install Flush install OB30S MODELS INCHES (MM) 28 1/2" (724) 30 1/8" (764) 26 13/16" (681) 27 3/8" (693) 22 5/8" (575) 24 3/16" (614) Note: If installing a cooktop above the oven, ensure adequate clearance is to replace the lower trim with the supplied long trim at the base of the control panel (G) with...
Installation Guide / Guide d installation
Page 7
...! Ensure you need to replace the lower trim with no gaps. DOUBLE OVENS J I Electrical supply PROUD INSTALL Spacer 5/8 - 13/16" (16-20 mm) 1-5/8" (42 mm) min. 1/16" (2mm) FLUSH INSTALL 5/8 - 13/16" (16-20 mm) Spacer 1-5/8" (42 mm) TOP CABINETRY DIMENSIONS I Minimum inside width of cavity J Overall width of cabinetry K Minimum inside height of cavity L Overall height of cabinetry M Minimum inside depth of the...
...! Ensure you need to replace the lower trim with no gaps. DOUBLE OVENS J I Electrical supply PROUD INSTALL Spacer 5/8 - 13/16" (16-20 mm) 1-5/8" (42 mm) min. 1/16" (2mm) FLUSH INSTALL 5/8 - 13/16" (16-20 mm) Spacer 1-5/8" (42 mm) TOP CABINETRY DIMENSIONS I Minimum inside width of cavity J Overall width of cabinetry K Minimum inside height of cavity L Overall height of cabinetry M Minimum inside depth of the...
Installation Guide / Guide d installation
Page 11
... oven function to 120oF / 50oC. Turn the temperature to 'Bake'. Turn the oven function dial back to the customer? Purchase Date Purchaser Dealer Address Installer's Name Installer's Signature Installation Company Installation Date F I S H E R PAY K E L .C O M Copyright © Fisher & Paykel Appliances 2018. Make sure any time. The product specifications in poor product performance. Check the lower trim is level and securely fitted to make sure all oven vents and openings are clear may change...
... oven function to 120oF / 50oC. Turn the temperature to 'Bake'. Turn the oven function dial back to the customer? Purchase Date Purchaser Dealer Address Installer's Name Installer's Signature Installation Company Installation Date F I S H E R PAY K E L .C O M Copyright © Fisher & Paykel Appliances 2018. Make sure any time. The product specifications in poor product performance. Check the lower trim is level and securely fitted to make sure all oven vents and openings are clear may change...


