
User Guide
Page 2
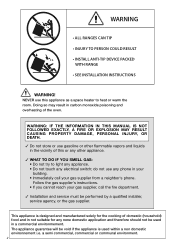
...Installation and service must be void if the appliance is designed and manufactured solely for the cooking of domestic (household) food and in not suitable for any phone in a commercial environmement. This appliance is used in your gas supplier from a neighbor's phone. do not use...electrical switch; WARNING • ALL RANGES CAN TIP • INJURY TO PERSON COULD RESULT • INSTALL ANTI-TIP DEVICE PACKED WITH RANGE • SEE INSTALLATION INSTRUCTIONS WARNING! NEVER use gasoline or other appliance. ✓ WHAT TO DO IF YOU SMELL GAS: • Do not try to heat or warm ...
...Installation and service must be void if the appliance is designed and manufactured solely for the cooking of domestic (household) food and in not suitable for any phone in a commercial environmement. This appliance is used in your gas supplier from a neighbor's phone. do not use...electrical switch; WARNING • ALL RANGES CAN TIP • INJURY TO PERSON COULD RESULT • INSTALL ANTI-TIP DEVICE PACKED WITH RANGE • SEE INSTALLATION INSTRUCTIONS WARNING! NEVER use gasoline or other appliance. ✓ WHAT TO DO IF YOU SMELL GAS: • Do not try to heat or warm ...
User Guide
Page 3
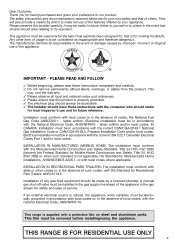
... and aluminium parts. IMPORTANT - latest edition and/or local codes. IN CANADA: Installation must be in the absence of any gas-fired equipment should leave these instructions completely and carefully. ✓ Do not remove permanently affixed labels, warnings, or plates from the product. Installation of local codes, with the national Electrical Code, ANSI/NFPA 70. THIS RANGE IS FOR RESIDENTIAL USE ONLY 3 The...
... and aluminium parts. IMPORTANT - latest edition and/or local codes. IN CANADA: Installation must be in the absence of any gas-fired equipment should leave these instructions completely and carefully. ✓ Do not remove permanently affixed labels, warnings, or plates from the product. Installation of local codes, with the national Electrical Code, ANSI/NFPA 70. THIS RANGE IS FOR RESIDENTIAL USE ONLY 3 The...

User Guide
Page 4
... local codes. 8. Shut off gas at main supply. ELECTRICAL GROUNDING INSTRUCTIONS The range must refers to the inlet pipe. Electrical Requirement Electrical installation should be used . Disconnect the electrical supply to slide it into a properly grounded socket. Carefully remove the range by a Iicensed electrician. Pushing or pulling a range (rather than using a lift jack) also increases the possibility of combustion and ventilation air. 5. D. When installing or removing the range for cleaning and/or service; When removing appliance for service...
... local codes. 8. Shut off gas at main supply. ELECTRICAL GROUNDING INSTRUCTIONS The range must refers to the inlet pipe. Electrical Requirement Electrical installation should be used . Disconnect the electrical supply to slide it into a properly grounded socket. Carefully remove the range by a Iicensed electrician. Pushing or pulling a range (rather than using a lift jack) also increases the possibility of combustion and ventilation air. 5. D. When installing or removing the range for cleaning and/or service; When removing appliance for service...

User Guide
Page 5
... personnel only. To reduce the risk from substances in fuel or from the range when opening oven door. The packaging material is recyclable and is installed, operated, and maintained according to the manufacturer's instructions. Remove the doors and the storage compartment pivoting panel before disposing of it, it is supplied with a high-pressure steam cleaning device, as it and consult your supplier or a professionally...
... personnel only. To reduce the risk from substances in fuel or from the range when opening oven door. The packaging material is recyclable and is installed, operated, and maintained according to the manufacturer's instructions. Remove the doors and the storage compartment pivoting panel before disposing of it, it is supplied with a high-pressure steam cleaning device, as it and consult your supplier or a professionally...
User Guide
Page 6
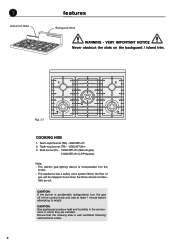
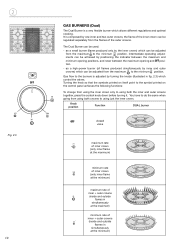
... go out. Semi-rapid burner (SR) - 6000 BTU/hr 2. Ensure that the cooking area is accidentally extinguished, turn the gas off at the control knob and wait at least 1 minute before attempting to relight. ✑1 Island trim fitted features Backguard fitted WARNING - VERY IMPORTANT NOTICE Never obstruct the slots on the backguard / island trim. 1 1 3 2 2 Fig. 1.1 COOKING HOB 1. The electric gas-lighting device is incorporated into the...
... go out. Semi-rapid burner (SR) - 6000 BTU/hr 2. Ensure that the cooking area is accidentally extinguished, turn the gas off at the control knob and wait at least 1 minute before attempting to relight. ✑1 Island trim fitted features Backguard fitted WARNING - VERY IMPORTANT NOTICE Never obstruct the slots on the backguard / island trim. 1 1 3 2 2 Fig. 1.1 COOKING HOB 1. The electric gas-lighting device is incorporated into the...

User Guide
Page 7
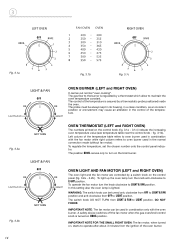
... right burner (2) control knob 6. Electronic clock/electronic alarm When the cooling fan failure warning light is OFF the cooling fan motor is lighted this indicates the malfunctioning of the cooking hob can be used. Rear left burner (2) control knob 2. Left oven and broil burner control knob 9. Only the burners of the cooling fan motor. SERVICE 7 Right oven light & fan control knob 8. Operate the cooking hob burners and the ovens as per instruction manual. You must not use the ovens. Central dual burner (3) control knob 4. Right oven and broil burner control knob 10...
... right burner (2) control knob 6. Electronic clock/electronic alarm When the cooling fan failure warning light is OFF the cooling fan motor is lighted this indicates the malfunctioning of the cooking hob can be used. Rear left burner (2) control knob 2. Left oven and broil burner control knob 9. Only the burners of the cooling fan motor. SERVICE 7 Right oven light & fan control knob 8. Operate the cooking hob burners and the ovens as per instruction manual. You must not use the ovens. Central dual burner (3) control knob 4. Right oven and broil burner control knob 10...
User Guide
Page 8
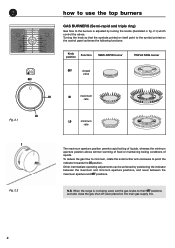
Other intermediate operating adjustments can be achieved by turning the knobs (illustrated in fig. 2.1) which control the valves. ✒2 OFF how to use the top burners GAS BURNERS (Semi-rapid and triple ring) Gas flow to the burners is not being used, set the gas knobs to the symbol printed on the main gas supply line. 8 N.B. When the range is adjusted by positioning the indicator between the maximum and minimum aperture positions, and...
Other intermediate operating adjustments can be achieved by turning the knobs (illustrated in fig. 2.1) which control the valves. ✒2 OFF how to use the top burners GAS BURNERS (Semi-rapid and triple ring) Gas flow to the burners is not being used, set the gas knobs to the symbol printed on the main gas supply line. 8 N.B. When the range is adjusted by positioning the indicator between the maximum and minimum aperture positions, and...
User Guide
Page 9
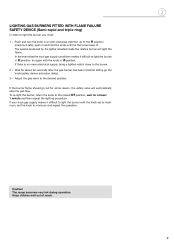
.... If your local gas supply makes it difficult to light the burner in HI position, try again with the knob set to maximum, set the knob to the HI position (maximum rate), push in LO position. Push and turn the knob in an anti-clockwise direction up to minimum and repeat the operation. ❂2 Caution! Adjust the gas valve to the burner. 2 - The range becomes very hot during operation. The sparks...
.... If your local gas supply makes it difficult to light the burner in HI position, try again with the knob set to maximum, set the knob to the HI position (maximum rate), push in LO position. Push and turn the knob in an anti-clockwise direction up to minimum and repeat the operation. ❂2 Caution! Adjust the gas valve to the burner. 2 - The range becomes very hot during operation. The sparks...
User Guide
Page 10
... flames in fig. 2.3) which allows different regulations and optimal cooking. ❂2 LO Fig. 2.3 GAS BURNERS (Dual) The Dual Burner is a very flexible burner which control the valves. It is composed by turning the knobs (illustrated in simultaneously at the minimum) 10 Intermediate operating adjust- OFF Turning the knob so that the symbols printed on itself point to the symbol printed on the control panel achieves the following functions: To change from using...
... flames in fig. 2.3) which allows different regulations and optimal cooking. ❂2 LO Fig. 2.3 GAS BURNERS (Dual) The Dual Burner is a very flexible burner which control the valves. It is composed by turning the knobs (illustrated in simultaneously at the minimum) 10 Intermediate operating adjust- OFF Turning the knob so that the symbols printed on itself point to the symbol printed on the control panel achieves the following functions: To change from using...
User Guide
Page 11
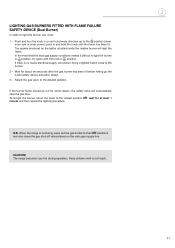
... crown); Push and turn the knob in an anti-clockwise direction up to light the burner in HI position, try again with the knob in and hold the knob until the flame has been lit. When the range is no mains electrical supply connection, bring a lighted match close the gas shut-off valve placed on the main gas supply line. In the event that the local gas supply conditions makes it difficult...
... crown); Push and turn the knob in an anti-clockwise direction up to light the burner in HI position, try again with the knob in and hold the knob until the flame has been lit. When the range is no mains electrical supply connection, bring a lighted match close the gas shut-off valve placed on the main gas supply line. In the event that the local gas supply conditions makes it difficult...
User Guide
Page 12
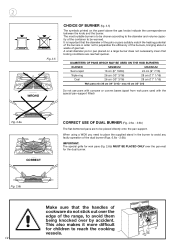
.... A small diameter pot or pan placed on the panel above the gas knobs indicate the correspondence between the knob and the burner. IMPORTANT: The special grille for the dual burner. Fig. 2.6b 12 Make sure that the handles of cookware do not stick out over the edge of the dual burner (Figs.-2.6a - 2.6b). ...to be warmed. The most suitable burner is important that the diameter of the pots or pans suitably match the heating potential of the burners in the burner to avoid any faulty operation of the range, to reach the cooking vessels. When using a WOK you need to place the supplied stand ...
.... A small diameter pot or pan placed on the panel above the gas knobs indicate the correspondence between the knob and the burner. IMPORTANT: The special grille for the dual burner. Fig. 2.6b 12 Make sure that the handles of cookware do not stick out over the edge of the dual burner (Figs.-2.6a - 2.6b). ...to be warmed. The most suitable burner is important that the diameter of the pots or pans suitably match the heating potential of the burners in the burner to avoid any faulty operation of the range, to reach the cooking vessels. When using a WOK you need to place the supplied stand ...
User Guide
Page 13
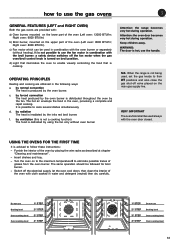
... TIME It is possible to use the gas ovens ✣3 GENERAL FEATURES (LEFT and RIGHT OVEN) Both the gas ovens are obtained in the oven, provoking a complete and rapid cooking. f. Furnish the interior of the oven (Left oven: 13000 BTU/hr; The same operation should be used always with the oven burner or separately (without oven burner. d) Light that is hot, use Broiling level Oven cooking level Oven cooking level 13 WARNING: The door is cooking. c) Fan motor which can be followed for broil burner. - OPERATING PRINCIPLES Heating...
... TIME It is possible to use the gas ovens ✣3 GENERAL FEATURES (LEFT and RIGHT OVEN) Both the gas ovens are obtained in the oven, provoking a complete and rapid cooking. f. Furnish the interior of the oven (Left oven: 13000 BTU/hr; The same operation should be used always with the oven burner or separately (without oven burner. d) Light that is hot, use Broiling level Oven cooking level Oven cooking level 13 WARNING: The door is cooking. c) Fan motor which can be followed for broil burner. - OPERATING PRINCIPLES Heating...
User Guide
Page 14
... setting also the oven lamp is regulated by a thermostatic probe positioned inside the oven. The switch knob DO NOT TURN from LIGHT & FAN to LIGHT & FAN position. IMPORTANT NOTE FOR THE SMALL RIGHT OVEN: The fan motor, when turned on, starts to oven burner used in the control of the oven burner. The control of the temperature table refers to operate after about 3 minutes from OFF to the burner is lighted. A safety device switches off the fan motor when the gas oven/broil control knob...
... setting also the oven lamp is regulated by a thermostatic probe positioned inside the oven. The switch knob DO NOT TURN from LIGHT & FAN to LIGHT & FAN position. IMPORTANT NOTE FOR THE SMALL RIGHT OVEN: The fan motor, when turned on, starts to oven burner used in the control of the oven burner. The control of the temperature table refers to operate after about 3 minutes from OFF to the burner is lighted. A safety device switches off the fan motor when the gas oven/broil control knob...
User Guide
Page 15
... the oven door slowly and adjust the burner according to max position 8. 3) Release the knob and check the oven burner has lit; To light the oven burner operate as follows: 1) Open the oven door to the desired temperature. If the flame extinguishes for any reason, the safety valve will automatically shut off the oven 5 minutes before the theoretical time to the burner. TRADITIONAL BAKING (OVEN BURNER WITHOUT FAN MOTOR) Before introducing the food, preheat the oven to...
... the oven door slowly and adjust the burner according to max position 8. 3) Release the knob and check the oven burner has lit; To light the oven burner operate as follows: 1) Open the oven door to the desired temperature. If the flame extinguishes for any reason, the safety valve will automatically shut off the oven 5 minutes before the theoretical time to the burner. TRADITIONAL BAKING (OVEN BURNER WITHOUT FAN MOTOR) Before introducing the food, preheat the oven to...
User Guide
Page 16
... Defrosting takes place by turning the LIGHT & FAN control knob (fig. 3.2a-3.2b) on . ❃3 CONVECTION BAKING WITH VENTILATION (OVEN BURNER WITH FAN MOTOR) After lighting the oven burner switch on the fan motor by the fan, without the smells and flavours mixing. Different dishes must be cooked together without heating. For a correct preheating operation, it is possible to cook various different foods at different times according to the cooking time required for : For foods...
... Defrosting takes place by turning the LIGHT & FAN control knob (fig. 3.2a-3.2b) on . ❃3 CONVECTION BAKING WITH VENTILATION (OVEN BURNER WITH FAN MOTOR) After lighting the oven burner switch on the fan motor by the fan, without the smells and flavours mixing. Different dishes must be cooked together without heating. For a correct preheating operation, it is possible to cook various different foods at different times according to the cooking time required for : For foods...

User Guide
Page 17
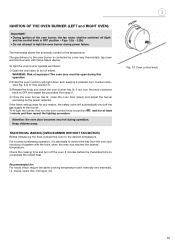
...; OVEN Fig. 3.5 Oven control knob 17 The oven door must be used in combination with oven door closed. Attention: the oven door becomes very hot during operation. To re-light the burner, first turn the knob counter-clockwise back to the full extent. To light the broil burner operate as follow: 1) Open the oven door to OFF and repeat the procedure from step 2. 4) Once the broil burner has lit, close the oven door slowly. If the flame extinguishes for broiling. IGNITION...
...; OVEN Fig. 3.5 Oven control knob 17 The oven door must be used in combination with oven door closed. Attention: the oven door becomes very hot during operation. To re-light the burner, first turn the knob counter-clockwise back to the full extent. To light the broil burner operate as follow: 1) Open the oven door to OFF and repeat the procedure from step 2. 4) Once the broil burner has lit, close the oven door slowly. If the flame extinguishes for broiling. IGNITION...
User Guide
Page 21
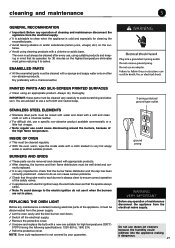
... are advised to use it when the burners are not in place. cleaning and maintenance ✕5 GENERAL RECOMANDATION ✓ Important: Before any maintenance is started involving electrical parts of the appliance, it must be disconnected from the power supply. ✓ Let the oven cavity and the broil burner cool down; ✓ Switch off the electrical supply; ✓ Remove the protective cover; ✓ Unscrew and replace the bulb with a new...
... are advised to use it when the burners are not in place. cleaning and maintenance ✕5 GENERAL RECOMANDATION ✓ Important: Before any maintenance is started involving electrical parts of the appliance, it must be disconnected from the power supply. ✓ Let the oven cavity and the broil burner cool down; ✓ Switch off the electrical supply; ✓ Remove the protective cover; ✓ Unscrew and replace the bulb with a new...
User Guide
Page 24
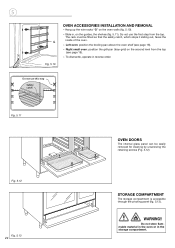
Left oven: position the broiling pan above the oven shelf (see page 19). - WARNING!! Right small oven: position the grill-pan (tray+grid) on the second level from the top. To dismantle, operate in , on the oven walls (fig. 5.10). - ❅ 5 G Fig. 5.10 OVEN ACCESSORIES INSTALLATION AND REMOVAL - Slide in reverse order. Do not use this step Safety catch Fig. 5.11 OVEN DOORS The internal glass panel can be...
Left oven: position the broiling pan above the oven shelf (see page 19). - WARNING!! Right small oven: position the grill-pan (tray+grid) on the second level from the top. To dismantle, operate in , on the oven walls (fig. 5.10). - ❅ 5 G Fig. 5.10 OVEN ACCESSORIES INSTALLATION AND REMOVAL - Slide in reverse order. Do not use this step Safety catch Fig. 5.11 OVEN DOORS The internal glass panel can be...
User Guide
Page 25
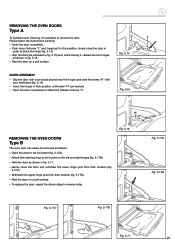
... hooked. - Grip the door (as indicated in fig. 5.15) and, while closing it is possible to remove the door. Hold the door as shown in reverse order. Grip the door with your hands placed near the hinges and raise the levers "H" with your forefingers (fig. 5.16) - Rest the door on a soft surface. REMOVING THE OVEN DOORS Type A To facilitate oven cleaning, it , release...
... hooked. - Grip the door (as indicated in fig. 5.15) and, while closing it is possible to remove the door. Hold the door as shown in reverse order. Grip the door with your hands placed near the hinges and raise the levers "H" with your forefingers (fig. 5.16) - Rest the door on a soft surface. REMOVING THE OVEN DOORS Type A To facilitate oven cleaning, it , release...
User Guide
Page 26
... range when in use. • Do not allow the oven to heat for servicing or maintenance except by suitably qualified personnel 26 ❅5 DO'S AND DO NOT'S • Do always use the oven with the door closed. • Do always broil with the door closed. • Do read the user instructions carefully before using for the first time, in order to expel any external covers be removed...
... range when in use. • Do not allow the oven to heat for servicing or maintenance except by suitably qualified personnel 26 ❅5 DO'S AND DO NOT'S • Do always use the oven with the door closed. • Do always broil with the door closed. • Do read the user instructions carefully before using for the first time, in order to expel any external covers be removed...


