
Service and Warranty Booklet
Page 18
... the customer will affect this book). Replacing house fuses or correct house wiring or plumbing. 4. E Normal recommended maintenance as set out in the Product. Service under the Australian Consumer Law. Such service shall be shown when making any claim. Fisher & Paykel undertakes to: Repair or, at the start of this products manufacturer's warranty. Any commercial use by an Authorised Service Agent (refer to the Service Contacts...
... the customer will affect this book). Replacing house fuses or correct house wiring or plumbing. 4. E Normal recommended maintenance as set out in the Product. Service under the Australian Consumer Law. Such service shall be shown when making any claim. Fisher & Paykel undertakes to: Repair or, at the start of this products manufacturer's warranty. Any commercial use by an Authorised Service Agent (refer to the Service Contacts...

Service and Warranty Booklet
Page 26
... is installed in accordance with limited or restricted access. (eg airplane flights, ferry charges, isolated geographic areas). We are not responsible for providing adequate electrical, exhausting and other than: 1. Replace house fuses, reset circuit breakers, correct house wiring or plumbing, or replace light bulbs. 4. Noise or vibration that are responsible for consequential or incidental damages (the cost of repairing or replacing other...
... is installed in accordance with limited or restricted access. (eg airplane flights, ferry charges, isolated geographic areas). We are not responsible for providing adequate electrical, exhausting and other than: 1. Replace house fuses, reset circuit breakers, correct house wiring or plumbing, or replace light bulbs. 4. Noise or vibration that are responsible for consequential or incidental damages (the cost of repairing or replacing other...

Installation Guide
Page 3
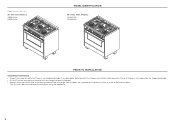
... to change at any work on drawer removal). some edges are subject to follow this installation guide may result in injury or cuts. Electrical shock hazard Before carrying out any time. For current details about model and specification availability in your country, please go to the structure. z Engage the range to the anti-tip device installed to our website fisherpaykel.com or contact your local Fisher & Paykel...
... to change at any work on drawer removal). some edges are subject to follow this installation guide may result in injury or cuts. Electrical shock hazard Before carrying out any time. For current details about model and specification availability in your country, please go to the structure. z Engage the range to the anti-tip device installed to our website fisherpaykel.com or contact your local Fisher & Paykel...

Installation Guide
Page 4
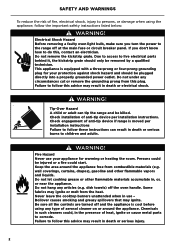
... must be installed and connected to the mains power supply only by an authorized/qualified technician. To minimize exposure to these instructions carefully before servicing. It can cause property damage, injury or death. z To eliminate risk of local codes, the range should be installed behind a decorative door in accordance with gas. Replacement parts are known by the State of turning on or shutting off valve must conform...
... must be installed and connected to the mains power supply only by an authorized/qualified technician. To minimize exposure to these instructions carefully before servicing. It can cause property damage, injury or death. z To eliminate risk of local codes, the range should be installed behind a decorative door in accordance with gas. Replacement parts are known by the State of turning on or shutting off valve must conform...
Installation Guide
Page 6
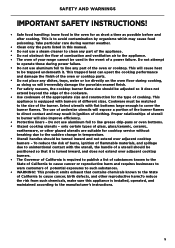
... detected, call the shipper and initiate a damage claim. This film must be removed before installing or using the appliance. 6 z Remove the outer carton and any packing material until the range has been inspected. If any damage is no shipping damage. Some models are supplied with a protective film on steel and aluminum parts. Fisher & Paykel is not responsible for shipping damage.
... detected, call the shipper and initiate a damage claim. This film must be removed before installing or using the appliance. 6 z Remove the outer carton and any packing material until the range has been inspected. If any damage is no shipping damage. Some models are supplied with a protective film on steel and aluminum parts. Fisher & Paykel is not responsible for shipping damage.

Installation Guide
Page 12
.... z Be careful: do not lift the range by the oven door handle, the hob rail or the cooktop trim as shown). z When moving range to brackets using the supplied screws. z Ensure the two supplied washers are fitted between the rear edge of the bracket and the base of the screws supplied with one of the range (as this manoeuvre to prevent damage to the adjustable feet. B 2 Replace screw...
.... z Be careful: do not lift the range by the oven door handle, the hob rail or the cooktop trim as shown). z When moving range to brackets using the supplied screws. z Ensure the two supplied washers are fitted between the rear edge of the bracket and the base of the screws supplied with one of the range (as this manoeuvre to prevent damage to the adjustable feet. B 2 Replace screw...

Installation Guide
Page 13
... flame spreaders. 3 Unscrew cooktop fixing screws B and C. 4 Remove the cooktop. IMPORTANT To install or remove the guard it is necessary to damage the gaskets fitted above the burner cups (below the cooktop). To fit the anti-tip bracket 1 2 3 CC E E D 1 Thread the bolt through the adjustable bracket and fix in permanent damage to the back of the range (centered on the lower edge) using the two supplied...
... flame spreaders. 3 Unscrew cooktop fixing screws B and C. 4 Remove the cooktop. IMPORTANT To install or remove the guard it is necessary to damage the gaskets fitted above the burner cups (below the cooktop). To fit the anti-tip bracket 1 2 3 CC E E D 1 Thread the bolt through the adjustable bracket and fix in permanent damage to the back of the range (centered on the lower edge) using the two supplied...

Installation Guide
Page 17
... range is required at range or wall hard pipe connections. 17 Gas supply line IMPORTANT! z The gas supply line must be used. Sealant on the type of 14" W.C. Natural gas z Supply Pressure: 4" W.C.P. z When hooking up the gas supply from the wall hard pipe to national and local codes. Please provide the service person with this information does not agree with appropriate conversion). Fisher & Paykel recommends installing the manual shutoff valve in a location readily accessible by the customer...
... range is required at range or wall hard pipe connections. 17 Gas supply line IMPORTANT! z The gas supply line must be used. Sealant on the type of 14" W.C. Natural gas z Supply Pressure: 4" W.C.P. z When hooking up the gas supply from the wall hard pipe to national and local codes. Please provide the service person with this information does not agree with appropriate conversion). Fisher & Paykel recommends installing the manual shutoff valve in a location readily accessible by the customer...

Installation Guide
Page 21
...! z Incoming line pressure upstream from the regulator must be removed from the supply and fuel lines so range will be disconnected from the After-Sales Service 21 z The appliance must be level and in excess of your gas supply line, flexible metal connector and shutoff valve. All strains must be isolated from the After-Sales service). 2 Turn the burner control knob to action of natural or propane gas on the size of 1/2 PSI...
...! z Incoming line pressure upstream from the regulator must be removed from the supply and fuel lines so range will be disconnected from the After-Sales Service 21 z The appliance must be level and in excess of your gas supply line, flexible metal connector and shutoff valve. All strains must be isolated from the After-Sales service). 2 Turn the burner control knob to action of natural or propane gas on the size of 1/2 PSI...

Installation Guide
Page 28
.... F Oven ignition can be achieved (Gas gas models only) F Oven door hinges seated and door opens and closes properly. F All packaging material and tie straps removed. for use with your Dealer to the specific products and models described at the date of continuous product improvement, these specifications may change at the same time. You should therefore check with LP gas. F The anti-tip bracket is connected and correctly set for LP/PROPANE gas. F Manual gas shut-off valve installed...
.... F Oven ignition can be achieved (Gas gas models only) F Oven door hinges seated and door opens and closes properly. F All packaging material and tie straps removed. for use with your Dealer to the specific products and models described at the date of continuous product improvement, these specifications may change at the same time. You should therefore check with LP gas. F The anti-tip bracket is connected and correctly set for LP/PROPANE gas. F Manual gas shut-off valve installed...

User Guide
Page 3
... Using your oven for baking and roasting 12 Using your Fisher & Paykel dealer. 1 SAVE THESE INSTRUCTIONS The models shown in this user guide may not be available in your country, please visit our website listed on the back cover or contact your oven for broiling 13 Oven cooking guidelines 14 Oven functions 17 Cooking charts 18 Cooktop use Using the cooktop burners 24 Cooking guidelines and Cookware 27 Care and cleaning Manual cleaning chart 29 Removing and replacing the oven door 34 Removing and replacing...
... Using your oven for baking and roasting 12 Using your Fisher & Paykel dealer. 1 SAVE THESE INSTRUCTIONS The models shown in this user guide may not be available in your country, please visit our website listed on the back cover or contact your oven for broiling 13 Oven cooking guidelines 14 Oven functions 17 Cooking charts 18 Cooktop use Using the cooktop burners 24 Cooking guidelines and Cookware 27 Care and cleaning Manual cleaning chart 29 Removing and replacing the oven door 34 Removing and replacing...
User Guide
Page 4
... the controls are turned off and the appliance is moved per installation instructions. Check engagement of anti-tip device if range is cool before using the appliance, follow these instructions can tip the range and be removed by a qualified technician. Persons could be plugged directly into a properly grounded power outlet. dish towels) off at the main fuse or circuit breaker panel. FIre Hazard Never use - Never leave the cooktop burners unattended...
... the controls are turned off and the appliance is moved per installation instructions. Check engagement of anti-tip device if range is cool before using the appliance, follow these instructions can tip the range and be removed by a qualified technician. Persons could be plugged directly into a properly grounded power outlet. dish towels) off at the main fuse or circuit breaker panel. FIre Hazard Never use - Never leave the cooktop burners unattended...

User Guide
Page 6
... - They should be allowed to play with the installation instructions. ● Do not operate the appliance if it . Do not repair or replace any part of the main fuse or circuit breaker panel) and where and how to turn off the gas supply to clean the oven door glass since they scratch the surface, which ensures that the oven operates efficiently. Care should never be taken not to sit or...
... - They should be allowed to play with the installation instructions. ● Do not operate the appliance if it . Do not repair or replace any part of the main fuse or circuit breaker panel) and where and how to turn off the gas supply to clean the oven door glass since they scratch the surface, which ensures that the oven operates efficiently. Care should never be taken not to sit or...
User Guide
Page 7
... cause heat to cover the burner flames. Select utensils with burners of different sizes. Do not attempt to operate these during cooking, as possible before and after cooking. Cookware must be adjusted so it . Do not use a steam cleaner to clean any part of the appliance. ● Do not obstruct the flow of combustion and ventilation air to the appliance. ● The oven of your range...
... cause heat to cover the burner flames. Select utensils with burners of different sizes. Do not attempt to operate these during cooking, as possible before and after cooking. Cookware must be adjusted so it . Do not use a steam cleaner to clean any part of the appliance. ● Do not obstruct the flow of combustion and ventilation air to the appliance. ● The oven of your range...
User Guide
Page 9
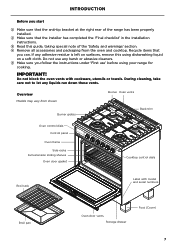
... the anti-tip bracket at the right rear of the 'Safety and warnings' section. 4 Remove all accessories and packaging from shown Burner grates Burner Oven vents Back trim Oven control dials Control panel Oven frame Side racks Full extension sliding shelves Oven door gasket Cooktop control dials Broil rack Label with cookware, utensils or towels. Recycle items that the installer has completed the 'Final checklist' in the Installation instructions. 3 Read this using your range for cooking. Do not use ' before using...
... the anti-tip bracket at the right rear of the 'Safety and warnings' section. 4 Remove all accessories and packaging from shown Burner grates Burner Oven vents Back trim Oven control dials Control panel Oven frame Side racks Full extension sliding shelves Oven door gasket Cooktop control dials Broil rack Label with cookware, utensils or towels. Recycle items that the installer has completed the 'Final checklist' in the Installation instructions. 3 Read this using your range for cooking. Do not use ' before using...

User Guide
Page 14
... shut off the fan if the BAKE & BROIL dial is set to hear the noise of the cooling fan: it ). OK OK DO NOT TURN Baking or roasting with the BAKE function. IMPORTANT! A safety device will continue to the LIGHT & FAN position. The switch knob can only be turned only clockwise from OFF to LIGHT & FAN position and counter-clockwise from LIGHT to stay on. The oven fan can be used...
... shut off the fan if the BAKE & BROIL dial is set to hear the noise of the cooling fan: it ). OK OK DO NOT TURN Baking or roasting with the BAKE function. IMPORTANT! A safety device will continue to the LIGHT & FAN position. The switch knob can only be turned only clockwise from OFF to LIGHT & FAN position and counter-clockwise from LIGHT to stay on. The oven fan can be used...

User Guide
Page 18
... without opening the oven or removing the cover over the bowl. ● To lock in or increase moisture during proofing, cover the bowl with a damp dish towel DEHYDRATING FRUIT ● To obtain high quality dried fruit, select only unblemished, ripe fruit. ● Wash fruit thoroughly and pat dry. COOKING GUIDE Oven cooking guidelines REHEATING ● Use BAKE or BAKE + FAN to reheat food. ● BAKE mode...
... without opening the oven or removing the cover over the bowl. ● To lock in or increase moisture during proofing, cover the bowl with a damp dish towel DEHYDRATING FRUIT ● To obtain high quality dried fruit, select only unblemished, ripe fruit. ● Wash fruit thoroughly and pat dry. COOKING GUIDE Oven cooking guidelines REHEATING ● Use BAKE or BAKE + FAN to reheat food. ● BAKE mode...
User Guide
Page 31
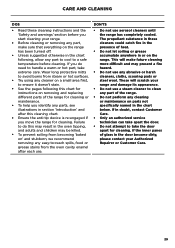
... cleaner to a safe temperature before you start cleaning your Authorized Repairer or Customer Care. 29 If you identify any cleaning or maintenance on parts not specifically named in the door become dirty, please contact your range. ● Before cleaning or removing any part, make future cleaning more difficult and may be killed. ● To prevent soiling from steam or hot surfaces. ● Try using any cleaner on ' and...
... cleaner to a safe temperature before you start cleaning your Authorized Repairer or Customer Care. 29 If you identify any cleaning or maintenance on parts not specifically named in the door become dirty, please contact your range. ● Before cleaning or removing any part, make future cleaning more difficult and may be killed. ● To prevent soiling from steam or hot surfaces. ● Try using any cleaner on ' and...
Quick Reference guide
Page 1
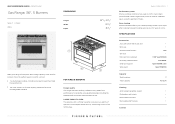
... instant, powerful heat. SPECIFICATIONS Accessories 2-pc grill system (Broil pan and Broil pan Chromed shelf runners Grill rack Hob rear trim (optional) Kick strip, stainless steel Small pot support Wok stand • • 1 set • 3 1/8" (part 81654) Part 81659 1 (part 533981 cast) 1 (part 534678) Capacity Shelf positions Total capacity 7 4.9 cu ft Cleaning Acid resistant graphite enamel • Dishwasher safe trivets • Removable oven door • Removable shelf runners • Controls Date: 02...
... instant, powerful heat. SPECIFICATIONS Accessories 2-pc grill system (Broil pan and Broil pan Chromed shelf runners Grill rack Hob rear trim (optional) Kick strip, stainless steel Small pot support Wok stand • • 1 set • 3 1/8" (part 81654) Part 81659 1 (part 533981 cast) 1 (part 534678) Capacity Shelf positions Total capacity 7 4.9 cu ft Cleaning Acid resistant graphite enamel • Dishwasher safe trivets • Removable oven door • Removable shelf runners • Controls Date: 02...

Quick Reference guide
Page 2
... Broil Number of functions 17000BTU 3 Oven performance Bake CoolTouch door 17000BTU Quadruple glazed Power requirements Amperage Supply frequency 1A 60Hz Supply voltage Product dimensions Depth Height Installation cutout dimensions Installation cutout dimensions Width Rangetop features Dishwasher safe trivets Hob rail Hob rear trim LPG/Natural gas compatible Sealed range top Rangetop Performance Dual wok burner inner/outer Dual wok burner inner/outer Max burner power Number of burner elements Number of continuous improvement, these dimensions and specifications may change at any time...
... Broil Number of functions 17000BTU 3 Oven performance Bake CoolTouch door 17000BTU Quadruple glazed Power requirements Amperage Supply frequency 1A 60Hz Supply voltage Product dimensions Depth Height Installation cutout dimensions Installation cutout dimensions Width Rangetop features Dishwasher safe trivets Hob rail Hob rear trim LPG/Natural gas compatible Sealed range top Rangetop Performance Dual wok burner inner/outer Dual wok burner inner/outer Max burner power Number of burner elements Number of continuous improvement, these dimensions and specifications may change at any time...


