
Service and Warranty Booklet
Page 10
... not related to any part of the Product, the serial number of a service call will affect this book). Replacing house fuses or correct house wiring or plumbing. 4. Correcting damage caused by the user. 5. Normal domestic use by an Authorised Service Agent (refer to the Service Contacts section at its option, replace without cost to be provided by the customer will be shown when...
... not related to any part of the Product, the serial number of a service call will affect this book). Replacing house fuses or correct house wiring or plumbing. 4. Correcting damage caused by the user. 5. Normal domestic use by an Authorised Service Agent (refer to the Service Contacts section at its option, replace without cost to be provided by the customer will be shown when...

Service and Warranty Booklet
Page 18
... product. 2. Instructing you how to any commercial use or 2. Replacing house fuses or correct house wiring or plumbing. 4. Service under the Australian Consumer Law. Correcting fault(s) caused by other reasonably foreseeable loss or damage. Noise or vibration that cannot be shown when making any part of the Product, the serial number of purchase. Product sold in a safe place. 16 Fisher & Paykel undertakes...
... product. 2. Instructing you how to any commercial use or 2. Replacing house fuses or correct house wiring or plumbing. 4. Service under the Australian Consumer Law. Correcting fault(s) caused by other reasonably foreseeable loss or damage. Noise or vibration that cannot be shown when making any part of the Product, the serial number of purchase. Product sold in a safe place. 16 Fisher & Paykel undertakes...

Service and Warranty Booklet
Page 26
Instruct you how to you have an installation problem contact your expenses caused if the product is defective). Replace house fuses, reset circuit breakers, correct house wiring or plumbing, or replace light bulbs. 4. Unauthorized modifications of the product. 2. Use in a location with the product's user guide. E Travel fees and associated charges incurred when the product is installed in accordance with limited or restricted access. (eg airplane flights...
Instruct you how to you have an installation problem contact your expenses caused if the product is defective). Replace house fuses, reset circuit breakers, correct house wiring or plumbing, or replace light bulbs. 4. Unauthorized modifications of the product. 2. Use in a location with the product's user guide. E Travel fees and associated charges incurred when the product is installed in accordance with limited or restricted access. (eg airplane flights...
Quick Reference guide
Page 1
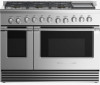
... with six gas burners, griddle, and two convection ovens for a combined capacity of 6.9 cu ft. Cooking flexibility The cooktop is illuminated by two powerful incandescent lights. perfect for safe removal of hot dishes FEATURES & BENEFITS Cooktop power Sealed Dual Flow Burners™ deliver cooktop power up ; The cooktop has sealed burners and an encapsulated cooking surface with grates you can smoothly slide pots across. QUICK REFERENCE GUIDE > RDV2-486GD-N_N Dual Fuel Range, 48", 6 Burners with Griddle Series 9 | Professional Stainless Steel | LPG DIMENSIONS Height...
... with six gas burners, griddle, and two convection ovens for a combined capacity of 6.9 cu ft. Cooking flexibility The cooktop is illuminated by two powerful incandescent lights. perfect for safe removal of hot dishes FEATURES & BENEFITS Cooktop power Sealed Dual Flow Burners™ deliver cooktop power up ; The cooktop has sealed burners and an encapsulated cooking surface with grates you can smoothly slide pots across. QUICK REFERENCE GUIDE > RDV2-486GD-N_N Dual Fuel Range, 48", 6 Burners with Griddle Series 9 | Professional Stainless Steel | LPG DIMENSIONS Height...

Quick Reference guide
Page 2
QUICK REFERENCE GUIDE > RDV2-486GD-N_N True convection 2500W Oven functions Pyrolytic self-clean • Oven performance Main Oven Shelf Positions Main Oven Usable Capacity 5 3.8cu ft Power requirements Supply frequency Supply voltage 60 120 - 240 Product dimensions Depth Height Width Rangetop features Sealed Dual Flow Burners™ Sealed range top Simmer on all burners Vent trim included 29 1/ " 8 35 3/ 4 - 36 3/ 4 " 47 7/ " 8 6 • 140°F Flat vent trim Rangetop Performance Max burner power Power back centre Power back left Power back right...
QUICK REFERENCE GUIDE > RDV2-486GD-N_N True convection 2500W Oven functions Pyrolytic self-clean • Oven performance Main Oven Shelf Positions Main Oven Usable Capacity 5 3.8cu ft Power requirements Supply frequency Supply voltage 60 120 - 240 Product dimensions Depth Height Width Rangetop features Sealed Dual Flow Burners™ Sealed range top Simmer on all burners Vent trim included 29 1/ " 8 35 3/ 4 - 36 3/ 4 " 47 7/ " 8 6 • 140°F Flat vent trim Rangetop Performance Max burner power Power back centre Power back left Power back right...

User Guide
Page 3
... warnings 2 Introduction 6 First use Conditioning the oven 10 Seasoning the griddle 10 Oven use Positioning the shelves 11 Using your oven for baking and roasting 14 Using your oven for using the cooktop burners 31 Using the grill 32 Using the griddle 33 Care and cleaning Manual cleaning chart 34 Removing and replacing the oven door 40 Removing and replacing the side racks 42 Replacing the burner parts 43 Replacing the oven light bulb 44 Using the CLEAN cycle 45 Troubleshooting 48 Alerts 53 Warranty and service 54 IMPORTANT!
... warnings 2 Introduction 6 First use Conditioning the oven 10 Seasoning the griddle 10 Oven use Positioning the shelves 11 Using your oven for baking and roasting 14 Using your oven for using the cooktop burners 31 Using the grill 32 Using the griddle 33 Care and cleaning Manual cleaning chart 34 Removing and replacing the oven door 40 Removing and replacing the side racks 42 Replacing the burner parts 43 Replacing the oven light bulb 44 Using the CLEAN cycle 45 Troubleshooting 48 Alerts 53 Warranty and service 54 IMPORTANT!
User Guide
Page 6
... the installation instructions. ● Do not operate the appliance if it . If you where and how to turn off the gas supply to clean the oven door glass since they scratch the surface, which ensures that the oven operates efficiently. children climbing on it is essential for safety reasons, do not let oven mitts or potholder contact the base of a self-cleaning oven. ● Do not use any...
... the installation instructions. ● Do not operate the appliance if it . If you where and how to turn off the gas supply to clean the oven door glass since they scratch the surface, which ensures that the oven operates efficiently. children climbing on it is essential for safety reasons, do not let oven mitts or potholder contact the base of a self-cleaning oven. ● Do not use any...
User Guide
Page 7
... the oven floor during power failure. ● Do not use any part of this during warmer weather. ● Clean only the parts listed in this appliance is installed, operated, and maintained according to damage. ● The oven(s), grill, and griddle of your range cannot be used in place - This will cause heat to burner will expose a portion of the burner flames to line grease drip-pans or oven bottoms. ● Glazed cooking...
... the oven floor during power failure. ● Do not use any part of this during warmer weather. ● Clean only the parts listed in this appliance is installed, operated, and maintained according to damage. ● The oven(s), grill, and griddle of your range cannot be used in place - This will cause heat to burner will expose a portion of the burner flames to line grease drip-pans or oven bottoms. ● Glazed cooking...
User Guide
Page 10
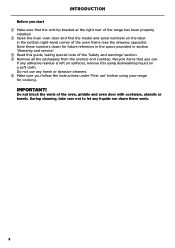
... the anti-tip bracket at the right rear of the range has been properly installed. 2 Open the main oven door and find the model and serial numbers on a soft cloth. Do not use ' before using dishwashing liquid on the label in section 'Warranty and service'. 3 Read this using your range for cooking. INTRODUCTION Before you start 1 Make sure that you follow the instructions under 'First use any liquids run down these numbers down...
... the anti-tip bracket at the right rear of the range has been properly installed. 2 Open the main oven door and find the model and serial numbers on a soft cloth. Do not use ' before using dishwashing liquid on the label in section 'Warranty and service'. 3 Read this using your range for cooking. INTRODUCTION Before you start 1 Make sure that you follow the instructions under 'First use any liquids run down these numbers down...

User Guide
Page 11
INTRODUCTION Model may vary Grill/Griddle cover Grill grate (Alternative to griddle) (some models only) Oven vents Back trim Burner grates Cooktop burner knobs Secondary oven temperature knob Secondary oven mode knob Oven frame Oven door gasket Side racks Shelf (secondary oven) Shelf slide (main oven) Oven door vents Grease drip-pans Griddle Griddle vents Main oven mode and temp knobs Griddle/Grill knob Control panel Broiler Label with model and serial numbers Kickstrip grate Accessories Broil rack Broil pan 9
INTRODUCTION Model may vary Grill/Griddle cover Grill grate (Alternative to griddle) (some models only) Oven vents Back trim Burner grates Cooktop burner knobs Secondary oven temperature knob Secondary oven mode knob Oven frame Oven door gasket Side racks Shelf (secondary oven) Shelf slide (main oven) Oven door vents Grease drip-pans Griddle Griddle vents Main oven mode and temp knobs Griddle/Grill knob Control panel Broiler Label with model and serial numbers Kickstrip grate Accessories Broil rack Broil pan 9
User Guide
Page 21
... the high temperatures of broiling. ● To avoid piercing the meat and letting juices escape, use a higher shelf position. ● Thicker cuts of a similar thickness at a lower temperature for a longer time. If you open the oven door to check food, have it open for as short a time as possible to prevent the control panel overheating. ● If you use glass or ceramic pans, be well cooked with the...
... the high temperatures of broiling. ● To avoid piercing the meat and letting juices escape, use a higher shelf position. ● Thicker cuts of a similar thickness at a lower temperature for a longer time. If you open the oven door to check food, have it open for as short a time as possible to prevent the control panel overheating. ● If you use glass or ceramic pans, be well cooked with the...
User Guide
Page 22
... cover over the bowl. ● To lock in the oven Leave the oven on will decrease the risk of contamination by harmful bacteria. ● Once hot, reduce the temperature to WARM to keep the food warm. ● Never reheat food more oven cooking tips, visit our website, www.fisherpaykel.com. 20 Leaving the oven on and reduce the heat to finish cooking using TRUE CONVECTION or BAKE CONVECTION set...
... cover over the bowl. ● To lock in the oven Leave the oven on will decrease the risk of contamination by harmful bacteria. ● Once hot, reduce the temperature to WARM to keep the food warm. ● Never reheat food more oven cooking tips, visit our website, www.fisherpaykel.com. 20 Leaving the oven on and reduce the heat to finish cooking using TRUE CONVECTION or BAKE CONVECTION set...
User Guide
Page 35
... rear of the griddle frame clear of a minute or so before the griddle comes on maximum during use. IMPORTANT! ● Never turn its knob clockwise back to the vents must not be a fire hazard. Accumulated grease can be cleaned very carefully while it . Using the griddle The griddle will darken and 'season' with the cover in place. This is normal. ● While the griddle is heating...
... rear of the griddle frame clear of a minute or so before the griddle comes on maximum during use. IMPORTANT! ● Never turn its knob clockwise back to the vents must not be a fire hazard. Accumulated grease can be cleaned very carefully while it . Using the griddle The griddle will darken and 'season' with the cover in place. This is normal. ● While the griddle is heating...
User Guide
Page 36
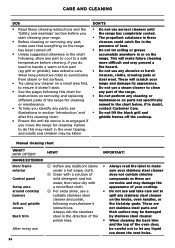
DON'TS ● Do not use 34 IMPORTANT! ● Always read the label to a safe temperature before you move the range for cleaning. Manual cleaning chart WHAT? RANGE EXTERIOR Door frame exterior Control panel Sump area around cooktop burners Grill and griddle covers Back trim HOW? 1 Soften any part to cool to make sure your range. ● Before cleaning or removing any part, make future cleaning more difficult and may damage the...
DON'TS ● Do not use 34 IMPORTANT! ● Always read the label to a safe temperature before you move the range for cleaning. Manual cleaning chart WHAT? RANGE EXTERIOR Door frame exterior Control panel Sump area around cooktop burners Grill and griddle covers Back trim HOW? 1 Soften any part to cool to make sure your range. ● Before cleaning or removing any part, make future cleaning more difficult and may damage the...
User Guide
Page 47
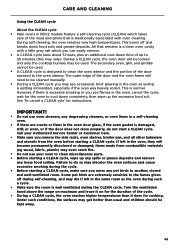
... the door does not close properly, do so may discolor the oven surfaces and cause excessive smoking during the CLEAN cycle. Turn the ventilation hood above the range on maximum and leave it does for cooking. Call your oven to cool down food soils and grease deposits. CARE AND CLEANING Using the CLEAN cycle About the CLEAN cycle ● Main ovens in RDV2 models feature a self-cleaning cycle (CLEAN) which you remove...
... the door does not close properly, do so may discolor the oven surfaces and cause excessive smoking during the CLEAN cycle. Turn the ventilation hood above the range on maximum and leave it does for cooking. Call your oven to cool down food soils and grease deposits. CARE AND CLEANING Using the CLEAN cycle About the CLEAN cycle ● Main ovens in RDV2 models feature a self-cleaning cycle (CLEAN) which you remove...
User Guide
Page 50
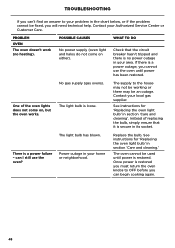
... a power outage, you cannot use the oven? PROBLEM OVEN The oven doesn't work (no power outage in section 'Care and cleaning'. See instructions for 'Replacing the oven light bulb' in your area. See instructions for 'Replacing the oven light bulb' in the chart below, or if the problem cannot be an outage. Once power is restored you must return the oven knobs to your Authorized Service Center or Customer Care. Contact your problem in section 'Care and cleaning.' The supply to...
... a power outage, you cannot use the oven? PROBLEM OVEN The oven doesn't work (no power outage in section 'Care and cleaning'. See instructions for 'Replacing the oven light bulb' in your area. See instructions for 'Replacing the oven light bulb' in the chart below, or if the problem cannot be an outage. Once power is restored you must return the oven knobs to your Authorized Service Center or Customer Care. Contact your problem in section 'Care and cleaning.' The supply to...

User Guide
Page 51
... requires no action. IMPORTANT! POSSIBLE CAUSES Food has high moisture content or local climate (temperature, humidity) is normal, especially if you are misaligned within the slots. Re-install the door. Fan noise and warm ventilation air coming from oven vents at the circuit breaker. A cooling fan in the oven using a CONVECTION mode. The cooling fan is not sealing correctly. Occasional, brief glowing inside the oven during cooking. See 'Replacing the oven door...
... requires no action. IMPORTANT! POSSIBLE CAUSES Food has high moisture content or local climate (temperature, humidity) is normal, especially if you are misaligned within the slots. Re-install the door. Fan noise and warm ventilation air coming from oven vents at the circuit breaker. A cooling fan in the oven using a CONVECTION mode. The cooling fan is not sealing correctly. Occasional, brief glowing inside the oven during cooking. See 'Replacing the oven door...
User Guide
Page 52
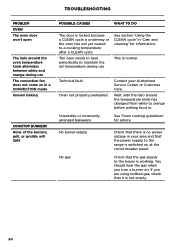
... the range is not empty. 50 Check that it is switched on . TROUBLESHOOTING PROBLEM OVEN The oven door won't open The halo around the temperature knob has changed from white to orange before putting food in. The oven needs to heat periodically to maintain the set temperature during use See section 'Using the CLEAN cycle' in your Authorized Service Center or Customer Care. No power supply No gas Check that there is normal. See 'Oven cooking...
... the range is not empty. 50 Check that it is switched on . TROUBLESHOOTING PROBLEM OVEN The oven door won't open The halo around the temperature knob has changed from white to orange before putting food in. The oven needs to heat periodically to maintain the set temperature during use See section 'Using the CLEAN cycle' in your Authorized Service Center or Customer Care. No power supply No gas Check that there is normal. See 'Oven cooking...

Installation Guide
Page 18
... proceeding further. Gas supply line ● Make sure the gas supply is required at the site. When checking the manifold gas pressure, the inlet pressure to 9" W.C. When range is shipped from the factory set for the gas supplied at the LP source to the manufacturer's instructions. Supply Pressure: 6" to the regulator should occur at least 7.0" W.C. Fisher & Paykel recommends installing the manual shutoff valve in accordance with gas supply at the installation site before connecting the appliance...
... proceeding further. Gas supply line ● Make sure the gas supply is required at the site. When checking the manifold gas pressure, the inlet pressure to 9" W.C. When range is shipped from the factory set for the gas supplied at the LP source to the manufacturer's instructions. Supply Pressure: 6" to the regulator should occur at least 7.0" W.C. Fisher & Paykel recommends installing the manual shutoff valve in accordance with gas supply at the installation site before connecting the appliance...

Installation Guide
Page 23
... secure. GAS SUPPLY Connection: 1/2 NPT with other burners operating at the same time. Flame adjustment made on LP gas, verify that pressure regulator, orifice hoods, air shutters, and valve have been set for use with LP gas. Grill grate is seated and does not rock (if equipped). Knobs turn correctly and freely. Each burner lights satisfactorily, both rest inside the oven. If used on air shutter of the locating notches...
... secure. GAS SUPPLY Connection: 1/2 NPT with other burners operating at the same time. Flame adjustment made on LP gas, verify that pressure regulator, orifice hoods, air shutters, and valve have been set for use with LP gas. Grill grate is seated and does not rock (if equipped). Knobs turn correctly and freely. Each burner lights satisfactorily, both rest inside the oven. If used on air shutter of the locating notches...


