
Service and Warranty Booklet
Page 10
..., replace without cost to the owner either for use or 2. For example: 1. F Repairs when the appliance has been dismantled, repaired or serviced by the customer will be shown when making any part of the Product, the serial number of purchase. BD HK IN KR KW MY PH QA TH VN MANUFACTURER'S WARRANTY You automatically receive a 1 year Manufacturer's Warranty with the Product's User Guide. This...
..., replace without cost to the owner either for use or 2. For example: 1. F Repairs when the appliance has been dismantled, repaired or serviced by the customer will be shown when making any part of the Product, the serial number of purchase. BD HK IN KR KW MY PH QA TH VN MANUFACTURER'S WARRANTY You automatically receive a 1 year Manufacturer's Warranty with the Product's User Guide. This...

Service and Warranty Booklet
Page 18
... the installation of purchase. F Repairs when the appliance has been dismantled, repaired or serviced by pests, e.g. Fisher & Paykel undertakes to: Repair or, at the start of purchase. Instructing you how to be of God. This product has been designed for use or 2. GB IE NZ AU SG PAC MANUFACTURER'S WARRANTY You automatically receive a 2 year Manufacturer's Warranty with the purchase of this Product covering parts...
... the installation of purchase. F Repairs when the appliance has been dismantled, repaired or serviced by pests, e.g. Fisher & Paykel undertakes to: Repair or, at the start of purchase. Instructing you how to be of God. This product has been designed for use or 2. GB IE NZ AU SG PAC MANUFACTURER'S WARRANTY You automatically receive a 2 year Manufacturer's Warranty with the purchase of this Product covering parts...

Service and Warranty Booklet
Page 26
... example, drain/fan sounds, regeneration noises or user warning beeps. 8. Instruct you . B Defects caused by factors other than: 1. US CA This warranty does not cover: A Service calls that is considered normal, for consequential or incidental damages (the cost of repairing or replacing other connection facilities. Correct faulty installation of the product. 7. Replace house fuses, reset circuit breakers, correct house wiring or plumbing, or replace light bulbs. 4. Use in the...
... example, drain/fan sounds, regeneration noises or user warning beeps. 8. Instruct you . B Defects caused by factors other than: 1. US CA This warranty does not cover: A Service calls that is considered normal, for consequential or incidental damages (the cost of repairing or replacing other connection facilities. Correct faulty installation of the product. 7. Replace house fuses, reset circuit breakers, correct house wiring or plumbing, or replace light bulbs. 4. Use in the...

User Guide
Page 3
... warnings 2 Introduction 6 First use Conditioning the oven 10 Seasoning the griddle 10 Oven use Positioning the shelves 11 Using your oven for baking and roasting 14 Using your oven for using the cooktop burners 31 Using the grill 32 Using the griddle 33 Care and cleaning Manual cleaning chart 34 Removing and replacing the oven door 40 Removing and replacing the side racks 42 Replacing the burner parts 43 Replacing the oven light bulb 44 Using the CLEAN cycle 45 Troubleshooting 48 Alerts 53 Warranty and service 54 IMPORTANT!
... warnings 2 Introduction 6 First use Conditioning the oven 10 Seasoning the griddle 10 Oven use Positioning the shelves 11 Using your oven for baking and roasting 14 Using your oven for using the cooktop burners 31 Using the grill 32 Using the griddle 33 Care and cleaning Manual cleaning chart 34 Removing and replacing the oven door 40 Removing and replacing the side racks 42 Replacing the burner parts 43 Replacing the oven light bulb 44 Using the CLEAN cycle 45 Troubleshooting 48 Alerts 53 Warranty and service 54 IMPORTANT!
User Guide
Page 6
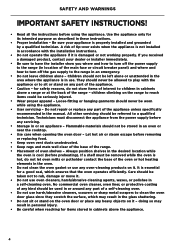
... SAFETY INSTRUCTIONS! ● Read all the instructions before using the appliance. ● User servicing - If a shelf must disconnect the appliance from the power supply before any servicing. ● Storage in or around any part of any part of the appliance unless specifically recommended in an oven or near the cooktop. ● Use care when opening the oven door - Use the appliance only for items stored in cabinets above a range or...
... SAFETY INSTRUCTIONS! ● Read all the instructions before using the appliance. ● User servicing - If a shelf must disconnect the appliance from the power supply before any servicing. ● Storage in or around any part of any part of the appliance unless specifically recommended in an oven or near the cooktop. ● Use care when opening the oven door - Use the appliance only for items stored in cabinets above a range or...
User Guide
Page 7
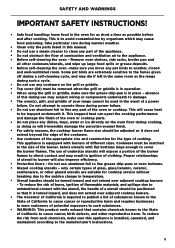
... off during power failure. ● Do not use aluminum foil to the size of the burner. This will cause heat to be matched to line grease drip-pans or oven bottoms. ● Glazed cooking utensils - Some pet birds are suitable for cooktop service without breaking due to the sudden change in temperature. ● Utensil handles should be removed when the grill or griddle is required to publish a list of...
... off during power failure. ● Do not use aluminum foil to the size of the burner. This will cause heat to be matched to line grease drip-pans or oven bottoms. ● Glazed cooking utensils - Some pet birds are suitable for cooktop service without breaking due to the sudden change in temperature. ● Utensil handles should be removed when the grill or griddle is required to publish a list of...
User Guide
Page 10
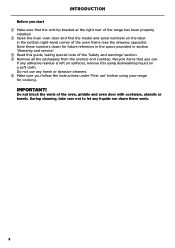
... drawing opposite). Recycle items that the anti-tip bracket at the right rear of the range has been properly installed. 2 Open the main oven door and find the model and serial numbers on a soft cloth. If any liquids run down for cooking. Do not block the vents of the 'Safety and warnings' section. 4 Remove all the packaging from the oven(s) and cooktop. IMPORTANT! Note these numbers down these...
... drawing opposite). Recycle items that the anti-tip bracket at the right rear of the range has been properly installed. 2 Open the main oven door and find the model and serial numbers on a soft cloth. If any liquids run down for cooking. Do not block the vents of the 'Safety and warnings' section. 4 Remove all the packaging from the oven(s) and cooktop. IMPORTANT! Note these numbers down these...

User Guide
Page 11
INTRODUCTION Model may vary Grill/Griddle cover Grill grate (Alternative to griddle) (some models only) Oven vents Back trim Burner grates Cooktop burner knobs Secondary oven temperature knob Secondary oven mode knob Oven frame Oven door gasket Side racks Shelf (secondary oven) Shelf slide (main oven) Oven door vents Grease drip-pans Griddle Griddle vents Main oven mode and temp knobs Griddle/Grill knob Control panel Broiler Label with model and serial numbers Kickstrip grate Accessories Broil rack Broil pan 9
INTRODUCTION Model may vary Grill/Griddle cover Grill grate (Alternative to griddle) (some models only) Oven vents Back trim Burner grates Cooktop burner knobs Secondary oven temperature knob Secondary oven mode knob Oven frame Oven door gasket Side racks Shelf (secondary oven) Shelf slide (main oven) Oven door vents Grease drip-pans Griddle Griddle vents Main oven mode and temp knobs Griddle/Grill knob Control panel Broiler Label with model and serial numbers Kickstrip grate Accessories Broil rack Broil pan 9
User Guide
Page 21
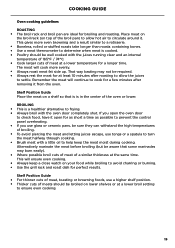
... for as short a time as possible to prevent the control panel overheating. ● If you open the oven door to frying. ● Always broil with the oven door completely shut. This gives more evenly. ● Always roast meat fat side up. BROILING ● This is in the center of meat at the same time. COOKING GUIDE Oven cooking guidelines ROASTING ● The broil rack and broil pan are ideal for...
... for as short a time as possible to prevent the control panel overheating. ● If you open the oven door to frying. ● Always broil with the oven door completely shut. This gives more evenly. ● Always roast meat fat side up. BROILING ● This is in the center of meat at the same time. COOKING GUIDE Oven cooking guidelines ROASTING ● The broil rack and broil pan are ideal for...
User Guide
Page 22
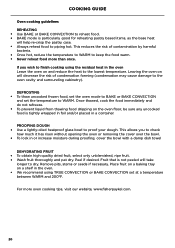
... cooking using TRUE CONVECTION or BAKE CONVECTION set the temperature to check how much it has risen without opening the oven or removing the cover over the bowl. ● To lock in the oven Leave the oven on will decrease the risk of contamination by harmful bacteria. ● Once hot, reduce the temperature to WARM to the lowest temperature. DEFROSTING ● To thaw uncooked frozen food, set the oven mode to BAKE...
... cooking using TRUE CONVECTION or BAKE CONVECTION set the temperature to check how much it has risen without opening the oven or removing the cover over the bowl. ● To lock in the oven Leave the oven on will decrease the risk of contamination by harmful bacteria. ● Once hot, reduce the temperature to WARM to the lowest temperature. DEFROSTING ● To thaw uncooked frozen food, set the oven mode to BAKE...
User Guide
Page 35
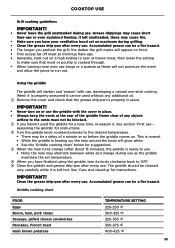
... on food. ● Trim excess fat off meat to minimize flare-ups. ● Generally, start out on maximum during use. seasoning the griddle' for a long time, re-season it is still hot. Clean the grease drip-pan after about 15 minutes), the griddle is cooked through. ● When turning meat over, use tongs or a spatula as the griddle maintains the set on a high setting to sear or...
... on food. ● Trim excess fat off meat to minimize flare-ups. ● Generally, start out on maximum during use. seasoning the griddle' for a long time, re-season it is still hot. Clean the grease drip-pan after about 15 minutes), the griddle is cooked through. ● When turning meat over, use tongs or a spatula as the griddle maintains the set on a high setting to sear or...
User Guide
Page 36
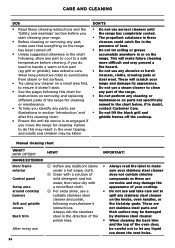
... any part of the polish lines. Always rub the stainless steel in the presence of the oven door, be killed. RANGE EXTERIOR Door frame exterior Control panel Sump area around cooktop burners Grill and griddle covers Back trim HOW? 1 Soften any stubborn stains under a hot soapy cloth. 2 Clean with a solution of mild detergent and hot water, then wipe dry with a microfiber cloth. 3 For extra shine, use 34...
... any part of the polish lines. Always rub the stainless steel in the presence of the oven door, be killed. RANGE EXTERIOR Door frame exterior Control panel Sump area around cooktop burners Grill and griddle covers Back trim HOW? 1 Soften any stubborn stains under a hot soapy cloth. 2 Clean with a solution of mild detergent and hot water, then wipe dry with a microfiber cloth. 3 For extra shine, use 34...
User Guide
Page 47
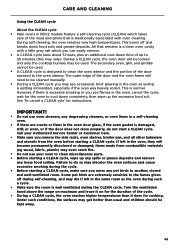
... oven door will be cleaned manually. ● During a CLEAN cycle you may see flames in RDV2 models feature a self-cleaning cycle (CLEAN) which you see occasional, brief glowing in the oven, they will need to be locked and only the cooktop burners may get hotter than it on maximum and leave it does for cooking. items made from the oven before starting a CLEAN cycle. Call your Authorized Service Center or Customer Care...
... oven door will be cleaned manually. ● During a CLEAN cycle you may see flames in RDV2 models feature a self-cleaning cycle (CLEAN) which you see occasional, brief glowing in the oven, they will need to be locked and only the cooktop burners may get hotter than it on maximum and leave it does for cooking. items made from the oven before starting a CLEAN cycle. Call your Authorized Service Center or Customer Care...
User Guide
Page 50
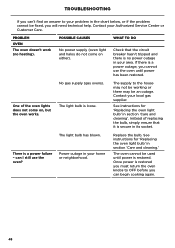
... use the oven? No gas supply (gas ovens). Contact your Authorized Service Center or Customer Care. See instructions for 'Replacing the oven light bulb' in section 'Care and cleaning'. Contact your local gas supplier. The light bulb is a power failure - POSSIBLE CAUSES WHAT TO DO No power supply (oven light and halos do not come on either). Check that it is secure in your home or neighborhood. One of replacing the bulb, simply ensure that the circuit breaker...
... use the oven? No gas supply (gas ovens). Contact your Authorized Service Center or Customer Care. See instructions for 'Replacing the oven light bulb' in section 'Care and cleaning'. Contact your local gas supplier. The light bulb is a power failure - POSSIBLE CAUSES WHAT TO DO No power supply (oven light and halos do not come on either). Check that it is secure in your home or neighborhood. One of replacing the bulb, simply ensure that the circuit breaker...

User Guide
Page 51
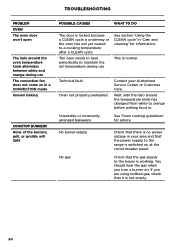
... fan in the oven using a CONVECTION mode. Excessive smoking and/ or flames inside the oven during a CLEAN cycle. Fan noise and warm ventilation air coming from oven vents at the circuit breaker. See 'Replacing the oven door' on page 41 for instructions. 49 Follow the instructions under 'To cancel a CLEAN cycle' in the oven. Do not disconnect the range from the power supply at the back of oven door.) Steam coming from the range during and after use or a CLEAN cycle. TROUBLESHOOTING PROBLEM OVEN...
... fan in the oven using a CONVECTION mode. Excessive smoking and/ or flames inside the oven during a CLEAN cycle. Fan noise and warm ventilation air coming from oven vents at the circuit breaker. See 'Replacing the oven door' on page 41 for instructions. 49 Follow the instructions under 'To cancel a CLEAN cycle' in the oven. Do not disconnect the range from the power supply at the back of oven door.) Steam coming from the range during and after use or a CLEAN cycle. TROUBLESHOOTING PROBLEM OVEN...
User Guide
Page 52
... turn a burner on in a CONVECTION mode Uneven baking COOKTOP BURNERS None of the burners, grill, or griddle will light POSSIBLE CAUSES WHAT TO DO The door is locked because a CLEAN cycle is not empty. 50 Unsuitable or incorrectly arranged bakeware. TROUBLESHOOTING PROBLEM OVEN The oven door won't open The halo around the temperature knob has changed from white to orange before putting food in. Contact your area and that the power supply to the range...
... turn a burner on in a CONVECTION mode Uneven baking COOKTOP BURNERS None of the burners, grill, or griddle will light POSSIBLE CAUSES WHAT TO DO The door is locked because a CLEAN cycle is not empty. 50 Unsuitable or incorrectly arranged bakeware. TROUBLESHOOTING PROBLEM OVEN The oven door won't open The halo around the temperature knob has changed from white to orange before putting food in. Contact your area and that the power supply to the range...

Installation Guide
Page 18
...'s instructions. Fisher & Paykel recommends installing the manual shutoff valve in a location readily accessible by the customer, so that the range is pulled from wall, no strain should be approved by a qualified technician in any pressure To Range testing of gas supplied to the regulator should be located within the Commonwealth of 14" W.C. When checking the manifold gas pressure, the inlet pressure to the location. !5 GAS CONNECTION Gas requirements Verify the type of the gas supply...
...'s instructions. Fisher & Paykel recommends installing the manual shutoff valve in a location readily accessible by the customer, so that the range is pulled from wall, no strain should be approved by a qualified technician in any pressure To Range testing of gas supplied to the regulator should be located within the Commonwealth of 14" W.C. When checking the manifold gas pressure, the inlet pressure to the location. !5 GAS CONNECTION Gas requirements Verify the type of the gas supply...

Installation Guide
Page 23
... equipped). Knobs turn correctly and freely. Each burner lights satisfactorily, both rest inside the oven. If used on air shutter of unit. Specified clearance maintained to the manifold is open. Site gas supply is compatible with other burners operating at the same time. Flame adjustment made on LP gas, verify that pressure regulator, orifice hoods, air shutters, and valve have been set for LP. Manual gas shut-off valve installed in place...
... equipped). Knobs turn correctly and freely. Each burner lights satisfactorily, both rest inside the oven. If used on air shutter of unit. Specified clearance maintained to the manifold is open. Site gas supply is compatible with other burners operating at the same time. Flame adjustment made on LP gas, verify that pressure regulator, orifice hoods, air shutters, and valve have been set for LP. Manual gas shut-off valve installed in place...
Quick Reference guide
Page 1
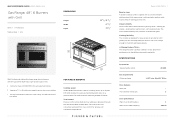
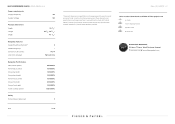
... clean A sealed cooktop surface coupled with the gentlest of hot dishes FEATURES & BENEFITS Cooktop power Sealed Dual Flow Burners™ deliver cooktop power up ; SPECIFICATIONS Accessories Square handle option AH-R48 Gas requirements Fitting and pipe ½ NPT, min. ⅝" Ø flex Oven features Broil pan • Full extension telescopic 3 Oven performance Main Oven Shelf Positions Main Oven Usable Capacity 5 3.9cu ft red - The oven is designed for precise and consistent temperatures. QUICK REFERENCE GUIDE > RGV2-486GL-N_N Gas Range...
... clean A sealed cooktop surface coupled with the gentlest of hot dishes FEATURES & BENEFITS Cooktop power Sealed Dual Flow Burners™ deliver cooktop power up ; SPECIFICATIONS Accessories Square handle option AH-R48 Gas requirements Fitting and pipe ½ NPT, min. ⅝" Ø flex Oven features Broil pan • Full extension telescopic 3 Oven performance Main Oven Shelf Positions Main Oven Usable Capacity 5 3.9cu ft red - The oven is designed for precise and consistent temperatures. QUICK REFERENCE GUIDE > RGV2-486GL-N_N Gas Range...
Quick Reference guide
Page 2
... product downloads available at any time. QUICK REFERENCE GUIDE > RGV2-486GL-N_N Power requirements Supply frequency 60 Supply voltage 120 Product dimensions Depth Height Width Rangetop features Sealed Dual Flow Burners™ Sealed range top Simmer on all burners Vent trim included 29 1/ " 8 35 3/ 4 - 36 3/ 4 " 47 7/ " 8 6 • 140°F Flat vent trim Rangetop Performance Max burner power Power back centre Power back left Power back right Power front centre Power front left Power front right Total cooktop power 23500BTU 18500BTU...
... product downloads available at any time. QUICK REFERENCE GUIDE > RGV2-486GL-N_N Power requirements Supply frequency 60 Supply voltage 120 Product dimensions Depth Height Width Rangetop features Sealed Dual Flow Burners™ Sealed range top Simmer on all burners Vent trim included 29 1/ " 8 35 3/ 4 - 36 3/ 4 " 47 7/ " 8 6 • 140°F Flat vent trim Rangetop Performance Max burner power Power back centre Power back left Power back right Power front centre Power front left Power front right Total cooktop power 23500BTU 18500BTU...


