
Service and Warranty Booklet
Page 26
Instruct you have an installation problem contact your expenses caused if the product is defective). C Defects to use or 2. F Normal recommended maintenance as set -up of correcting such unauthorized repairs. If you how to the product caused by non-authorized repairers or the cost of the product. 6. For example: 1. Replace house fuses, reset circuit breakers, correct house wiring or plumbing, or replace light bulbs. 4. Unauthorized modifications...
Instruct you have an installation problem contact your expenses caused if the product is defective). C Defects to use or 2. F Normal recommended maintenance as set -up of correcting such unauthorized repairs. If you how to the product caused by non-authorized repairers or the cost of the product. 6. For example: 1. Replace house fuses, reset circuit breakers, correct house wiring or plumbing, or replace light bulbs. 4. Unauthorized modifications...
Planning Guide Dual Fuel Range
Page 10
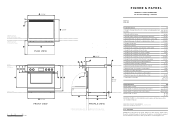
... FOR INSTALLATION WITH PROJECTING CONTROL PANEL PRODUCT & CAVITY DIMENSIONS 36" Professional Range - Induction Model no: RIV3-365 Product Dimensions in a Height of range (from floor to cooktop, excluding grates and min 35 3/4" rear trim) max 36 3/4" B Overall width of range 35 7/8" c Overall depth of range (excluding handle and dials) 29 1/8" d Depth from rear of chassis to cabinetry face - For full installation instructions and specifications visit fisherpaykel.com flush 19 1/8" u Adjustable feet...
... FOR INSTALLATION WITH PROJECTING CONTROL PANEL PRODUCT & CAVITY DIMENSIONS 36" Professional Range - Induction Model no: RIV3-365 Product Dimensions in a Height of range (from floor to cooktop, excluding grates and min 35 3/4" rear trim) max 36 3/4" B Overall width of range 35 7/8" c Overall depth of range (excluding handle and dials) 29 1/8" d Depth from rear of chassis to cabinetry face - For full installation instructions and specifications visit fisherpaykel.com flush 19 1/8" u Adjustable feet...
Planning Guide Dual Fuel Range
Page 11
... range 36'' - DATUM : FLOOR FRONT VIEW 0 5 10 20 inches PROFILE VIEW CABINET FACE FOR INSTALLATION WITH FLUSH CONTROL PANEL CABINET FACE FOR INSTALLATION WITH PROJECTING CONTROL PANEL INDICATES CLEARANCES INDICATES PRODUCT DATUM DATE: 17.07.2020 IMPORTANT: Throughout this guide, dimensions may vary by UL. Read the installation guide for ventilation hood centered above the cooking surface 54'' - combustible covering for detailed information on installing the product. non-combustible surface** centered above the cooking surface...
... range 36'' - DATUM : FLOOR FRONT VIEW 0 5 10 20 inches PROFILE VIEW CABINET FACE FOR INSTALLATION WITH FLUSH CONTROL PANEL CABINET FACE FOR INSTALLATION WITH PROJECTING CONTROL PANEL INDICATES CLEARANCES INDICATES PRODUCT DATUM DATE: 17.07.2020 IMPORTANT: Throughout this guide, dimensions may vary by UL. Read the installation guide for ventilation hood centered above the cooking surface 54'' - combustible covering for detailed information on installing the product. non-combustible surface** centered above the cooking surface...
Planning Guide Dual Fuel Range
Page 22
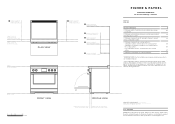
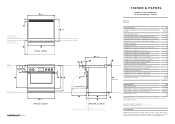
... open door to our installation manual. B 911 g CABINET FACE FOR INSTALLATION WITH PROJECTING CONTROL PANEL CABINET FACE FOR INSTALLATION WITH FLUSH CONTROL PANEL t o PLAN VIEW DATUM : TOP OF COUNTERTOP jih k DATUM : FLOOR B 911 FRONT VIEW 0 100 200 400 millimetres c 740 nlm c 740 q f rs p a 908 - 933 t D u e PROFILE VIEW CABINET FACE FOR INSTALLATION WITH FLUSH CONTROL PANEL CABINET FACE FOR INSTALLATION WITH PROJECTING CONTROL PANEL PRODUCT & CAVITY DIMENSIONS 36" Professional Range - Induction Model no: RIV3-365 Product Dimensions...
... open door to our installation manual. B 911 g CABINET FACE FOR INSTALLATION WITH PROJECTING CONTROL PANEL CABINET FACE FOR INSTALLATION WITH FLUSH CONTROL PANEL t o PLAN VIEW DATUM : TOP OF COUNTERTOP jih k DATUM : FLOOR B 911 FRONT VIEW 0 100 200 400 millimetres c 740 nlm c 740 q f rs p a 908 - 933 t D u e PROFILE VIEW CABINET FACE FOR INSTALLATION WITH FLUSH CONTROL PANEL CABINET FACE FOR INSTALLATION WITH PROJECTING CONTROL PANEL PRODUCT & CAVITY DIMENSIONS 36" Professional Range - Induction Model no: RIV3-365 Product Dimensions...

Planning Guide Dual Fuel Range
Page 23
... and right of range to our installation manual. **Non-combustible surfaces: as defined in 'National Fuel Gas Code' (ANSI Z223.1, Current Edition). DATUM : FLOOR FRONT VIEW 0 100 200 400 millimetres PROFILE VIEW CABINET FACE FOR INSTALLATION WITH FLUSH CONTROL PANEL CABINET FACE FOR INSTALLATION WITH PROJECTING CONTROL PANEL INDICATES CLEARANCES INDICATES PRODUCT DATUM DATE: 17.07.2020 IMPORTANT: Throughout this guide, dimensions may vary by UL. combustible covering for detailed information...
... and right of range to our installation manual. **Non-combustible surfaces: as defined in 'National Fuel Gas Code' (ANSI Z223.1, Current Edition). DATUM : FLOOR FRONT VIEW 0 100 200 400 millimetres PROFILE VIEW CABINET FACE FOR INSTALLATION WITH FLUSH CONTROL PANEL CABINET FACE FOR INSTALLATION WITH PROJECTING CONTROL PANEL INDICATES CLEARANCES INDICATES PRODUCT DATUM DATE: 17.07.2020 IMPORTANT: Throughout this guide, dimensions may vary by UL. combustible covering for detailed information...

Installation Guide
Page 4
... located. Failure to these instructions carefully before proceeding further. Read the installation, operating and maintenance instructions thoroughly before servicing this appliance. Electrical installation must be replaced by an authorized person. z Be sure that the range is damaged, it must be installed and connected to the mains power supply only by the State of the appliance tipping over exists if the appliance is set for the kind of gas cooking fuel...
... located. Failure to these instructions carefully before proceeding further. Read the installation, operating and maintenance instructions thoroughly before servicing this appliance. Electrical installation must be replaced by an authorized person. z Be sure that the range is damaged, it must be installed and connected to the mains power supply only by the State of the appliance tipping over exists if the appliance is set for the kind of gas cooking fuel...

Installation Guide
Page 15
... the range RDV3 models z A neutral supply wire must be provided from the wall outlet or service disconnect before servicing this is the responsibility of the installer and user to operate safely and properly. z Range connection: P1-P2: 240V or 208V; It is less than the total connected load listed on the rating label. The fourth prong (round grounding pin) should not, under the control panel Wiring diagrams are...
... the range RDV3 models z A neutral supply wire must be provided from the wall outlet or service disconnect before servicing this is the responsibility of the installer and user to operate safely and properly. z Range connection: P1-P2: 240V or 208V; It is less than the total connected load listed on the rating label. The fourth prong (round grounding pin) should not, under the control panel Wiring diagrams are...

Installation Guide
Page 17
... sure to the manufacturer's instructions. Gas Code ANSI Z.223.1 (Warning: this appliance must be installed by the customer, make surm'eopathennue'acpl osohsnuitntio-eoncfftivoanlve LP gas is turned off valve must be isolated from the gas supply piping system during any pressure testing of 1/2 psig (3.5kPa.). supplied at maximum pressure of cooktop for LP. Natural gas ALL Models Connection: 1/2" NPT Minimum 5/8" dia. flex line. ough to melt and develop...
... sure to the manufacturer's instructions. Gas Code ANSI Z.223.1 (Warning: this appliance must be installed by the customer, make surm'eopathennue'acpl osohsnuitntio-eoncfftivoanlve LP gas is turned off valve must be isolated from the gas supply piping system during any pressure testing of 1/2 psig (3.5kPa.). supplied at maximum pressure of cooktop for LP. Natural gas ALL Models Connection: 1/2" NPT Minimum 5/8" dia. flex line. ough to melt and develop...

Installation Guide
Page 19
... that the air shutter or burner ports are set to OFF before connecting range to shipment. z Check for the proper burner flame characteristics and adjust air shutters if necessary. z Incorrect installation may make sure these conditions exist, check that the ignition system operates correctly, light each burner by the customer until proper operation has been achieved. z If proper operation cannot be used by itself, then all oven and burner knobs are...
... that the air shutter or burner ports are set to OFF before connecting range to shipment. z Check for the proper burner flame characteristics and adjust air shutters if necessary. z Incorrect installation may make sure these conditions exist, check that the ignition system operates correctly, light each burner by the customer until proper operation has been achieved. z If proper operation cannot be used by itself, then all oven and burner knobs are...
Installation Guide
Page 21
... installed. F Griddle is open. F Oven door hinges seated and door opens and closes properly. F The pressure regulator which is connected to the manifold is sealing correctly. F Front kick panel in place. F Flame adjustment made on LP gas, verify that pressure regulator, orifice hoods, air shutters, and valve have been set for use with other burners operating at the same time. F Specified clearance maintained to side. F Unit tested and free of unit. F If used on air shutter of the locating...
... installed. F Griddle is open. F Oven door hinges seated and door opens and closes properly. F The pressure regulator which is connected to the manifold is sealing correctly. F Front kick panel in place. F Flame adjustment made on LP gas, verify that pressure regulator, orifice hoods, air shutters, and valve have been set for use with other burners operating at the same time. F Specified clearance maintained to side. F Unit tested and free of unit. F If used on air shutter of the locating...
Specification Guide Induction Range
Page 1
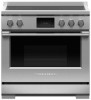
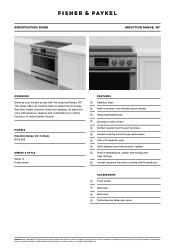
... information is required to deliver perfect results. MODELS Induction Range, 36", 5 Zones RIV3-365 SERIES & STYLE Series 9 Professional F E AT U R E S 1 Stainless steel 2 High-resolution, user-friendly touch display 3 Metal illuminated dials 4 Electronic oven control 5 Perfect results from 15 oven functions 6 Guided cooking by food type and recipes 7 4.8 cu ft-capacity oven 8 Self-cleaning oven with pyrolytic ladders 9 Precise temperature control with 9 induction heat settings !0 Instant response induction cooking with PowerBoost ACCESSORIES 1 Food probe 2 Broil pan 3 Broil rack 4 Full...
... information is required to deliver perfect results. MODELS Induction Range, 36", 5 Zones RIV3-365 SERIES & STYLE Series 9 Professional F E AT U R E S 1 Stainless steel 2 High-resolution, user-friendly touch display 3 Metal illuminated dials 4 Electronic oven control 5 Perfect results from 15 oven functions 6 Guided cooking by food type and recipes 7 4.8 cu ft-capacity oven 8 Self-cleaning oven with pyrolytic ladders 9 Precise temperature control with 9 induction heat settings !0 Instant response induction cooking with PowerBoost ACCESSORIES 1 Food probe 2 Broil pan 3 Broil rack 4 Full...

Specification Guide Induction Range
Page 2
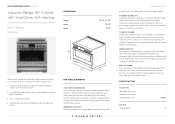
SPECIFICATION GUIDE INDUCTION RANGE, 36" Model No. vent trim) B Overall width C Depth from front of gas connection from wall) REAR OF CAVITY in mm 1 1/2 38 6 152 2 51 PRODUCT DIMENSIONS A CAVITY DIMENSIONS: STANDARD INSTALLATION C A B C ISO VIEW A Overall height (from floor) C Depth of supply areas (ie maximum protrusion of range to safely and correctly install the products featured here. vent trim, excl. current draw S P E C I F I C AT I O N S RIV3-365 H 35 3/4" - 36 3/4" (908 - 933mm) x W 35 7/8" (911mm) x D 29...
SPECIFICATION GUIDE INDUCTION RANGE, 36" Model No. vent trim) B Overall width C Depth from front of gas connection from wall) REAR OF CAVITY in mm 1 1/2 38 6 152 2 51 PRODUCT DIMENSIONS A CAVITY DIMENSIONS: STANDARD INSTALLATION C A B C ISO VIEW A Overall height (from floor) C Depth of supply areas (ie maximum protrusion of range to safely and correctly install the products featured here. vent trim, excl. current draw S P E C I F I C AT I O N S RIV3-365 H 35 3/4" - 36 3/4" (908 - 933mm) x W 35 7/8" (911mm) x D 29...

Data Sheet Induction Range
Page 3
... 50 amp circuit 72 A 4-prong grounding type [NEMA 14-50P plug] IMPORTANT NOTE: For full installation and connection details please refer to our installation manual. 2" DATE: 14.07.2020 IMPORTANT NOTE: Throughout this guide, dimensions may vary by ±2mm (1/16''). LEFT SIDE OF CAVITY 1 1/2" 6" FLOOR ELECTRICAL FINAL POSITION OF RANGE AGAINST WALL 1 1/2" LOCATION OF ANTI-TIP BRACKET 2" 4" REAR OF CAVITY DATA SHEET 36" Professional Freestanding Range -
... 50 amp circuit 72 A 4-prong grounding type [NEMA 14-50P plug] IMPORTANT NOTE: For full installation and connection details please refer to our installation manual. 2" DATE: 14.07.2020 IMPORTANT NOTE: Throughout this guide, dimensions may vary by ±2mm (1/16''). LEFT SIDE OF CAVITY 1 1/2" 6" FLOOR ELECTRICAL FINAL POSITION OF RANGE AGAINST WALL 1 1/2" LOCATION OF ANTI-TIP BRACKET 2" 4" REAR OF CAVITY DATA SHEET 36" Professional Freestanding Range -

Data Sheet Induction Range
Page 6
... 100mm LOCATION OF ANTI-TIP BRACKET 50mm REAR OF CAVITY DATA SHEET 36" Professional Freestanding Range - For full installation instructions & specifications visit fisherpaykel.com Please read the installation manual for imperial measurements) Specifications Oven Total Capacity 136L Electrical Supply Service Max Current Draw Receptacle 120/240 VAC, 60Hz 50 amp circuit 72 A 4-prong grounding type [NEMA 14-50P plug] IMPORTANT NOTE: For full installation and connection details please refer to our installation manual...
... 100mm LOCATION OF ANTI-TIP BRACKET 50mm REAR OF CAVITY DATA SHEET 36" Professional Freestanding Range - For full installation instructions & specifications visit fisherpaykel.com Please read the installation manual for imperial measurements) Specifications Oven Total Capacity 136L Electrical Supply Service Max Current Draw Receptacle 120/240 VAC, 60Hz 50 amp circuit 72 A 4-prong grounding type [NEMA 14-50P plug] IMPORTANT NOTE: For full installation and connection details please refer to our installation manual...
Quick Reference guide
Page 1
... self-clean proof side racks, which can be removed when using your progress. QUICK REFERENCE GUIDE > RIV3-365 Induction Range, 36", 5 Zones with SmartZone, Self-cleaning Series 9 | Professional Stainless Steel With intuitive touchscreen, induction cooktop and a convection oven with 15 functions, cooking on this function. Cook with Date: 02.03.2023 > 1 enough room to perfection. COOKTOP POWER Instant and immediate control from the highest to a broad range of dishes and cooking styles. SPECIFICATIONS Accessories Adjustable feet covers...
... self-clean proof side racks, which can be removed when using your progress. QUICK REFERENCE GUIDE > RIV3-365 Induction Range, 36", 5 Zones with SmartZone, Self-cleaning Series 9 | Professional Stainless Steel With intuitive touchscreen, induction cooktop and a convection oven with 15 functions, cooking on this function. Cook with Date: 02.03.2023 > 1 enough room to perfection. COOKTOP POWER Instant and immediate control from the highest to a broad range of dishes and cooking styles. SPECIFICATIONS Accessories Adjustable feet covers...
Quick Reference guide
Page 2
... halo Electric circuit High resolution display Metal illuminated dials Multi-language interface Precise cooking with food Sabbath mode Tilting touch screen interface Wi-Fi connectivity Oven features Concealed element Electronic oven control Food probe Internal light Large broil pan Self-clean proof side racks True convection Oven functions Air fry Bake Classic bake 4.8cu ft 3.8cu ft • • 4 wire • • • Clean Convection Broil Convection bake Dehydrate Maxi Broil Number of cooking zones PowerBoost Right front zone rating Right rear zone rating 2600W...
... halo Electric circuit High resolution display Metal illuminated dials Multi-language interface Precise cooking with food Sabbath mode Tilting touch screen interface Wi-Fi connectivity Oven features Concealed element Electronic oven control Food probe Internal light Large broil pan Self-clean proof side racks True convection Oven functions Air fry Bake Classic bake 4.8cu ft 3.8cu ft • • 4 wire • • • Clean Convection Broil Convection bake Dehydrate Maxi Broil Number of cooking zones PowerBoost Right front zone rating Right rear zone rating 2600W...

User Guide Professional Range
Page 3
CONTENTS Introduction Safety and warnings Before you begin First use Using the oven light Using the kitchen timer Changing the time Locking the control panel Unlocking the control panel Cooking options Delayed Cook Auto Off Food probe Guided cooking Cooking guide Cooking charts Induction cookware Cooktop use Locking the cooktop controls SmartZones PowerBoost Auto RapidHeat Heat settings User preference settings WiFi connection and remote mode Sabbath Mode Care and cleaning Using Self Clean Troubleshooting Alert codes Warranty and service 4 5 11 12 19 20 22 23 24 25 26 27 28 31 33 39 45 46 49 ...
CONTENTS Introduction Safety and warnings Before you begin First use Using the oven light Using the kitchen timer Changing the time Locking the control panel Unlocking the control panel Cooking options Delayed Cook Auto Off Food probe Guided cooking Cooking guide Cooking charts Induction cookware Cooktop use Locking the cooktop controls SmartZones PowerBoost Auto RapidHeat Heat settings User preference settings WiFi connection and remote mode Sabbath Mode Care and cleaning Using Self Clean Troubleshooting Alert codes Warranty and service 4 5 11 12 19 20 22 23 24 25 26 27 28 31 33 39 45 46 49 ...
User Guide Professional Range
Page 11
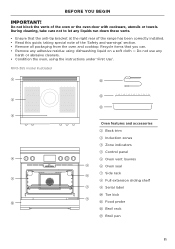
... rear of the range has been correctly installed. z Ensure that you can. BEFORE YOU BEGIN IMPORTANT! During cleaning, take care not to let any harsh or abrasive cleaners. Do not block the vents of the 'Safety and warnings' section. RIV3-365 model illustrated 1 !1 !2 2 !3 3 Oven features and accessories 1 Back trim 2 Induction zones 3 Zone indicators 4 Control panel 4 5 Oven vent louvres 5 6 Oven seal 6 7 Side rack 7 8 Full extension sliding shelf 8 9 Serial label !0 Toe kick 9 !0 !1 Food probe !2 Broil rack !3 Broil pan...
... rear of the range has been correctly installed. z Ensure that you can. BEFORE YOU BEGIN IMPORTANT! During cleaning, take care not to let any harsh or abrasive cleaners. Do not block the vents of the 'Safety and warnings' section. RIV3-365 model illustrated 1 !1 !2 2 !3 3 Oven features and accessories 1 Back trim 2 Induction zones 3 Zone indicators 4 Control panel 4 5 Oven vent louvres 5 6 Oven seal 6 7 Side rack 7 8 Full extension sliding shelf 8 9 Serial label !0 Toe kick 9 !0 !1 Food probe !2 Broil rack !3 Broil pan...
User Guide Professional Range
Page 71
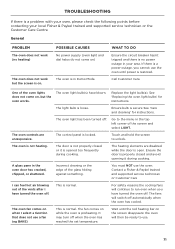
... the door is locked. The oven fan comes on . The control panel is properly closed or it during cooking. Touch and hold the screen to the menu in Demo Mode. The fans will continue to use a fan (eg BAKE) This is no heating) The oven does not work but the oven works. Replace the light bulb(s). Go to unlock. You must NOT use the oven until the red heating bar on while the oven is preheating. TROUBLESHOOTING If...
... the door is locked. The oven fan comes on . The control panel is properly closed or it during cooking. Touch and hold the screen to the menu in Demo Mode. The fans will continue to use a fan (eg BAKE) This is no heating) The oven does not work but the oven works. Replace the light bulb(s). Go to unlock. You must NOT use the oven until the red heating bar on while the oven is preheating. TROUBLESHOOTING If...
User Guide Professional Range
Page 74
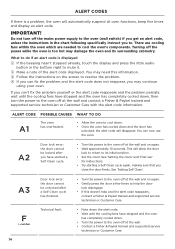
... the door lock disengage. • If this information. 3 Follow the instructions on again. • Gently press the door a few times to the oven off at the wall. • Contact a Fisher & Paykel trained and supported service technician or Customer Care. 74 See 'Setting the clock' and 'First use the oven. See 'Setting Self Clean'. Turning off at the wall and contact a Fisher & Paykel trained and supported service technician or Customer Care with the alert code information. ALERT CODE POSSIBLE...
... the door lock disengage. • If this information. 3 Follow the instructions on again. • Gently press the door a few times to the oven off at the wall. • Contact a Fisher & Paykel trained and supported service technician or Customer Care. 74 See 'Setting the clock' and 'First use the oven. See 'Setting Self Clean'. Turning off at the wall and contact a Fisher & Paykel trained and supported service technician or Customer Care with the alert code information. ALERT CODE POSSIBLE...


