

English Manual.
Page 6
... Power Management Setup 40 PC Health Status 42 BIOS Security Features 43 Load Optimal Defaults 43 Save & Exit Setup 43 Exit Without Saving 43 Chapter 4 RAID Configuration RAID Introduction 45 Install SATA Hard Disks 46 RAID Configuration 46 Create RAID Driver Disk 48 Install Windows OS 49
... Power Management Setup 40 PC Health Status 42 BIOS Security Features 43 Load Optimal Defaults 43 Save & Exit Setup 43 Exit Without Saving 43 Chapter 4 RAID Configuration RAID Introduction 45 Install SATA Hard Disks 46 RAID Configuration 46 Create RAID Driver Disk 48 Install Windows OS 49
English Manual.
Page 9
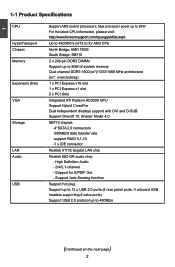
... Support Hybrid CrossFire Dual Independent displays support with DVI and D-SUB Support DirectX 10, Shader Model 4.0 SB710 chipset: -4*SATA 2.0 connectors -300MB/S data transfer rate -support RAID 0,1,10 -1 x IDE connector Realtek 8111E Gigabit LAN chip Realtek 662-GR audio chip: -
... Support Hybrid CrossFire Dual Independent displays support with DVI and D-SUB Support DirectX 10, Shader Model 4.0 SB710 chipset: -4*SATA 2.0 connectors -300MB/S data transfer rate -support RAID 0,1,10 -1 x IDE connector Realtek 8111E Gigabit LAN chip Realtek 662-GR audio chip: -

English Manual.
Page 44
... 1985-2008, American Megatrends, Inc. The specification includes a description of your SATA drives must also support AHCI. [AHCI] - Options : [Native IDE]; [RAID]; [AHCI]; [Legacy IDE]. [Native IDE] - 3 IDE Configuration CMOS Setup Utility - If your motherboard supporting AHCI, and you have a SATA device, ...which is used to support native IDE mode. [RAID] - AHCI provides more advanced features including SATA features, but some SATA drives may not support AHCI, unless they are labeled with AHCI support...
... 1985-2008, American Megatrends, Inc. The specification includes a description of your SATA drives must also support AHCI. [AHCI] - Options : [Native IDE]; [RAID]; [AHCI]; [Legacy IDE]. [Native IDE] - 3 IDE Configuration CMOS Setup Utility - If your motherboard supporting AHCI, and you have a SATA device, ...which is used to support native IDE mode. [RAID] - AHCI provides more advanced features including SATA features, but some SATA drives may not support AHCI, unless they are labeled with AHCI support...

English Manual.
Page 51
It includes the following information : ■ RAID Introduction ■ Install SATA Hard Disks ■ RAID Configuration ■ Create RAID Driver Disk ■ Install Windows OS The RAID BIOS Setup pictures shown in this chapter are for reference only, please refer to the practical screen.
It includes the following information : ■ RAID Introduction ■ Install SATA Hard Disks ■ RAID Configuration ■ Create RAID Driver Disk ■ Install Windows OS The RAID BIOS Setup pictures shown in this chapter are for reference only, please refer to the practical screen.

English Manual.
Page 52
... error correction information. FAT16/32 and NTFS file systems may be included in different RAID level: RAID Level RAID 0 RAID 1 RAID 10 RAID 5 RAID Ready Disk NO. >=2 2 >=4 >=3 >=1 JBOD >=1 45 CAUTION ! RAID 10 (Striped Mirror) RAID 10 is one volume. Level 5 is a combination of Disks". JBOD (Span...four SATA hard disks. The nember of data in excellent performance and good fault tolerance. 4 4-1 RAID Introduction RAID 0 (Striped) RAID 0 reads and writes sectors of RAID. If any disk member fails, it offers no fault-tolerance, so if any disk fails, ...
... error correction information. FAT16/32 and NTFS file systems may be included in different RAID level: RAID Level RAID 0 RAID 1 RAID 10 RAID 5 RAID Ready Disk NO. >=2 2 >=4 >=3 >=1 JBOD >=1 45 CAUTION ! RAID 10 (Striped Mirror) RAID 10 is one volume. Level 5 is a combination of Disks". JBOD (Span...four SATA hard disks. The nember of data in excellent performance and good fault tolerance. 4 4-1 RAID Introduction RAID 0 (Striped) RAID 0 reads and writes sectors of RAID. If any disk member fails, it offers no fault-tolerance, so if any disk fails, ...
English Manual.
Page 53
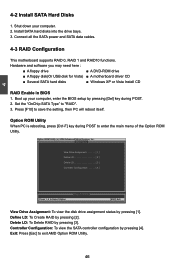
... BIOS setup by pressing [Del] key during POST to enter the main menu of the Option ROM Utility. Delete LD: To Delete RAID by pressing [1]. Exit: Press [Esc] to Select Option [ESC] Exit View Drive Assignment: To view the disk drive assignment status by... pressing [3]. Connect all the SATA power and SATA data cables. 4-3 RAID Configuration This motherboard supports RAID 0, RAID 1 and RAID10 functions. 4 4-2 Install SATA Hard Disks 1. Boot up your computer. 2. Install SATA hard disks into the drive bays...
... BIOS setup by pressing [Del] key during POST to enter the main menu of the Option ROM Utility. Delete LD: To Delete RAID by pressing [1]. Exit: Press [Esc] to Select Option [ESC] Exit View Drive Assignment: To view the disk drive assignment status by... pressing [3]. Connect all the SATA power and SATA data cables. 4-3 RAID Configuration This motherboard supports RAID 0, RAID 1 and RAID10 functions. 4 4-2 Install SATA Hard Disks 1. Boot up your computer. 2. Install SATA hard disks into the drive bays...

English Manual.
Page 54
... [Space] to "Y" by pressing [Space] or [Y]. 4. Use [↓] key to highlight the hard disks, change any two of the drives' "Assignment" status to select RAID 0. 3. Press [Ctrl-Y] to key in the main menu, "Define LD Menu" appears and the "LD 1" row is highlight, press [Enter], the scree is shown as... an example: 1. Press [Ctrl-Y] to clear the RAID array or press any other key to continue, another prompt appears: Press Ctrl-Y to Modify Array Capacity or press any other key to its maximum...
... [Space] to "Y" by pressing [Space] or [Y]. 4. Use [↓] key to highlight the hard disks, change any two of the drives' "Assignment" status to select RAID 0. 3. Press [Ctrl-Y] to key in the main menu, "Define LD Menu" appears and the "LD 1" row is highlight, press [Enter], the scree is shown as... an example: 1. Press [Ctrl-Y] to clear the RAID array or press any other key to continue, another prompt appears: Press Ctrl-Y to Modify Array Capacity or press any other key to its maximum...

English Manual.
Page 55
... abort. Insert a floppy disk/USB disk into the optical drive. 3. Boot your will install, go to CD:\Driver\AMD\RAID\Driver\WinXP or WinVista, click on a hard disk that is required during POST to complete the process. 48 Follow the instructions... to enter BIOS. 2. Option ROM Utility (c) 2008 Advanced Micro Devices, Inc. [ View[ DLeDfinDeeLfinDitMionenMue]nu ] LD No RAID Mode Total Drv Capacity(MB) Status LD 1 RAID 0 2 XXXXX Functional Stripe Block: 64 KB Cache Mode: WriteThru [ Drives Assignment ] Channel :ID Drive Model Compatibilities Capacity(...
... abort. Insert a floppy disk/USB disk into the optical drive. 3. Boot your will install, go to CD:\Driver\AMD\RAID\Driver\WinXP or WinVista, click on a hard disk that is required during POST to complete the process. 48 Follow the instructions... to enter BIOS. 2. Option ROM Utility (c) 2008 Advanced Micro Devices, Inc. [ View[ DLeDfinDeeLfinDitMionenMue]nu ] LD No RAID Mode Total Drv Capacity(MB) Status LD 1 RAID 0 2 XXXXX Functional Stripe Block: 64 KB Cache Mode: WriteThru [ Drives Assignment ] Channel :ID Drive Model Compatibilities Capacity(...

English Manual.
Page 56
...the message "Press F6 if you need to continue the OS installation. 49 Insert the floppy disk/USB disk into the optical drive. 3. Insert the RAID driver floppy disk into the optical drive. 3. Set the "1st Boot Device" to continue. After the driver is really what we wanted, press [...continue. 6. When the screen shows "No driver were founded...", select "Load Driver". 5. Select it and press "Next" to install a 3rd party SCSI or RAID driver". 5. Insert the Windows Vista installation CD into the floppy disk drive, and press [S] to enter BIOS. 2. Select "AMD AHCI Compatible...
...the message "Press F6 if you need to continue the OS installation. 49 Insert the floppy disk/USB disk into the optical drive. 3. Insert the RAID driver floppy disk into the optical drive. 3. Set the "1st Boot Device" to continue. After the driver is really what we wanted, press [...continue. 6. When the screen shows "No driver were founded...", select "Load Driver". 5. Select it and press "Next" to install a 3rd party SCSI or RAID driver". 5. Insert the Windows Vista installation CD into the floppy disk drive, and press [S] to enter BIOS. 2. Select "AMD AHCI Compatible...