
English Manual.
Page 6
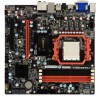
...Product Specifications 2 Layout...4 Back Panel Connectors 5 Chapter 2 Hardware Install Install the CPU and CPU Cooler 8 Install the Memory 10 Install an Expansion Card 12 Install other Internal Connectors 13 Jumpers 17 Chapter 3 BIOS Setup Enter BIOS Setup 19 Main Menu 19 System Information 21 Boot Setting Configuration 24 Advanced Chipset Features 26 Integrated Peripherals 30 Power Management 33 Hardware Monitor 35 Overclock Control Center 36 BIOS Security Features 47 Load Optimal Defaults 48 Save & Exit Setup 48 Exit without Saving 48 Chapter 4 CD Instruction Utility CD...
...Product Specifications 2 Layout...4 Back Panel Connectors 5 Chapter 2 Hardware Install Install the CPU and CPU Cooler 8 Install the Memory 10 Install an Expansion Card 12 Install other Internal Connectors 13 Jumpers 17 Chapter 3 BIOS Setup Enter BIOS Setup 19 Main Menu 19 System Information 21 Boot Setting Configuration 24 Advanced Chipset Features 26 Integrated Peripherals 30 Power Management 33 Hardware Monitor 35 Overclock Control Center 36 BIOS Security Features 47 Load Optimal Defaults 48 Save & Exit Setup 48 Exit without Saving 48 Chapter 4 CD Instruction Utility CD...

English Manual.
Page 9
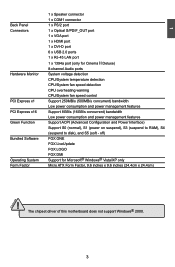
... Memory (only for Cinema II Deluxe) Support Full HD HDMI Technology Support Hybrid CrossFireX Dual independent displays support with HDMI/DVI and D-Sub Audio Realtek 8-channel audio chip High Definition Audio 2/4/5.1/7.1-channel Support for S/PDIF Out Support Jack-Sensing function LAN Realtek 10/100/1000Mb/s LAN chip Expansion Slots 1 x PCI Express x16 slot 2 x PCI Express x1 slots 1 x PCI slot Onboard Serial ATA 4 x SATA connectors 1 x ESATA connector 300MB/s data transfer rate Support hot plug and NCQ (Native Command Queuing ) USB Support hot plug...
... Memory (only for Cinema II Deluxe) Support Full HD HDMI Technology Support Hybrid CrossFireX Dual independent displays support with HDMI/DVI and D-Sub Audio Realtek 8-channel audio chip High Definition Audio 2/4/5.1/7.1-channel Support for S/PDIF Out Support Jack-Sensing function LAN Realtek 10/100/1000Mb/s LAN chip Expansion Slots 1 x PCI Express x16 slot 2 x PCI Express x1 slots 1 x PCI slot Onboard Serial ATA 4 x SATA connectors 1 x ESATA connector 300MB/s data transfer rate Support hot plug and NCQ (Native Command Queuing ) USB Support hot plug...
English Manual.
Page 10
... Bundled Software FOX ONE FOX LiveUpdate FOX LOGO FOX DMI Operating System Support for Cinema II Deluxe) 8-channel Audio ports Hardware Monitor System voltage detection CPU/System temperature detection CPU/System fan speed detection CPU overheating warning CPU/System fan speed control PCI Express x1 Support 250MB/s (500MB/s concurrent) bandwidth Low power consumption and power management features PCI Express x16 Support 8GB/s (16GB/s concurrent) bandwidth Low power consumption and power management features Green Function Support ACPI (Advanced Configuration and Power...
... Bundled Software FOX ONE FOX LiveUpdate FOX LOGO FOX DMI Operating System Support for Cinema II Deluxe) 8-channel Audio ports Hardware Monitor System voltage detection CPU/System temperature detection CPU/System fan speed detection CPU overheating warning CPU/System fan speed control PCI Express x1 Support 250MB/s (500MB/s concurrent) bandwidth Low power consumption and power management features PCI Express x16 Support 8GB/s (16GB/s concurrent) bandwidth Low power consumption and power management features Green Function Support ACPI (Advanced Configuration and Power...

English Manual.
Page 19
... to BIOS Setup to prevent hardware damage. Installing and Removing a PCI Express x16 Graphics Card : • Installing a Graphics Card: Gently insert the graphics card into the slot. 4. Locate an expansion slot that came with the expansion card in your expansion card in the slot. 3. Install the driver provided with your computer. Align the card with a screw. 5. After installing all expansion cards, replace the chassis cover. 6. Make sure the metal contacts on your expansion card. ■ Always turn off...
... to BIOS Setup to prevent hardware damage. Installing and Removing a PCI Express x16 Graphics Card : • Installing a Graphics Card: Gently insert the graphics card into the slot. 4. Locate an expansion slot that came with the expansion card in your expansion card in the slot. 3. Install the driver provided with your computer. Align the card with a screw. 5. After installing all expansion cards, replace the chassis cover. 6. Make sure the metal contacts on your expansion card. ■ Always turn off...

English Manual.
Page 21
... S3/S4 sleep state or power off mode (S5), the LED is off rather than using the power supply button. 1 + HDD-LED - 2 + PWR-LED - We recommend you using a 4-pin power supply, you are using an 8-pin ATX 12V power supply. Reset Switch (RESET-SW) Attach the connector to connect speaker of the hard disks. It indicates the active status of the chassis. the system will send a message out. The system can be turned on the front panel of the chassis. Speaker Connector : SPEAKER The speaker connector is...
... S3/S4 sleep state or power off mode (S5), the LED is off rather than using the power supply button. 1 + HDD-LED - 2 + PWR-LED - We recommend you using a 4-pin power supply, you are using an 8-pin ATX 12V power supply. Reset Switch (RESET-SW) Attach the connector to connect speaker of the hard disks. It indicates the active status of the chassis. the system will send a message out. The system can be turned on the front panel of the chassis. Speaker Connector : SPEAKER The speaker connector is...

English Manual.
Page 24
... go back to short them . Return the setting to its original with pins 2-3 closed Set two pins opened Clear CMOS Jumper: CLR_CMOS The motherboard uses CMOS RAM to store the basic hardware information (such as "1". 2. For any jumper setting. It can be done by touching two pins by changing the jumper settings. Turn off the computer, unplug the power cord from pins 2-3, put it onto pins 1-2 to factory default when the BIOS settings were mistakenly...
... go back to short them . Return the setting to its original with pins 2-3 closed Set two pins opened Clear CMOS Jumper: CLR_CMOS The motherboard uses CMOS RAM to store the basic hardware information (such as "1". 2. For any jumper setting. It can be done by touching two pins by changing the jumper settings. Turn off the computer, unplug the power cord from pins 2-3, put it onto pins 1-2 to factory default when the BIOS settings were mistakenly...

English Manual.
Page 27
... Saving Do not change Fan speeds, and displays temperatures and voltages of your CPU/System. ► BIOS Security Features The Supervisor/User password can be set up through this menu to prevent unauthorized use of your computer. What you need now is to adjust BIOS setting one by one, trial and error, to find out the best setting for your system loading is heavy, set to optimal default may sometimes...
... Saving Do not change Fan speeds, and displays temperatures and voltages of your CPU/System. ► BIOS Security Features The Supervisor/User password can be set up through this menu to prevent unauthorized use of your computer. What you need now is to adjust BIOS setting one by one, trial and error, to find out the best setting for your system loading is heavy, set to optimal default may sometimes...

English Manual.
Page 29
... powering on the memory clock frequency. User can be enabled/disabled in clock cycles). ► Subtimings Information Press to go to return data after the read CAS_L is a function of this information and discuss with the field service people if a BIOS upgrade is needed. ► Memory Information This item displays the current memory size/memory tinings/memory clock/tCL/tRCD/tRP/tRAS. The target clock frequency is determined from the supported...
... powering on the memory clock frequency. User can be enabled/disabled in clock cycles). ► Subtimings Information Press to go to return data after the read CAS_L is a function of this information and discuss with the field service people if a BIOS upgrade is needed. ► Memory Information This item displays the current memory size/memory tinings/memory clock/tCL/tRCD/tRP/tRAS. The target clock frequency is determined from the supported...

English Manual.
Page 33
... controls how long each PCI device to wait longer before another takes over. Some PCI devices may enhance the graphics card speed. ► Auto Detect PCI/PCIE Clock This option is used to PCI VGA card even if the card requests an IRQ. 26 Advanced Chipset Features CMOS Setup Utility - The larger the value, the longer the PCI device can conduct their transactions for a longer time. Advanced Chipset Features PCI/PCI Express Configuration Help Item ► PCIe Port #2 Configuration [Press Enter] ► PCIe Port #6 Configuration [Press Enter] ► PCIe Port...
... controls how long each PCI device to wait longer before another takes over. Some PCI devices may enhance the graphics card speed. ► Auto Detect PCI/PCIE Clock This option is used to PCI VGA card even if the card requests an IRQ. 26 Advanced Chipset Features CMOS Setup Utility - The larger the value, the longer the PCI device can conduct their transactions for a longer time. Advanced Chipset Features PCI/PCI Express Configuration Help Item ► PCIe Port #2 Configuration [Press Enter] ► PCIe Port #6 Configuration [Press Enter] ► PCIe Port...

English Manual.
Page 37
...; USB Configuration LAN Controller LAN Boot ROM 1394 FireWire USB Controller Azalia HD Audio Controller Serial Port Address Ir Port Address Ir Port Mode Ir Port Duplex Mode [Press Enter] Help Item [Press Enter] [Enabled] Configure the SATA [Disabled] device(s). [Enabled] [Enabled] [Enabled] [3F8/IRQ4] [2F8/IRQ3] [IrDA] [Half Duplex] 3 Move Enter:Select +/-/:Value F10:Save ESC:Exit F1:General Help F2/F3:Change Colors F9:Optimized Defaults ► SATA Configuration / USB Configuration Press to go to relative submenu. ► LAN Controller This item is used to enable or...
...; USB Configuration LAN Controller LAN Boot ROM 1394 FireWire USB Controller Azalia HD Audio Controller Serial Port Address Ir Port Address Ir Port Mode Ir Port Duplex Mode [Press Enter] Help Item [Press Enter] [Enabled] Configure the SATA [Disabled] device(s). [Enabled] [Enabled] [Enabled] [3F8/IRQ4] [2F8/IRQ3] [IrDA] [Half Duplex] 3 Move Enter:Select +/-/:Value F10:Save ESC:Exit F1:General Help F2/F3:Change Colors F9:Optimized Defaults ► SATA Configuration / USB Configuration Press to go to relative submenu. ► LAN Controller This item is used to enable or...

English Manual.
Page 38
...ports to set the operating mode of the hardware/software interface between system software and the host controller hardware. Options : [Native IDE]; [RAID]; [AHCI]; [Legacy IDE]. [Native IDE] - SATA Configuration SB710 SATA Controller [Enable d] Help Item SB710 SATA Mode [Native IDE] Enables or Disables the SB710 SATA Controller Move Enter:Select +/-/:Value F10:Save ESC:Exit F1:General Help F2/F3:Change Colors F9:Optimized Defaults ► SB710 SATA Controller This item is used to get its specification. The Advanced Host Controller Interface (AHCI) specification...
...ports to set the operating mode of the hardware/software interface between system software and the host controller hardware. Options : [Native IDE]; [RAID]; [AHCI]; [Legacy IDE]. [Native IDE] - SATA Configuration SB710 SATA Controller [Enable d] Help Item SB710 SATA Mode [Native IDE] Enables or Disables the SB710 SATA Controller Move Enter:Select +/-/:Value F10:Save ESC:Exit F1:General Help F2/F3:Change Colors F9:Optimized Defaults ► SB710 SATA Controller This item is used to get its specification. The Advanced Host Controller Interface (AHCI) specification...

English Manual.
Page 39
...; BIOS EHCI Hand-Off Windows XP supports a number of USB 2.0. 3 USB Configuration CMOS Setup Utility - USB Configuration USB Configuration Help Item Module Version - 2.24.5-13.4 USB Device Enabled : 1 Keyboard Legacy USB Support USB 2.0 Controller Mode BIOS EHCI Hand-Off [Enabled] [HiSpeed] [Enabled] Enabled support for OS without EHCI hand-off feature. Microsoft said preliminary support for OS without EHCI hand-Off support . The available settings are many different emulation types of this USB device, such as floppy, hard disk and CDROM can set the transmission rate mode...
...; BIOS EHCI Hand-Off Windows XP supports a number of USB 2.0. 3 USB Configuration CMOS Setup Utility - USB Configuration USB Configuration Help Item Module Version - 2.24.5-13.4 USB Device Enabled : 1 Keyboard Legacy USB Support USB 2.0 Controller Mode BIOS EHCI Hand-Off [Enabled] [HiSpeed] [Enabled] Enabled support for OS without EHCI hand-off feature. Microsoft said preliminary support for OS without EHCI hand-Off support . The available settings are many different emulation types of this USB device, such as floppy, hard disk and CDROM can set the transmission rate mode...

English Manual.
Page 40
... (CPU or chip set context are : S1 - Hardware maintains memory context and restores some CPU and L2 configuration context. This state is maintained. (also called Suspend to Disk) S5 - Power Management Setup CMOS Setup Utility - Power Managemeng Setup Suspend mode Repost Video on S3 Resume PWR on after the wake event. Control starts from the processor's reset vector after PWR fail Resume by PME Resume by Onboard LAN Resume by USB Devices Resume by ACPI. Platform...
... (CPU or chip set context are : S1 - Hardware maintains memory context and restores some CPU and L2 configuration context. This state is maintained. (also called Suspend to Disk) S5 - Power Management Setup CMOS Setup Utility - Power Managemeng Setup Suspend mode Repost Video on S3 Resume PWR on after the wake event. Control starts from the processor's reset vector after PWR fail Resume by PME Resume by Onboard LAN Resume by USB Devices Resume by ACPI. Platform...

English Manual.
Page 45
... Link Control option controls the physical speed of memory, and the HT links between processors are initialized between the adjacent coherent and/or noncoherent HyperTransport technology devices during the reset sequence. The physical speed of the link is idling. Overclock Control Center Allow Microcode Updates [ Enabled] Help Item Secure Virtual Machine [Enabled] Cool 'N' Quiet [Enabled] Allow the CPUs ► Advanced CPU Settings [Press Enter] Microcode to be updated/patched CPU Configuration Module Version: 13...
... Link Control option controls the physical speed of memory, and the HT links between processors are initialized between the adjacent coherent and/or noncoherent HyperTransport technology devices during the reset sequence. The physical speed of the link is idling. Overclock Control Center Allow Microcode Updates [ Enabled] Help Item Secure Virtual Machine [Enabled] Cool 'N' Quiet [Enabled] Allow the CPUs ► Advanced CPU Settings [Press Enter] Microcode to be updated/patched CPU Configuration Module Version: 13...

English Manual.
Page 52
...only memory to which the integrated graphics has access is a dynamically allocated partition of or alongside the Athlon 64's memory controller. Setting values are: [Auto], [Coarse], [Fine]. IGP Configuration IGP Mode [UMA+SIDEPORT] Help Item UMA Frame Buffer Size SIDEPORT memory clock [Auto] [667MHz] Options UMA-SP Interleave Mode [Auto] IGP Core Clickspeed [Enable] I Disable GPU Clock [650] UMA NB Core Voltage Offset [Auto] SIDEPORT Surround View [Auto] UMA+SIDEPORT HDMI Audio [Enable] Primary Video Controller [PCI-GFXO-IGFX] PCIEx16 Slot Clock...
...only memory to which the integrated graphics has access is a dynamically allocated partition of or alongside the Athlon 64's memory controller. Setting values are: [Auto], [Coarse], [Fine]. IGP Configuration IGP Mode [UMA+SIDEPORT] Help Item UMA Frame Buffer Size SIDEPORT memory clock [Auto] [667MHz] Options UMA-SP Interleave Mode [Auto] IGP Core Clickspeed [Enable] I Disable GPU Clock [650] UMA NB Core Voltage Offset [Auto] SIDEPORT Surround View [Auto] UMA+SIDEPORT HDMI Audio [Enable] Primary Video Controller [PCI-GFXO-IGFX] PCIEx16 Slot Clock...

English Manual.
Page 53
... used to change the North Bridge voltage in turn makes available up to the IGP is freed for both the ATI PCIe-based graphics card and the ATI integrated graphics processor (IGP). Enabling SurroundView does not impact display modes (resolution and color depth) or performance. Enabling SurroundView in the BIOS enables the integrated UMA graphics controller, which in a step of PCI Express slot. PCI-PCI graphics card.) ► PCIEx16 Slot Clock This option is used to enable or disable the audio...
... used to change the North Bridge voltage in turn makes available up to the IGP is freed for both the ATI PCIe-based graphics card and the ATI integrated graphics processor (IGP). Enabling SurroundView does not impact display modes (resolution and color depth) or performance. Enabling SurroundView in the BIOS enables the integrated UMA graphics controller, which in a step of PCI Express slot. PCI-PCI graphics card.) ► PCIEx16 Slot Clock This option is used to enable or disable the audio...

English Manual.
Page 57
... install ATI HDMI Audio driver. 50 ATI HDMI Audio Driver Use it to install Realtek Audio driver. To begin with one Utility CD. The CD will automatically run and display the main menu on the screen. 1. Realtek 811X LAN Driver Use it to install AMD chipset driver. Realtek HDA Audio Driver Use it to restart your computer after finishing all the necessary drivers for your CD drive. AMD RAID Driver Use it to install Realtek 811X LAN driver. You need to install AMD RAID driver. Driver Select "Driver", then use these options to install...
... install ATI HDMI Audio driver. 50 ATI HDMI Audio Driver Use it to install Realtek Audio driver. To begin with one Utility CD. The CD will automatically run and display the main menu on the screen. 1. Realtek 811X LAN Driver Use it to install AMD chipset driver. Realtek HDA Audio Driver Use it to restart your computer after finishing all the necessary drivers for your CD drive. AMD RAID Driver Use it to install Realtek 811X LAN driver. You need to install AMD RAID driver. Driver Select "Driver", then use these options to install...
English Manual.
Page 82
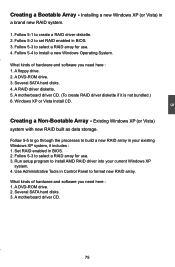
... install AMD RAID driver into your existing Windows XP system, it is not bundled.) 6. Use Administrative Tools in BIOS. 3. A motherboard driver CD. 75 Installing a new Windows XP (or Vista) in BIOS. 2. A motherboard driver CD. (To create RAID driver diskette if it includes : 1. Creating a Non-Bootable Array - Set RAID enabled in a brand new RAID system. 1. What kinds of hardware and software you need here : 1. Run setup program to select a RAID array for use . 3. Several SATA hard disks. 3. A DVD-ROM drive. 3. A floppy drive. 2. Windows XP...
... install AMD RAID driver into your existing Windows XP system, it is not bundled.) 6. Use Administrative Tools in BIOS. 3. A motherboard driver CD. 75 Installing a new Windows XP (or Vista) in BIOS. 2. A motherboard driver CD. (To create RAID driver diskette if it includes : 1. Creating a Non-Bootable Array - Set RAID enabled in a brand new RAID system. 1. What kinds of hardware and software you need here : 1. Run setup program to select a RAID array for use . 3. Several SATA hard disks. 3. A DVD-ROM drive. 3. A floppy drive. 2. Windows XP...
English Manual.
Page 103
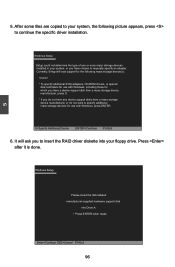
... RAID driver diskette into Drive A: * Press ENTER when ready Enter=Continue ESC=Cancel F3=Exit 96 Windows Setup Please insert the disk labeled manufacturer-supplied hardware support disk into your floppy drive. S=Specify Additional Device ENTER=Continue F3=Exit 6. Windows Setup Setup could not determine the type of one or more mass storage devices installed in your system, the following mass storage device(s): * To specify additional SCSI adapters, CD-ROM drivers, or special disk controllers for use with Windows, press ENTER...
... RAID driver diskette into Drive A: * Press ENTER when ready Enter=Continue ESC=Cancel F3=Exit 96 Windows Setup Please insert the disk labeled manufacturer-supplied hardware support disk into your floppy drive. S=Specify Additional Device ENTER=Continue F3=Exit 6. Windows Setup Setup could not determine the type of one or more mass storage devices installed in your system, the following mass storage device(s): * To specify additional SCSI adapters, CD-ROM drivers, or special disk controllers for use with Windows, press ENTER...

English Manual.
Page 112
... memory clock [667MHz] UMA-SP Interleave Mode [Auto] IGP Core Clickspeed [Enable] I Disable GPU Clock [650] UMA NB Core Voltage Offset [Auto] SIDEPORT Surround View [Enable] UMA+SIDEPORT HDMI Audio [Enable] Primary Video Controller [PCI-GFXO-IGFX] PCIEx16 Slot Clock [100] Appendix Move Enter:Select +/-/:Value F10:Save ESC:Exit F1:General Help F2/F3:Change Colors F9:Optimized Defaults 2. ATI Hybrid CrossFire™ technology can be used for both discrete GPU and IGP graphics cores to enter...
... memory clock [667MHz] UMA-SP Interleave Mode [Auto] IGP Core Clickspeed [Enable] I Disable GPU Clock [650] UMA NB Core Voltage Offset [Auto] SIDEPORT Surround View [Enable] UMA+SIDEPORT HDMI Audio [Enable] Primary Video Controller [PCI-GFXO-IGFX] PCIEx16 Slot Clock [100] Appendix Move Enter:Select +/-/:Value F10:Save ESC:Exit F1:General Help F2/F3:Change Colors F9:Optimized Defaults 2. ATI Hybrid CrossFire™ technology can be used for both discrete GPU and IGP graphics cores to enter...


