Multi-language manual.
Page 4
... 4. Set Supervisor Password 30 10. Power Management Setup 27 6. Integrated Periphreals 26 5. Table of Contents Chapter 1 Main Features Specifications 2 Jumpers 18 Chapter 2 BIOS Description Enter BIOS Setup 21 Main menu 21 1. Fox Central Control Unit 24 3. Save & Exit Setup 31 12. Load Optimized Defaults 30 9. Exit Without Saving 31 Chapter 3 Directions for Bundled Software FOX ONE 33 FOX LiveUpdate 36 FOX LOGO 38 FOX DMI 39 PnP/PCI Configurations 29 7. Set User Password...
... 4. Set Supervisor Password 30 10. Power Management Setup 27 6. Integrated Periphreals 26 5. Table of Contents Chapter 1 Main Features Specifications 2 Jumpers 18 Chapter 2 BIOS Description Enter BIOS Setup 21 Main menu 21 1. Fox Central Control Unit 24 3. Save & Exit Setup 31 12. Load Optimized Defaults 30 9. Exit Without Saving 31 Chapter 3 Directions for Bundled Software FOX ONE 33 FOX LiveUpdate 36 FOX LOGO 38 FOX DMI 39 PnP/PCI Configurations 29 7. Set User Password...
Multi-language manual.
Page 5
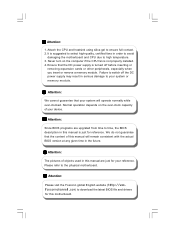
... the actual BIOS version at any given time in serious damage to switch off before inserting or removing expansion cards or other peripherals, especially when you insert or remove a memory module. Normal operation depends on the computer if the CPU fan is turned off the DC power supply may result in the future. Attach the CPU and heatsink using silica gel to the physical motherboard. Attention...
... the actual BIOS version at any given time in serious damage to switch off before inserting or removing expansion cards or other peripherals, especially when you insert or remove a memory module. Normal operation depends on the computer if the CPU fan is turned off the DC power supply may result in the future. Attach the CPU and heatsink using silica gel to the physical motherboard. Attention...
Multi-language manual.
Page 9
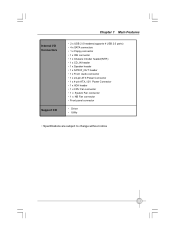
Internal I/O Connectors Support CD Chapter 1 Main Features ·2 x USB 2.0 headers(supports 4 USB 2.0 ports) ·4 x SATA connectors ·1 x Floppy connector ·1 x IDE connector ·1 x Chassis intruder header(INTR) ·1 x CD_IN header ·1 x Speaker header ·1 x S/PDIF_OUT header ·1 x Front Audio connector ·1 x 24-pin ATX Power Connector ·1 x 4-pin ATX_12V Power Connector ·1 x IrDA header ·1 x CPU Fan connector ·1 x System Fan connector ·1 x NB Fan connector ·Front panel connector · Driver · Utility ·Specifications...
Internal I/O Connectors Support CD Chapter 1 Main Features ·2 x USB 2.0 headers(supports 4 USB 2.0 ports) ·4 x SATA connectors ·1 x Floppy connector ·1 x IDE connector ·1 x Chassis intruder header(INTR) ·1 x CD_IN header ·1 x Speaker header ·1 x S/PDIF_OUT header ·1 x Front Audio connector ·1 x 24-pin ATX Power Connector ·1 x 4-pin ATX_12V Power Connector ·1 x IrDA header ·1 x CPU Fan connector ·1 x System Fan connector ·1 x NB Fan connector ·Front panel connector · Driver · Utility ·Specifications...
Multi-language manual.
Page 24
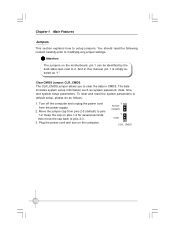
Move the jumper cap from the power supply. 2. Attention The jumpers on the computer. 1 Normal (default) 1 Clear CLR_ CMOS 18 And in CMOS. Plug the power cord and turn on the motherboard, pin 1 can be identified by the bold silkscreen next to it. To clear and reset the system parameters to pins 1-2. Chapter 1 Main Features Jumpers This section explains how to pins 2-3. 3. The data includes system setup information such as follows...
Move the jumper cap from the power supply. 2. Attention The jumpers on the computer. 1 Normal (default) 1 Clear CLR_ CMOS 18 And in CMOS. Plug the power cord and turn on the motherboard, pin 1 can be identified by the bold silkscreen next to it. To clear and reset the system parameters to pins 1-2. Chapter 1 Main Features Jumpers This section explains how to pins 2-3. 3. The data includes system setup information such as follows...
Multi-language manual.
Page 25
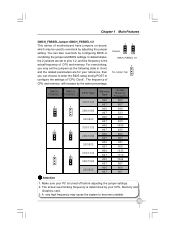
... frequency of CPU and memory will increase by adjusting the jumper setting. You can choose to enter the BIOS setup during POST to configure the settings of "CPU Clock". Chapter 1 Main Features GMCH_FSBSEL Jumper: GMCH_FSBSEL 1/2 This series of motherboard have jumpers on-board, which may set to pins 1-2, and the frequency is determined by your PC is turned off before adjusting the jumper settings. 2. A very high frequency may cause the system to overclock by the same percentage. 11 Default...
... frequency of CPU and memory will increase by adjusting the jumper setting. You can choose to enter the BIOS setup during POST to configure the settings of "CPU Clock". Chapter 1 Main Features GMCH_FSBSEL Jumper: GMCH_FSBSEL 1/2 This series of motherboard have jumpers on-board, which may set to pins 1-2, and the frequency is determined by your PC is turned off before adjusting the jumper settings. 2. A very high frequency may cause the system to overclock by the same percentage. 11 Default...
Multi-language manual.
Page 26
... cases occur: 1. Detailed descriptions of the BIOS parameters are also provided. You want to change system settings through the BIOS Setup menus. Chapter 2 BIOS Description 2 Chapter This chapter introduces how to change the default CMOS settings. You have to run the Setup Program when the following information: v Enter BIOS Setup v Main Menu v Standard CMOS Features v Fox Central Control Unit v Advanced BIOS Features v Intergrated peripherals v Power Management Setup v PnP/PCI Configurations v PC Health Status v Load Optimized Defaults v Set...
... cases occur: 1. Detailed descriptions of the BIOS parameters are also provided. You want to change system settings through the BIOS Setup menus. Chapter 2 BIOS Description 2 Chapter This chapter introduces how to change the default CMOS settings. You have to run the Setup Program when the following information: v Enter BIOS Setup v Main Menu v Standard CMOS Features v Fox Central Control Unit v Advanced BIOS Features v Intergrated peripherals v Power Management Setup v PnP/PCI Configurations v PC Health Status v Load Optimized Defaults v Set...

Multi-language manual.
Page 27
... this menu. 5. Power Management Setup Through this menu. 2. Correctly setting up through this menu. 4. Main Menu The main menu displays a list of the screen during the POST (Power On Self Test), press key to enter Boot Menu. Chapter 2 BIOS Description Enter BIOS Setup The BIOS is critical to maintain optimal system performance. Note: W e do not suggest that you can be responsible for any damage that results from any changes that you change the default parameters in the main menu...
... this menu. 5. Power Management Setup Through this menu. 2. Correctly setting up through this menu. 4. Main Menu The main menu displays a list of the screen during the POST (Power On Self Test), press key to enter Boot Menu. Chapter 2 BIOS Description Enter BIOS Setup The BIOS is critical to maintain optimal system performance. Note: W e do not suggest that you can be responsible for any damage that results from any changes that you change the default parameters in the main menu...
Multi-language manual.
Page 29
... for a keyboard error; The system boot will stop for all other errors. 23 but it will be entered manually. There are three choices provided for all other errors. but not supporting LBA Auto Recommended mode 1.3 Drive A This option allows you will stop for other errors. by choosing "Manual" and changing Access Mode to be detected. The system boot will not stop if an error is installed or set; The system boot will...
... for a keyboard error; The system boot will stop for all other errors. 23 but it will be entered manually. There are three choices provided for all other errors. but not supporting LBA Auto Recommended mode 1.3 Drive A This option allows you will stop for other errors. by choosing "Manual" and changing Access Mode to be detected. The system boot will not stop if an error is installed or set; The system boot will...
Multi-language manual.
Page 30
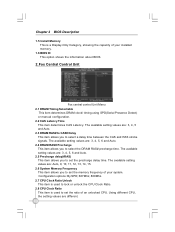
... allows you to set the memory frequency of your installed memory. 1.6 BIOS ID This option shows the information about BIOS. 2.Fox Central Control Unit Fox central control Unit Menu 2.1 DRAM Timing Selectable This item determines DRAM clock/ timing using SPD(Serial Presence Detect) or manual configuration. 2.2 CAS Latency Time This item determines CAS Latency. The available setting values are : Auto, 9, 10, 11, 12, 13, 14, 15. 2.6 System Memory Frequency This item allows...
... allows you to set the memory frequency of your installed memory. 1.6 BIOS ID This option shows the information about BIOS. 2.Fox Central Control Unit Fox central control Unit Menu 2.1 DRAM Timing Selectable This item determines DRAM clock/ timing using SPD(Serial Presence Detect) or manual configuration. 2.2 CAS Latency Time This item determines CAS Latency. The available setting values are : Auto, 9, 10, 11, 12, 13, 14, 15. 2.6 System Memory Frequency This item allows...

Multi-language manual.
Page 31
... "overClock Magic Setting" set as "Manual", this option is used to regulate the DRAM voltage. 2.16 CPU Voltage Regulator W hen the "overClock Magic Setting" set as "Manual", this item is used to set the CPU clock. 2.12 OverClock Magic Setting W hen select "Intelligent", BIOS will move(turn off) the empty PCI slot clock to reduce EMI(Electromagnetic Interference). 2.10 CPU Frequency control You can select the default CPU frequency or "manual" to enable the "CPU Clock" option. 2.11 CPU Clock W hen the "CPU Frequency control" is set to be optimal. Chapter 2 BIOS Description 2.9 Auto...
... "overClock Magic Setting" set as "Manual", this option is used to regulate the DRAM voltage. 2.16 CPU Voltage Regulator W hen the "overClock Magic Setting" set as "Manual", this item is used to set the CPU clock. 2.12 OverClock Magic Setting W hen select "Intelligent", BIOS will move(turn off) the empty PCI slot clock to reduce EMI(Electromagnetic Interference). 2.10 CPU Frequency control You can select the default CPU frequency or "manual" to enable the "CPU Clock" option. 2.11 CPU Clock W hen the "CPU Frequency control" is set to be optimal. Chapter 2 BIOS Description 2.9 Auto...
Multi-language manual.
Page 32
... Technology This option is used for HDD startup. you can select the HDD using the Up/Down arrow keys, and change the HDD priority using / or / keys ; You can press 26 Chapter 2 BIOS Description 3.1 CPU Feature You can press to set the boot device's sequence. 3.5 Boot Other Device W hile enabled, the system will appear an error message. 3.7 Boot Up NumLock Status This item allows you to select the power-on status for a floppy drive...
... Technology This option is used for HDD startup. you can select the HDD using the Up/Down arrow keys, and change the HDD priority using / or / keys ; You can press 26 Chapter 2 BIOS Description 3.1 CPU Feature You can press to set the boot device's sequence. 3.5 Boot Other Device W hile enabled, the system will appear an error message. 3.7 Boot Up NumLock Status This item allows you to select the power-on status for a floppy drive...

Multi-language manual.
Page 33
... is a standard that describes how computer components work together to manage system hardware. W hen select "Delay 4 sec", the power will remain as serial port, parallel port and so on. 4.4 USB Device Setting This sub-menu is used to set the parameters of USB devices. 5.Power Management Setup Power Management Setup Menu 5.1 ACPI function ACPI( Advanced Configuration and Power Interface)is a standard that defines power and configuration management interfaces between an operating system and the BIOS.
... is a standard that describes how computer components work together to manage system hardware. W hen select "Delay 4 sec", the power will remain as serial port, parallel port and so on. 4.4 USB Device Setting This sub-menu is used to set the parameters of USB devices. 5.Power Management Setup Power Management Setup Menu 5.1 ACPI function ACPI( Advanced Configuration and Power Interface)is a standard that defines power and configuration management interfaces between an operating system and the BIOS.
Multi-language manual.
Page 34
... an ATX power supply. Hot KEY; In order to use this item will be modified. Chapter 2 BIOS Description 5.4 PWRON After PWR-Fail This item is used to enable or disable the HPET Support. 5.11 Power On by button/Mouse W hen enabled, it allows you to use the button/mouse to wake up the system from soft off and green mode. up by PCI card This item is used to wake up...
... an ATX power supply. Hot KEY; In order to use this item will be modified. Chapter 2 BIOS Description 5.4 PWRON After PWR-Fail This item is used to enable or disable the HPET Support. 5.11 Power On by button/Mouse W hen enabled, it allows you to use the button/mouse to wake up the system from soft off and green mode. up by PCI card This item is used to wake up...

Multi-language manual.
Page 35
... solve graphic acceleration card or MPEG audio card problems (e.g., colors not the accurate display). The setting values: [Disabled]; [Enabled]. 6.3 PCI/VGA Palette Snoop If you use a non-standard VGA card, use this option to enable or disable case open warning function. 29 PCI Express relative items 6.4 Maximum Payload Size This item is used to automatically distribute IRQ DMA and I/O addresses when each time that the machine is turned on. 6.PnP/PCI Configurations Chapter 2 BIOS Description PnP/PCI Configurations menu 6.1 Init Display...
... solve graphic acceleration card or MPEG audio card problems (e.g., colors not the accurate display). The setting values: [Disabled]; [Enabled]. 6.3 PCI/VGA Palette Snoop If you use a non-standard VGA card, use this option to enable or disable case open warning function. 29 PCI Express relative items 6.4 Maximum Payload Size This item is used to automatically distribute IRQ DMA and I/O addresses when each time that the machine is turned on. 6.PnP/PCI Configurations Chapter 2 BIOS Description PnP/PCI Configurations menu 6.1 Init Display...

Multi-language manual.
Page 36
... a regular User password. W hen prompted, key in the center of voltage, temperature and FAN speed that detected automatically by BIOS, which have set the initial PW M value of smart fan. 7.7 Slope PWM Value This item is used to enter 30 W hen the temperature exceeds the setting value, the motherboard will automatically cut off power to enable or disable smart fan function. While the User password can be modified using the User password. The User password can set some correlative...
... a regular User password. W hen prompted, key in the center of voltage, temperature and FAN speed that detected automatically by BIOS, which have set the initial PW M value of smart fan. 7.7 Slope PWM Value This item is used to enter 30 W hen the temperature exceeds the setting value, the motherboard will automatically cut off power to enable or disable smart fan function. While the User password can be modified using the User password. The User password can set some correlative...
Multi-language manual.
Page 39
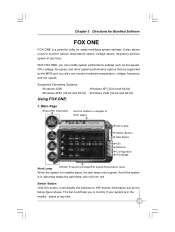
... users to HW monitor information bar as bus speed, CPU voltage, fan speed, and other pages Alert Lamp Switch Button Skin Button Exit Minimum Configuration Homepage Alert Lamp Monitor Frequency/Voltage/Fan speed/Temperature value When the system is in the healthy status at any time. 33 And if the system is in healthy status, the alert lamp color is a powerful utility for easily modifying system settings. Chapter 3 Directions for Bundled Software...
... users to HW monitor information bar as bus speed, CPU voltage, fan speed, and other pages Alert Lamp Switch Button Skin Button Exit Minimum Configuration Homepage Alert Lamp Monitor Frequency/Voltage/Fan speed/Temperature value When the system is in the healthy status at any time. 33 And if the system is in healthy status, the alert lamp color is a powerful utility for easily modifying system settings. Chapter 3 Directions for Bundled Software...
Multi-language manual.
Page 41
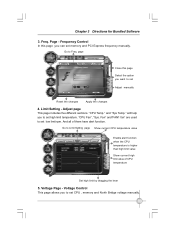
Frequency Control In this page Select the option you can set memory and PCI Express frequency manually. Go to set Adjust manually Reset the changes Apply the changes 4. Fan" and"FAN1 fan" are used to Freq. Go to set low limit rpm. page Close this page ,you want to Limit Setting page Show current CPU temperature value Enable alert function when the CPU temperature is higher than high limit value Show current high limit value of them...
Frequency Control In this page Select the option you can set memory and PCI Express frequency manually. Go to set Adjust manually Reset the changes Apply the changes 4. Fan" and"FAN1 fan" are used to Freq. Go to set low limit rpm. page Close this page ,you want to Limit Setting page Show current CPU temperature value Enable alert function when the CPU temperature is higher than high limit value Show current high limit value of them...
Multi-language manual.
Page 42
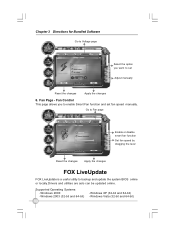
... 64-bit) 36 -Windows XP (32-bit and 64-bit) -W indows Vista (32-bit and 64-bit) Chapter 3 Directions for Bundled Software Go to Voltage page Select the option you to enable Smart Fan function and set Adjust manually Reset the changes Apply the changes 6. Go to Fan page Enable or disable smart fan function Set fan speed by dragging the lever Reset the changes Apply the changes FOX LiveUpdate FOX LiveUpdate is a useful utility to backup and update the system BIOS...
... 64-bit) 36 -Windows XP (32-bit and 64-bit) -W indows Vista (32-bit and 64-bit) Chapter 3 Directions for Bundled Software Go to Voltage page Select the option you to enable Smart Fan function and set Adjust manually Reset the changes Apply the changes 6. Go to Fan page Enable or disable smart fan function Set fan speed by dragging the lever Reset the changes Apply the changes FOX LiveUpdate FOX LiveUpdate is a useful utility to backup and update the system BIOS...

Multi-language manual.
Page 43
... for Bundled Software Using FOX LiveUpdate: 1. "Backup BIOS" could backup your system BIOS from Internet. "Update BIOS" helps to finish the operation. Then follow the wizard to update your system BIOS ,please click this button ,then key in a pop balloon notification; 37 Configure "Option" provides auto search options and version filter. Local Update "BIOS Info" tells you update your system BIOS,Drivers,Utilities and all of them from local BIOS files ,please follow...
... for Bundled Software Using FOX LiveUpdate: 1. "Backup BIOS" could backup your system BIOS from Internet. "Update BIOS" helps to finish the operation. Then follow the wizard to update your system BIOS ,please click this button ,then key in a pop balloon notification; 37 Configure "Option" provides auto search options and version filter. Local Update "BIOS Info" tells you update your system BIOS,Drivers,Utilities and all of them from local BIOS files ,please follow...
Multi-language manual.
Page 44
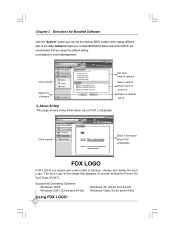
... useful utility to backup, change different skin of ver s i on s Reset to flash BIOS,Boot Block and clear CMOS ,we recommend that appears on screen during the Power-On Self-Tests (POST). Supported Operating Systems: -W indows 2000 -W indows 2003 (32-bit and 64-bit) -Windows XP (32-bit and 64-bit) -W indows Vista (32-bit and 64-bit) Using FOX LOGO: 38 Chapter 3 Directions for Bundled Software click the "System" button,you can set...
... useful utility to backup, change different skin of ver s i on s Reset to flash BIOS,Boot Block and clear CMOS ,we recommend that appears on screen during the Power-On Self-Tests (POST). Supported Operating Systems: -W indows 2000 -W indows 2003 (32-bit and 64-bit) -Windows XP (32-bit and 64-bit) -W indows Vista (32-bit and 64-bit) Using FOX LOGO: 38 Chapter 3 Directions for Bundled Software click the "System" button,you can set...


