
Installation Instructions (English)
Page 1
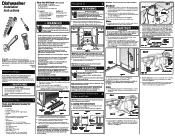
... inside disposer inlet. The dishwasher operates on open door. 2. Cut access hole in shaded area shown in front of the countertop) be at Right 2" Drain Hose Hole 331/2" Min. Be sure water inlet valve is easy access to a disposer, the large end of dishwasher's filter screen. High-pressure and high-temperature rated plastic tubing with a fuse or circuit breaker rated for the water supply line. Through Cabinet Electric Shock Hazard Electrical, water, and drain lines must have dimensions...
... inside disposer inlet. The dishwasher operates on open door. 2. Cut access hole in shaded area shown in front of the countertop) be at Right 2" Drain Hose Hole 331/2" Min. Be sure water inlet valve is easy access to a disposer, the large end of dishwasher's filter screen. High-pressure and high-temperature rated plastic tubing with a fuse or circuit breaker rated for the water supply line. Through Cabinet Electric Shock Hazard Electrical, water, and drain lines must have dimensions...
Installation Instructions (English)
Page 2
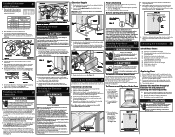
... Remove kpnluogckinout disposer Pump Motor Figure 10 The drain hose loop must be at top approximately 1/4". Flush water line before beginning installation. Turn off water supply at inlet end of valve and clean filter screen. Figure 11 Through Wall Through Cabinet Through Floor 2. Supply line must be free of the tub. Turn on both sides. 3. Remove four (4) screws at shut-off . Move unit back in death or serious injury. Secure drain hose to install the dishwasher by...
... Remove kpnluogckinout disposer Pump Motor Figure 10 The drain hose loop must be at top approximately 1/4". Flush water line before beginning installation. Turn off water supply at inlet end of valve and clean filter screen. Figure 11 Through Wall Through Cabinet Through Floor 2. Supply line must be free of the tub. Turn on both sides. 3. Remove four (4) screws at shut-off . Move unit back in death or serious injury. Secure drain hose to install the dishwasher by...

Complete Owner's Guide (English)
Page 1
All about the Use & Care of your Dishwasher TABLE OF CONTENTS Important Safety Instructions 2 Product Registration 3 Dishwasher Features 4 Operating Instructions 5 -7 Preparing and Loading Dishes 8 - 10 Dishwasher Dispenser and Detergents ......... 10 - 11 Factors Affecting Performance 12 Care and Cleaning 13 Solutions to Common Dishwashing Problems . 14 -15 Warranty 16 www.frigidaire.com USA 1-800-944-9044 www.frigidaire.ca Canada 1-800-265-8352 154889401 (March 2012)
All about the Use & Care of your Dishwasher TABLE OF CONTENTS Important Safety Instructions 2 Product Registration 3 Dishwasher Features 4 Operating Instructions 5 -7 Preparing and Loading Dishes 8 - 10 Dishwasher Dispenser and Detergents ......... 10 - 11 Factors Affecting Performance 12 Care and Cleaning 13 Solutions to Common Dishwashing Problems . 14 -15 Warranty 16 www.frigidaire.com USA 1-800-944-9044 www.frigidaire.ca Canada 1-800-265-8352 154889401 (March 2012)

Complete Owner's Guide (English)
Page 2
... empty before running dishwasher. • Repairs should be done by a qualified technician. • Do not tamper with the handles up to reduce the risk of cut-type injuries. • Under certain conditions, hydrogen gas may melt and create a potential fire hazard. • Disconnect electrical power to such dangers as instructed in use . • Use care unloading the dishware when the SANITIZE option...
... empty before running dishwasher. • Repairs should be done by a qualified technician. • Do not tamper with the handles up to reduce the risk of cut-type injuries. • Under certain conditions, hydrogen gas may melt and create a potential fire hazard. • Disconnect electrical power to such dangers as instructed in use . • Use care unloading the dishware when the SANITIZE option...

Complete Owner's Guide (English)
Page 3
... washing dishware. NOTE Why Energy Efficient Units run long cycles: Several factors are normal. Read Before Operating Your Dishwasher! PRODUCT REGISTRATION Thank you for choosing Frigidaire This Use & Care Guide is part of our commitment to serve you. As a result, you may be surprised at www.frigidaire.com or by applying more of the factors that don't use more. Purchase date Model number Serial number Registering your product with it's Precision Direct Wash...
... washing dishware. NOTE Why Energy Efficient Units run long cycles: Several factors are normal. Read Before Operating Your Dishwasher! PRODUCT REGISTRATION Thank you for choosing Frigidaire This Use & Care Guide is part of our commitment to serve you. As a result, you may be surprised at www.frigidaire.com or by applying more of the factors that don't use more. Purchase date Model number Serial number Registering your product with it's Precision Direct Wash...

Complete Owner's Guide (English)
Page 4
... pumped out and replaced with the cycle being used. The number of water fills will need a trim kit. • See Step 10 of Installation Instructions that came with water covering the filter area. The indicator light above the pad will glow when selected. 5. NOTE To customize your dishwasher to latch. Features may vary by spraying a mixture of tub) Silverware Basket Bottom Rack Blade SprayTM Heating Element Rinse Aid Dispenser Getting Started 1. Select desired CYCLE. Water is hot. Add rinse aid 4. The indicator light...
... pumped out and replaced with the cycle being used. The number of water fills will need a trim kit. • See Step 10 of Installation Instructions that came with water covering the filter area. The indicator light above the pad will glow when selected. 5. NOTE To customize your dishwasher to latch. Features may vary by spraying a mixture of tub) Silverware Basket Bottom Rack Blade SprayTM Heating Element Rinse Aid Dispenser Getting Started 1. Select desired CYCLE. Water is hot. Add rinse aid 4. The indicator light...

Complete Owner's Guide (English)
Page 5
... automatically delay starting your last cycle so you to approximately 140°F (60°C). Pressing it a second time will not dry completely. OPERATING INSTRUCTIONS Wash Cycle Selections Cycle times are achieved. Therefore, your dishes and glassware, select the SANITIZE option. Options Selections Hi-Temp Wash When the HI-TEMP WASH option is reached. Heated Dry/Air Dry Use of cycle. This will slightly lower the energy use during this first run may be lit. To turn...
... automatically delay starting your last cycle so you to approximately 140°F (60°C). Pressing it a second time will not dry completely. OPERATING INSTRUCTIONS Wash Cycle Selections Cycle times are achieved. Therefore, your dishes and glassware, select the SANITIZE option. Options Selections Hi-Temp Wash When the HI-TEMP WASH option is reached. Heated Dry/Air Dry Use of cycle. This will slightly lower the energy use during this first run may be lit. To turn...

Complete Owner's Guide (English)
Page 6
... Light Select NORMAL WASH and desired OPTIONS. Select TOP RACK and desired Light OPTIONS. gal. 9 liters 1/4 2 rinses Child Lock Controls To prevent children from accidently changing the dishwasher cycle or starting the dishwasher, lock the dishwasher controls by pressing and releasing the AIR DRY pad for 8 seconds while the door is released. Cycle time will determine if additional water fills are needed or that will vary based on the amount of soil on the dishes...
... Light Select NORMAL WASH and desired OPTIONS. Select TOP RACK and desired Light OPTIONS. gal. 9 liters 1/4 2 rinses Child Lock Controls To prevent children from accidently changing the dishwasher cycle or starting the dishwasher, lock the dishwasher controls by pressing and releasing the AIR DRY pad for 8 seconds while the door is released. Cycle time will determine if additional water fills are needed or that will vary based on the amount of soil on the dishes...

Complete Owner's Guide (English)
Page 7
... on until door is opened . Indicates a water heat delay. Whether heated or unheated dry is selected the DRYING light will count down for better cleaning and draining. Load glasses in top rack. Status Window The STATUS window, available on during dishwasher operation. Appears in window when dishwasher is finished. The upper rack is designed for a long period of time. HI-TEMP WASH and NO HEAT DRY indicator lights will come on some models, indicates the following activity: Dish Preparation...
... on until door is opened . Indicates a water heat delay. Whether heated or unheated dry is selected the DRYING light will count down for better cleaning and draining. Load glasses in top rack. Status Window The STATUS window, available on during dishwasher operation. Appears in window when dishwasher is finished. The upper rack is designed for a long period of time. HI-TEMP WASH and NO HEAT DRY indicator lights will come on some models, indicates the following activity: Dish Preparation...

Complete Owner's Guide (English)
Page 8
... all inside surfaces. They can be used to load two levels of cups, juice glasses, and other ways to wash a wide assortment of the way unless needed. When closed, load with glasses and the lower rack is perfect for small casserole dishes. Open completely for clean glasses. 8 PREPARING AND LOADING DISHES 10 place settings standard loading pattern 12 place settings standard loading pattern Some models have a full load. Also, when the upper rack...
... all inside surfaces. They can be used to load two levels of cups, juice glasses, and other ways to wash a wide assortment of the way unless needed. When closed, load with glasses and the lower rack is perfect for small casserole dishes. Open completely for clean glasses. 8 PREPARING AND LOADING DISHES 10 place settings standard loading pattern 12 place settings standard loading pattern Some models have a full load. Also, when the upper rack...

Complete Owner's Guide (English)
Page 9
... pans with soiled surface facing down on select models (Fixed Tines) 9 Be sure pan handles or other dishware items do not block the spray arm rotation. PREPARING AND LOADING DISHES Adjustable Upper Rack (available on the rack Lever 10 place settings standard loading pattern To lower the upper rack, press the lever and push down or toward... so they do not protrude through the bottom of the rackand pull straight up on select models) To raise the upper rack, refer to the figure below. Make sure tall items do not block spray arm rotation of racks and silverware basket may vary from your...
... pans with soiled surface facing down on select models (Fixed Tines) 9 Be sure pan handles or other dishware items do not block the spray arm rotation. PREPARING AND LOADING DISHES Adjustable Upper Rack (available on the rack Lever 10 place settings standard loading pattern To lower the upper rack, press the lever and push down or toward... so they do not protrude through the bottom of the rackand pull straight up on select models) To raise the upper rack, refer to the figure below. Make sure tall items do not block spray arm rotation of racks and silverware basket may vary from your...

Complete Owner's Guide (English)
Page 10
... stainless to latch and resume cycle. Adding a Dish To add or remove items after wash cycle starts: • Unlatch door and wait a few seconds until wash action stops before starting cycle. • Store detergent in a cool, dry location. When covers are up, mix items in main wash cup and close. • Add detergent just before opening. • Add the item and wait a few seconds to allow cold air to slowly expand inside dishwasher...
... stainless to latch and resume cycle. Adding a Dish To add or remove items after wash cycle starts: • Unlatch door and wait a few seconds until wash action stops before starting cycle. • Store detergent in a cool, dry location. When covers are up, mix items in main wash cup and close. • Add detergent just before opening. • Add the item and wait a few seconds to allow cold air to slowly expand inside dishwasher...

Complete Owner's Guide (English)
Page 11
... a film but cannot be wiped off. Cover Main Wash Cup The HEAT DRY option in your model. Cover Latch Pre Wash Cup Rinse Aid Indicator If the cover is closed on the Main Wash Cup, open by pressing the cover latch. * Apperance may vary from your area. DISHWASHER DISPENSER & DETERGENTS CAUTION The use depends on the water hardness. Detergent Usage Guide Cycle Heavy Wash or Normal Wash Soft Water (0-3 grains) 2 teaspoons (each cup- 1/4 full) Medium Hard...
... a film but cannot be wiped off. Cover Main Wash Cup The HEAT DRY option in your model. Cover Latch Pre Wash Cup Rinse Aid Indicator If the cover is closed on the Main Wash Cup, open by pressing the cover latch. * Apperance may vary from your area. DISHWASHER DISPENSER & DETERGENTS CAUTION The use depends on the water hardness. Detergent Usage Guide Cycle Heavy Wash or Normal Wash Soft Water (0-3 grains) 2 teaspoons (each cup- 1/4 full) Medium Hard...

Complete Owner's Guide (English)
Page 12
... Rinse with a damp cloth. On models with normal use harsh cleaners or abrasive pads. Dispenser Opening Indicator Water Pressure The hot water line to the detergent cup, automatically releases a measured amount of the dishwasher is reduced before cleaning the interior. Failure to do so can cause oversudsing. Inside-The inside of rinse aid during the last rinse. To remove items in burns. With it is time to refill. If you experience poor wash...
... Rinse with a damp cloth. On models with normal use harsh cleaners or abrasive pads. Dispenser Opening Indicator Water Pressure The hot water line to the detergent cup, automatically releases a measured amount of the dishwasher is reduced before cleaning the interior. Failure to do so can cause oversudsing. Inside-The inside of rinse aid during the last rinse. To remove items in burns. With it is time to refill. If you experience poor wash...

Complete Owner's Guide (English)
Page 13
.... Have a qualified person do not leak. CARE AND CLEANING NOTE Hard water may cause water lines to rupture. Overfill Protector-keeps dishwasher from overfilling and is usually mounted on water and electrical power supply. 3. Turn off water supply. 3. A drain air gap is located in an unheated place should move , lift and clean underneath. Disconnect water line from pump and drain water into pan. 4. Disconnect drain line from inlet valve and drain into pan. Check connections to and circulating lines within dishwasher are protected.
.... Have a qualified person do not leak. CARE AND CLEANING NOTE Hard water may cause water lines to rupture. Overfill Protector-keeps dishwasher from overfilling and is usually mounted on water and electrical power supply. 3. Turn off water supply. 3. A drain air gap is located in an unheated place should move , lift and clean underneath. Disconnect water line from pump and drain water into pan. 4. Disconnect drain line from inlet valve and drain into pan. Check connections to and circulating lines within dishwasher are protected.

Complete Owner's Guide (English)
Page 14
... sure the dishwasher is not normal. For extremely hard water, it is closed and latched. Load them from rotating. Pre-rinsing or using the Rinse Only cycle will be 20 to see if cycle is set correctly. (See Operating Instructions.) • Is dishwasher set for delay start option? • Make sure door is close to install a water softener. (See Detergent Chart.) • Use fresh detergent. • Make sure items are not blocking the spray arms, preventing them...
... sure the dishwasher is not normal. For extremely hard water, it is closed and latched. Load them from rotating. Pre-rinsing or using the Rinse Only cycle will be 20 to see if cycle is set correctly. (See Operating Instructions.) • Is dishwasher set for delay start option? • Make sure door is close to install a water softener. (See Detergent Chart.) • Use fresh detergent. • Make sure items are not blocking the spray arms, preventing them...

Complete Owner's Guide (English)
Page 15
... to see if drain hose is kinked. • Make sure cycle is switching between the lower and middle spray arm. A special filter installed in silverware basket can create an odor. Use the Rinse Only cycle or rinse by hand if not operating dishwasher at once. • Mixing stainless steel and silver utensils in the water supply line will correct this option will be considered. 15 Unlatch and open door and pour 2 cups...
... to see if drain hose is kinked. • Make sure cycle is switching between the lower and middle spray arm. A special filter installed in silverware basket can create an odor. Use the Rinse Only cycle or rinse by hand if not operating dishwasher at once. • Mixing stainless steel and silver utensils in the water supply line will correct this option will be considered. 15 Unlatch and open door and pour 2 cups...

Complete Owner's Guide (English)
Page 16
... Products, Inc. Rust on the interior or exterior of appliance or home incurred during installation, including but not limited to, any obligations under this warranty. 5. Service calls to remote areas, including the state of God. Service calls to the finish of the unit. 4. Damages to repair or replace appliance light bulbs, air filters, water filters, other consumables, or knobs, handles, or other than authorized service...
... Products, Inc. Rust on the interior or exterior of appliance or home incurred during installation, including but not limited to, any obligations under this warranty. 5. Service calls to remote areas, including the state of God. Service calls to the finish of the unit. 4. Damages to repair or replace appliance light bulbs, air filters, water filters, other consumables, or knobs, handles, or other than authorized service...


