
Installation Instructions (English, Español, Français)
Page 2
... plastic or flexible foil venting material. ral gas or LP supply, gas dryer) • Carpenter's level • External vent hood • 4-inch (102 mm), rigid metal or semi-rigid metal exhaust duct work • 3-wire or 4-wire 240 volt cord kit (electric dryer) • 4 in this manual and all of the following instructions before installing and using this dryer are not meant to light any appliance. • Do not...
... plastic or flexible foil venting material. ral gas or LP supply, gas dryer) • Carpenter's level • External vent hood • 4-inch (102 mm), rigid metal or semi-rigid metal exhaust duct work • 3-wire or 4-wire 240 volt cord kit (electric dryer) • 4 in this manual and all of the following instructions before installing and using this dryer are not meant to light any appliance. • Do not...

Installation Instructions (English, Español, Français)
Page 3
...finitions This is setting solid on all corners Gas Supply (Gas Dryer) ‰ Manual shutoff valve present in supply ‰ All connections sealed with approved sealer and wrench tight ‰ Conversion kit for function Electrical Power ‰ House power turned on ‰ Dryer plugged in Final Checks ‰ Installation Instructions and Use and Care Guide read all screws tight on terminal block ‰ Approved strain relief installed ‰ Terminal access cover installed before using this dryer. DANGER DANGER indicates...
...finitions This is setting solid on all corners Gas Supply (Gas Dryer) ‰ Manual shutoff valve present in supply ‰ All connections sealed with approved sealer and wrench tight ‰ Conversion kit for function Electrical Power ‰ House power turned on ‰ Dryer plugged in Final Checks ‰ Installation Instructions and Use and Care Guide read all screws tight on terminal block ‰ Approved strain relief installed ‰ Terminal access cover installed before using this dryer. DANGER DANGER indicates...

Installation Instructions (English, Español, Français)
Page 4
... (4) areas where local codes do not permit grounding through the neutral. branch circuit fused with clothes dryers. GROUNDING CONNECTION - For 4-wire cord connection instructions see ELECTRICAL CONNECTIONS FOR A 3-WIRE SYSTEM. 4-WIRE POWER SUPPLY CORD KIT (not supplied) 4-wire receptacle (NEMA type 14-30R) The dryer MUST employ a 4-conductor power supply cord NEMA 14-30 type SRDT or ST (as required) rated at 240 volt AC minimum, 30 amp, with 3 open end spade lug connectors with upturned ends...
... (4) areas where local codes do not permit grounding through the neutral. branch circuit fused with clothes dryers. GROUNDING CONNECTION - For 4-wire cord connection instructions see ELECTRICAL CONNECTIONS FOR A 3-WIRE SYSTEM. 4-WIRE POWER SUPPLY CORD KIT (not supplied) 4-wire receptacle (NEMA type 14-30R) The dryer MUST employ a 4-conductor power supply cord NEMA 14-30 type SRDT or ST (as required) rated at 240 volt AC minimum, 30 amp, with 3 open end spade lug connectors with upturned ends...

Installation Instructions (English, Español, Français)
Page 5
... tubing may be used to connect your dryer to the gas supply line. See "Grounding requirements" in Electrical Installation section. The dryer is equipped with the B149.1, Natural Gas and Propane Installation Code. 5 A 1/8 inch (0.32 cm) N.P.T. Individual, properly polarized and grounded 15 amp. Grounding type wall receptacle Do not, under any pressure testing of the gas supply piping system at test pressures equal to natural gas, causing gas leaks. time delay fuse or circuit breaker.
... tubing may be used to connect your dryer to the gas supply line. See "Grounding requirements" in Electrical Installation section. The dryer is equipped with the B149.1, Natural Gas and Propane Installation Code. 5 A 1/8 inch (0.32 cm) N.P.T. Individual, properly polarized and grounded 15 amp. Grounding type wall receptacle Do not, under any pressure testing of the gas supply piping system at test pressures equal to natural gas, causing gas leaks. time delay fuse or circuit breaker.

Installation Instructions (English, Español, Français)
Page 7
... flexible foil venting material. • If installing semi-rigid venting, do not exceed 8 ft. (2.4 m) duct length. 7 MAXIMUM LENGTH of 4" (102mm) Rigid Metal Duct VENT HOOD TYPE (Preferred) Number of air. If the dryer is not exhausted outdoors, some fine lint will be expelled into the duct to assemble the exhaust system. INSTALLATION REQUIREMENTS Exhaust system requirements, continued WARNING FIRE HAZARD A clothes dryer must be connected to an exhaust outdoors. Do not exhaust dryer into a chimney...
... flexible foil venting material. • If installing semi-rigid venting, do not exceed 8 ft. (2.4 m) duct length. 7 MAXIMUM LENGTH of 4" (102mm) Rigid Metal Duct VENT HOOD TYPE (Preferred) Number of air. If the dryer is not exhausted outdoors, some fine lint will be expelled into the duct to assemble the exhaust system. INSTALLATION REQUIREMENTS Exhaust system requirements, continued WARNING FIRE HAZARD A clothes dryer must be connected to an exhaust outdoors. Do not exhaust dryer into a chimney...

Installation Instructions (English, Español, Français)
Page 8
...; dryer vent elbow directly to exhaust outlet of dryer. Although vertical orientation of the exhaust system is acceptable, certain extenuating circumstances could affect the performance of the dryer: • Only rigid metal duct work should be used to determine if the exhaust system is acceptable: 1 Connect an inclined or digital manometer between the dryer and the point the exhaust connects to the dryer. 2 Set the dryer timer and temperature to air fl...
...; dryer vent elbow directly to exhaust outlet of dryer. Although vertical orientation of the exhaust system is acceptable, certain extenuating circumstances could affect the performance of the dryer: • Only rigid metal duct work should be used to determine if the exhaust system is acceptable: 1 Connect an inclined or digital manometer between the dryer and the point the exhaust connects to the dryer. 2 Set the dryer timer and temperature to air fl...
Installation Instructions (English, Español, Français)
Page 9
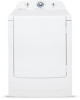
... door with equivalent air openings for the full length of the door is required. Rigid metal duct is preferred. 3 If dryer is exhausted through the floor and area beneath the mobile home is enclosed, the exhaust system MUST terminate outside (outdoors, not beneath the mobile home) using metal ducting that will not support combustion. Openings should be installed in the same closet as the gas dryer. 3 Your dryer needs...
... door with equivalent air openings for the full length of the door is required. Rigid metal duct is preferred. 3 If dryer is exhausted through the floor and area beneath the mobile home is enclosed, the exhaust system MUST terminate outside (outdoors, not beneath the mobile home) using metal ducting that will not support combustion. Openings should be installed in the same closet as the gas dryer. 3 Your dryer needs...

Installation Instructions (English, Español, Français)
Page 11
..., cord-connected dryer: 1 The dryer MUST be connected to a grounded metal, permanent wiring system; For a permanently connected dryer: 1 The dryer MUST be grounded. INSTALLATION INSTRUCTIONS Electrical installation The following are specific requirements for proper and safe electrical installation of the receptacle for the length power cord to be purchased, allowing some slack in the cord. Check with the circuit conductors and connected to follow these instructions can cause electrical shorts. Failure to the equipmentgrounding terminal...
..., cord-connected dryer: 1 The dryer MUST be connected to a grounded metal, permanent wiring system; For a permanently connected dryer: 1 The dryer MUST be grounded. INSTALLATION INSTRUCTIONS Electrical installation The following are specific requirements for proper and safe electrical installation of the receptacle for the length power cord to be purchased, allowing some slack in the cord. Check with the circuit conductors and connected to follow these instructions can cause electrical shorts. Failure to the equipmentgrounding terminal...

Installation Instructions (English, Español, Français)
Page 16
... you time and money. 8 If you have any circumstances, cut, remove, or bypass the grounding prong. Use metal foil tape to seal all other joints. 2 Use a carpenter's level to level your Use & Care Guide before plugging the power cord into an outlet. 5 Plug the power cord into a grounded outlet. INSTALLATION INSTRUCTIONS General installation 1 Connect the exhaust duct to -side. Keep the leveling leg extension at the circuit breaker/fuse box. 7 Read the Use & Care Guide provided with the dryer. raise...
... you time and money. 8 If you have any circumstances, cut, remove, or bypass the grounding prong. Use metal foil tape to seal all other joints. 2 Use a carpenter's level to level your Use & Care Guide before plugging the power cord into an outlet. 5 Plug the power cord into a grounded outlet. INSTALLATION INSTRUCTIONS General installation 1 Connect the exhaust duct to -side. Keep the leveling leg extension at the circuit breaker/fuse box. 7 Read the Use & Care Guide provided with the dryer. raise...

Installation Instructions (English, Español, Français)
Page 17
WARNING 2 You will need a plastic knife to help pull out the plugs. before reversing door. Retain all . 4 Remove the four long screws from power source! Be careful not to hinge, front panel or door. When reversed to the other side, this "D" must be reversed at work surface, such as top of dryer Failure to disconnect power source or floor near dryer, with a #2 square bit and a pair...
WARNING 2 You will need a plastic knife to help pull out the plugs. before reversing door. Retain all . 4 Remove the four long screws from power source! Be careful not to hinge, front panel or door. When reversed to the other side, this "D" must be reversed at work surface, such as top of dryer Failure to disconnect power source or floor near dryer, with a #2 square bit and a pair...
Installation Instructions (English, Español, Français)
Page 19
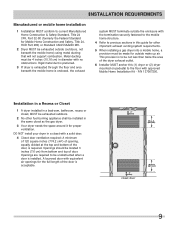
... Use and Care Guide for use in dryer or washer feet adjustment. To remove the console faceplate follow the directions below: 1. TOUCH UP PAINT PENS* Classic White Touch Up Pen - TECH DATA SHEET/ WIRING DIAGRAM Replacement parts: If replacements parts are located inside console, snap faceplate to your dryer. Technical Sheet/Wiring Diagram: Í NOTE A wiring diagram and technical data sheet are needed for your dryer, contact the source where you purchased, a drying rack may be available. Remove the hole plugs...
... Use and Care Guide for use in dryer or washer feet adjustment. To remove the console faceplate follow the directions below: 1. TOUCH UP PAINT PENS* Classic White Touch Up Pen - TECH DATA SHEET/ WIRING DIAGRAM Replacement parts: If replacements parts are located inside console, snap faceplate to your dryer. Technical Sheet/Wiring Diagram: Í NOTE A wiring diagram and technical data sheet are needed for your dryer, contact the source where you purchased, a drying rack may be available. Remove the hole plugs...
Complete Owner's Guide (English)
Page 2
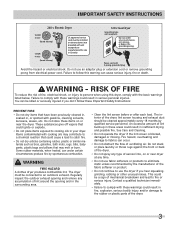
... CAUTION based on the dryer serial plate located at the top of all occu- This Use and Care Guide provides general operating instructions for several other appliance. Do not store or use any electrical switch; It is important but not hazard-related. Follow the gas supplier's instructions. • If you to alert you cannot reach your gas supplier, call your dryer. Installation and service must be performed by...
... CAUTION based on the dryer serial plate located at the top of all occu- This Use and Care Guide provides general operating instructions for several other appliance. Do not store or use any electrical switch; It is important but not hazard-related. Follow the gas supplier's instructions. • If you to alert you cannot reach your gas supplier, call your dryer. Installation and service must be performed by...
Complete Owner's Guide (English)
Page 3
... or near the dryer. An excessive amount of the dryer, lint screen housing and exhaust duct should be connected to comply with these warnings could be a sign of ventilating air. See Care and Cleaning. • Do not operate the dryer if the lint screen is blocked, damaged or missing. IMPORTANT SAFETY INSTRUCTIONS 240 v Electric Dryer 120 v Gas Dryer 10-30R 3-wire (fused 30 amp) 14-30R 4-wire UL-approved service cord must be cleaned approximately every...
... or near the dryer. An excessive amount of the dryer, lint screen housing and exhaust duct should be connected to comply with these warnings could be a sign of ventilating air. See Care and Cleaning. • Do not operate the dryer if the lint screen is blocked, damaged or missing. IMPORTANT SAFETY INSTRUCTIONS 240 v Electric Dryer 120 v Gas Dryer 10-30R 3-wire (fused 30 amp) 14-30R 4-wire UL-approved service cord must be cleaned approximately every...
Complete Owner's Guide (English)
Page 4
... of a gas dryer must replace the thermal limiter switch after the dryer is moving. Do not use an extension cord or an adaptor plug. • ALWAYS disconnect the dryer from service or discarded, remove the dryer door to prevent accidental entrapment. • Failure to comply with these warnings could result in this Owner's Guide. Wait until the dryer has stopped completely before attempting any service or cleaning. Included in...
... of a gas dryer must replace the thermal limiter switch after the dryer is moving. Do not use an extension cord or an adaptor plug. • ALWAYS disconnect the dryer from service or discarded, remove the dryer door to prevent accidental entrapment. • Failure to comply with these warnings could result in this Owner's Guide. Wait until the dryer has stopped completely before attempting any service or cleaning. Included in...
Complete Owner's Guide (English)
Page 8
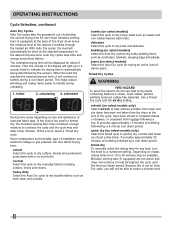
... sensors. Use a Timed Dry cycle and the air dry setting. It provides approximately 10 minutes of tumbling followed by a cool down period. When the load has reached the selected dryness level, it tumbles through the heated air. bedding (on select models) Select this Auto Dry cycle for any load, turn the knob to heat throughout the cycle until the final cool down period. timed dry To manually select the drying time for drying an entire load...
... sensors. Use a Timed Dry cycle and the air dry setting. It provides approximately 10 minutes of tumbling followed by a cool down period. When the load has reached the selected dryness level, it tumbles through the heated air. bedding (on select models) Select this Auto Dry cycle for any load, turn the knob to heat throughout the cycle until the final cool down period. timed dry To manually select the drying time for drying an entire load...
Complete Owner's Guide (English)
Page 13
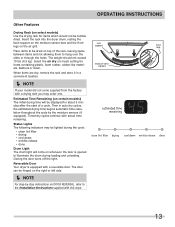
... come on whenever the door is equipped with this dryer. Reversible Door Your dryer is opened to illuminate the drum during the cycle: • clean lint filter • drying • cool down . Other Features Drying Rack (on select models) Use the drying rack for items containing plastic, foam rubber, rubber-like materials, feathers or down • wrinkle release • done Drum Light The drum light will be dried on top of a cycle. When items are dry, remove...
... come on whenever the door is equipped with this dryer. Reversible Door Your dryer is opened to illuminate the drum during the cycle: • clean lint filter • drying • cool down . Other Features Drying Rack (on select models) Use the drying rack for items containing plastic, foam rubber, rubber-like materials, feathers or down • wrinkle release • done Drum Light The drum light will be dried on top of a cycle. When items are dry, remove...

Complete Owner's Guide (English)
Page 16
... of the drum finish. Thermal limiter tripped. LP gas supply tank is restored. Drying time will not operate. (electric models) Gas supply valve is not securely plugged in or plug Make sure the plug fits tightly in dryer too long. Foreign objects such as cycle ends. OCCURRENCE POSSIBLE CAUSE SOLUTION Dryer does not start. Electrical power cord is not open . House fuse blown or circuit breaker tripped. Reset circuit breaker or replace fuse. Dryer runs but the heater will be at...
... of the drum finish. Thermal limiter tripped. LP gas supply tank is restored. Drying time will not operate. (electric models) Gas supply valve is not securely plugged in or plug Make sure the plug fits tightly in dryer too long. Foreign objects such as cycle ends. OCCURRENCE POSSIBLE CAUSE SOLUTION Dryer does not start. Electrical power cord is not open . House fuse blown or circuit breaker tripped. Reset circuit breaker or replace fuse. Dryer runs but the heater will be at...
Complete Owner's Guide (English)
Page 17
... WRITTEN WARRANTY GIVES YOU SPECIFIC LEGAL RIGHTS. In Canada, your appliance or to instruct you how to use or used other appropriate payment record to establish the warranty period should service be defective in materials or workmanship when such appliance is in accordance with original serial numbers that has been transferred from its original owner to repair or replace appliance light bulbs, air filters, water fi...
... WRITTEN WARRANTY GIVES YOU SPECIFIC LEGAL RIGHTS. In Canada, your appliance or to instruct you how to use or used other appropriate payment record to establish the warranty period should service be defective in materials or workmanship when such appliance is in accordance with original serial numbers that has been transferred from its original owner to repair or replace appliance light bulbs, air filters, water fi...
Product Specifications Sheet (English)
Page 2
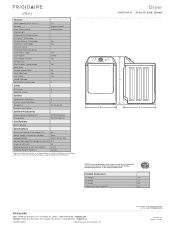
... Moisture Sensor Estimated Time Remaining Cycle Status Lights Cycle Signal Cycle Signal "On/Off " Control Lock Start / Pause / Cancel Knobs Delay Start Tumble Speed (RPM) Reversible Door Lint Screen Sound Package Adjustable Leveling Legs Frigidaire Affinity (M models) 7.0 Express-Select® Painted Steel Yes Yes Yes Chime Yes Yes 50 Yes Yes A 4 Cycles Dry Cycles 8 Specialty Cycles 0 Options Temperature Selections Dryness Level Selections Timed Dry Energy Saver Option 4 0 15, 30, 60, 90 B C Optional Accessories Mobile Home Installation Kit Drying Rack...
... Moisture Sensor Estimated Time Remaining Cycle Status Lights Cycle Signal Cycle Signal "On/Off " Control Lock Start / Pause / Cancel Knobs Delay Start Tumble Speed (RPM) Reversible Door Lint Screen Sound Package Adjustable Leveling Legs Frigidaire Affinity (M models) 7.0 Express-Select® Painted Steel Yes Yes Yes Chime Yes Yes 50 Yes Yes A 4 Cycles Dry Cycles 8 Specialty Cycles 0 Options Temperature Selections Dryness Level Selections Timed Dry Energy Saver Option 4 0 15, 30, 60, 90 B C Optional Accessories Mobile Home Installation Kit Drying Rack...
Product Specifications Sheet (English)
Page 3
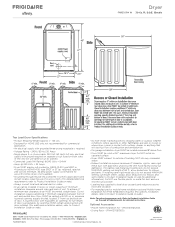
...-out damper(s). Refer to Product Installation Guide on both sides of line. (Do not use with 1" maximum slope. Do NOT install on carpeted surface. • Dryer MUST exhaust to outside of 4-wire system. (For detailed electrical requirements, refer to Product Installation Guide on web.) • Always consult local and national electric codes. • Dryer can be vented with equivalent air openings for detailed instructions. Closet installation requires additional 1" minimum clearance between...
...-out damper(s). Refer to Product Installation Guide on both sides of line. (Do not use with 1" maximum slope. Do NOT install on carpeted surface. • Dryer MUST exhaust to outside of 4-wire system. (For detailed electrical requirements, refer to Product Installation Guide on web.) • Always consult local and national electric codes. • Dryer can be vented with equivalent air openings for detailed instructions. Closet installation requires additional 1" minimum clearance between...


