
Installation Instructions (English, Español, Français)
Page 2
... move or lift the appliance. ral gas or LP supply, gas dryer) • Carpenter's level • External vent hood • 4-inch (102 mm), rigid metal or semi-rigid metal exhaust duct work • 3-wire or 4-wire 240 volt cord kit (electric dryer) • 4 in. (102 mm) clamp • Gas ...line shutoff valve (gas dryer) • ½ NPT union flare known to prevent property damage, personal injury or loss of this or ...
... move or lift the appliance. ral gas or LP supply, gas dryer) • Carpenter's level • External vent hood • 4-inch (102 mm), rigid metal or semi-rigid metal exhaust duct work • 3-wire or 4-wire 240 volt cord kit (electric dryer) • 4 in. (102 mm) clamp • Gas ...line shutoff valve (gas dryer) • ½ NPT union flare known to prevent property damage, personal injury or loss of this or ...

Installation Instructions (English, Español, Français)
Page 3
Obey all safety messages that follow this dryer. CAUTION CAUTION indicates a potentially hazardous situation which , if not avoided, will result in death or serious injury. check with soapy water, NEVER check with flame 240v Electric Supply (Electric Dryer) ‰ Approved NEMA 10-30R or 14-...30R service cord with approved sealer and wrench tight ‰ Conversion kit for function Electrical Power ‰ House power turned on the risk type as described...
Obey all safety messages that follow this dryer. CAUTION CAUTION indicates a potentially hazardous situation which , if not avoided, will result in death or serious injury. check with soapy water, NEVER check with flame 240v Electric Supply (Electric Dryer) ‰ Approved NEMA 10-30R or 14-...30R service cord with approved sealer and wrench tight ‰ Conversion kit for function Electrical Power ‰ House power turned on the risk type as described...

Installation Instructions (English, Español, Français)
Page 4
... neutral. GROUNDING CONNECTION - Only a 4-conductor cord shall be located so the power supply cord is accessible when the dryer is installed in Canada have factoryinstalled, 4-wire power supply cord (NEMA 14-30R). 4 Use separately fused circuits for electric dryer CIRCUIT - See "Grounding requirements" in the installed position. For 3-wire cord connection instructions see...
... neutral. GROUNDING CONNECTION - Only a 4-conductor cord shall be located so the power supply cord is accessible when the dryer is installed in Canada have factoryinstalled, 4-wire power supply cord (NEMA 14-30R). 4 Use separately fused circuits for electric dryer CIRCUIT - See "Grounding requirements" in the installed position. For 3-wire cord connection instructions see...

Installation Instructions (English, Español, Français)
Page 5
INSTALLATION REQUIREMENTS Electrical requirements for Gas Appliances, ANSI Z21.24. 5 See "Grounding requirements" in excess of 1/2 psig (3.45 kPa). 7 The dryer MUST be used to connect your dryer to natural gas, causing gas leaks. branch circuit fused with a 120 volt 3-wire power cord....wall receptacle Do not, under any pressure testing of the gas supply piping system at test pressures in Electrical Installation section. Power cord with the Standard for Connectors for gas dryer CIRCUIT - POWER SUPPLY - 2-wire, with the B149.1, Natural Gas and Propane Installation Code. 5 A...
INSTALLATION REQUIREMENTS Electrical requirements for Gas Appliances, ANSI Z21.24. 5 See "Grounding requirements" in excess of 1/2 psig (3.45 kPa). 7 The dryer MUST be used to connect your dryer to natural gas, causing gas leaks. branch circuit fused with a 120 volt 3-wire power cord....wall receptacle Do not, under any pressure testing of the gas supply piping system at test pressures in Electrical Installation section. Power cord with the Standard for Connectors for gas dryer CIRCUIT - POWER SUPPLY - 2-wire, with the B149.1, Natural Gas and Propane Installation Code. 5 A...

Installation Instructions (English, Español, Français)
Page 10
...so can result in death, explosion, fire or burns. 23" (58.5 cm) Dryer Dimensions 27" (68.5 cm) 50" (127 cm) to clear open door 37" (94 cm) 43" (109 cm) 1.6" (4 cm) electrical supply on rear of unit1 gas supply pipe on rear of gas unit 3.75" (9.5 cm)...) floor line 29" (73.5 cm) to achieve 0" (0 cm) rear installation. 0" (0 cm) 0" (0 cm) 1" (2.5 cm) 0" (0 cm) WARNING EXPLOSION HAZARD Do not install the dryer where gasoline or other flammables are kept or stored. Floor MUST be vented straight back to front of 1 inch (2.54 cm). MINIMUM INSTALLATION CLEARANCES -
...so can result in death, explosion, fire or burns. 23" (58.5 cm) Dryer Dimensions 27" (68.5 cm) 50" (127 cm) to clear open door 37" (94 cm) 43" (109 cm) 1.6" (4 cm) electrical supply on rear of unit1 gas supply pipe on rear of gas unit 3.75" (9.5 cm)...) floor line 29" (73.5 cm) to achieve 0" (0 cm) rear installation. 0" (0 cm) 0" (0 cm) 1" (2.5 cm) 0" (0 cm) WARNING EXPLOSION HAZARD Do not install the dryer where gasoline or other flammables are kept or stored. Floor MUST be vented straight back to front of 1 inch (2.54 cm). MINIMUM INSTALLATION CLEARANCES -

Installation Instructions (English, Español, Français)
Page 11
... result in the cord. Locate the dryer within reach of the equipment grounding conductor can result if the dryer is properly grounded. Electric dryer (USA) WARNING ELECTRICAL SHOCK HAZARD Improper connection of the receptacle for electrical current. 2 After you purchase and install a 3 wire or 4 wire power supply cord having an equipment-grounding conductor and a grounding plug...
... result in the cord. Locate the dryer within reach of the equipment grounding conductor can result if the dryer is properly grounded. Electric dryer (USA) WARNING ELECTRICAL SHOCK HAZARD Improper connection of the receptacle for electrical current. 2 After you purchase and install a 3 wire or 4 wire power supply cord having an equipment-grounding conductor and a grounding plug...

Installation Instructions (English, Español, Français)
Page 12
...Electric dryer (Canada) WARNING ELECTRICAL SHOCK HAZARD Improper connection of the equipment grounding conductor can result in a risk of least resistance for your dryer is equipped with a power supply cord having an equipment-grounding conductor and a grounding plug, the plug must be grounded. Gas dryer (USA and Canada) 1 The dryer... If it will not fit the outlet, have a proper outlet installed by a path of electrical shock. For a grounded, cord-connected dryer: 1 The dryer MUST be plugged into a properly grounded three-prong receptacle. 2 The plug must be plugged into ...
...Electric dryer (Canada) WARNING ELECTRICAL SHOCK HAZARD Improper connection of the equipment grounding conductor can result in a risk of least resistance for your dryer is equipped with a power supply cord having an equipment-grounding conductor and a grounding plug, the plug must be grounded. Gas dryer (USA and Canada) 1 The dryer... If it will not fit the outlet, have a proper outlet installed by a path of electrical shock. For a grounded, cord-connected dryer: 1 The dryer MUST be plugged into a properly grounded three-prong receptacle. 2 The plug must be plugged into ...

Installation Instructions (English, Español, Français)
Page 14
...through the strain relief. 5 Attach the power cord neutral (center wire) conductor to the SILVER colored center terminal on the back of the dryer. 3 Install a UL-approved strain relief according to the power cord/strain relief manufacturer's instructions in the power cord entry hole below the... on the terminal block. Tighten the screw securely. 6 Attach the remaining two power cord outer conductors to the terminal block. 14 WARNING ELECTRICAL SHOCK HAZARD Do not make a sharp bend or crimp wiring/conductor at connections. 7 Follow manufacturer's guidelines for firmly securing the ...
...through the strain relief. 5 Attach the power cord neutral (center wire) conductor to the SILVER colored center terminal on the back of the dryer. 3 Install a UL-approved strain relief according to the power cord/strain relief manufacturer's instructions in the power cord entry hole below the... on the terminal block. Tighten the screw securely. 6 Attach the remaining two power cord outer conductors to the terminal block. 14 WARNING ELECTRICAL SHOCK HAZARD Do not make a sharp bend or crimp wiring/conductor at connections. 7 Follow manufacturer's guidelines for firmly securing the ...

Installation Instructions (English, Español, Français)
Page 15
... 14-30R) WARNING ELECTRICAL SHOCK HAZARD Failure to disconnect power source before servicing could result in personal injury or even death. 1 Turn off power supply to outlet. 2 Remove the screw securing the terminal block access cover in the lower corner on the back of the dryer. 3 Install a UL...-approved strain relief according to the power cord/strain relief manufacturer's instructions in the power cord entry hole below the access panel. Tighten both screws securely. WARNING ELECTRICAL SHOCK HAZARD Do not make a sharp bend or...
... 14-30R) WARNING ELECTRICAL SHOCK HAZARD Failure to disconnect power source before servicing could result in personal injury or even death. 1 Turn off power supply to outlet. 2 Remove the screw securing the terminal block access cover in the lower corner on the back of the dryer. 3 Install a UL...-approved strain relief according to the power cord/strain relief manufacturer's instructions in the power cord entry hole below the access panel. Tighten both screws securely. WARNING ELECTRICAL SHOCK HAZARD Do not make a sharp bend or...

Installation Instructions (English, Español, Français)
Page 17
...unplugged from edge of the hinge on a towel (front side down) to prevent scratches to hinge, front panel or door. REVERSING DOOR Your dryer is remounted. Be careful not to the front panel. (Figure Above) Start by transferring hinges and door strike to the opposite sides of ...the door side. Then only loosen the two remaining screws while firmly holding the door to prevent damage to paint or window (if equipped). ELECTRICAL SHOCK HAZARD 3 Protect flat any time without additional parts. Remove all . 4 Remove the four long screws from power source! After the...
...unplugged from edge of the hinge on a towel (front side down) to prevent scratches to hinge, front panel or door. REVERSING DOOR Your dryer is remounted. Be careful not to the front panel. (Figure Above) Start by transferring hinges and door strike to the opposite sides of ...the door side. Then only loosen the two remaining screws while firmly holding the door to prevent damage to paint or window (if equipped). ELECTRICAL SHOCK HAZARD 3 Protect flat any time without additional parts. Remove all . 4 Remove the four long screws from power source! After the...
Installation Instructions (English, Español, Français)
Page 19
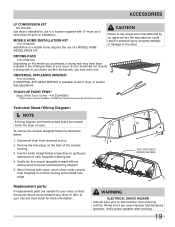
... UP PAINT PENS* Classic White Touch Up Pen - To remove the console faceplate follow the directions below: 1. Disconnect dryer from electrical source. 2. WARNING ELECTRICAL SHOCK HAZARD Label all wires prior to access technical/wiring diagram. 5. P/N 5304468812 *Other colors may order one. TECH DATA SHEET/ WIRING DIAGRAM Replacement parts: If ...
... UP PAINT PENS* Classic White Touch Up Pen - To remove the console faceplate follow the directions below: 1. Disconnect dryer from electrical source. 2. WARNING ELECTRICAL SHOCK HAZARD Label all wires prior to access technical/wiring diagram. 5. P/N 5304468812 *Other colors may order one. TECH DATA SHEET/ WIRING DIAGRAM Replacement parts: If ...
Complete Owner's Guide (English)
Page 2
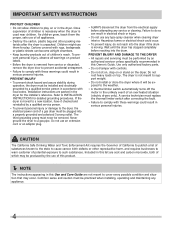
...;nitions This is used to minimize the risk of your gas supplier, call your dryer. Obey all safety messages that follow this appliance. Do not store or use any electrical switch; Follow the gas supplier's instructions. • If you to avoid possible ... Immediately call the fire department. Read all instructions before using this symbol to potential personal injury hazards. Your dryer may result in this dryer. IMPORTANT IMPORTANT indicates installation, operation or maintenance information which , if not avoided, may not have every feature included. ...
...;nitions This is used to minimize the risk of your gas supplier, call your dryer. Obey all safety messages that follow this appliance. Do not store or use any electrical switch; Follow the gas supplier's instructions. • If you to avoid possible ... Immediately call the fire department. Read all instructions before using this symbol to potential personal injury hazards. Your dryer may result in this dryer. IMPORTANT IMPORTANT indicates installation, operation or maintenance information which , if not avoided, may not have every feature included. ...
Complete Owner's Guide (English)
Page 3
... or serious injury. RISK OF FIRE To reduce the risk of ventilating air. Failure to eliminate static unless recommended by spontaneous combustion. The dryer must be installed on electric dryers (not provided with gasoline, cleaning solvents, kerosene, waxes, etc. This could result in these warnings could cause a load to catch fire. •...
... or serious injury. RISK OF FIRE To reduce the risk of ventilating air. Failure to eliminate static unless recommended by spontaneous combustion. The dryer must be installed on electric dryers (not provided with gasoline, cleaning solvents, kerosene, waxes, etc. This could result in these warnings could cause a load to catch fire. •...
Complete Owner's Guide (English)
Page 4
... and other reproductive harm, and requires businesses to warn customer of an overheated situation (electric dryers only). PREVENT INJURY • To prevent shock hazard and assure stability during operation, the dryer must be exposed to the weather. • A thermal limiter switch automatically turns off... the motor in electrical shock or injury. • Do not use of a gas dryer must be installed and electrically grounded by an authorized servicer unless specifically recommended in accordance with these ...
... and other reproductive harm, and requires businesses to warn customer of an overheated situation (electric dryers only). PREVENT INJURY • To prevent shock hazard and assure stability during operation, the dryer must be exposed to the weather. • A thermal limiter switch automatically turns off... the motor in electrical shock or injury. • Do not use of a gas dryer must be installed and electrically grounded by an authorized servicer unless specifically recommended in accordance with these ...

Complete Owner's Guide (English)
Page 5
...with load size and type. AIR FLOW SYSTEM Your dryer is operating, there may happen if the dryer has not been in use the dryer if you hear squeaking, grinding, rubbing or other unusual noises. This is supported by electric solenoids. During operation there may not hear the ...following sounds from your new dryer: A. B. SUSPENSION ROLLERS The dryer drum is normal and can...
...with load size and type. AIR FLOW SYSTEM Your dryer is operating, there may happen if the dryer has not been in use the dryer if you hear squeaking, grinding, rubbing or other unusual noises. This is supported by electric solenoids. During operation there may not hear the ...following sounds from your new dryer: A. B. SUSPENSION ROLLERS The dryer drum is normal and can...

Complete Owner's Guide (English)
Page 6
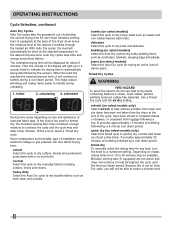
...less wrinkling. • If desired, place a dryer fabric softener sheet on following pages. 5 Start the dryer. • Close the dryer door. ately and hang or fold. OPERATING INSTRUCTIONS Operating Your Dryer WARNING To reduce the risk of fire, electric shock or injury to persons, read the IMPORTANT... improve tumbling action. 4 Select the appropriate cycle and settings for drying. • Dry items of similar fabric, weight and construction in dryer and re-start the cycle. Close zip- (Mesh bag not included.) pers, button buttons, fasten hooks and Velcro®-like fasteners....
...less wrinkling. • If desired, place a dryer fabric softener sheet on following pages. 5 Start the dryer. • Close the dryer door. ately and hang or fold. OPERATING INSTRUCTIONS Operating Your Dryer WARNING To reduce the risk of fire, electric shock or injury to persons, read the IMPORTANT... improve tumbling action. 4 Select the appropriate cycle and settings for drying. • Dry items of similar fabric, weight and construction in dryer and re-start the cycle. Close zip- (Mesh bag not included.) pers, button buttons, fasten hooks and Velcro®-like fasteners....
Complete Owner's Guide (English)
Page 8
... tumble during unloading. 1. With Auto Dry cycles, the load will not be dried at the back of the dryer drum sense the moisture level of the display will be available. This helps reduce wrinkling and makes items easier to...Use a Timed Dry cycle and the air dry setting. Moisture sensing bars (if equipped) are not active and dryer will continue to dry cottons, blends and permanent press items with a no-iron finish. OPERATING INSTRUCTIONS ...a few items. It provides approximately 20 minutes of installation and electrical voltage or gas pressure can also affect drying time.
... tumble during unloading. 1. With Auto Dry cycles, the load will not be dried at the back of the dryer drum sense the moisture level of the display will be available. This helps reduce wrinkling and makes items easier to...Use a Timed Dry cycle and the air dry setting. Moisture sensing bars (if equipped) are not active and dryer will continue to dry cottons, blends and permanent press items with a no-iron finish. OPERATING INSTRUCTIONS ...a few items. It provides approximately 20 minutes of installation and electrical voltage or gas pressure can also affect drying time.

Complete Owner's Guide (English)
Page 14
... could result in the Important Safety Instructions and those listed below. • Before cleaning the dryer interior, unplug the electrical power cord to avoid electrical shock hazards. • Do not use harsh, gritty or abrasive cleansers. • If the cabinet becomes stained, clean with diluted chlorine ...listed in inefficient drying and possible fire hazard. Dry the filter thoroughly and replace. Do not operate the dryer without the lint filter in the surrounding area. An excessive amount of cardboard or thin fiberboard under the front leveling legs...
... could result in the Important Safety Instructions and those listed below. • Before cleaning the dryer interior, unplug the electrical power cord to avoid electrical shock hazards. • Do not use harsh, gritty or abrasive cleansers. • If the cabinet becomes stained, clean with diluted chlorine ...listed in inefficient drying and possible fire hazard. Dry the filter thoroughly and replace. Do not operate the dryer without the lint filter in the surrounding area. An excessive amount of cardboard or thin fiberboard under the front leveling legs...

Complete Owner's Guide (English)
Page 15
... Many drying problems involve poor cleaning results, poor soil and stain removal, residues of load before starting the dryer. • Do not overload dryer. • Use fabric softener in washer or dryer to reduce static electricity. • Remove items when they are slightly damp to avoid overdrying. • Check that lint filter is...
... Many drying problems involve poor cleaning results, poor soil and stain removal, residues of load before starting the dryer. • Do not overload dryer. • Use fabric softener in washer or dryer to reduce static electricity. • Remove items when they are slightly damp to avoid overdrying. • Check that lint filter is...

Complete Owner's Guide (English)
Page 16
...any obstruction. Reset circuit breaker or replace fuse. Excessive wrinkling. Make sure electrical line is not overloaded and the dryer is clogged with lint. Make sure all lint has been removed from the dryer lint filter before laundering. or restricted. See "Operating Instructions." ... permanently attached items is not covered by the warranty. 16 Drying cycle takes too long, outside of the drum finish. Electric dryer is restored. There are inside of rigid or semi-rigid metal. interruption of the 2 Replace fuse. Drying temperature too high. ...
...any obstruction. Reset circuit breaker or replace fuse. Excessive wrinkling. Make sure electrical line is not overloaded and the dryer is clogged with lint. Make sure all lint has been removed from the dryer lint filter before laundering. or restricted. See "Operating Instructions." ... permanently attached items is not covered by the warranty. 16 Drying cycle takes too long, outside of the drum finish. Electric dryer is restored. There are inside of rigid or semi-rigid metal. interruption of the 2 Replace fuse. Drying temperature too high. ...


