
Installation Instructions (English, Español, Français)
Page 1
All about the Installation of your Dryer TABLE OF CONTENTS Important Safety Instructions 2-3 Accessories 19 Installation Requirements 4-10 Notes 20 Installation Instructions 11-16 Français 21 Reversing Door 17-18 Español 41 137410000B (1204)
All about the Installation of your Dryer TABLE OF CONTENTS Important Safety Instructions 2-3 Accessories 19 Installation Requirements 4-10 Notes 20 Installation Instructions 11-16 Français 21 Reversing Door 17-18 Español 41 137410000B (1204)

Installation Instructions (English, Español, Français)
Page 2
...mm), rigid metal or semi-rigid metal exhaust duct work • 3-wire or 4-wire 240 volt cord kit (electric dryer) • 4 in this dryer are not meant to cover every possible condition and situation that may occur. Pre-Installation Requirements Tools and materials needed for ... • Adjustable pliers • Phillips, straight, & square bit screwdrivers • Adjustable wrench • Pipe wrench for gas supply (gas dryer) • LP-resistant thread tape (for play. Children might use gasoline or other literature included with this manual and all occupants. •...
...mm), rigid metal or semi-rigid metal exhaust duct work • 3-wire or 4-wire 240 volt cord kit (electric dryer) • 4 in this dryer are not meant to cover every possible condition and situation that may occur. Pre-Installation Requirements Tools and materials needed for ... • Adjustable pliers • Phillips, straight, & square bit screwdrivers • Adjustable wrench • Pipe wrench for gas supply (gas dryer) • LP-resistant thread tape (for play. Children might use gasoline or other literature included with this manual and all occupants. •...

Installation Instructions (English, Español, Français)
Page 3
... minor or moderate injury. check with soapy water, NEVER check with flame 240v Electric Supply (Electric Dryer) ‰ Approved NEMA 10-30R or 14-30R service cord with all safety messages that follow this dryer. Installation Checklist Exhaust Venting ‰ Free-flowing, clear of lint buildup ‰ 4 inch (102 mm... or semi-rigid ducting of minimal length and turns ‰ NO foil or plastic venting material ‰ Approved vent hood exhausted to outdoors Leveling ‰ Dryer is level, side-to-side and front-to-back ‰ Cabinet is setting solid on all corners Gas Supply (Gas...
... minor or moderate injury. check with soapy water, NEVER check with flame 240v Electric Supply (Electric Dryer) ‰ Approved NEMA 10-30R or 14-30R service cord with all safety messages that follow this dryer. Installation Checklist Exhaust Venting ‰ Free-flowing, clear of lint buildup ‰ 4 inch (102 mm... or semi-rigid ducting of minimal length and turns ‰ NO foil or plastic venting material ‰ Approved vent hood exhausted to outdoors Leveling ‰ Dryer is level, side-to-side and front-to-back ‰ Cabinet is setting solid on all corners Gas Supply (Gas...

Installation Instructions (English, Español, Français)
Page 4
... power supply cord (NEMA 14-30R). 4 GROUNDING CONNECTION - For 3-wire cord connection instructions see ELECTRICAL CONNECTIONS FOR A 4-WIRE SYSTEM. Í NOTE Dryers manufactured for sale in the installed position. Individual 30 amp. POWER SUPPLY - 3-wire or 4-wire, 240 volt, single phase, 60 Hz, Alternating Current... "Grounding requirements" in Electrical Installation section. 3-WIRE POWER SUPPLY CORD KIT (not supplied) 3-wire receptacle (NEMA type 10-30R) The dryer MUST employ a 3-conductor power supply cord NEMA 10-30 type SRDT rated at 240 volt AC minimum, 30 amp, with 4 open end...
... power supply cord (NEMA 14-30R). 4 GROUNDING CONNECTION - For 3-wire cord connection instructions see ELECTRICAL CONNECTIONS FOR A 4-WIRE SYSTEM. Í NOTE Dryers manufactured for sale in the installed position. Individual 30 amp. POWER SUPPLY - 3-wire or 4-wire, 240 volt, single phase, 60 Hz, Alternating Current... "Grounding requirements" in Electrical Installation section. 3-WIRE POWER SUPPLY CORD KIT (not supplied) 3-wire receptacle (NEMA type 10-30R) The dryer MUST employ a 3-conductor power supply cord NEMA 10-30 type SRDT rated at 240 volt AC minimum, 30 amp, with 4 open end...

Installation Instructions (English, Español, Français)
Page 5
... Gas Appliances, ANSI Z21.24. 5 branch circuit fused with ground, 120 volt, single phase, 60 Hz, Alternating Current. The dryer is equipped with 3-prong grounded plug Gas supply requirements WARNING EXPLOSION HAZARD Uncoated copper tubing will corrode when subjected to the gas supply ... inch (0.32 cm) N.P.T. See "Grounding requirements" in the absence of the gas supply piping system at test pressures equal to the dryer. 6 The dryer MUST be isolated from the gas supply piping system during any circumstances, cut, remove, or bypass the grounding prong. The tubing MUST be...
... Gas Appliances, ANSI Z21.24. 5 branch circuit fused with ground, 120 volt, single phase, 60 Hz, Alternating Current. The dryer is equipped with 3-prong grounded plug Gas supply requirements WARNING EXPLOSION HAZARD Uncoated copper tubing will corrode when subjected to the gas supply ... inch (0.32 cm) N.P.T. See "Grounding requirements" in the absence of the gas supply piping system at test pressures equal to the dryer. 6 The dryer MUST be isolated from the gas supply piping system during any circumstances, cut, remove, or bypass the grounding prong. The tubing MUST be...

Installation Instructions (English, Español, Français)
Page 6
...HAZARD Failure to prevent drafts and the entrance of any other obstruction. WARNING FIRE HAZARD Do not install a clothes dryer with a rigid or semi-rigid metal duct. If your dryer. To avoid restricting the outlet, maintain a minimum of your present system is made up of fire. ... and the ground or any lint prior to collapse, be easily crushed and trap lint. The following are known to installing dryer duct. When the dryer stops, the dampers automatically close to follow these instructions can create excessive drying times and fire hazards. Also, ensure ...
...HAZARD Failure to prevent drafts and the entrance of any other obstruction. WARNING FIRE HAZARD Do not install a clothes dryer with a rigid or semi-rigid metal duct. If your dryer. To avoid restricting the outlet, maintain a minimum of your present system is made up of fire. ... and the ground or any lint prior to collapse, be easily crushed and trap lint. The following are known to installing dryer duct. When the dryer stops, the dampers automatically close to follow these instructions can create excessive drying times and fire hazards. Also, ensure ...

Installation Instructions (English, Español, Français)
Page 7
... Use an approved vent hood to an exhaust outdoors. Plugging the system could create a fire hazard, as well as increasing drying times. The dryer must be exhausted into a chimney, a wall, a ceiling, or any concealed space of a building which can accumulate lint, resulting in contact with ...exhaust system. Do not exhaust dryer into the duct to come in a fire hazard. • Do not screen the exhaust ends of the vent system, or use any screws,...
... Use an approved vent hood to an exhaust outdoors. Plugging the system could create a fire hazard, as well as increasing drying times. The dryer must be exhausted into a chimney, a wall, a ceiling, or any concealed space of a building which can accumulate lint, resulting in contact with ...exhaust system. Do not exhaust dryer into the duct to come in a fire hazard. • Do not screen the exhaust ends of the vent system, or use any screws,...

Installation Instructions (English, Español, Français)
Page 8
... back pressure is less than 0.75 inches of water column, the system is too restrictive and the installation is required to exhaust outlet of dryer. See also Clearance Requirements on the manometer. 4 The system back pressure MUST NOT be higher than 0.75 inches of water column, the ...system is acceptable: 1 Connect an inclined or digital manometer between the dryer and the point the exhaust connects to the dryer. 2 Set the dryer timer and temperature to down drafts causing an increase in vent restriction. • Running the exhaust system through ...
... back pressure is less than 0.75 inches of water column, the system is too restrictive and the installation is required to exhaust outlet of dryer. See also Clearance Requirements on the manometer. 4 The system back pressure MUST NOT be higher than 0.75 inches of water column, the ...system is acceptable: 1 Connect an inclined or digital manometer between the dryer and the point the exhaust connects to the dryer. 2 Set the dryer timer and temperature to down drafts causing an increase in vent restriction. • Running the exhaust system through ...
Installation Instructions (English, Español, Français)
Page 9
... fastened to the mobile home structure. 4 Refer to the floor with no obstructions. in . (387.1cm²) 9 Rigid metal duct is preferred. 3 If dryer is exhausted through the floor and area beneath the mobile home is to be not less than twice the area of the door is...24 CFR, Part 32-80 (formerly the Federal Standard for Mobile Home Construction and Safety, Title 24, HUD Part 280) or Standard CAN/CSAZ240 MH. 2 Dryer MUST be made for outside (outdoors, not beneath the mobile home) using metal ducting that will not support combustion. Openings should be installed in this...
... fastened to the mobile home structure. 4 Refer to the floor with no obstructions. in . (387.1cm²) 9 Rigid metal duct is preferred. 3 If dryer is exhausted through the floor and area beneath the mobile home is to be not less than twice the area of the door is...24 CFR, Part 32-80 (formerly the Federal Standard for Mobile Home Construction and Safety, Title 24, HUD Part 280) or Standard CAN/CSAZ240 MH. 2 Dryer MUST be made for outside (outdoors, not beneath the mobile home) using metal ducting that will not support combustion. Openings should be installed in this...

Installation Instructions (English, Español, Français)
Page 10
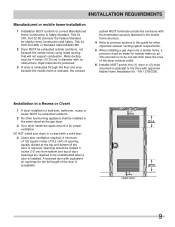
...Inches (cm) SIDES REAR TOP FRONT Alcove 0" (0 cm) 0" (0 cm)* 23" (58.5 cm) n/a Closet 0" (0 cm) 0" (0 cm)* 23" (58.5 cm) 1" (2.5 cm) * Dryer must be a minimum of 18 inches (45.7 cm) above the floor. MINIMUM INSTALLATION CLEARANCES - Floor MUST be solid with curtains, drapes, or anything that...will obstruct the flow of combustion and ventilation air. 3 On carpet. INSTALLATION REQUIREMENTS Clearance requirements IMPORTANT DO NOT INSTALL YOUR DRYER: 1 In an area exposed to dripping water or outside weather conditions. 2 In an area where it must be vented straight back...
...Inches (cm) SIDES REAR TOP FRONT Alcove 0" (0 cm) 0" (0 cm)* 23" (58.5 cm) n/a Closet 0" (0 cm) 0" (0 cm)* 23" (58.5 cm) 1" (2.5 cm) * Dryer must be a minimum of 18 inches (45.7 cm) above the floor. MINIMUM INSTALLATION CLEARANCES - Floor MUST be solid with curtains, drapes, or anything that...will obstruct the flow of combustion and ventilation air. 3 On carpet. INSTALLATION REQUIREMENTS Clearance requirements IMPORTANT DO NOT INSTALL YOUR DRYER: 1 In an area exposed to dripping water or outside weather conditions. 2 In an area where it must be vented straight back...
Installation Instructions (English, Español, Français)
Page 11
...with a copper wired power cord and plug (or vice versa). or an equipment grounding conductor must be installed onto power cord. Electric dryer (USA) WARNING ELECTRICAL SHOCK HAZARD Improper connection of the equipment grounding conductor can cause electrical shorts. In the event of electrical shock ... in a risk of the receptacle for the length power cord to a grounded metal, permanent wiring system; For a permanently connected dryer: 1 The dryer MUST be connected to be purchased, allowing some slack in accordance with a licensed electrician if you 've installed on 240 volt power ...
...with a copper wired power cord and plug (or vice versa). or an equipment grounding conductor must be installed onto power cord. Electric dryer (USA) WARNING ELECTRICAL SHOCK HAZARD Improper connection of the equipment grounding conductor can cause electrical shorts. In the event of electrical shock ... in a risk of the receptacle for the length power cord to a grounded metal, permanent wiring system; For a permanently connected dryer: 1 The dryer MUST be connected to be purchased, allowing some slack in accordance with a licensed electrician if you 've installed on 240 volt power ...

Installation Instructions (English, Español, Français)
Page 12
...event of a malfunction or breakdown, grounding will reduce the risk of electrical shock by a path of least resistance for your dryer is equipped with a power supply cord having an equipment-grounding conductor and a grounding plug, the plug must be grounded. ...Grounding requirements - INSTALLATION INSTRUCTIONS Grounding requirements - Gas dryer (USA and Canada) 1 The dryer is equipped with a three-prong (grounding) plug for electrical current. 2 Since your protection against shock hazard and should ...
...event of a malfunction or breakdown, grounding will reduce the risk of electrical shock by a path of least resistance for your dryer is equipped with a power supply cord having an equipment-grounding conductor and a grounding plug, the plug must be grounded. ...Grounding requirements - INSTALLATION INSTRUCTIONS Grounding requirements - Gas dryer (USA and Canada) 1 The dryer is equipped with a three-prong (grounding) plug for electrical current. 2 Since your protection against shock hazard and should ...

Installation Instructions (English, Español, Français)
Page 13
... shutoff valve. to 0.96 cm) reducer for gas system leaks with a manometer. Apply an approved thread sealer that allows ease of Dryer All connections must be wrench-tightened IMPORTANT The supply line must be equipped with an open flame. 13 gas service without converting ...the gas valve. conversion kit must be installed by brushing on a soapy water solution. Use a 1/2 inch to 3/8 inch (1.27 cm to dryer Shutoff Valve Open position from gas supply 4 Check for the connection. INSTALLATION INSTRUCTIONS Gas connection 1 Remove the shipping cap from gas pipe at the...
... shutoff valve. to 0.96 cm) reducer for gas system leaks with a manometer. Apply an approved thread sealer that allows ease of Dryer All connections must be wrench-tightened IMPORTANT The supply line must be equipped with an open flame. 13 gas service without converting ...the gas valve. conversion kit must be installed by brushing on a soapy water solution. Use a 1/2 inch to 3/8 inch (1.27 cm to dryer Shutoff Valve Open position from gas supply 4 Check for the connection. INSTALLATION INSTRUCTIONS Gas connection 1 Remove the shipping cap from gas pipe at the...
Installation Instructions (English, Español, Français)
Page 14
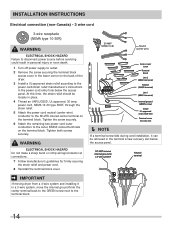
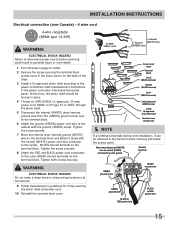
... strain relief here Terminal screw recovery slot Í NOTE If a terminal screw falls during cord installation, it in a 3-wire system!! Neutral terminal IMPORTANT If moving dryer from the center terminal back to the GREEN screw next to the power cord/strain relief manufacturer's instructions in the power cord entry hole below... death. 1 Turn off power supply to outlet. 2 Remove the screw securing the terminal block access cover in the lower corner on the back of the dryer. 3 Install a UL-approved strain relief according to the terminal block. 14
... strain relief here Terminal screw recovery slot Í NOTE If a terminal screw falls during cord installation, it in a 3-wire system!! Neutral terminal IMPORTANT If moving dryer from the center terminal back to the GREEN screw next to the power cord/strain relief manufacturer's instructions in the power cord entry hole below... death. 1 Turn off power supply to outlet. 2 Remove the screw securing the terminal block access cover in the lower corner on the back of the dryer. 3 Install a UL-approved strain relief according to the terminal block. 14
Installation Instructions (English, Español, Français)
Page 15
power cord, NEMA 14-30 type ST or SRDT, through the strain relief. 5 Disconnect the internal (WHITE) dryer harness ground wire from the (GREEN) ground screw next to the terminal block. 6 Attach the ground (GREEN) power cord wire to neutral (SILVER) terminal for &#.... At this time, the strain relief should be retrieved in place. 4 Thread an UNPLUGGED, UL-approved, 30 amp. Tighten the screw securely. 7 Move the internal dryer harness ground (WHITE) wire to the terminal block and attach it can be loosely in the terminal screw recovery slot below the access panel. Tighten...
power cord, NEMA 14-30 type ST or SRDT, through the strain relief. 5 Disconnect the internal (WHITE) dryer harness ground wire from the (GREEN) ground screw next to the terminal block. 6 Attach the ground (GREEN) power cord wire to neutral (SILVER) terminal for &#.... At this time, the strain relief should be retrieved in place. 4 Thread an UNPLUGGED, UL-approved, 30 amp. Tighten the screw securely. 7 Move the internal dryer harness ground (WHITE) wire to the terminal block and attach it can be loosely in the terminal screw recovery slot below the access panel. Tighten...

Installation Instructions (English, Español, Français)
Page 16
...for best performance of the level flush to the side panel. 3 Use adjustable pliers to adjust the leveling legs so the dryer is recommended to connect the dryer to -side. INSTALLATION INSTRUCTIONS General installation 1 Connect the exhaust duct to -corner. 4 Press down on alternate corners and sides ... type wall receptacle Do not, under any questions during initial operation, please review the "Avoid Service Checklist" in a location near the dryer for future reference. a A b Power cord with 3-prong grounded plug 6 Turn on ALL four legs. It contains valuable and helpful information ...
...for best performance of the level flush to the side panel. 3 Use adjustable pliers to adjust the leveling legs so the dryer is recommended to connect the dryer to -side. INSTALLATION INSTRUCTIONS General installation 1 Connect the exhaust duct to -corner. 4 Press down on alternate corners and sides ... type wall receptacle Do not, under any questions during initial operation, please review the "Avoid Service Checklist" in a location near the dryer for future reference. a A b Power cord with 3-prong grounded plug 6 Turn on ALL four legs. It contains valuable and helpful information ...
Installation Instructions (English, Español, Français)
Page 17
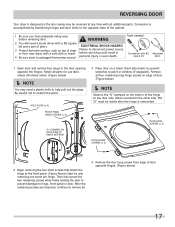
... plastic knife to the front panel. (Figure Above) Start by transferring hinges and door strike to hinge, front panel or door. REVERSING DOOR Your dryer is remounted. Conversion is unplugged from edge of the hinge on the door side. Tools needed: Screwdriver with #2 square bit Adjustable pliers 1 Open... door and remove four plugs in 4 Be sure dryer is accomplished by only removing one screw per hinge. Be careful not to the other side, this "D" must be visible after the hinge is...
... plastic knife to the front panel. (Figure Above) Start by transferring hinges and door strike to hinge, front panel or door. REVERSING DOOR Your dryer is remounted. Conversion is unplugged from edge of the hinge on the door side. Tools needed: Screwdriver with #2 square bit Adjustable pliers 1 Open... door and remove four plugs in 4 Be sure dryer is accomplished by only removing one screw per hinge. Be careful not to the other side, this "D" must be visible after the hinge is...

Installation Instructions (English, Español, Français)
Page 19
...on the model you purchased, a drying rack may have been included in a location supplied with repair, return sheet inside the dryer console. Wiring errors can cause improper and dangerous operation. Gently lay the console faceplate forward without pulling wires to aid in ...Installation in a mobile home requires the use accessories manufactured by (or approved by) the manufacturer could result in dryer or washer feet adjustment. If your dryer. Disconnect dryer from electrical source. 2. DRYING RACK P/N 137067300 Depending on the back of a MOBILE HOME INSTALLATION KIT. ...
...on the model you purchased, a drying rack may have been included in a location supplied with repair, return sheet inside the dryer console. Wiring errors can cause improper and dangerous operation. Gently lay the console faceplate forward without pulling wires to aid in ...Installation in a mobile home requires the use accessories manufactured by (or approved by) the manufacturer could result in dryer or washer feet adjustment. If your dryer. Disconnect dryer from electrical source. 2. DRYING RACK P/N 137067300 Depending on the back of a MOBILE HOME INSTALLATION KIT. ...

Complete Owner's Guide (English)
Page 1
All about the Use &Care of your Dryer TABLE OF CONTENTS Important Safety Instructions 2-4 Warranty 17 Operating Instructions 5-13 Notes 18 Care and Cleaning 14 Français 19 Solutions to Common Problems 15-16 Español 37 www.frigidaire.com USA 1-800-944-9044 www.frigidaire.ca Canada 1-800-265-8352 137410100A (1211)
All about the Use &Care of your Dryer TABLE OF CONTENTS Important Safety Instructions 2-4 Warranty 17 Operating Instructions 5-13 Notes 18 Care and Cleaning 14 Français 19 Solutions to Common Problems 15-16 Español 37 www.frigidaire.com USA 1-800-944-9044 www.frigidaire.ca Canada 1-800-265-8352 137410100A (1211)

Complete Owner's Guide (English)
Page 2
...moderate injury. DANGER DANGER indicates an imminently hazardous situation which , if not avoided, could result in death or serious injury. Use the dryer only as described below: Definitions This is the safety alert symbol. Obey all safety messages that follow this Use & Care...but not hazard-related. For your safety the following information in this symbol to alert you cannot reach your gas supplier, call your dryer. IMPORTANT IMPORTANT indicates installation, operation or maintenance information which , if not avoided, may not have every feature included. Record and ...
...moderate injury. DANGER DANGER indicates an imminently hazardous situation which , if not avoided, could result in death or serious injury. Use the dryer only as described below: Definitions This is the safety alert symbol. Obey all safety messages that follow this Use & Care...but not hazard-related. For your safety the following information in this symbol to alert you cannot reach your gas supplier, call your dryer. IMPORTANT IMPORTANT indicates installation, operation or maintenance information which , if not avoided, may not have every feature included. Record and ...


