
Installation Instructions (English, Español, Français)
Page 2
... electrical code C22.1 part 1. • The gas service to children. • Clothes dryer installation and service must conform with the National Fuel Gas Code, ANSI Z223.1/NFPA 54. • The dryer is designed under ANSI Z 21.5.1 or ANSI/UL 2158 - do not use any other literature included with flexible plastic or flexible foil venting material. Save these instructions for natu- An individual manual shut-off valve...
... electrical code C22.1 part 1. • The gas service to children. • Clothes dryer installation and service must conform with the National Fuel Gas Code, ANSI Z223.1/NFPA 54. • The dryer is designed under ANSI Z 21.5.1 or ANSI/UL 2158 - do not use any other literature included with flexible plastic or flexible foil venting material. Save these instructions for natu- An individual manual shut-off valve...

Installation Instructions (English, Español, Français)
Page 3
.... It is setting solid on all corners Gas Supply (Gas Dryer) ‰ Manual shutoff valve present in supply ‰ All connections sealed with all screws tight on terminal block ‰ Approved strain relief installed ‰ Terminal access cover installed before using this guide ‰ Test hinge and latch for LP system ‰ Gas supply turned on ‰ Dryer plugged in Final Checks ‰ Installation Instructions and Use and Care Guide read all connections - Installation Checklist Exhaust Venting ‰ Free-flowing, clear...
.... It is setting solid on all corners Gas Supply (Gas Dryer) ‰ Manual shutoff valve present in supply ‰ All connections sealed with all screws tight on terminal block ‰ Approved strain relief installed ‰ Terminal access cover installed before using this guide ‰ Test hinge and latch for LP system ‰ Gas supply turned on ‰ Dryer plugged in Final Checks ‰ Installation Instructions and Use and Care Guide read all connections - Installation Checklist Exhaust Venting ‰ Free-flowing, clear...

Installation Instructions (English, Español, Français)
Page 4
... CONNECTION - Use separately fused circuits for electric dryer CIRCUIT - For 4-wire cord connection instructions see ELECTRICAL CONNECTIONS FOR A 3-WIRE SYSTEM. 4-WIRE POWER SUPPLY CORD KIT (not supplied) 4-wire receptacle (NEMA type 14-30R) The dryer MUST employ a 4-conductor power supply cord NEMA 14-30 type SRDT or ST (as required) rated at 240 volt AC minimum, 30 amp, with 3 open end spade lug connectors with upturned ends or closed loop connectors and marked for use with 30 amp. time delay fuses or circuit breakers...
... CONNECTION - Use separately fused circuits for electric dryer CIRCUIT - For 4-wire cord connection instructions see ELECTRICAL CONNECTIONS FOR A 3-WIRE SYSTEM. 4-WIRE POWER SUPPLY CORD KIT (not supplied) 4-wire receptacle (NEMA type 14-30R) The dryer MUST employ a 4-conductor power supply cord NEMA 14-30 type SRDT or ST (as required) rated at 240 volt AC minimum, 30 amp, with 3 open end spade lug connectors with upturned ends or closed loop connectors and marked for use with 30 amp. time delay fuses or circuit breakers...

Installation Instructions (English, Español, Français)
Page 5
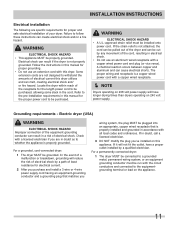
... natural gas, causing gas leaks. time delay fuse or circuit breaker. GROUNDING CONNECTION - Power cord with 3-prong grounded plug Gas supply requirements WARNING EXPLOSION HAZARD Uncoated copper tubing will corrode when subjected to or less than 1/2 psig (3.45 kPa). 8 Connections for the gas supply must comply with the B149.1, Natural Gas and Propane Installation Code. 5 A 1/8 inch (0.32 cm) N.P.T. plugged tapping, accessible for test gauge connection, MUST be installed immediately upstream of the gas supply connection to the dryer. 6 The dryer...
... natural gas, causing gas leaks. time delay fuse or circuit breaker. GROUNDING CONNECTION - Power cord with 3-prong grounded plug Gas supply requirements WARNING EXPLOSION HAZARD Uncoated copper tubing will corrode when subjected to or less than 1/2 psig (3.45 kPa). 8 Connections for the gas supply must comply with the B149.1, Natural Gas and Propane Installation Code. 5 A 1/8 inch (0.32 cm) N.P.T. plugged tapping, accessible for test gauge connection, MUST be installed immediately upstream of the gas supply connection to the dryer. 6 The dryer...

Installation Instructions (English, Español, Français)
Page 7
...; Do not screen the exhaust ends of a building. Use an approved vent hood to assemble the exhaust system. Do not exhaust dryer into the duct to terminate the duct outdoors, and seal all joints with exhaust system. A clothes dryer produces combustible lint. An accumulation of lint in the screen, on the screws or rivets, clogging the duct work and creating a fire hazard as well as increase drying times. WARNING FIRE...
...; Do not screen the exhaust ends of a building. Use an approved vent hood to assemble the exhaust system. Do not exhaust dryer into the duct to terminate the duct outdoors, and seal all joints with exhaust system. A clothes dryer produces combustible lint. An accumulation of lint in the screen, on the screws or rivets, clogging the duct work and creating a fire hazard as well as increase drying times. WARNING FIRE...

Installation Instructions (English, Español, Français)
Page 8
... metal duct work should be used to determine if the exhaust system is acceptable: 1 Connect an inclined or digital manometer between the dryer and the point the exhaust connects to the dryer. 2 Set the dryer timer and temperature to down ) and start the dryer. 3 Read the measurement on the next page. Í NOTE Use of 90° quick-turn 90° dryer vent elbow directly to exhaust outlet of dryer. CORRECT INCORRECT In installations...
... metal duct work should be used to determine if the exhaust system is acceptable: 1 Connect an inclined or digital manometer between the dryer and the point the exhaust connects to the dryer. 2 Set the dryer timer and temperature to down ) and start the dryer. 3 Read the measurement on the next page. Í NOTE Use of 90° quick-turn 90° dryer vent elbow directly to exhaust outlet of dryer. CORRECT INCORRECT In installations...
Installation Instructions (English, Español, Français)
Page 9
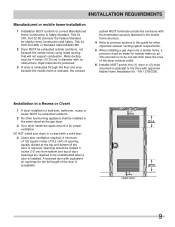
... Part 280) or Standard CAN/CSAZ240 MH. 2 Dryer MUST be exhausted outside the enclosure with no obstructions. A louvered door with approved Mobile Home Installation Kit - Openings are required to the floor with equivalent air openings for proper ventilation. Openings should be unobstructed when a door is enclosed, the exhaust system MUST terminate outside (outdoors, not beneath the mobile home) using metal ducting that will not support combustion. Installation...
... Part 280) or Standard CAN/CSAZ240 MH. 2 Dryer MUST be exhausted outside the enclosure with no obstructions. A louvered door with approved Mobile Home Installation Kit - Openings are required to the floor with equivalent air openings for proper ventilation. Openings should be unobstructed when a door is enclosed, the exhaust system MUST terminate outside (outdoors, not beneath the mobile home) using metal ducting that will not support combustion. Installation...
Installation Instructions (English, Español, Français)
Page 11
... wired power cord with this dryer. Check with all local codes and ordinances. INSTALLATION INSTRUCTIONS Electrical installation The following are specific requirements for proper and safe electrical installation of electrical current this dryer utilizes and can melt, creating electrical shock and/ or fire hazard. Locate the dryer within reach of the receptacle for the length power cord to the equipmentgrounding terminal or lead on this appliance. For a permanently connected dryer: 1 The dryer MUST...
... wired power cord with this dryer. Check with all local codes and ordinances. INSTALLATION INSTRUCTIONS Electrical installation The following are specific requirements for proper and safe electrical installation of electrical current this dryer utilizes and can melt, creating electrical shock and/ or fire hazard. Locate the dryer within reach of the receptacle for the length power cord to the equipmentgrounding terminal or lead on this appliance. For a permanently connected dryer: 1 The dryer MUST...

Installation Instructions (English, Español, Français)
Page 16
... the leveling leg extension at the circuit breaker/fuse box. 7 Read the Use & Care Guide provided with the dryer. a A b Power cord with 3-prong grounded plug 6 Turn on the power at a minimum for the slightest movement. It contains valuable and helpful information that will save you time and money. 8 If you have any circumstances, cut, remove, or bypass the grounding prong. INSTALLATION INSTRUCTIONS General installation 1 Connect the exhaust duct to -back leveling, place bottom...
... the leveling leg extension at the circuit breaker/fuse box. 7 Read the Use & Care Guide provided with the dryer. a A b Power cord with 3-prong grounded plug 6 Turn on the power at a minimum for the slightest movement. It contains valuable and helpful information that will save you time and money. 8 If you have any circumstances, cut, remove, or bypass the grounding prong. INSTALLATION INSTRUCTIONS General installation 1 Connect the exhaust duct to -back leveling, place bottom...
Installation Instructions (English, Español, Français)
Page 17
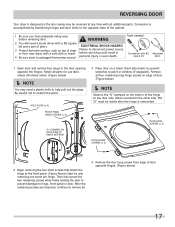
before reversing door. When reversed to hinge, front panel or door. ELECTRICAL SHOCK HAZARD 3 Protect flat any time without additional parts. personal injury or even death. Retain all parts for use later, unless otherwise noted. (Figure below ) Í NOTE Observe the "D" stamped on the interior of the hinge on the door side. Remove all . 4 Remove the four long screws from power source! DOOR HINGE SCREWS (x 4) DOOR EDGE...
before reversing door. When reversed to hinge, front panel or door. ELECTRICAL SHOCK HAZARD 3 Protect flat any time without additional parts. personal injury or even death. Retain all parts for use later, unless otherwise noted. (Figure below ) Í NOTE Observe the "D" stamped on the interior of the hinge on the door side. Remove all . 4 Remove the four long screws from power source! DOOR HINGE SCREWS (x 4) DOOR EDGE...

Installation Instructions (English, Español, Français)
Page 19
... in the initial purchase of your model did not include a drying rack or you desire another drying rack, you purchased your Use and Care Guide for use in a location supplied with repair, return sheet inside the dryer console. To remove the console faceplate follow the directions below: 1. ACCESSORIES LP CONVERSION KIT P/N PCK4200 Gas dryers intended for more information. MOBILE HOME INSTALLATION KIT P/N 137067200 Installation in a mobile home requires the use of the console housing. 3.
... in the initial purchase of your model did not include a drying rack or you desire another drying rack, you purchased your Use and Care Guide for use in a location supplied with repair, return sheet inside the dryer console. To remove the console faceplate follow the directions below: 1. ACCESSORIES LP CONVERSION KIT P/N PCK4200 Gas dryers intended for more information. MOBILE HOME INSTALLATION KIT P/N 137067200 Installation in a mobile home requires the use of the console housing. 3.

Complete Owner's Guide (English)
Page 2
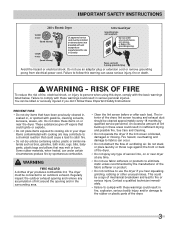
... to prevent property damage, personal injury or death. This Use and Care Guide provides general operating instructions for your gas supplier, call your safety the following information in your dryer are labeled with a WARNING or CAUTION based on the dryer serial plate located at the top of fire or explosion or to light any appliance. • Do not touch any other...
... to prevent property damage, personal injury or death. This Use and Care Guide provides general operating instructions for your gas supplier, call your safety the following information in your dryer are labeled with a WARNING or CAUTION based on the dryer serial plate located at the top of fire or explosion or to light any appliance. • Do not touch any other...
Complete Owner's Guide (English)
Page 3
... to use an adaptor plug or extension cord or remove grounding prong from electrical power cord. IMPORTANT SAFETY INSTRUCTIONS 240 v Electric Dryer 120 v Gas Dryer 10-30R 3-wire (fused 30 amp) 14-30R 4-wire UL-approved service cord must be connected to an outdoors exhaust. Grounding type wall ...Care and Cleaning. • Do not operate the dryer if the lint screen is blocked, damaged or missing. Do not use the dryer if you don't follow this dryer, comply with these items on or near the dryer. RISK OF FIRE To reduce the risk of ventilating air. Failure to persons when using...
... to use an adaptor plug or extension cord or remove grounding prong from electrical power cord. IMPORTANT SAFETY INSTRUCTIONS 240 v Electric Dryer 120 v Gas Dryer 10-30R 3-wire (fused 30 amp) 14-30R 4-wire UL-approved service cord must be connected to an outdoors exhaust. Grounding type wall ...Care and Cleaning. • Do not operate the dryer if the lint screen is blocked, damaged or missing. Do not use the dryer if you don't follow this dryer, comply with these items on or near the dryer. RISK OF FIRE To reduce the risk of ventilating air. Failure to persons when using...

Complete Owner's Guide (English)
Page 4
... use of a gas dryer must replace the thermal limiter switch after the dryer is unpacked. Do not rest heavy loads on the dryer. The dryer is moving. CAUTION The California Safe Drinking Water and Toxic Enforcement Act requires the Governor of California to publish a list of potential exposure to such substances. Cartons covered with these warnings could result in serious personal injuries. Refer to INSTALLATION INSTRUCTIONS...
... use of a gas dryer must replace the thermal limiter switch after the dryer is unpacked. Do not rest heavy loads on the dryer. The dryer is moving. CAUTION The California Safe Drinking Water and Toxic Enforcement Act requires the Governor of California to publish a list of potential exposure to such substances. Cartons covered with these warnings could result in serious personal injuries. Refer to INSTALLATION INSTRUCTIONS...
Complete Owner's Guide (English)
Page 8
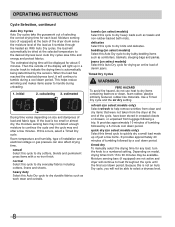
... be displayed for any load, turn the knob to help remove wrinkles from clean and dry items that were not taken from the dryer at the selected temperature to dry everyday fabrics including cottons, linens and sheets. OPERATING INSTRUCTIONS Cycle Selection, continued Auto Dry Cycles Auto Dry cycles take the guesswork out of selecting the correct drying time for drying an entire load of denim jeans. quick dry (on model, drying times from luggage following...
... be displayed for any load, turn the knob to help remove wrinkles from clean and dry items that were not taken from the dryer at the selected temperature to dry everyday fabrics including cottons, linens and sheets. OPERATING INSTRUCTIONS Cycle Selection, continued Auto Dry Cycles Auto Dry cycles take the guesswork out of selecting the correct drying time for drying an entire load of denim jeans. quick dry (on model, drying times from luggage following...
Complete Owner's Guide (English)
Page 13
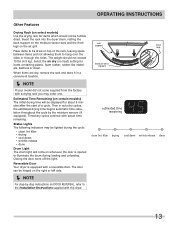
... the moisture sensors (if equipped). Reversible Door Your dryer is opened to the Installation Instructions supplied with a reversible door. The door can be lighted during loading and unloading. Closing the door turns off the light. Select the air dry (no heat) setting for items which should not exceed 10 lbs (4.5 kg). Estimated Time Remaining (on certain models) The initial drying time will come supplied from the factory with actual time remaining. Timed dry cycles continue with a drying rack you may...
... the moisture sensors (if equipped). Reversible Door Your dryer is opened to the Installation Instructions supplied with a reversible door. The door can be lighted during loading and unloading. Closing the door turns off the light. Select the air dry (no heat) setting for items which should not exceed 10 lbs (4.5 kg). Estimated Time Remaining (on certain models) The initial drying time will come supplied from the factory with actual time remaining. Timed dry cycles continue with a drying rack you may...
Complete Owner's Guide (English)
Page 16
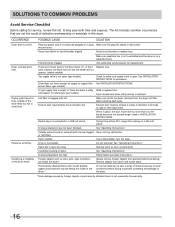
... plug fits tightly in the dryer circuit. Exhaust duct requirements have not been followed. Drying procedures have not been met. See "Operating Instructions." may turn but won't heat. Check to make sure supply valve is restored. Dryer should heat when utility service is open (gas models). Exhaust duct must not exceed length listed in this list. or restricted. Remove objects from the dryer lint filter before starting each cycle. Drying cycle takes too long, outside of items. See "Operating Instructions." Make sure electrical line...
... plug fits tightly in the dryer circuit. Exhaust duct requirements have not been followed. Drying procedures have not been met. See "Operating Instructions." may turn but won't heat. Check to make sure supply valve is restored. Dryer should heat when utility service is open (gas models). Exhaust duct must not exceed length listed in this list. or restricted. Remove objects from the dryer lint filter before starting each cycle. Drying cycle takes too long, outside of items. See "Operating Instructions." Make sure electrical line...
Complete Owner's Guide (English)
Page 17
... in accordance with original serial numbers that has been transferred from its original owner to repair or replace appliance light bulbs, air filters, water filters, other consumables, or knobs, handles, or other appropriate payment record to floors, cabinets, walls, etc. 13. IF YOU NEED SERVICE Keep your receipt, delivery slip, or some other cosmetic parts. 11. Products purchased "as...
... in accordance with original serial numbers that has been transferred from its original owner to repair or replace appliance light bulbs, air filters, water filters, other consumables, or knobs, handles, or other appropriate payment record to floors, cabinets, walls, etc. 13. IF YOU NEED SERVICE Keep your receipt, delivery slip, or some other cosmetic parts. 11. Products purchased "as...
Product Specifications Sheet (English)
Page 2
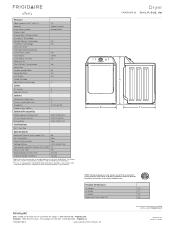
... Product Installation Guide for safe operation. Always consult local and national electric and gas codes. Depth 29" Depth with a separate ground wire. Ft.) Controls Dryer Drum Interior Interior Light Framed Glass Window Door DrySense™ Technology Wrinkle Release Technology TimeWise® Technology Moisture Sensor Estimated Time Remaining Cycle Status Lights Cycle Signal Cycle Signal "On/Off " Control Lock Start / Pause / Cancel Knobs Delay Start Tumble Speed (RPM) Reversible Door Lint Screen Sound Package Adjustable Leveling Legs Frigidaire Affinity (M models) 7.0 Express...
... Product Installation Guide for safe operation. Always consult local and national electric and gas codes. Depth 29" Depth with a separate ground wire. Ft.) Controls Dryer Drum Interior Interior Light Framed Glass Window Door DrySense™ Technology Wrinkle Release Technology TimeWise® Technology Moisture Sensor Estimated Time Remaining Cycle Status Lights Cycle Signal Cycle Signal "On/Off " Control Lock Start / Pause / Cancel Knobs Delay Start Tumble Speed (RPM) Reversible Door Lint Screen Sound Package Adjustable Leveling Legs Frigidaire Affinity (M models) 7.0 Express...
Product Specifications Sheet (English)
Page 3
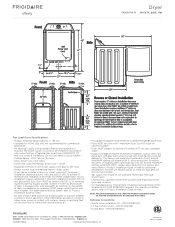
... Gas Conversion Kit - (PN # PCK4200). • Drying Rack - (PN # 137067300). minimum louvered opening, equally divided, located 3" from top and bottom of building, NOT into any concealed space. • Exhaust installation requires minimum 4"-diameter rigid or semi-rigid metal duct with 120V 3-wire power supply cord, approx. 60" long. • Always consult local and national electric & gas codes. • Dryer can be vented with door installed. (For additional installation details, refer to Product Installation Guide on...
... Gas Conversion Kit - (PN # PCK4200). • Drying Rack - (PN # 137067300). minimum louvered opening, equally divided, located 3" from top and bottom of building, NOT into any concealed space. • Exhaust installation requires minimum 4"-diameter rigid or semi-rigid metal duct with 120V 3-wire power supply cord, approx. 60" long. • Always consult local and national electric & gas codes. • Dryer can be vented with door installed. (For additional installation details, refer to Product Installation Guide on...


