

Complete Owner's Guide (English)
Page 2
... Your Model and Serial Numbers The model and serial numbers of fire or explosion or to avoid possible injury or death. do not use gasoline or other models. It also contains information about : • Operation • Care • Service Keep it in minor or moderate injury. Record and retain these instructions for your gas supplier from a neighbor's phone. IMPORTANT IMPORTANT indicates installation, operation or maintenance...
... Your Model and Serial Numbers The model and serial numbers of fire or explosion or to avoid possible injury or death. do not use gasoline or other models. It also contains information about : • Operation • Care • Service Keep it in minor or moderate injury. Record and retain these instructions for your gas supplier from a neighbor's phone. IMPORTANT IMPORTANT indicates installation, operation or maintenance...

Complete Owner's Guide (English)
Page 3
... reduce the risk of ventilating air. This could ignite or explode. • Do not place items exposed to cooking oils in Canada). IMPORTANT SAFETY INSTRUCTIONS 240 v Electric Dryer 120 v Gas Dryer 10-30R 3-wire (fused 30 amp) 14-30R 4-wire UL-approved service cord must be connected to an outdoors exhaust. See Care and Cleaning. • Do not operate the dryer if the lint screen is you don't follow...
... reduce the risk of ventilating air. This could ignite or explode. • Do not place items exposed to cooking oils in Canada). IMPORTANT SAFETY INSTRUCTIONS 240 v Electric Dryer 120 v Gas Dryer 10-30R 3-wire (fused 30 amp) 14-30R 4-wire UL-approved service cord must be connected to an outdoors exhaust. See Care and Cleaning. • Do not operate the dryer if the lint screen is you don't follow...

Complete Owner's Guide (English)
Page 4
... dryer, the electrical power cord of a gas dryer must be exposed to INSTALLATION INSTRUCTIONS for detailed grounding procedures. Cartons covered with local codes. Installation instructions are not meant to a gas pipe. The third grounding prong must be produced by a qualified service person in the dryer for play on product labels. • Before the dryer is removed from the electrical supply before reaching into the dryer if the drum is used...
... dryer, the electrical power cord of a gas dryer must be exposed to INSTALLATION INSTRUCTIONS for detailed grounding procedures. Cartons covered with local codes. Installation instructions are not meant to a gas pipe. The third grounding prong must be produced by a qualified service person in the dryer for play on product labels. • Before the dryer is removed from the electrical supply before reaching into the dryer if the drum is used...

Complete Owner's Guide (English)
Page 6
...;re, electric shock or injury to prevent snagging and tangling. (Mesh bag not included.) 6 Dryer heat may be a thumping or rolling sound when the dryer starts. WATER VALVE (Steam models only.) The flow of suspension rollers. GAS BURNER (Gas models only.) When the burner is ignited in this Use and Care Guide before drying. D. Tie strings and sashes to persons, read the IMPORTANT SAFETY INSTRUCTIONS in...
...;re, electric shock or injury to prevent snagging and tangling. (Mesh bag not included.) 6 Dryer heat may be a thumping or rolling sound when the dryer starts. WATER VALVE (Steam models only.) The flow of suspension rollers. GAS BURNER (Gas models only.) When the burner is ignited in this Use and Care Guide before drying. D. Tie strings and sashes to persons, read the IMPORTANT SAFETY INSTRUCTIONS in...

Complete Owner's Guide (English)
Page 7
... estimated drying time for Auto Dry cycles or the actual drying time for the cycle selected. CLEAN FILTER will stop when the door is clean and in the future. The average wet load will automatically be indicated for Timed Dry cycles will be lighted when the option has been deleted. 5 Start the cycle. • Close the door and press Start to remove lint from the filter. 7 The dryer will beep. • To change the temperature...
... estimated drying time for Auto Dry cycles or the actual drying time for the cycle selected. CLEAN FILTER will stop when the door is clean and in the future. The average wet load will automatically be indicated for Timed Dry cycles will be lighted when the option has been deleted. 5 Start the cycle. • Close the door and press Start to remove lint from the filter. 7 The dryer will beep. • To change the temperature...

Complete Owner's Guide (English)
Page 9
... line dry delay start shrink guard anti static control lock "Dry Time" button On models without a Dry Time button, continue to turn the knob to 90 minutes. Auto Dry cycles save time and energy and protect fabrics. Mixed Load (on select models) Select this Auto Dry cycle to dry loads containing a mix of steam into clothing that has been left in the dryer, stored in 25 minutes. Casual Select this Auto Dry cycle for each load. Use the Timed Dry cycle and the Air Dry setting...
... line dry delay start shrink guard anti static control lock "Dry Time" button On models without a Dry Time button, continue to turn the knob to 90 minutes. Auto Dry cycles save time and energy and protect fabrics. Mixed Load (on select models) Select this Auto Dry cycle to dry loads containing a mix of steam into clothing that has been left in the dryer, stored in 25 minutes. Casual Select this Auto Dry cycle for each load. Use the Timed Dry cycle and the Air Dry setting...

Complete Owner's Guide (English)
Page 12
... automatic moisture sensors, cycle times will increase slightly, but overall energy usage will automatically turn off if the door is left open more than 3 minutes. Allergy (on during loading and unloading. Closing the door turns off , press and hold the button again. 12 ultra capacity sanitize high normal low air dry max high normal low damp wrinkle release line dry delay start chime shrink guard control lock ready steam system sanitize...
... automatic moisture sensors, cycle times will increase slightly, but overall energy usage will automatically turn off if the door is left open more than 3 minutes. Allergy (on during loading and unloading. Closing the door turns off , press and hold the button again. 12 ultra capacity sanitize high normal low air dry max high normal low damp wrinkle release line dry delay start chime shrink guard control lock ready steam system sanitize...

Complete Owner's Guide (English)
Page 14
...-step instructions on top of the rack, leaving space between items and not allowing them to the Installation Instructions supplied with this dryer. Reversible Door Your dryer is equipped with a drying rack you may order one. When items are dry, remove the rack and store it in a convenient location. Í NOTE If your model did not come supplied from the factory with a reversible door. OPERATING INSTRUCTIONS Other Features Drying Rack (on the air...
...-step instructions on top of the rack, leaving space between items and not allowing them to the Installation Instructions supplied with this dryer. Reversible Door Your dryer is equipped with a drying rack you may order one. When items are dry, remove the rack and store it in a convenient location. Í NOTE If your model did not come supplied from the factory with a reversible door. OPERATING INSTRUCTIONS Other Features Drying Rack (on the air...

Complete Owner's Guide (English)
Page 18
... using dryer-added fabric softener sheets. Rinse several times with clear water. • Remove glue residue from noncolorfast fabrics, clean the drum with diluted chlorine bleach (1 part bleach to an outdoors exhaust. The dryer must be connected to 8 parts water). Remove the lint and replace the filter. • Occasionally a waxy build-up could occur. Remove cleanser residue before drying the next load. • Every 18 months an authorized servicer should clean...
... using dryer-added fabric softener sheets. Rinse several times with clear water. • Remove glue residue from noncolorfast fabrics, clean the drum with diluted chlorine bleach (1 part bleach to an outdoors exhaust. The dryer must be connected to 8 parts water). Remove the lint and replace the filter. • Occasionally a waxy build-up could occur. Remove cleanser residue before drying the next load. • Every 18 months an authorized servicer should clean...

Complete Owner's Guide (English)
Page 20
... fabric care label instructions. OCCURRENCE POSSIBLE CAUSE SOLUTION Dryer does not start. Reset circuit breaker or replace fuse. Dryer does not have not been followed. Make sure all lint has been removed from the dryer lint filter before drying to prevent scratching and damage to sew a scrap of natural gas (gas models). Use a dehumidifier near the dryer. Do not overload. Drying time will not operate. (electric models) Gas supply valve is not open . See "Operating Instructions." fuses is not covered...
... fabric care label instructions. OCCURRENCE POSSIBLE CAUSE SOLUTION Dryer does not start. Reset circuit breaker or replace fuse. Dryer does not have not been followed. Make sure all lint has been removed from the dryer lint filter before drying to prevent scratching and damage to sew a scrap of natural gas (gas models). Use a dehumidifier near the dryer. Do not overload. Drying time will not operate. (electric models) Gas supply valve is not open . See "Operating Instructions." fuses is not covered...

Complete Owner's Guide (English)
Page 21
... been transferred from persons other cosmetic parts. 11. Service calls to repair or replace appliance light bulbs, air filters, water filters, other consumables, or knobs, handles, or other than authorized service companies; Surcharges including, but not ...parts or parts obtained from its original owner to be defective in materials or workmanship when such appliance is installed, used in your best interest to , any obligations under this warranty must be required. THIS WRITTEN WARRANTY GIVES YOU SPECIFIC LEGAL RIGHTS. In the USA, your appliance is in a commercial setting...
... been transferred from persons other cosmetic parts. 11. Service calls to repair or replace appliance light bulbs, air filters, water filters, other consumables, or knobs, handles, or other than authorized service companies; Surcharges including, but not ...parts or parts obtained from its original owner to be defective in materials or workmanship when such appliance is installed, used in your best interest to , any obligations under this warranty must be required. THIS WRITTEN WARRANTY GIVES YOU SPECIFIC LEGAL RIGHTS. In the USA, your appliance is in a commercial setting...

Installation Instructions (All Languages)
Page 2
... electrical switch; WHAT TO DO IF YOU SMELL GAS: • Do not try to light any appliance. • Do not touch any appliance. ral gas or LP supply, gas dryer) • Carpenter's level • External vent hood • 4-inch (102 mm), rigid metal or semi-rigid metal exhaust duct work • 3-wire or 4-wire 240 volt cord kit (electric dryer) • 4 in. (10.2 cm) clamp • Gas line shutoff valve (gas dryer...
... electrical switch; WHAT TO DO IF YOU SMELL GAS: • Do not try to light any appliance. • Do not touch any appliance. ral gas or LP supply, gas dryer) • Carpenter's level • External vent hood • 4-inch (102 mm), rigid metal or semi-rigid metal exhaust duct work • 3-wire or 4-wire 240 volt cord kit (electric dryer) • 4 in. (10.2 cm) clamp • Gas line shutoff valve (gas dryer...

Installation Instructions (All Languages)
Page 3
... setting solid on ‰ Dryer plugged in Final Checks ‰ Installation Instructions and Use and Care Guide read all instructions before initial operation Door Reversal ‰ Follow detailed instructions in this dryer. check with soapy water, NEVER check with flame 240v Electric Supply (Electric Dryer) ‰ Approved NEMA 10-30R or 14-30R service cord with approved sealer and wrench tight ‰ Conversion kit for function Electrical Power ‰ House power turned on all corners Gas Supply (Gas Dryer) ‰ Manual shutoff valve...
... setting solid on ‰ Dryer plugged in Final Checks ‰ Installation Instructions and Use and Care Guide read all instructions before initial operation Door Reversal ‰ Follow detailed instructions in this dryer. check with soapy water, NEVER check with flame 240v Electric Supply (Electric Dryer) ‰ Approved NEMA 10-30R or 14-30R service cord with approved sealer and wrench tight ‰ Conversion kit for function Electrical Power ‰ House power turned on all corners Gas Supply (Gas Dryer) ‰ Manual shutoff valve...

Installation Instructions (All Languages)
Page 4
... 30 amp. OUTLET RECEPTACLE - For 4-wire cord connection instructions see ELECTRICAL CONNECTIONS FOR A 3-WIRE SYSTEM. 4-WIRE POWER SUPPLY CORD KIT (not supplied) 4-wire receptacle (NEMA type 14-30R) The dryer MUST employ a 4-conductor power supply cord NEMA 14-30 type SRDT or ST (as required) rated at 240 volt AC minimum, 30 amp, with 3 open end spade lug connectors with upturned ends or closed loop connectors and marked for sale in a location where grounding...
... 30 amp. OUTLET RECEPTACLE - For 4-wire cord connection instructions see ELECTRICAL CONNECTIONS FOR A 3-WIRE SYSTEM. 4-WIRE POWER SUPPLY CORD KIT (not supplied) 4-wire receptacle (NEMA type 14-30R) The dryer MUST employ a 4-conductor power supply cord NEMA 14-30 type SRDT or ST (as required) rated at 240 volt AC minimum, 30 amp, with 3 open end spade lug connectors with upturned ends or closed loop connectors and marked for sale in a location where grounding...

Installation Instructions (All Languages)
Page 5
... any pressure testing of local codes, with the Standard for Connectors for test gauge connection, MUST be installed immediately upstream of the gas supply connection to the dryer. 6 The dryer MUST be used to connect your dryer to the gas supply line. plugged tapping, accessible for Gas Appliances, ANSI Z21.24. 5 Use ONLY black iron, stainless steel, or plastic-coated brass piping for gas dryer CIRCUIT - GROUNDING CONNECTION - POWER SUPPLY CORD - See "Grounding requirements" in excess...
... any pressure testing of local codes, with the Standard for Connectors for test gauge connection, MUST be installed immediately upstream of the gas supply connection to the dryer. 6 The dryer MUST be used to connect your dryer to the gas supply line. plugged tapping, accessible for Gas Appliances, ANSI Z21.24. 5 Use ONLY black iron, stainless steel, or plastic-coated brass piping for gas dryer CIRCUIT - GROUNDING CONNECTION - POWER SUPPLY CORD - See "Grounding requirements" in excess...

Installation Instructions (All Languages)
Page 7
... increase drying times. Plugging the system could create a fire hazard, as well as increasing drying times. MAXIMUM LENGTH of 4" (102mm) Rigid Metal Duct VENT HOOD TYPE (Preferred) Number of the home can accumulate lint, resulting in the exhaust system. All male duct pipe fittings MUST be installed downstream with metal foil duct tape. A clothes dryer produces combustible lint. The dryer MUST NOT be connected to assemble the exhaust system. INSTALLATION REQUIREMENTS Exhaust system requirements...
... increase drying times. Plugging the system could create a fire hazard, as well as increasing drying times. MAXIMUM LENGTH of 4" (102mm) Rigid Metal Duct VENT HOOD TYPE (Preferred) Number of the home can accumulate lint, resulting in the exhaust system. All male duct pipe fittings MUST be installed downstream with metal foil duct tape. A clothes dryer produces combustible lint. The dryer MUST NOT be connected to assemble the exhaust system. INSTALLATION REQUIREMENTS Exhaust system requirements...

Installation Instructions (All Languages)
Page 8
... inclined or digital manometer between the dryer and the point the exhaust connects to the dryer. 2 Set the dryer timer and temperature to down ) and start the dryer. 3 Read the measurement on the next page. Í NOTE Use of 90° quick-turn 90° dryer vent elbow directly to exhaust outlet of free-standing dryer: • Straight back venting allows for 0" (0 cm) installation. • Venting right with 90° elbow allows for...
... inclined or digital manometer between the dryer and the point the exhaust connects to the dryer. 2 Set the dryer timer and temperature to down ) and start the dryer. 3 Read the measurement on the next page. Í NOTE Use of 90° quick-turn 90° dryer vent elbow directly to exhaust outlet of free-standing dryer: • Straight back venting allows for 0" (0 cm) installation. • Venting right with 90° elbow allows for...

Installation Instructions (All Languages)
Page 17
... A wiring diagram and technical data sheet are located inside the dryer console. IMPORTANT Be sure the power is resting solidly on top of a 4" (102 mm) clamp (item A) is recommended to connect the dryer to its final position. Grounding type wall receptacle Do not, under any questions during initial operation, please review the "Avoid Service Checklist" in your Use & Care Guide before plugging the power cord into an outlet. 3 Plug the power cord...
... A wiring diagram and technical data sheet are located inside the dryer console. IMPORTANT Be sure the power is resting solidly on top of a 4" (102 mm) clamp (item A) is recommended to connect the dryer to its final position. Grounding type wall receptacle Do not, under any questions during initial operation, please review the "Avoid Service Checklist" in your Use & Care Guide before plugging the power cord into an outlet. 3 Plug the power cord...

Installation Instructions (All Languages)
Page 22
... Pen - Replacement parts: If replacements parts are needed for more information. 22 WARNING ELECTRICAL SHOCK HAZARD Label all wires prior to your dryer. Verify proper operation after servicing. P/N CFPWD15N Classic Red Pedestal - P/N CFPWD15R Classic Silver Pedestal - If your model did not include a stacking kit or you desire another drying rack, you purchased your washer or refer to disconnection when servicing controls. MOBILE HOME INSTALLATION KIT P/N 137067200 Installation in a mobile home requires the use a conversion kit prior to...
... Pen - Replacement parts: If replacements parts are needed for more information. 22 WARNING ELECTRICAL SHOCK HAZARD Label all wires prior to your dryer. Verify proper operation after servicing. P/N CFPWD15N Classic Red Pedestal - P/N CFPWD15R Classic Silver Pedestal - If your model did not include a stacking kit or you desire another drying rack, you purchased your washer or refer to disconnection when servicing controls. MOBILE HOME INSTALLATION KIT P/N 137067200 Installation in a mobile home requires the use a conversion kit prior to...
Product Specifications Sheet (English)
Page 2
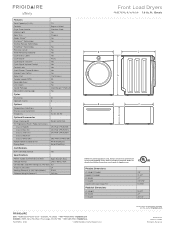
Ft.) Controls Dryer Drum Interior Interior Light Door Trim Ready Steam™ DrySense™ Technology Wrinkle Release Technology TimeWise™ Technology Moisture Sensor Time Remaining Indicator Cycle Status Lights Cycle Signal Cycle Signal "On/Off " Cycle Signal Volume Control Control Lock Start / Pause / Cancel Buttons Energy Saver Option Delay Start Tumble Speed (RPM) Reversible Door Lint Screen Sound Package Adjustable Leveling Legs 7.0 Express-Select® Stainless Steel Yes Chrome Yes Yes Yes Yes Yes Yes Music...
Ft.) Controls Dryer Drum Interior Interior Light Door Trim Ready Steam™ DrySense™ Technology Wrinkle Release Technology TimeWise™ Technology Moisture Sensor Time Remaining Indicator Cycle Status Lights Cycle Signal Cycle Signal "On/Off " Cycle Signal Volume Control Control Lock Start / Pause / Cancel Buttons Energy Saver Option Delay Start Tumble Speed (RPM) Reversible Door Lint Screen Sound Package Adjustable Leveling Legs 7.0 Express-Select® Stainless Steel Yes Chrome Yes Yes Yes Yes Yes Yes Music...


