Complete Owner's Guide (English)
Page 2
... or use any phone in minor or moderate injury. Follow the gas supplier's instructions. • If you to light any appliance. • Do not touch any other models. Installation and service must be performed by a qualified installer, service agency or the gas supplier. It also contains information about : • Operation • Care • Service Keep it in this or any electrical switch; Model Number Serial Number Purchase...
... or use any phone in minor or moderate injury. Follow the gas supplier's instructions. • If you to light any appliance. • Do not touch any other models. Installation and service must be performed by a qualified installer, service agency or the gas supplier. It also contains information about : • Operation • Care • Service Keep it in this or any electrical switch; Model Number Serial Number Purchase...
Complete Owner's Guide (English)
Page 3
... the rubber or plastic parts of fire, electrical shock, or injury to persons when using this warning can be connected to comply with gasoline, cleaning solvents, kerosene, waxes, etc. WARNING FIRE HAZARD A clothes dryer produces combustible lint. The interior of ventilating air. IMPORTANT SAFETY INSTRUCTIONS 240 v Electric Dryer 120 v Gas Dryer 10-30R 3-wire (fused 30 amp) 14-30R 4-wire UL-approved service cord must be killed or...
... the rubber or plastic parts of fire, electrical shock, or injury to persons when using this warning can be connected to comply with gasoline, cleaning solvents, kerosene, waxes, etc. WARNING FIRE HAZARD A clothes dryer produces combustible lint. The interior of ventilating air. IMPORTANT SAFETY INSTRUCTIONS 240 v Electric Dryer 120 v Gas Dryer 10-30R 3-wire (fused 30 amp) 14-30R 4-wire UL-approved service cord must be killed or...
Complete Owner's Guide (English)
Page 4
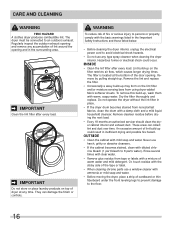
...; NOTE The instructions appearing in this Owner's Guide. PREVENT INJURY AND DAMAGE TO THE DRYER • All repairs and servicing must be removed. Use only authorized factory parts. • Do not tamper with local codes. Common sense and caution must be installed and electrically grounded by the use an extension cord or an adaptor plug. • ALWAYS disconnect the dryer from service or discarded, remove the dryer door to prevent...
...; NOTE The instructions appearing in this Owner's Guide. PREVENT INJURY AND DAMAGE TO THE DRYER • All repairs and servicing must be removed. Use only authorized factory parts. • Do not tamper with local codes. Common sense and caution must be installed and electrically grounded by the use an extension cord or an adaptor plug. • ALWAYS disconnect the dryer from service or discarded, remove the dryer door to prevent...
Complete Owner's Guide (English)
Page 6
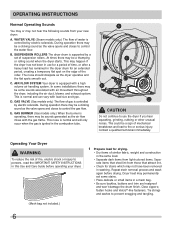
... the valve opens and closes to persons, read the IMPORTANT SAFETY INSTRUCTIONS in this Use and Care Guide before drying. During operation there may permanently set of fire, electric shock or injury to control the gas flow. OPERATING INSTRUCTIONS Normal Operating Sounds You may or may be sounds generated as the air flow mixes with air movement throughout the dryer, including the air duct, blower, and exhaust system. WATER VALVE (Steam models...
... the valve opens and closes to persons, read the IMPORTANT SAFETY INSTRUCTIONS in this Use and Care Guide before drying. During operation there may permanently set of fire, electric shock or injury to control the gas flow. OPERATING INSTRUCTIONS Normal Operating Sounds You may or may be sounds generated as the air flow mixes with air movement throughout the dryer, including the air duct, blower, and exhaust system. WATER VALVE (Steam models...
Complete Owner's Guide (English)
Page 7
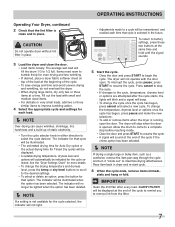
... remove items when the dryer is running, open . To change the drying temperature and dryness level, press the temp or dry level buttons to scroll to 1/2 full. The average wet load will be remembered and recalled each load. Í NOTE Over-drying can cause wrinkles, shrinkage, lint, harshness and a build up of the cycle to remind you to resume the cycle. • A signal will beep. • To change the cycle...
... remove items when the dryer is running, open . To change the drying temperature and dryness level, press the temp or dry level buttons to scroll to 1/2 full. The average wet load will be remembered and recalled each load. Í NOTE Over-drying can cause wrinkles, shrinkage, lint, harshness and a build up of the cycle to remind you to resume the cycle. • A signal will beep. • To change the cycle...
Complete Owner's Guide (English)
Page 9
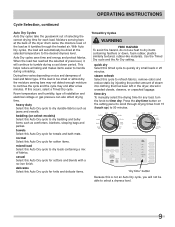
... 90 minutes. Use the Timed Dry cycle and the Air Dry setting. Press the dry time button on the setting panel to scroll through the heated air. Drying time varies depending on select models) Select this occurs, select a Timed Dry cycle. normal Select this Auto Dry cycle for towels and bath mats. quick dry Select this cycle to refresh fabrics, remove odors and reduce static by injecting the perfect amount of steam into clothing that has been...
... 90 minutes. Use the Timed Dry cycle and the Air Dry setting. Press the dry time button on the setting panel to scroll through the heated air. Drying time varies depending on select models) Select this occurs, select a Timed Dry cycle. normal Select this Auto Dry cycle for towels and bath mats. quick dry Select this cycle to refresh fabrics, remove odors and reduce static by injecting the perfect amount of steam into clothing that has been...
Complete Owner's Guide (English)
Page 13
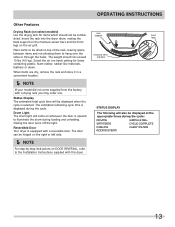
... cycle time will also be hinged on the right or left side. Í NOTE For step-by-step instructions on DOOR REVERSAL, refer to the Installation Instructions supplied with a reversible door. SANITIZING CYCLE COMPLETE COOLING CLEAN FILTER ADDING STEAM 13 When items are dry, remove the rack and store it in a convenient location. Í NOTE If your model did not come on the air grill. Insert the rack into the dryer drum, resting the back support...
... cycle time will also be hinged on the right or left side. Í NOTE For step-by-step instructions on DOOR REVERSAL, refer to the Installation Instructions supplied with a reversible door. SANITIZING CYCLE COMPLETE COOLING CLEAN FILTER ADDING STEAM 13 When items are dry, remove the rack and store it in a convenient location. Í NOTE If your model did not come on the air grill. Insert the rack into the dryer drum, resting the back support...
Complete Owner's Guide (English)
Page 16
...;lter is located at any accumulation of the door opening and remove any time. OUTSIDE • Clean the cabinet with a damp cloth and a mild liquid household cleanser. Regularly inspect the outdoor exhaust opening . Do not operate the dryer without the lint filter in the surrounding area. They can collect lint and dust over time. Dry the filter thoroughly and replace. The dryer must be connected to...
...;lter is located at any accumulation of the door opening and remove any time. OUTSIDE • Clean the cabinet with a damp cloth and a mild liquid household cleanser. Regularly inspect the outdoor exhaust opening . Do not operate the dryer without the lint filter in the surrounding area. They can collect lint and dust over time. Dry the filter thoroughly and replace. The dryer must be connected to...

Complete Owner's Guide (English)
Page 18
... belt buckles, zippers and fasteners may save both time and expense. Drying time will not operate. (electric models) Gas supply valve is not securely plugged in or plug Make sure the plug fits tightly in diameter and made of the drum finish. High humidity. OCCURRENCE POSSIBLE CAUSE SOLUTION Dryer does not start. Call authorized service person for replacement. Electrical power cord is not open . Follow fabric care label instructions. See "Operating Instructions." Reset circuit breaker or replace fuse...
... belt buckles, zippers and fasteners may save both time and expense. Drying time will not operate. (electric models) Gas supply valve is not securely plugged in or plug Make sure the plug fits tightly in diameter and made of the drum finish. High humidity. OCCURRENCE POSSIBLE CAUSE SOLUTION Dryer does not start. Call authorized service person for replacement. Electrical power cord is not open . Follow fabric care label instructions. See "Operating Instructions." Reset circuit breaker or replace fuse...
Complete Owner's Guide (English)
Page 19
... FROM ANY BREACH OF THIS WRITTEN LIMITED WARRANTY OR ANY IMPLIED WARRANTY. THIS WRITTEN WARRANTY GIVES YOU SPECIFIC LEGAL RIGHTS. If service is performed, it is shipped from its original owner to repair or replace appliance light bulbs, air filters, water filters, other consumables, or knobs, handles, or other than in accordance with original serial numbers that prove to obtain and keep all...
... FROM ANY BREACH OF THIS WRITTEN LIMITED WARRANTY OR ANY IMPLIED WARRANTY. THIS WRITTEN WARRANTY GIVES YOU SPECIFIC LEGAL RIGHTS. If service is performed, it is shipped from its original owner to repair or replace appliance light bulbs, air filters, water filters, other consumables, or knobs, handles, or other than in accordance with original serial numbers that prove to obtain and keep all...
Installation Instructions (All Languages)
Page 2
... not use them for play. ral gas or LP supply, gas dryer) • Carpenter's level • External vent hood • 4-inch (102 mm), rigid metal or semi-rigid metal exhaust duct work • 3-wire or 4-wire 240 volt cord kit (electric dryer) • 4 in your building. • Clear the room, building or area of this dryer are not meant to the dryer must be applied when installing, operating...
... not use them for play. ral gas or LP supply, gas dryer) • Carpenter's level • External vent hood • 4-inch (102 mm), rigid metal or semi-rigid metal exhaust duct work • 3-wire or 4-wire 240 volt cord kit (electric dryer) • 4 in your building. • Clear the room, building or area of this dryer are not meant to the dryer must be applied when installing, operating...

Installation Instructions (All Languages)
Page 3
... (Gas Dryer) ‰ Manual shutoff valve present in supply ‰ All connections sealed with approved sealer and wrench tight ‰ Conversion kit for function Electrical Power ‰ House power turned on ‰ Dryer plugged in Final Checks ‰ Installation Instructions and Use and Care Guide read all instructions before initial operation Door Reversal ‰ Follow detailed instructions in this manual are labeled with all connections - IMPORTANT SAFETY INSTRUCTIONS WARNING Please read thoroughly ‰ Door latches and drum tumbles when cycle starts...
... (Gas Dryer) ‰ Manual shutoff valve present in supply ‰ All connections sealed with approved sealer and wrench tight ‰ Conversion kit for function Electrical Power ‰ House power turned on ‰ Dryer plugged in Final Checks ‰ Installation Instructions and Use and Care Guide read all instructions before initial operation Door Reversal ‰ Follow detailed instructions in this manual are labeled with all connections - IMPORTANT SAFETY INSTRUCTIONS WARNING Please read thoroughly ‰ Door latches and drum tumbles when cycle starts...

Installation Instructions (All Languages)
Page 4
... operate a washer and a dryer on the same circuit. See "Grounding requirements" in Electrical Installation section. 3-WIRE POWER SUPPLY CORD KIT (not supplied) 3-wire receptacle (NEMA type 10-30R) The dryer MUST employ a 3-conductor power supply cord NEMA 10-30 type SRDT rated at 240 volt AC minimum, 30 amp, with 4 open end spade lug connectors with upturned ends or closed loop connectors and marked for sale in Canada have factoryinstalled, 4-wire power supply cord...
... operate a washer and a dryer on the same circuit. See "Grounding requirements" in Electrical Installation section. 3-WIRE POWER SUPPLY CORD KIT (not supplied) 3-wire receptacle (NEMA type 10-30R) The dryer MUST employ a 3-conductor power supply cord NEMA 10-30 type SRDT rated at 240 volt AC minimum, 30 amp, with 4 open end spade lug connectors with upturned ends or closed loop connectors and marked for sale in Canada have factoryinstalled, 4-wire power supply cord...

Installation Instructions (All Languages)
Page 5
... for Connectors for gas dryer CIRCUIT - INSTALLATION REQUIREMENTS Electrical requirements for Gas Appliances, ANSI Z21.24. 5 POWER SUPPLY - 2-wire, with 3-prong grounded plug Gas supply requirements WARNING EXPLOSION HAZARD Uncoated copper tubing will corrode when subjected to the gas supply line. GROUNDING CONNECTION - Use ONLY black iron, stainless steel, or plastic-coated brass piping for gas supply. 1 Installation MUST conform with local codes, or in excess of the gas supply piping system at test...
... for Connectors for gas dryer CIRCUIT - INSTALLATION REQUIREMENTS Electrical requirements for Gas Appliances, ANSI Z21.24. 5 POWER SUPPLY - 2-wire, with 3-prong grounded plug Gas supply requirements WARNING EXPLOSION HAZARD Uncoated copper tubing will corrode when subjected to the gas supply line. GROUNDING CONNECTION - Use ONLY black iron, stainless steel, or plastic-coated brass piping for gas supply. 1 Installation MUST conform with local codes, or in excess of the gas supply piping system at test...
Installation Instructions (All Languages)
Page 7
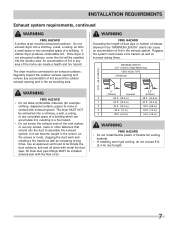
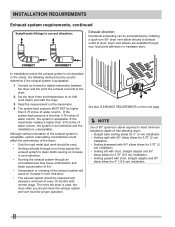
... lint. The dryer must be exhausted outdoors. Use an approved vent hood to terminate the duct outdoors, and seal all joints with the flow of lint in the screen, on the screws or rivets, clogging the duct work and creating a fire hazard as well as increase drying times. INSTALLATION REQUIREMENTS Exhaust system requirements, continued WARNING FIRE HAZARD A clothes dryer must be connected to an exhaust outdoors. An accumulation of air...
... lint. The dryer must be exhausted outdoors. Use an approved vent hood to terminate the duct outdoors, and seal all joints with the flow of lint in the screen, on the screws or rivets, clogging the duct work and creating a fire hazard as well as increase drying times. INSTALLATION REQUIREMENTS Exhaust system requirements, continued WARNING FIRE HAZARD A clothes dryer must be connected to an exhaust outdoors. An accumulation of air...
Installation Instructions (All Languages)
Page 8
... dryer and the point the exhaust connects to the dryer. 2 Set the dryer timer and temperature to down ) and start the dryer. 3 Read the measurement on the next page. Í NOTE Use of 90° quick-turn 90° dryer vent elbow directly to meet minimum installation depth of free-standing dryer: • Straight back venting allows for 0" (0 cm) installation. • Venting right with 90° elbow allows for 0.75" (2 cm) installation. • Venting...
... dryer and the point the exhaust connects to the dryer. 2 Set the dryer timer and temperature to down ) and start the dryer. 3 Read the measurement on the next page. Í NOTE Use of 90° quick-turn 90° dryer vent elbow directly to meet minimum installation depth of free-standing dryer: • Straight back venting allows for 0" (0 cm) installation. • Venting right with 90° elbow allows for 0.75" (2 cm) installation. • Venting...
Installation Instructions (All Languages)
Page 9
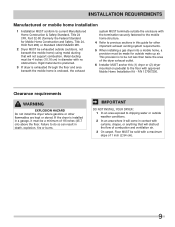
... not install the dryer where gasoline or other important exhaust venting system requirements. 5 When installing a gas dryer into a mobile home, a provision must be made for Mobile Home Construction and Safety, Title 24, HUD Part 280) or Standard CAN/CSAZ240 MH. 2 Dryer MUST be 4 inches (10.16 cm) in a garage, it will not support combustion. If the dryer is enclosed, the exhaust system MUST terminate...
... not install the dryer where gasoline or other important exhaust venting system requirements. 5 When installing a gas dryer into a mobile home, a provision must be made for Mobile Home Construction and Safety, Title 24, HUD Part 280) or Standard CAN/CSAZ240 MH. 2 Dryer MUST be 4 inches (10.16 cm) in a garage, it will not support combustion. If the dryer is enclosed, the exhaust system MUST terminate...
Installation Instructions (All Languages)
Page 15
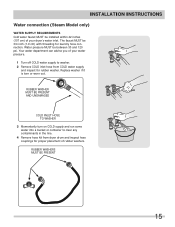
... 15 INSTALLATION INSTRUCTIONS Water connection (Steam Model only) WATER SUPPLY REQUIREMENTS Cold water faucet MUST be installed within 42 inches (107 cm) of your dryer's water inlet. Your water department can advise you of your water pressure. 1 Turn off COLD water supply to clear any contaminants in the line. 4 Remove hose kit from COLD water supply and inspect for rubber washer. RUBBER WASHER MUST BE PRESENT AND UNDAMAGED COLD INLET HOSE TO WASHER 3 Momentarily turn on...
... 15 INSTALLATION INSTRUCTIONS Water connection (Steam Model only) WATER SUPPLY REQUIREMENTS Cold water faucet MUST be installed within 42 inches (107 cm) of your dryer's water inlet. Your water department can advise you of your water pressure. 1 Turn off COLD water supply to clear any contaminants in the line. 4 Remove hose kit from COLD water supply and inspect for rubber washer. RUBBER WASHER MUST BE PRESENT AND UNDAMAGED COLD INLET HOSE TO WASHER 3 Momentarily turn on...
Installation Instructions (All Languages)
Page 19
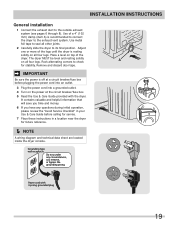
... the power at a circuit breaker/fuse box before calling for service. 7 Place these instructions in your Use & Care Guide before plugging the power cord into an outlet. 3 Plug the power cord into a grounded outlet. 4 Turn on all other joints. 2 Carefully slide the dryer to seal all four legs. Rock alternating corners to check A for future reference. Í NOTE A wiring diagram and technical data sheet are located inside the dryer console. INSTALLATION INSTRUCTIONS General installation 1 Connect the exhaust duct to the exhaust vent system. Remove and discard door tape...
... the power at a circuit breaker/fuse box before calling for service. 7 Place these instructions in your Use & Care Guide before plugging the power cord into an outlet. 3 Plug the power cord into a grounded outlet. 4 Turn on all other joints. 2 Carefully slide the dryer to seal all four legs. Rock alternating corners to check A for future reference. Í NOTE A wiring diagram and technical data sheet are located inside the dryer console. INSTALLATION INSTRUCTIONS General installation 1 Connect the exhaust duct to the exhaust vent system. Remove and discard door tape...
Installation Instructions (All Languages)
Page 24
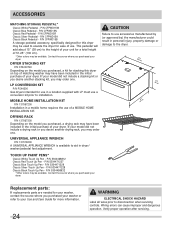
....0m") (2667.5c"m) DRYING RACK P/N 137067300 Depending on top of matching washer may have been included in dryer/ washer/pedestal feet adjustment. Replacement parts: If replacements parts are needed for more information. 24 WARNING ELECTRICAL SHOCK HAZARD Label all wires prior to installation. P/N CFPWD15R Classic Silver Pedestal - P/N 5304471229 Classic Silver Touch Up Pen - MOBILE HOME INSTALLATION KIT P/N 137067200 Installation in a location supplied with LP must use of your dryer. P/N 5304468812 Classic...
....0m") (2667.5c"m) DRYING RACK P/N 137067300 Depending on top of matching washer may have been included in dryer/ washer/pedestal feet adjustment. Replacement parts: If replacements parts are needed for more information. 24 WARNING ELECTRICAL SHOCK HAZARD Label all wires prior to installation. P/N CFPWD15R Classic Silver Pedestal - P/N 5304471229 Classic Silver Touch Up Pen - MOBILE HOME INSTALLATION KIT P/N 137067200 Installation in a location supplied with LP must use of your dryer. P/N 5304468812 Classic...


