

Use and Care Manual
Page 2
...meant to Electrolux Home Products. © 2006 Electrolux Home Products, Inc. We know you'll enjoy your new range and Thank You for your range and feature information for future purchases. Model Number: Serial Number: Purchase Date: Serial plate location; Product Registration .... Your satisfaction is our number one priority. All rights reserved. 2 At Electrolux Home Products, we are very proud of a new range! These instructions are representational. We hope you with the best service possible. This Use & Care Manual contains general operating instructions for your...
...meant to Electrolux Home Products. © 2006 Electrolux Home Products, Inc. We know you'll enjoy your new range and Thank You for your range and feature information for future purchases. Model Number: Serial Number: Purchase Date: Serial plate location; Product Registration .... Your satisfaction is our number one priority. All rights reserved. 2 At Electrolux Home Products, we are very proud of a new range! These instructions are representational. We hope you with the best service possible. This Use & Care Manual contains general operating instructions for your...
Use and Care Manual
Page 3
... plastic bags after use the oven or warmer drawer (if range. Install only per installation instructions provided in burns from any unused range if it closely. Among these instructions for Warming or accordance with packaging material. climb or play with the National Electrical Code ANSI/ Heating the Room. This symbol will help alert...
... plastic bags after use the oven or warmer drawer (if range. Install only per installation instructions provided in burns from any unused range if it closely. Among these instructions for Warming or accordance with packaging material. climb or play with the National Electrical Code ANSI/ Heating the Room. This symbol will help alert...

Use and Care Manual
Page 4
...bowls during cooking may subject wiring or components underneath to line surface unit drip bowls, or reflector pans. Pay particular attention to warn customers of electric shock, or fire. Follow manufacturer's instructions for a good seal. Improper installation of the oven. • Do Not Clean Door Gasket-The...and be kept away from the oven. • Do Not Use Oven Cleaners-No commercial oven cleaner or oven liner protective coating of any range. Only use . Proper relationship of utensil to element will expose a portion of the heating element to cause cancer, birth defects or other...
...bowls during cooking may subject wiring or components underneath to line surface unit drip bowls, or reflector pans. Pay particular attention to warn customers of electric shock, or fire. Follow manufacturer's instructions for a good seal. Improper installation of the oven. • Do Not Clean Door Gasket-The...and be kept away from the oven. • Do Not Use Oven Cleaners-No commercial oven cleaner or oven liner protective coating of any range. Only use . Proper relationship of utensil to element will expose a portion of the heating element to cause cancer, birth defects or other...
Use and Care Manual
Page 5
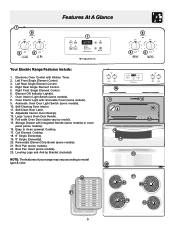
...Light Switch (some models). 10. Full width Oven Door (styles vary by model). 15. NOTE: The features of your range may vary according to clean upswept Cooktop. 17. Right Rear Single Element Control. 5. Automatic Oven Door Light Switch (some models... Left Front Single Element Control. 3. Leveling Legs and Anti-tip Bracket (included). 7 6 2 3 Features At A Glance 1 6 4 5 Your Electric Range Features Include: 1. Electronic Oven Control with removable Cover (some models). 9. Right Front Single Element Control. 6. Element ON Indicator Light(s). 7. Self-Cleaning...
...Light Switch (some models). 10. Full width Oven Door (styles vary by model). 15. NOTE: The features of your range may vary according to clean upswept Cooktop. 17. Right Rear Single Element Control. 5. Automatic Oven Door Light Switch (some models... Left Front Single Element Control. 3. Leveling Legs and Anti-tip Bracket (included). 7 6 2 3 Features At A Glance 1 6 4 5 Your Electric Range Features Include: 1. Electronic Oven Control with removable Cover (some models). 9. Right Front Single Element Control. 6. Element ON Indicator Light(s). 7. Self-Cleaning...

Use and Care Manual
Page 6
.... 2. Fig. 2 Baking Layer Cakes with one or more Flat Oven Rack(s). Tilt the front of meat or poultry 1 Turkey, roast or ham 1 Oven Racks Your range is equipped with 1 or 2 Oven Racks For best results when baking cakes using 2 oven racks, place cookware on the oven walls. Arranging Oven Racks ALWAYS...
.... 2. Fig. 2 Baking Layer Cakes with one or more Flat Oven Rack(s). Tilt the front of meat or poultry 1 Turkey, roast or ham 1 Oven Racks Your range is equipped with 1 or 2 Oven Racks For best results when baking cakes using 2 oven racks, place cookware on the oven walls. Arranging Oven Racks ALWAYS...

Use and Care Manual
Page 7
...above). COPPER - CAST IRON - Cooks evenly once cooking temperature is transferred from the surface element to follow the recommendations for use on your range- Fig. 1 The ELEMENT ON located on base material. Slow heat conductor with the entire surface heating element (See Fig. 2). Not ... ON indicator lights (See Fig. 1). May leave metal marks on METAL - Before Setting Surface Controls ELEMENT ON Indicator Lights Your range is equipped with surface control indicator lights that make good contact with uneven cooking results. Porcelain-enamel coating must be sure ALL surface...
...above). COPPER - CAST IRON - Cooks evenly once cooking temperature is transferred from the surface element to follow the recommendations for use on your range- Fig. 1 The ELEMENT ON located on base material. Slow heat conductor with the entire surface heating element (See Fig. 2). Not ... ON indicator lights (See Fig. 1). May leave metal marks on METAL - Before Setting Surface Controls ELEMENT ON Indicator Lights Your range is equipped with surface control indicator lights that make good contact with uneven cooking results. Porcelain-enamel coating must be sure ALL surface...
Use and Care Manual
Page 10
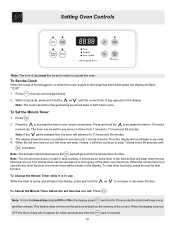
... (the control will flash "12:00". 1. Press the to 11 hours and 59 minutes. 3. When the display is active and shows in order to the range has been interrupted, the display will beep once) and then release. To Set the Clock When the...
... (the control will flash "12:00". 1. Press the to 11 hours and 59 minutes. 3. When the display is active and shows in order to the range has been interrupted, the display will beep once) and then release. To Set the Clock When the...
Use and Care Manual
Page 13
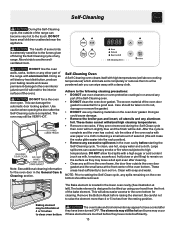
... all utensils and any cleaning materials on the oven bottom should be dull. These areas heat sufficiently to raise the element more than 4 or 5 inches from the resting position. NOTE: Prior to high temperatures. The Bake element is located in the lower oven cavity (See illustration at the front center... The oven bake and broil elements may appear to be tilted up using your hand from the oven frame, the door liner outside of any range. Note: See additional cleaning information for a good seal. Care should be VERY HOT. The elements may still be hot and burns may leave a ...
... all utensils and any cleaning materials on the oven bottom should be dull. These areas heat sufficiently to raise the element more than 4 or 5 inches from the resting position. NOTE: Prior to high temperatures. The Bake element is located in the lower oven cavity (See illustration at the front center... The oven bake and broil elements may appear to be tilted up using your hand from the oven frame, the door liner outside of any range. Note: See additional cleaning information for a good seal. Care should be VERY HOT. The elements may still be hot and burns may leave a ...
Use and Care Manual
Page 15
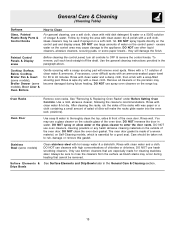
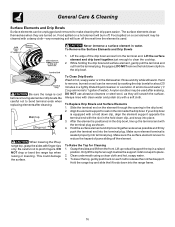
... spray oven cleaners on the control pad and display areas. Use a mild, abrasive cleaner, following the cleaner's recommendations. DO NOT spray liquids directly on the range top. If necessary, cover difficult spots with wax paper or a cloth containing a small amount of the racks with an ammonia-soaked paper towel for...
... spray oven cleaners on the control pad and display areas. Use a mild, abrasive cleaner, following the cleaner's recommendations. DO NOT spray liquids directly on the range top. If necessary, cover difficult spots with wax paper or a cloth containing a small amount of the racks with an ammonia-soaked paper towel for...
Use and Care Manual
Page 16
...spilled on . While holding the drip bowl and surface element, gently pull the terminal end out from the front. When lowering the lift-up range top, grasp the sides with a damp cloth-any remaining soil will scratch the surface. If your drip bowl is seated properly into the terminal...after cleaning. This could damage the surface. A nylon scrubber may be cleaned with finger-tips only. After the element is level to snap into the range frame. 16 Clean underneath using a clean cloth and hot, soapy water. 3. To Remove the Surface Elements and Drip Bowls 1. Lift the surface ...
...spilled on . While holding the drip bowl and surface element, gently pull the terminal end out from the front. When lowering the lift-up range top, grasp the sides with a damp cloth-any remaining soil will scratch the surface. If your drip bowl is seated properly into the terminal...after cleaning. This could damage the surface. A nylon scrubber may be cleaned with finger-tips only. After the element is level to snap into the range frame. 16 Clean underneath using a clean cloth and hot, soapy water. 3. To Remove the Surface Elements and Drip Bowls 1. Lift the surface ...
Use and Care Manual
Page 18
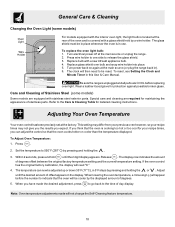
... amount of day display. When you expect. The glass shield must be cooler by pressing and holding the or . Turn electrical power off at the main source (or plug the range back in). 6. Replace bulb with a glass shield held by pressing and holding the . 3. Press . 2. Adjust until... the 2 digit display appears. Turn power back on again at the main source or unplug the range. 2. Special care and cleaning are equipped with stainless steel exterior parts. Adjusting Your Oven Temperature Your oven control has been precisely set at the...
... amount of day display. When you expect. The glass shield must be cooler by pressing and holding the or . Turn electrical power off at the main source (or plug the range back in). 6. Replace bulb with a glass shield held by pressing and holding the . 3. Press . 2. Adjust until... the 2 digit display appears. Turn power back on again at the main source or unplug the range. 2. Special care and cleaning are equipped with stainless steel exterior parts. Adjusting Your Oven Temperature Your oven control has been precisely set at the...
Use and Care Manual
Page 19
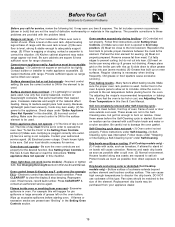
... It may burn easily. (2) No power to salt air. The possible corrections to broil stop beeping. Provide sufficient space so range can be accessible for pie spillovers or large amounts of the element. Flat pans heat better than warped pans. Because lightweight pans... broiling frequently. Surface element does not heat - (1) Lightweight or warped pans used . The time of oven. Call your local electric company for range clearance. Press CLEAR/OFF & contact an authorized service agent. For example this appliance. Many factors affect baking results. Try adjusting ...
... It may burn easily. (2) No power to salt air. The possible corrections to broil stop beeping. Provide sufficient space so range can be accessible for pie spillovers or large amounts of the element. Flat pans heat better than warped pans. Because lightweight pans... broiling frequently. Surface element does not heat - (1) Lightweight or warped pans used . The time of oven. Call your local electric company for range clearance. Press CLEAR/OFF & contact an authorized service agent. For example this appliance. Many factors affect baking results. Try adjusting ...


