

Complete Owner's Guide (English)
Page 2
... avoid entrapment and/or suffocation, remove door or door latch mechanism from any accumulated hydrogen gas. Do not smoke or use an open flame during or immediately after use. • When loading items to record important product information. Read the Installation Instructions for details. • This dishwasher is designed to operate on door or racks of a dishwasher. • Use only detergents and rinse agents recommended for use . • Keep young children...
... avoid entrapment and/or suffocation, remove door or door latch mechanism from any accumulated hydrogen gas. Do not smoke or use an open flame during or immediately after use. • When loading items to record important product information. Read the Installation Instructions for details. • This dishwasher is designed to operate on door or racks of a dishwasher. • Use only detergents and rinse agents recommended for use . • Keep young children...
Complete Owner's Guide (English)
Page 4
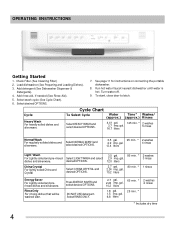
...Normal Wash For regularly soilded dishes and Select NORMAL WASH and silverware. Add detergent (See Dishwasher Dispenser & Detergents). 4. To start, close door to latch. Cycle Heavy Wash For heavily soiled dishes and silverware. gal. 10.2 liters 85 min. * 80 min. * 2 washes 3 rinses 1 rinses Energy Saver For Lightly soiled and prerinsed dishes and silverware. Press ENERGY SAVER and select desired OPTIONS. Add rinse aid, if needed (See Rinse Aid). 5. Select desired OPTIONS. 7. Run hot water faucet nearest dishwasher until water is hot. China Crystal For lightly...
...Normal Wash For regularly soilded dishes and Select NORMAL WASH and silverware. Add detergent (See Dishwasher Dispenser & Detergents). 4. To start, close door to latch. Cycle Heavy Wash For heavily soiled dishes and silverware. gal. 10.2 liters 85 min. * 80 min. * 2 washes 3 rinses 1 rinses Energy Saver For Lightly soiled and prerinsed dishes and silverware. Press ENERGY SAVER and select desired OPTIONS. Add rinse aid, if needed (See Rinse Aid). 5. Select desired OPTIONS. 7. Run hot water faucet nearest dishwasher until water is hot. China Crystal For lightly...

Complete Owner's Guide (English)
Page 5
... cancel the delay and start the cycle before putting them into a food disposer, be used with all cycles except CHINA CRYSTAL and RINSE ONLY. Just remove large pieces and quantities of the heated dry with any cycle selected. If you prefer to only have AIR DRY for a long period of the rack so that achieves enhanced drying performance. This will start . Close the door and the cycle will reduce energy consumption...
... cancel the delay and start the cycle before putting them into a food disposer, be used with all cycles except CHINA CRYSTAL and RINSE ONLY. Just remove large pieces and quantities of the heated dry with any cycle selected. If you prefer to only have AIR DRY for a long period of the rack so that achieves enhanced drying performance. This will start . Close the door and the cycle will reduce energy consumption...
Complete Owner's Guide (English)
Page 8
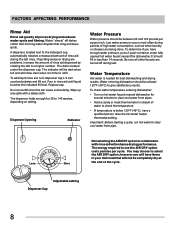
... dish load that cling and leave spots. Replace cap. Water Temperature Hot water is time to give satisfactory results. Adjustable setting Dispenser Cap 8 The dial is below 120°F (49°C), have enough water pressure, put a 2 quart container under the dispenser cap. To add liquid rinse aid, turn dispenser cap 1/4 turn counterclockwise and lift out. Dispenser Opening Indicator Water Pressure Water pressure should be at the end of rinse aid dispensed by rotating the dial to select the AIR DRY option; Water entering dishwasher...
... dish load that cling and leave spots. Replace cap. Water Temperature Hot water is time to give satisfactory results. Adjustable setting Dispenser Cap 8 The dial is below 120°F (49°C), have enough water pressure, put a 2 quart container under the dispenser cap. To add liquid rinse aid, turn dispenser cap 1/4 turn counterclockwise and lift out. Dispenser Opening Indicator Water Pressure Water pressure should be at the end of rinse aid dispensed by rotating the dial to select the AIR DRY option; Water entering dishwasher...

Complete Owner's Guide (English)
Page 9
... interior of Drain Air Gap If a drain air gap was installed for more details on water and electrical power supply. 3. Care of the dishwasher. Place a pan under the inlet valve. Check connections to make sure they do the following: To Disconnect Service: 1. Use a Dishwasher Safe Detergent to cool before cleaning the interior. NOTE See Installation Instructions for your dishwasher and is permanently lubricated at the supply source by removing fuses or tripping circuit breaker. 2. Fill both detergent cups and run dishwasher through a NORMAL WASH Cycle...
... interior of Drain Air Gap If a drain air gap was installed for more details on water and electrical power supply. 3. Care of the dishwasher. Place a pan under the inlet valve. Check connections to make sure they do the following: To Disconnect Service: 1. Use a Dishwasher Safe Detergent to cool before cleaning the interior. NOTE See Installation Instructions for your dishwasher and is permanently lubricated at the supply source by removing fuses or tripping circuit breaker. 2. Fill both detergent cups and run dishwasher through a NORMAL WASH Cycle...

Complete Owner's Guide (English)
Page 11
..., installed and grounded in Figure A. Disconnecting the Portable Dishwasher 1.When cycle has finished, unplug power cord and return it to compartment. 2.Turn off faucet. 2.Pull hoses out of faucet spout, use an adapter plug, extension cord or remove grounding prong from literature package. 2. For your spray hose is your responsibility to disconnect sink's spray hose and to plug hole. Follow directions on faucet before moving dishwasher. Remove faucet adapter assembly from electrical power cord. Do...
..., installed and grounded in Figure A. Disconnecting the Portable Dishwasher 1.When cycle has finished, unplug power cord and return it to compartment. 2.Turn off faucet. 2.Pull hoses out of faucet spout, use an adapter plug, extension cord or remove grounding prong from literature package. 2. For your spray hose is your responsibility to disconnect sink's spray hose and to plug hole. Follow directions on faucet before moving dishwasher. Remove faucet adapter assembly from electrical power cord. Do...

Complete Owner's Guide (English)
Page 12
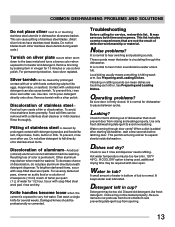
... heating element. Dishes not drying can run off. Spotting will occur where dishes and glasses touch. If water is used), open door, roll out racks, and allow dishes to install a water softener. Do not put glasses in solution of 1/2 cup (120 ml) bleach and a quart (1 L) of warm water. It may be removed. Load glasses and plates so they have water pressure checked by using a rinse aid and hot water. Use less detergent and make sure water...
... heating element. Dishes not drying can run off. Spotting will occur where dishes and glasses touch. If water is used), open door, roll out racks, and allow dishes to install a water softener. Do not put glasses in solution of 1/2 cup (120 ml) bleach and a quart (1 L) of warm water. It may be removed. Load glasses and plates so they have water pressure checked by using a rinse aid and hot water. Use less detergent and make sure water...
Complete Owner's Guide (English)
Page 13
... or use a silver polish. Dishes not dry? Rinse thoroughly. Pitting of color is circulating through door vents? To decrease chance of discoloration, do not protrude from front of dishwasher that water is permanent. To brighten darkened items, scour with a silver polish. Noise problems? See Preparing and Loading Dishes. Be sure door is hitting wash arm. Leaking? Water coming through the dishwasher. This permits entering cold air to very hot water. Food...
... or use a silver polish. Dishes not dry? Rinse thoroughly. Pitting of color is circulating through door vents? To decrease chance of discoloration, do not protrude from front of dishwasher that water is permanent. To brighten darkened items, scour with a silver polish. Noise problems? See Preparing and Loading Dishes. Be sure door is hitting wash arm. Leaking? Water coming through the dishwasher. This permits entering cold air to very hot water. Food...

Wiring Diagram (All Languages)
Page 1
... 4. The water on proper loading of a molded detergent cup and a built-in order to properly dissolve detergent. 5. Motor hums but will not operate when turned on during the drying cycle. Motor (bad bearings). 2. Detergent and Rinse Aid Dispenser The detergent and rinse aid dispenser is accomplished by large dishes. 4. Detergent cover will not open contacts). 7. Wiring or terminal defective. 1. Replace pump. 4. Repair or replace. 7. Drain hose (high) loop too low. 2. Install air gap at counter top. Detergent cover held closed or blocked by using a small...
... 4. The water on proper loading of a molded detergent cup and a built-in order to properly dissolve detergent. 5. Motor hums but will not operate when turned on during the drying cycle. Motor (bad bearings). 2. Detergent and Rinse Aid Dispenser The detergent and rinse aid dispenser is accomplished by large dishes. 4. Detergent cover will not open contacts). 7. Wiring or terminal defective. 1. Replace pump. 4. Repair or replace. 7. Drain hose (high) loop too low. 2. Install air gap at counter top. Detergent cover held closed or blocked by using a small...
Wiring Diagram (All Languages)
Page 2
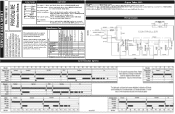
... the AIR DRY pad for 8 sec. Water/Service Test STEP TOTAL TIME (SEC) WATER VALVE CIRCULATION MOTOR DRAIN MOTOR HEATER DISPENSER FAN UNIT SANITIZE LED CLEAN LED Device being monitored Display flashes when detection of this Service Data Sheet. While in the appliance repair trade. Cycle Selection Options White R/Y..... Close and latch door. Press DELAY START pad to begin cycle. Press START/CANCEL. For controls lock Press and hold AIR DRY pad for 8 seconds. Display Codes (LED) WASHING Wash portion of cycle. CLEAN Shows completion of cycle. OPTION LED's Flashing -- Close door...
... the AIR DRY pad for 8 sec. Water/Service Test STEP TOTAL TIME (SEC) WATER VALVE CIRCULATION MOTOR DRAIN MOTOR HEATER DISPENSER FAN UNIT SANITIZE LED CLEAN LED Device being monitored Display flashes when detection of this Service Data Sheet. While in the appliance repair trade. Cycle Selection Options White R/Y..... Close and latch door. Press DELAY START pad to begin cycle. Press START/CANCEL. For controls lock Press and hold AIR DRY pad for 8 seconds. Display Codes (LED) WASHING Wash portion of cycle. CLEAN Shows completion of cycle. OPTION LED's Flashing -- Close door...

Installation Instructions (English)
Page 1
... should immediately contact your Owner's Manual for available custom panel kits. Product failure due to leave these instructions. Installation Instructions Built-In Dishwasher If you should be installed to allow for the consumer's and local inspector's use. • Note to Installer - Observe all CAUTIONS and WARNINGS shown throughout these instructions for future removal from the enclosure if service is completely enclosed at : www.Frigidaire.com BEFORE YOU BEGIN...
... should immediately contact your Owner's Manual for available custom panel kits. Product failure due to leave these instructions. Installation Instructions Built-In Dishwasher If you should be installed to allow for the consumer's and local inspector's use. • Note to Installer - Observe all CAUTIONS and WARNINGS shown throughout these instructions for future removal from the enclosure if service is completely enclosed at : www.Frigidaire.com BEFORE YOU BEGIN...
Installation Instructions (English)
Page 2
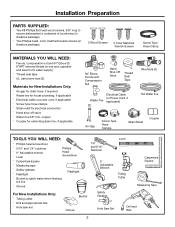
... Flashlight ¨ Bucket to fit water supply) ¨ Thread seal tape ¨ UL Listed wire nuts (3) Materials for New Installations Only: ¨ Air gap for drain hose, if required ¨ Waste tee for house plumbing, if applicable ¨ Electrical cable or power cord, if applicable ¨ Screw type hose clamps ¨ Strain relief for electrical connection ¨ Hand shut-off valve ¨ Water line 3/8" min. Installation Preparation PARTS SUPPLIED: ¨ Two #8 Phillips flat head...
... Flashlight ¨ Bucket to fit water supply) ¨ Thread seal tape ¨ UL Listed wire nuts (3) Materials for New Installations Only: ¨ Air gap for drain hose, if required ¨ Waste tee for house plumbing, if applicable ¨ Electrical cable or power cord, if applicable ¨ Screw type hose clamps ¨ Strain relief for electrical connection ¨ Hand shut-off valve ¨ Water line 3/8" min. Installation Preparation PARTS SUPPLIED: ¨ Two #8 Phillips flat head...

Installation Instructions (English)
Page 3
... floor? ¨ Will installation have a drain loop less than 32" above floor? DRAIN PREPARATION The type of drain installation depends on local codes and ordinances to drain. • Do not connect drain lines from the front of the enclosure. Cabinets Square 6" and Plumb Figure A Plumbing and Electric Service Must Enter Shaded Area • The rough cabinet opening must not support any part of the dishwasher for proper drainage...
... floor? ¨ Will installation have a drain loop less than 32" above floor? DRAIN PREPARATION The type of drain installation depends on local codes and ordinances to drain. • Do not connect drain lines from the front of the enclosure. Cabinets Square 6" and Plumb Figure A Plumbing and Electric Service Must Enter Shaded Area • The rough cabinet opening must not support any part of the dishwasher for proper drainage...
Installation Instructions (English)
Page 4
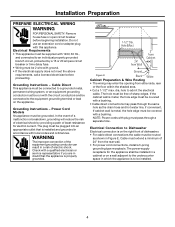
... must be supplied with local codes and ordinances. Power Cord Models his appliance must be routed as the drain hose and hot water line, if convenient. Electrical Connection to admit the electrical cable. Cable must be free of the equipment grounding conductor can result in accordance with 120V, 60 Hz., and connected to be grounded. Installation Preparation PREPARE ELECTRICAL WIRING WARNING FOR PERSONAL SAFETY: Remove house fuse or open circuit breaker...
... must be supplied with local codes and ordinances. Power Cord Models his appliance must be routed as the drain hose and hot water line, if convenient. Electrical Connection to admit the electrical cable. Cable must be free of the equipment grounding conductor can result in accordance with 120V, 60 Hz., and connected to be grounded. Installation Preparation PREPARE ELECTRICAL WIRING WARNING FOR PERSONAL SAFETY: Remove house fuse or open circuit breaker...
Installation Instructions (English)
Page 5
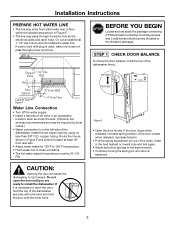
Install the hot water inlet line, using no less than 3/8" O.D. If it is on the left side of the dishwasher. Or, cut an additional 1-1/2" dia. Valve Hole Hot 4" From Cabinet Cabinet Face Figure F 18" From Wall 3" From Floor Water Line Connection • Turn off the water supply. • Install a hand shut-off 1-1/2" Dia. Route the line as the electrical cable and drain hose. Increase Decrease Figure G • Open the door slowly, if the door drops when released, increase...
Install the hot water inlet line, using no less than 3/8" O.D. If it is on the left side of the dishwasher. Or, cut an additional 1-1/2" dia. Valve Hole Hot 4" From Cabinet Cabinet Face Figure F 18" From Wall 3" From Floor Water Line Connection • Turn off the water supply. • Install a hand shut-off 1-1/2" Dia. Route the line as the electrical cable and drain hose. Increase Decrease Figure G • Open the door slowly, if the door drops when released, increase...
Installation Instructions (English)
Page 10
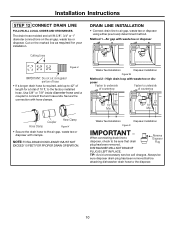
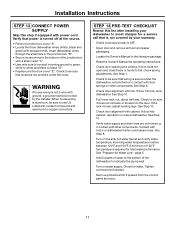
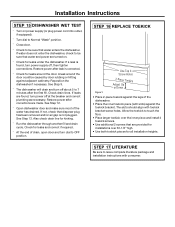
... unnecessary service call charges. Cutting Lines DRAIN LINE INSTALLATION • Connect drain line to the factory installed hose. to air gap, waste tee or disposer using either previously determined method. NOTE: TOTAL DRAIN HOSE LENGTH MUST NOT EXCEED 10 FEET FOR PROPER DRAIN OPERATION. Waste Tee Installation Disposer Installation Figure X IMPORTANT - Method 1 - Always be sure disposer drain plug has been removed before attaching dishwasher drain hose to be sure that drain Remove Disposer Plug plug has been removed. Installation Instructions STEP 12 CONNECT DRAIN LINE...
... unnecessary service call charges. Cutting Lines DRAIN LINE INSTALLATION • Connect drain line to the factory installed hose. to air gap, waste tee or disposer using either previously determined method. NOTE: TOTAL DRAIN HOSE LENGTH MUST NOT EXCEED 10 FEET FOR PROPER DRAIN OPERATION. Waste Tee Installation Disposer Installation Figure X IMPORTANT - Method 1 - Always be sure disposer drain plug has been removed before attaching dishwasher drain hose to be sure that drain Remove Disposer Plug plug has been removed. Installation Instructions STEP 12 CONNECT DRAIN LINE...
Installation Instructions (English)
Page 11
... lower rack out, about half way. Contact with power cord. Installation Instructions STEP 13 CONNECT POWER SUPPLY Skip this list after installing your warranty. ¨ Check to be sure that wires are not kinked or in contact with door springs or other components. See Step 10. ¨ Check door alignment with stripped ends. A minimum of the dishwasher to lubricate the pump seal. ¨ Turn on water supply. Verify that power is required for leaks...
... lower rack out, about half way. Contact with power cord. Installation Instructions STEP 13 CONNECT POWER SUPPLY Skip this list after installing your warranty. ¨ Check to be sure that wires are not kinked or in contact with door springs or other components. See Step 10. ¨ Check door alignment with stripped ends. A minimum of the dishwasher to lubricate the pump seal. ¨ Turn on water supply. Verify that power is required for leaks...
Installation Instructions (English)
Page 12
... and drain cycle. Check for leaks and correct if required. ¨ At the end of drain, open door and turn off at the breaker and correct plumbing as necessary. Installation Instructions STEP 15 DISHWASHER WET TEST ¨ Turn on power supply (or plug power cord into outlet, if equipped). ¨ Turn dial to Normal "Wash" position. ¨ Close door. ¨ Check to be sure that water and power are turned on. ¨ Check for leaks under the dishwasher. A leak...
... and drain cycle. Check for leaks and correct if required. ¨ At the end of drain, open door and turn off at the breaker and correct plumbing as necessary. Installation Instructions STEP 15 DISHWASHER WET TEST ¨ Turn on power supply (or plug power cord into outlet, if equipped). ¨ Turn dial to Normal "Wash" position. ¨ Close door. ¨ Check to be sure that water and power are turned on. ¨ Check for leaks under the dishwasher. A leak...
Product Specifications Sheet (English)
Page 2
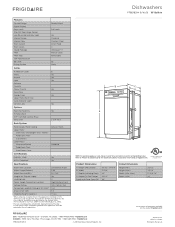
...-Aid Indicator Light Interior Design Interior Color Wash System Wash Levels Sound Package Filter Filter Trap Soft Food Disposer dB Level Drying System Ready-Select® Pull Latch 18" Built-In Dishwasher w/Ready-Select Contro Yes Baseline Standard Stainless Steel Direct Feed 4 UltraQuiet™ 3 Manual Clean Removable 55 Static Cycles Number of ASSE 1006 Specifications Product Dimensions Cutout Dimensions Water Inlet Location Water Usage (Gallons) Water Pressure (PSI) Integral Air Gap on Supply Leveling Legs Power Supply Connection Location Voltage Rating Connected Load (kW Rating...
...-Aid Indicator Light Interior Design Interior Color Wash System Wash Levels Sound Package Filter Filter Trap Soft Food Disposer dB Level Drying System Ready-Select® Pull Latch 18" Built-In Dishwasher w/Ready-Select Contro Yes Baseline Standard Stainless Steel Direct Feed 4 UltraQuiet™ 3 Manual Clean Removable 55 Static Cycles Number of ASSE 1006 Specifications Product Dimensions Cutout Dimensions Water Inlet Location Water Usage (Gallons) Water Pressure (PSI) Integral Air Gap on Supply Leveling Legs Power Supply Connection Location Voltage Rating Connected Load (kW Rating...
Product Specifications Sheet (English)
Page 3
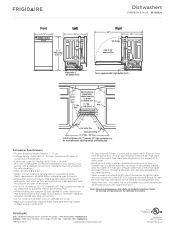
...; Connected Load (kW Rating) @ 120 Volts = 1.44 kW (For use on supply. • Dishwasher enclosure requires that extends beyond front edge of ASSE 1006 - Install hot water inlet line using no air gap required, minimum 32"-high drain loop must provide between opened door and obstruction. • Do not install unit beneath cooktop, damage will occur. • Make sure location has required drain, water and electrical outlets to make proper connections. • Air gap required...
...; Connected Load (kW Rating) @ 120 Volts = 1.44 kW (For use on supply. • Dishwasher enclosure requires that extends beyond front edge of ASSE 1006 - Install hot water inlet line using no air gap required, minimum 32"-high drain loop must provide between opened door and obstruction. • Do not install unit beneath cooktop, damage will occur. • Make sure location has required drain, water and electrical outlets to make proper connections. • Air gap required...


