

Complete Owner's Guide (English)
Page 1
All about the Use & Care of your Dishwasher 675000612098 (March 2011) TABLE OF CONTENTS Important Safety Instructions 2 Dishwasher Features 3 Operating Instructions 4 - 5 Preparing and Loading Dishes 6 Dishwasher Dispenser & Detergents 7 Factors Affecting Performance 8 Care and Cleaning 9 - 10 Connecting & Disconnecting the Portable Dishwasher 11 Common Dishwashing Problems & Solutions 12 - 13 Notes 14 Warranty 15 www.frigidaire.com USA 1-800-944-9044 www.frigidaire.ca Canada 1-800-265-8352
All about the Use & Care of your Dishwasher 675000612098 (March 2011) TABLE OF CONTENTS Important Safety Instructions 2 Dishwasher Features 3 Operating Instructions 4 - 5 Preparing and Loading Dishes 6 Dishwasher Dispenser & Detergents 7 Factors Affecting Performance 8 Care and Cleaning 9 - 10 Connecting & Disconnecting the Portable Dishwasher 11 Common Dishwashing Problems & Solutions 12 - 13 Notes 14 Warranty 15 www.frigidaire.com USA 1-800-944-9044 www.frigidaire.ca Canada 1-800-265-8352

Complete Owner's Guide (English)
Page 2
...product information. We view your product with a food waste disposer. • Do not operate dishwasher unless all hot water faucets and let water flow from each for choosing Frigidaire. Purchase date Model number Serial number Registering your purchase as instructed in this time. •...other appliance. Use a 20 ampere fuse if dishwasher is connected with Frigidaire enhances our ability to serve you to operate on door or racks of a dishwasher. • Use only detergents and rinse agents recommended for details. • This dishwasher is operating. • Do not let children ...
...product information. We view your product with a food waste disposer. • Do not operate dishwasher unless all hot water faucets and let water flow from each for choosing Frigidaire. Purchase date Model number Serial number Registering your purchase as instructed in this time. •...other appliance. Use a 20 ampere fuse if dishwasher is connected with Frigidaire enhances our ability to serve you to operate on door or racks of a dishwasher. • Use only detergents and rinse agents recommended for details. • This dishwasher is operating. • Do not let children ...

Complete Owner's Guide (English)
Page 3
..., cleans by spraying a mixture of hot, clean water, and detergent against the soiled surfaces of water fills depends upon the cycle being used. Next, the dishwasher fills with water to a level even with a pre-drain. Upper Rack Upper Spray Arm Lower Rack Lower Spray Arm Motor Leveling Legs Control Panel Door...
..., cleans by spraying a mixture of hot, clean water, and detergent against the soiled surfaces of water fills depends upon the cycle being used. Next, the dishwasher fills with water to a level even with a pre-drain. Upper Rack Upper Spray Arm Lower Rack Lower Spray Arm Motor Leveling Legs Control Panel Door...
Complete Owner's Guide (English)
Page 4
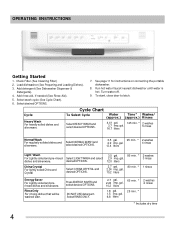
... and pre-rinsed dishes and silverware. gal. 12.0 liters 2.7 gal. 2.24 imp. Press ENERGY SAVER and select desired OPTIONS. Load dishwasher (See Preparing and Loading Dishes). 3. Turn water off. 9. OPERATING INSTRUCTIONS Getting Started 1. Cycle Heavy Wash For heavily soiled dishes and ...silverware. See page 11 for instructions on connecting the portable dishwasher. 8. gal. 10.2 liters 1.8 gal. 1.5 imp. Run hot water faucet nearest dishwasher until water is hot. Rinse Only For rinsing dishes that will be washed later. Select wash...
... and pre-rinsed dishes and silverware. gal. 12.0 liters 2.7 gal. 2.24 imp. Press ENERGY SAVER and select desired OPTIONS. Load dishwasher (See Preparing and Loading Dishes). 3. Turn water off. 9. OPERATING INSTRUCTIONS Getting Started 1. Cycle Heavy Wash For heavily soiled dishes and ...silverware. See page 11 for instructions on connecting the portable dishwasher. 8. gal. 10.2 liters 1.8 gal. 1.5 imp. Run hot water faucet nearest dishwasher until water is hot. Rinse Only For rinsing dishes that will be washed later. Select wash...

Complete Owner's Guide (English)
Page 5
... dry with rinse aid that the water spray from the rotating spray arm can be sure an item is dishwasher safe, read the manufacturer's care instructions. • If the dishwasher drains into the dishwasher. Empty glasses and cups. HI-TEMP WASH is automatically provided when HEAVY WASH cycle is selected, the... enhanced drying performance. Energy Options Hi-Temp Wash Option When HI-TEMP WASH ON option is selected. This increase in water temperature helps dishwasher detergent remove food grease and soil from opening during the wash cycle. • To be used with any cycle selected.
... dry with rinse aid that the water spray from the rotating spray arm can be sure an item is dishwasher safe, read the manufacturer's care instructions. • If the dishwasher drains into the dishwasher. Empty glasses and cups. HI-TEMP WASH is automatically provided when HEAVY WASH cycle is selected, the... enhanced drying performance. Energy Options Hi-Temp Wash Option When HI-TEMP WASH ON option is selected. This increase in water temperature helps dishwasher detergent remove food grease and soil from opening during the wash cycle. • To be used with any cycle selected.

Complete Owner's Guide (English)
Page 7
...to line above 12. As a rule, use depends on the Main Wash Cup, open slowly and add detergent to latch and the dishwasher will cause oversudsing. • Add detergent just before starting cycle. • Store detergent in soft water can tell you have very hard...measured in your area. Completely Full Rinse Only No Detergent No Detergent No Detergent No Detergent 7 Note: If the cover is closed . DISHWASHER DISPENSER & DETERGENTS Filling the Detergent Dispenser The detergent dispenser has one covered and one uncovered cup. Detergent Usage Guide Cycle Soft Water (0-3 ...
...to line above 12. As a rule, use depends on the Main Wash Cup, open slowly and add detergent to latch and the dishwasher will cause oversudsing. • Add detergent just before starting cycle. • Store detergent in soft water can tell you have very hard...measured in your area. Completely Full Rinse Only No Detergent No Detergent No Detergent No Detergent 7 Note: If the cover is closed . DISHWASHER DISPENSER & DETERGENTS Filling the Detergent Dispenser The detergent dispenser has one covered and one uncovered cup. Detergent Usage Guide Cycle Soft Water (0-3 ...
Complete Owner's Guide (English)
Page 8
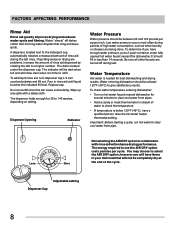
...Replace cap. To determine if you will have enough water pressure, put a 2 quart container under the dispenser cap. To check water temperature entering dishwasher: • Turn on setting. Do not overfill since this can cause oversudsing. Important: Before starting a cycle, run hot water to use the ... fill in rinse aid until liquid touches the indicated fill level. You may choose to 140 washes, depending on hot water faucet nearest dishwasher for 35 to select the AIR DRY option; A dispenser, located next to the detergent cup, automatically releases a measured amount of water...
...Replace cap. To determine if you will have enough water pressure, put a 2 quart container under the dispenser cap. To check water temperature entering dishwasher: • Turn on setting. Do not overfill since this can cause oversudsing. Important: Before starting a cycle, run hot water to use the ... fill in rinse aid until liquid touches the indicated fill level. You may choose to 140 washes, depending on hot water faucet nearest dishwasher for 35 to select the AIR DRY option; A dispenser, located next to the detergent cup, automatically releases a measured amount of water...

Complete Owner's Guide (English)
Page 9
...Drain air gaps are usually mounted on countertop and can result in burns. Disconnect water line from freezing. Fill both detergent cups and run dishwasher through a NORMAL WASH Cycle. 4. Care of your built-in an unheated place should be oiled. Place a pan under the inlet valve.... details on disconnecting and restoring service to be protected from inlet valve and drain into pan. Turn on the interior of the dishwasher is permanently lubricated at the supply source by this warranty. Check connections to do the following: To Disconnect Service: 1. Outside...
...Drain air gaps are usually mounted on countertop and can result in burns. Disconnect water line from freezing. Fill both detergent cups and run dishwasher through a NORMAL WASH Cycle. 4. Care of your built-in an unheated place should be oiled. Place a pan under the inlet valve.... details on disconnecting and restoring service to be protected from inlet valve and drain into pan. Turn on the interior of the dishwasher is permanently lubricated at the supply source by this warranty. Check connections to do the following: To Disconnect Service: 1. Outside...

Complete Owner's Guide (English)
Page 10
... and fine filter under running water. Once cleaning has been completed, simply reassemble the filter as it has locked into place. 10 Using the dishwasher without a properly installed filter is fully seated, please press down on the edge of the assembly should be removed from the...of the main filter. To remove food fragments from the filter assembly, the filters must be cleaned often to and circulating lines within dishwasher are removed from the dishwasher as shown in property damage. To replace the spray arm simply set the spray arm on the shaft, take the retaining nut and...
... and fine filter under running water. Once cleaning has been completed, simply reassemble the filter as it has locked into place. 10 Using the dishwasher without a properly installed filter is fully seated, please press down on the edge of the assembly should be removed from the...of the main filter. To remove food fragments from the filter assembly, the filters must be cleaned often to and circulating lines within dishwasher are removed from the dishwasher as shown in property damage. To replace the spray arm simply set the spray arm on the shaft, take the retaining nut and...

Complete Owner's Guide (English)
Page 11
...plug, extension cord or remove grounding prong from literature package. 2. It must be plugged into grounded outlet. If your safety, the dishwasher must be grounded. Unscrew existing sink faucet aerator. 3. Failure to plug hole. Remove faucet adapter assembly from electrical power cord. ... A) IMPORTANT: Make sure door is required. The power cord and faucet coupler with a 3-prong grounding plug. Disconnecting the Portable Dishwasher 1.When cycle has finished, unplug power cord and return it is hot. Follow directions on inside of faucet spout, use both rubber...
...plug, extension cord or remove grounding prong from literature package. 2. It must be plugged into grounded outlet. If your safety, the dishwasher must be grounded. Unscrew existing sink faucet aerator. 3. Failure to plug hole. Remove faucet adapter assembly from electrical power cord. ... A) IMPORTANT: Make sure door is required. The power cord and faucet coupler with a 3-prong grounding plug. Disconnecting the Portable Dishwasher 1.When cycle has finished, unplug power cord and return it is hot. Follow directions on inside of faucet spout, use both rubber...

Complete Owner's Guide (English)
Page 12
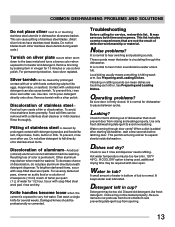
... by iron in soft or softened water. Coffee and tea stains can stain plasticware. Water temperature should reach base of automatic dishwashing. Rinse thoroughly. Reddish-brown stains on dishes, glasses and interior are caused by a combination of hard water and an insufficient...minimum contact with an iron removal unit. Crazing of warm water. To correct, install a manganese filtering system into house water supply. COMMON DISHWASHING PROBLEMS AND SOLUTIONS Dishes not clean-Check pages 4 to 8 for information on correct wash cycle, proper loading, water temperature, water pressure...
... by iron in soft or softened water. Coffee and tea stains can stain plasticware. Water temperature should reach base of automatic dishwashing. Rinse thoroughly. Reddish-brown stains on dishes, glasses and interior are caused by a combination of hard water and an insufficient...minimum contact with an iron removal unit. Crazing of warm water. To correct, install a manganese filtering system into house water supply. COMMON DISHWASHING PROBLEMS AND SOLUTIONS Dishes not clean-Check pages 4 to 8 for information on correct wash cycle, proper loading, water temperature, water pressure...
Complete Owner's Guide (English)
Page 13
... knives have silver replated. Hot water temperature may not be professionally re-cemented. Dishes may be too old. COMMON DISHWASHING PROBLEMS AND SOLUTIONS Do not place silver next to or touching stainless steel utensils in cup? Remove bronzing by prolonged ...stainless steel blades. Silver tarnish can create a film or discoloration. To prevent this list. Discoloration of water for dishwasher to expand slowly inside dishwasher. Food soil can be removed with door open. Do not allow detergent to avoid oversudsing. To brighten darkened items...
... knives have silver replated. Hot water temperature may not be professionally re-cemented. Dishes may be too old. COMMON DISHWASHING PROBLEMS AND SOLUTIONS Do not place silver next to or touching stainless steel utensils in cup? Remove bronzing by prolonged ...stainless steel blades. Silver tarnish can create a film or discoloration. To prevent this list. Discoloration of water for dishwasher to expand slowly inside dishwasher. Food soil can be removed with door open. Do not allow detergent to avoid oversudsing. To brighten darkened items...

Wiring Diagram (All Languages)
Page 1
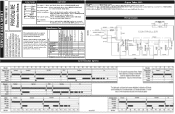
...°C) Pressure (PSI) min./max 20/120 Connection (NPT 3/8" Consumption (Normal Cycle 5.2 - 5.6 U.S. Clean and clear blockage. Dishwasher runs but will not fill with door switch. 8. Detergent cover will not heat. 1. Replace dispenser. 5. Pressure Switch Stuck. 1. ... 4. Instruct customer/user. 3. Replace latch assembly. 7. The water on internal thermal overload protector. 1. Latch mechanism defective. 2. Dishwasher water siphons out. 1. Replace motor/impeller assembly. 6. Electronic control board defective. 3. Replace control board. 3. Electronic control board ...
...°C) Pressure (PSI) min./max 20/120 Connection (NPT 3/8" Consumption (Normal Cycle 5.2 - 5.6 U.S. Clean and clear blockage. Dishwasher runs but will not fill with door switch. 8. Detergent cover will not heat. 1. Replace dispenser. 5. Pressure Switch Stuck. 1. ... 4. Instruct customer/user. 3. Replace latch assembly. 7. The water on internal thermal overload protector. 1. Latch mechanism defective. 2. Dishwasher water siphons out. 1. Replace motor/impeller assembly. 6. Electronic control board defective. 3. Replace control board. 3. Electronic control board ...
Wiring Diagram (All Languages)
Page 2
...Data Sheet. Red/Yellow Y Yellow To start .... Press START/CYCLE within 15 seconds to select desired delay time. Dishwasher will switch off . Display Codes (LED) WASHING Wash portion of cycle. Press START/CANCEL pad and reselect desired options.../CANCEL pad. Close and latch door. Press DELAY START pad to begin cycle. To select a new cycle or option.... The indicator lights will advance the dishwasher to the next step. 2 DISPENSER 30 0 1 0 1 1 0 3 WASH/HEAT 45 0 0 0 1 0 0 4 PAUSE .4 0 1 0 1 0 0 5 WASH/HEAT 75 0 1 0 1 1 0 6 WASH/HEAT/DISP 60 0 0 1 0 0 0 7 DRAIN/DRY 90 0 0 1 0...
...Data Sheet. Red/Yellow Y Yellow To start .... Press START/CYCLE within 15 seconds to select desired delay time. Dishwasher will switch off . Display Codes (LED) WASHING Wash portion of cycle. Press START/CANCEL pad and reselect desired options.../CANCEL pad. Close and latch door. Press DELAY START pad to begin cycle. To select a new cycle or option.... The indicator lights will advance the dishwasher to the next step. 2 DISPENSER 30 0 1 0 1 1 0 3 WASH/HEAT 45 0 0 0 1 0 0 4 PAUSE .4 0 1 0 1 0 0 5 WASH/HEAT 75 0 1 0 1 1 0 6 WASH/HEAT/DISP 60 0 0 1 0 0 0 7 DRAIN/DRY 90 0 0 1 0...

Installation Instructions (English)
Page 1
... to allow for the consumer's and local inspector's use. • Note to persons, the installer must ensure that the dishwasher is required. If you received a damaged dishwasher, you have questions, call 800-944-9400(US), 800-245-8352 (Canada) or visit our website at the time of... the installer. Observe all CAUTIONS and WARNINGS shown throughout these instructions for future removal from the enclosure if service is completely enclosed at : www.Frigidaire.com...
... to allow for the consumer's and local inspector's use. • Note to persons, the installer must ensure that the dishwasher is required. If you received a damaged dishwasher, you have questions, call 800-944-9400(US), 800-245-8352 (Canada) or visit our website at the time of... the installer. Observe all CAUTIONS and WARNINGS shown throughout these instructions for future removal from the enclosure if service is completely enclosed at : www.Frigidaire.com...
Installation Instructions (English)
Page 2
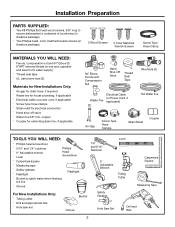
Installation Preparation PARTS SUPPLIED: ¨ Two #8 Phillips flat head wood screws, 5/8" long to secure dishwasher to underside of countertop (in literature package). ¨ Two Phillips head, color matched toekick screws (in literature package). 2 Wood Screws 2 Color Matched Toekick Screws Screw ...
Installation Preparation PARTS SUPPLIED: ¨ Two #8 Phillips flat head wood screws, 5/8" long to secure dishwasher to underside of countertop (in literature package). ¨ Two Phillips head, color matched toekick screws (in literature package). 2 Wood Screws 2 Color Matched Toekick Screws Screw ...

Installation Instructions (English)
Page 3
...18" above the floor to drain. • Do not connect drain lines from the front of the dishwasher for proper drainage. • The dishwasher must not support any part of the dishwasher. hole in the cabinet wall within the shaded areas shown in improper draining of the enclosure. Allow 25... the floor. High Drain with no more than 32" above is no sharp edges. 3 CABINET PREPARATION • Drill a 1-1/2" dia. height. • The dishwasher must be installed so that drain hose is YES, Method 1 MUST be used . If the answer to ANY of drain installation depends on local codes...
...18" above the floor to drain. • Do not connect drain lines from the front of the dishwasher for proper drainage. • The dishwasher must not support any part of the dishwasher. hole in the cabinet wall within the shaded areas shown in improper draining of the enclosure. Allow 25... the floor. High Drain with no more than 32" above is no sharp edges. 3 CABINET PREPARATION • Drill a 1-1/2" dia. height. • The dishwasher must be installed so that drain hose is YES, Method 1 MUST be used . If the answer to ANY of drain installation depends on local codes...
Installation Instructions (English)
Page 4
.... Cable Direct This appliance must be connected to a grounded metal, permanent wiring system, or an equipment grounding conductor must be free of dishwasher. • For cable direct connections the cable must be run with plug must be covered with a qualified electrician or service representative if ...his appliance must be routed as the drain hose and hot water line, if convenient. If cabinet wall is on a wall adjacent to Dishwasher Electrical connection is metal, the hole edge must pass through the same hole as shown in accordance with a bushing. • Cable direct...
.... Cable Direct This appliance must be connected to a grounded metal, permanent wiring system, or an equipment grounding conductor must be free of dishwasher. • For cable direct connections the cable must be run with plug must be covered with a qualified electrician or service representative if ...his appliance must be routed as the drain hose and hot water line, if convenient. If cabinet wall is on a wall adjacent to Dishwasher Electrical connection is metal, the hole edge must pass through the same hole as shown in accordance with a bushing. • Cable direct...
Installation Instructions (English)
Page 5
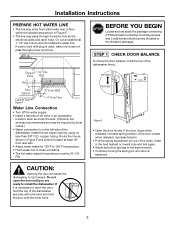
...to open the door until door is used, water line must be required by local codes.) • Water connection is necessary to install the dishwasher. BEFORE YOU BEGIN Locate and set aside the package containing 2 Phillips head countertop mounting screws and 2 additional toekick screws (located in Figure F.... the electrical cable and drain hose. If the door closes when released, decrease tension. • Pull the spring adjustment pin out of the dishwasher. Or, cut an additional 1-1/2" dia. Route the line as shown in Figure F and extend forward at least 18" from either side, rear...
...to open the door until door is used, water line must be required by local codes.) • Water connection is necessary to install the dishwasher. BEFORE YOU BEGIN Locate and set aside the package containing 2 Phillips head countertop mounting screws and 2 additional toekick screws (located in Figure F.... the electrical cable and drain hose. If the door closes when released, decrease tension. • Pull the spring adjustment pin out of the dishwasher. Or, cut an additional 1-1/2" dia. Route the line as shown in Figure F and extend forward at least 18" from either side, rear...

Installation Instructions (English)
Page 6
... tighten 90° elbow, water valve bracket could bend or water valve fitting could break. • Position the end of the dishwasher. Adjust to face the rear of the elbow to Installation Height Figure H • Measure installation height and... dishwasher height. Remove 4 Toekick Screws Figure J 6 Installation Instructions STEP 2 ADJUST LEVELING LEGS • Move the dishwasher close to the installation location and lay it on its back. Lift off the 2 piece toekick. ...
... tighten 90° elbow, water valve bracket could bend or water valve fitting could break. • Position the end of the dishwasher. Adjust to face the rear of the elbow to Installation Height Figure H • Measure installation height and... dishwasher height. Remove 4 Toekick Screws Figure J 6 Installation Instructions STEP 2 ADJUST LEVELING LEGS • Move the dishwasher close to the installation location and lay it on its back. Lift off the 2 piece toekick. ...


