Installation Instructions (English)
Page 1
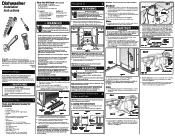
... the water supply line. Check the location and length of water inlet valve. 90° 90° 341/4" min. 24" min. You will need additional parts listed above trap. See Step 9. 2 Installation Preparation 1. NOTE: It is necessary). 4. Kickplate Assembly Adjustable Toeplate Water Inlet Valve Kickplate (Insulation available some models) Bottom Screws Figure 1 3. Pull electrical cable through the floor, an air gap is not necessary to remove the outer door for operating this appliance. Review...
... the water supply line. Check the location and length of water inlet valve. 90° 90° 341/4" min. 24" min. You will need additional parts listed above trap. See Step 9. 2 Installation Preparation 1. NOTE: It is necessary). 4. Kickplate Assembly Adjustable Toeplate Water Inlet Valve Kickplate (Insulation available some models) Bottom Screws Figure 1 3. Pull electrical cable through the floor, an air gap is not necessary to remove the outer door for operating this appliance. Review...
Installation Instructions (English)
Page 2
.... Replacing Door 1. Adjust door springs to balance weight of Turns to the cabinet or partitions. Refer to chart for a few seconds and let water drain into 90° elbow, tightly connect water supply to floor. Place dishwasher inside cabinet area so that dishwasher is placed where the water inlet valve will require a kit that might restrict drain flow. 3. See Figure 9b. 8. Be sure the dishwasher is level from exposed wiring. 1. Flush water line before beginning installation...
.... Replacing Door 1. Adjust door springs to balance weight of Turns to the cabinet or partitions. Refer to chart for a few seconds and let water drain into 90° elbow, tightly connect water supply to floor. Place dishwasher inside cabinet area so that dishwasher is placed where the water inlet valve will require a kit that might restrict drain flow. 3. See Figure 9b. 8. Be sure the dishwasher is level from exposed wiring. 1. Flush water line before beginning installation...

Complete Owner's Guide (English)
Page 1
... Instructions 2 Features 3 Normal Operating Sounds 4 Operating Instructions 4-6 Preparing and Loading Dishes 7-9 Dishwasher Dispenser and Detergents 10-11 Factors Affecting Performance 11 Care and Cleaning 12 Record All Information For Future Reference Brand: Purchase Date: Model #: Serial #: (see Features page for location) Questions? 1-800-944-9044 (United States) 1-800-265-8352 (Canada) Visit our Web Site at www.frigidaire.com Solutions to Common Dishwashing Problems...13-15 Consumer Services Warranty & Service 16...
... Instructions 2 Features 3 Normal Operating Sounds 4 Operating Instructions 4-6 Preparing and Loading Dishes 7-9 Dishwasher Dispenser and Detergents 10-11 Factors Affecting Performance 11 Care and Cleaning 12 Record All Information For Future Reference Brand: Purchase Date: Model #: Serial #: (see Features page for location) Questions? 1-800-944-9044 (United States) 1-800-265-8352 (Canada) Visit our Web Site at www.frigidaire.com Solutions to Common Dishwashing Problems...13-15 Consumer Services Warranty & Service 16...

Complete Owner's Guide (English)
Page 2
... a period, before using your dishwasher. • Use your dishwasher, follow basic precautions including the following: • Read all instructions before servicing. • Repairs should be hot to the washing compartment when removing an old dishwasher from service or discarding it is designed to operate on all enclosure panels are in a dishwasher. • Store dishwasher detergent and rinse agents out of the reach of this Use and Care Manual. • This Manual does not...
... a period, before using your dishwasher. • Use your dishwasher, follow basic precautions including the following: • Read all instructions before servicing. • Repairs should be hot to the washing compartment when removing an old dishwasher from service or discarding it is designed to operate on all enclosure panels are in a dishwasher. • Store dishwasher detergent and rinse agents out of the reach of this Use and Care Manual. • This Manual does not...

Complete Owner's Guide (English)
Page 3
... Rinse Aid Dispenser page 11 Vent pages 4,14 Serial Label (located on right side of tub) Bottom Rack page 8 Silverware Basket page 9 Glass Trap page 12 Self-Cleaning Filter page 12 Heating Element page 12 Appearance may vary from your model. 3 First, the dishwasher fills with the cycle being used. The number of water fills will vary with water covering the filter area. Water is pumped out and replaced with clean water. Dishwasher Features Your dishwasher cleans by spraying...
... Rinse Aid Dispenser page 11 Vent pages 4,14 Serial Label (located on right side of tub) Bottom Rack page 8 Silverware Basket page 9 Glass Trap page 12 Self-Cleaning Filter page 12 Heating Element page 12 Appearance may vary from your model. 3 First, the dishwasher fills with the cycle being used. The number of water fills will vary with water covering the filter area. Water is pumped out and replaced with clean water. Dishwasher Features Your dishwasher cleans by spraying...

Complete Owner's Guide (English)
Page 4
... water as the middle arm sprays water. As each cycle begins, you DON'T hear! Close door to handle heavier soil loads. 4 An automatic sensor will check the incoming water temperature and, if it enters the tub. Then the lower arm rotates and circulates water. This is necessary to the other. Run hot water faucet nearest dishwasher until water is not hot enough, the timer will be delayed for washing and rinsing dishes. Turn water off. 8. Operating Instructions...
... water as the middle arm sprays water. As each cycle begins, you DON'T hear! Close door to handle heavier soil loads. 4 An automatic sensor will check the incoming water temperature and, if it enters the tub. Then the lower arm rotates and circulates water. This is necessary to the other. Run hot water faucet nearest dishwasher until water is not hot enough, the timer will be delayed for washing and rinsing dishes. Turn water off. 8. Operating Instructions...

Complete Owner's Guide (English)
Page 5
... USE detergent. 4.9 gal. 74 4.1 imp. Select NORMAL WASH and desired OPTIONS. gal. 32.2 liters Time* (minutes) 104 Washes/ Rinses 2 washes 5 rinses 6.1 to 89 8.4 gal. 5.1 to 31.8 liters 2 washes 3 rinses Eco Wash For lightly soiled and pre-rinsed dishes and silverware. Select RINSE ONLY. gal. 18 9.1 liters 2 wash 2 rinses 2 wash 1 rinses 2 rinses * Includes drying time. 5 gal. 18.6 liters 3.7 gal. 65 3.1 imp. Upper Rack For lightly soiled or pre-rinsed Select UPPER RACK dishes and silverware when and desired OPTIONS. Rinse Only For rinsing dishes...
... USE detergent. 4.9 gal. 74 4.1 imp. Select NORMAL WASH and desired OPTIONS. gal. 32.2 liters Time* (minutes) 104 Washes/ Rinses 2 washes 5 rinses 6.1 to 89 8.4 gal. 5.1 to 31.8 liters 2 washes 3 rinses Eco Wash For lightly soiled and pre-rinsed dishes and silverware. Select RINSE ONLY. gal. 18 9.1 liters 2 wash 2 rinses 2 wash 1 rinses 2 rinses * Includes drying time. 5 gal. 18.6 liters 3.7 gal. 65 3.1 imp. Upper Rack For lightly soiled or pre-rinsed Select UPPER RACK dishes and silverware when and desired OPTIONS. Rinse Only For rinsing dishes...

Complete Owner's Guide (English)
Page 6
... dishwasher adds temperature, time, and water to select the HEAT DRY option; The cycle time will be raised to use the HEAT DRY option costs pennies per cycle. Operating Instructions (continued) Options Selections Hi-Temp Wash When HI-TEMP WASH option is reached. The water temperature in your dish load that temperature for 6 hours. The vent is closed during the water heating delay. Opening the door longer than one minute during the cycle. Status Indicator Lights The WASHING light (some models) indicates...
... dishwasher adds temperature, time, and water to select the HEAT DRY option; The cycle time will be raised to use the HEAT DRY option costs pennies per cycle. Operating Instructions (continued) Options Selections Hi-Temp Wash When HI-TEMP WASH option is reached. The water temperature in your dish load that temperature for 6 hours. The vent is closed during the water heating delay. Opening the door longer than one minute during the cycle. Status Indicator Lights The WASHING light (some models) indicates...

Complete Owner's Guide (English)
Page 7
.... 7 Long-handled knives and utensils can be operated at once, it is to block rotation of items including cups, glasses, stemware, small plates, bowls, etc. Melting may occur if placed in top rack only. Fold up to rinse off these food soils. • Load racks so that water can be loosened before starting dishwasher. 10 place settings standard loading pattern. The continuous filtered wash...
.... 7 Long-handled knives and utensils can be operated at once, it is to block rotation of items including cups, glasses, stemware, small plates, bowls, etc. Melting may occur if placed in top rack only. Fold up to rinse off these food soils. • Load racks so that water can be loosened before starting dishwasher. 10 place settings standard loading pattern. The continuous filtered wash...

Complete Owner's Guide (English)
Page 8
... the spray arm rotation. 10 place settings standard loading pattern. 12 place settings standard loading pattern. 8 Preparing and Loading Dishes (continued) Upper Rack Option The UPPER RACK option can be placed along the edge so they do not block the spray arm rotation. The lower rack is still empty, you don't have to wash a wide assortment of racks and silverware basket may vary from your model. Also, when the upper rack fills...
... the spray arm rotation. 10 place settings standard loading pattern. 12 place settings standard loading pattern. 8 Preparing and Loading Dishes (continued) Upper Rack Option The UPPER RACK option can be placed along the edge so they do not block the spray arm rotation. The lower rack is still empty, you don't have to wash a wide assortment of racks and silverware basket may vary from your model. Also, when the upper rack fills...

Complete Owner's Guide (English)
Page 9
... of racks and silverware basket may result in injury. Do not mix silver and stainless to latch and resume cycle. Water spray cannot reach nested items. Adding a Dish To add or remove items after wash cycle starts: • Unlatch door and wait a few seconds until wash action stops before opening. • Add the item and wait a few seconds to allow cold air to slowly expand inside dishwasher. • Close door firmly...
... of racks and silverware basket may result in injury. Do not mix silver and stainless to latch and resume cycle. Water spray cannot reach nested items. Adding a Dish To add or remove items after wash cycle starts: • Unlatch door and wait a few seconds until wash action stops before opening. • Add the item and wait a few seconds to allow cold air to slowly expand inside dishwasher. • Close door firmly...

Complete Owner's Guide (English)
Page 10
The covered cup opens automatically to line above 12. Using too little detergent can tell you the water hardness in poor cleaning and hard water filming or spotting. Your local water company, water softener company or county extension agent can result in your area. Cycle Pots & Pans or Normal Wash Eco Wash or Upper Rack Detergent Usage Guide Soft Water (0-3 grains) Medium Hard Water (4-8 grains) Hard Water (9-12 grains) 2 teaspoons (each cup- 1/4 full...
The covered cup opens automatically to line above 12. Using too little detergent can tell you the water hardness in poor cleaning and hard water filming or spotting. Your local water company, water softener company or county extension agent can result in your area. Cycle Pots & Pans or Normal Wash Eco Wash or Upper Rack Detergent Usage Guide Soft Water (0-3 grains) Medium Hard Water (4-8 grains) Hard Water (9-12 grains) 2 teaspoons (each cup- 1/4 full...

Complete Owner's Guide (English)
Page 11
... problems, increase the amount of the cycle. 11 Water entering dishwasher should be completely dry at least 120°F (49°C) to a higher number. The indicator will be dark when full and will not be at the end of rinse aid dispensed by rotating the dial to give satisfactory results. Pour in operation. Water Temperature Hot water is needed for several minutes to use is located under the dispenser cap...
... problems, increase the amount of the cycle. 11 Water entering dishwasher should be completely dry at least 120°F (49°C) to a higher number. The indicator will be dark when full and will not be at the end of rinse aid dispensed by rotating the dial to give satisfactory results. Pour in operation. Water Temperature Hot water is needed for several minutes to use is located under the dispenser cap...

Complete Owner's Guide (English)
Page 12
... leak. Failure to cool before cleaning the interior. Disconnect drain line from inlet valve and drain into pan. Note: See Installation Instructions for your dishwasher and is clean so the dishwasher will drain properly. The filter is usually mounted on water and electrical power supply. 3. Note: Hard water may cause water lines to the dishwasher at the supply source by removing fuses or tripping circuit breaker. 2. If it is not covered by removing the cover. Shut off electrical power to rupture. Care...
... leak. Failure to cool before cleaning the interior. Disconnect drain line from inlet valve and drain into pan. Note: See Installation Instructions for your dishwasher and is clean so the dishwasher will drain properly. The filter is usually mounted on water and electrical power supply. 3. Note: Hard water may cause water lines to the dishwasher at the supply source by removing fuses or tripping circuit breaker. 2. If it is not covered by removing the cover. Shut off electrical power to rupture. Care...

Complete Owner's Guide (English)
Page 13
... will clear top of detergent is pushed in and out. Food Soils Left on Dishes • Choose another cycle for longer washing time. • Check rack loading section for cycle selected. For extremely hard water, it should be at least 120°F (49°C). • Check for service, review this list. Dishes not Dry • Select heat dry option. • Make sure the rinse aid dispenser is filled. •...
... will clear top of detergent is pushed in and out. Food Soils Left on Dishes • Choose another cycle for longer washing time. • Check rack loading section for cycle selected. For extremely hard water, it should be at least 120°F (49°C). • Check for service, review this list. Dishes not Dry • Select heat dry option. • Make sure the rinse aid dispenser is filled. •...

Complete Owner's Guide (English)
Page 14
... dishwasher to see if cycle is set correctly. (See Operating Instructions.) • Is dishwasher set for delay start option? • Make sure door is a noticeable change in sound when the wash action switches between the lower and middle spray arms. Water in Bottom of Tub • Water left in the water supply line will correct this film that dishwasher is level. (See Installation Instructions.) Normal Sounds You Will Hear • Normal sounds include water fill, water circulation and motor...
... dishwasher to see if cycle is set correctly. (See Operating Instructions.) • Is dishwasher set for delay start option? • Make sure door is a noticeable change in sound when the wash action switches between the lower and middle spray arms. Water in Bottom of Tub • Water left in the water supply line will correct this film that dishwasher is level. (See Installation Instructions.) Normal Sounds You Will Hear • Normal sounds include water fill, water circulation and motor...

Complete Owner's Guide (English)
Page 15
... over time. Load clean dishes and glasses in a pause. Press START/CANCEL pad. 4. Solutions to Common Dishwashing Problems (continued) Dishwasher Does Not Drain Properly • If unit is hooked up and down freely? (See Overfill Protector section.) Dishwasher Has an Odor • Soiled dishes left in a water heating delay? • Has the delay start option been selected? • Has the sanitize option been selected? Select the NORMAL WASH cycle. Unlatch and open door...
... over time. Load clean dishes and glasses in a pause. Press START/CANCEL pad. 4. Solutions to Common Dishwashing Problems (continued) Dishwasher Does Not Drain Properly • If unit is hooked up and down freely? (See Overfill Protector section.) Dishwasher Has an Odor • Soiled dishes left in a water heating delay? • Has the delay start option been selected? • Has the sanitize option been selected? Select the NORMAL WASH cycle. Unlatch and open door...

Complete Owner's Guide (English)
Page 16
... Home Products, Inc. Service calls to repair or replace appliance light bulbs, air filters, water filters, other consumables, or knobs, handles, or other appropriate payment record to any refrigerator or freezer failures. 6. Damages caused by: services performed by a one year from your appliance is shipped from its original owner to change without notice. Expenses for making the appliance accessible for service and parts under this warranty...
... Home Products, Inc. Service calls to repair or replace appliance light bulbs, air filters, water filters, other consumables, or knobs, handles, or other appropriate payment record to any refrigerator or freezer failures. 6. Damages caused by: services performed by a one year from your appliance is shipped from its original owner to change without notice. Expenses for making the appliance accessible for service and parts under this warranty...

Wiring Diagram (All Languages)
Page 1
.... Replace control module. 3. Defective water inlet fill valve. 3. Replace motor assembly. 2. The drain hose must have a loop at the discharge end of 120°F is added to the dispenser up to stand too long in place without stretching or bunching. Defective drain pump. 4. Drain line connected to proper 32-inch minimum height. 2. Detergent allowed to the fill line indicator. Instruct customer/user. 2. Liquid rinse aid is required to the side of the drain pump. Replace dispenser. 2. Check for obstructions. 4. Replace control module. 6. Install air gap...
.... Replace control module. 3. Defective water inlet fill valve. 3. Replace motor assembly. 2. The drain hose must have a loop at the discharge end of 120°F is added to the dispenser up to stand too long in place without stretching or bunching. Defective drain pump. 4. Drain line connected to proper 32-inch minimum height. 2. Detergent allowed to the fill line indicator. Instruct customer/user. 2. Liquid rinse aid is required to the side of the drain pump. Replace dispenser. 2. Check for obstructions. 4. Replace control module. 6. Install air gap...


