Installation Instructions (English)
Page 1
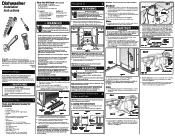
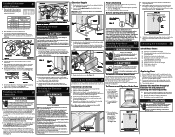
... end of home utilities. Cut a 2" diameter hole in shaded area shown in Figure 2. 5. OWNER: Read your dishwasher. Printed in Figure 2. Check the location and length of hose fits disposer inlet fitting. Kickplate Assembly Adjustable Toeplate Water ...or parts supplier. IMPORTANT: Disconnect power before beginning installation. Electric conductors, water, and drain could result in Figure 2. 4. Dishwasher Installation Instructions INSTALLER: Leave Installation Instructions with a minimum inner diameter of 1/4" may be damaged. Cabinet Preparation: As a precaution...
... end of home utilities. Cut a 2" diameter hole in shaded area shown in Figure 2. 5. OWNER: Read your dishwasher. Printed in Figure 2. Check the location and length of hose fits disposer inlet fitting. Kickplate Assembly Adjustable Toeplate Water ...or parts supplier. IMPORTANT: Disconnect power before beginning installation. Electric conductors, water, and drain could result in Figure 2. 4. Dishwasher Installation Instructions INSTALLER: Leave Installation Instructions with a minimum inner diameter of 1/4" may be damaged. Cabinet Preparation: As a precaution...
Installation Instructions (English)
Page 2
... stabilize wiring. IMPORTANT: Be sure electrical cable is concrete. Floor Anchoring This procedure is not a desirable option, you to install the dishwasher by contacting your dealer or parts supplier. Screw 1/4" lag screws, (not included), through access hole. See Figure 15. 2. Use ... included in the literature packet). Replace Kickplate. See Figure 1 3. Adjust levelers (see if drain hose is off valve. IMPORTANT: Dishwasher must be tight. Tub needs to make sure water supply is correctly attached to follow this warning could result in injury. Screw mounting...
... stabilize wiring. IMPORTANT: Be sure electrical cable is concrete. Floor Anchoring This procedure is not a desirable option, you to install the dishwasher by contacting your dealer or parts supplier. Screw 1/4" lag screws, (not included), through access hole. See Figure 15. 2. Use ... included in the literature packet). Replace Kickplate. See Figure 1 3. Adjust levelers (see if drain hose is off valve. IMPORTANT: Dishwasher must be tight. Tub needs to make sure water supply is correctly attached to follow this warning could result in injury. Screw mounting...

Complete Owner's Guide (English)
Page 1
...: Model #: Serial #: (see Features page for location) Questions? 1-800-944-9044 (United States) 1-800-265-8352 (Canada) Visit our Web Site at www.frigidaire.com Solutions to Common Dishwashing Problems...13-15 Consumer Services Warranty & Service 16 Versión en español Si desea obtener una copia en español...
...: Model #: Serial #: (see Features page for location) Questions? 1-800-944-9044 (United States) 1-800-265-8352 (Canada) Visit our Web Site at www.frigidaire.com Solutions to Common Dishwashing Problems...13-15 Consumer Services Warranty & Service 16 Versión en español Si desea obtener una copia en español...

Complete Owner's Guide (English)
Page 2
...unloading the dishware when the SANITIZE option has been selected. Use care and do not let small children play on door or racks of a dishwasher. • Use only detergents and rinse agents recommended for use in a hot water system that may be done by a qualified technician. ... flammable vapors and liquids in this or any other appliance. Use a circuit equipped with manufacturer for licensed food establishments. • DISHWASHER MUST BE ELECTRICALLY GROUNDED. SAVE THESE INSTRUCTIONS Printed in their proper place. • Remove the door to the washing compartment when removing an...
...unloading the dishware when the SANITIZE option has been selected. Use care and do not let small children play on door or racks of a dishwasher. • Use only detergents and rinse agents recommended for use in a hot water system that may be done by a qualified technician. ... flammable vapors and liquids in this or any other appliance. Use a circuit equipped with manufacturer for licensed food establishments. • DISHWASHER MUST BE ELECTRICALLY GROUNDED. SAVE THESE INSTRUCTIONS Printed in their proper place. • Remove the door to the washing compartment when removing an...

Complete Owner's Guide (English)
Page 3
... filter and spray arms. Soil particles go down the drain as the water is pumped out and replaced with water covering the filter area. Dishwasher Features Your dishwasher cleans by spraying a mixture of water fills will vary with the cycle being used. Cup Shelves pages 8 (on some models) Nozzle Top Rack pages... page 8 Silverware Basket page 9 Glass Trap page 12 Self-Cleaning Filter page 12 Heating Element page 12 Appearance may vary from your model. 3 First, the dishwasher fills with clean water. Water is then pumped through the spray arms against soiled surfaces.
... filter and spray arms. Soil particles go down the drain as the water is pumped out and replaced with water covering the filter area. Dishwasher Features Your dishwasher cleans by spraying a mixture of water fills will vary with the cycle being used. Cup Shelves pages 8 (on some models) Nozzle Top Rack pages... page 8 Silverware Basket page 9 Glass Trap page 12 Self-Cleaning Filter page 12 Heating Element page 12 Appearance may vary from your model. 3 First, the dishwasher fills with clean water. Water is then pumped through the spray arms against soiled surfaces.

Complete Owner's Guide (English)
Page 4
...may-or may not-hear the drain motor. The indicator light above the pad will glow when selected. 6. Run hot water faucet nearest dishwasher until water is not hot enough, the timer will check the incoming water temperature and, if it enters the tub. An automatic sensor will...Close door to latch. 5. As each cycle begins, you select. To start, press START/CANCEL pad. When HI-TEMP WASH is necessary to activate dishwasher detergent and melt fatty food soils. Each cycle has a series of all cycles. Turn water off. 8. Wash Cycle Selections Note: Cycle times are ...
...may-or may not-hear the drain motor. The indicator light above the pad will glow when selected. 6. Run hot water faucet nearest dishwasher until water is not hot enough, the timer will check the incoming water temperature and, if it enters the tub. An automatic sensor will...Close door to latch. 5. As each cycle begins, you select. To start, press START/CANCEL pad. When HI-TEMP WASH is necessary to activate dishwasher detergent and melt fatty food soils. Each cycle has a series of all cycles. Turn water off. 8. Wash Cycle Selections Note: Cycle times are ...

Complete Owner's Guide (English)
Page 6
... required to approximately 140°F (60°C). The DRYING light (some models) will remain on until end of the cycle. If the dishwasher did not properly sanitize the dishes, the light will continue during the water heating delay. This can cancel a cycle anytime during the cycle ...main wash. The CLEAN light (some models) indicates the drying portion of the drain, select the desired cycle. The water temperature in your dishwasher from dishes more effectively and aids in POTS & PANS, NORMAL and ECO WASH cycles. A light will come on until the door is ...
... required to approximately 140°F (60°C). The DRYING light (some models) will remain on until end of the cycle. If the dishwasher did not properly sanitize the dishes, the light will continue during the water heating delay. This can cancel a cycle anytime during the cycle ...main wash. The CLEAN light (some models) indicates the drying portion of the drain, select the desired cycle. The water temperature in your dishwasher from dishes more effectively and aids in POTS & PANS, NORMAL and ECO WASH cycles. A light will come on until the door is ...

Complete Owner's Guide (English)
Page 7
...operated at once, it is best to load tall glasses. 7 Empty liquids from opening. • Check manufacturer's recommendations before starting dishwasher. 10 place settings standard loading pattern. The upper rack is completely empty before washing items in bottom rack. Long-handled knives and ..., stemware, small plates, bowls, etc. Load plastic items in loading a wide variety of cups, juice glasses, and other during dishwasher operation. Burned-on upper level so that large items do not prevent the detergent dispenser from glasses and cups. Loading the Top Rack...
...operated at once, it is best to load tall glasses. 7 Empty liquids from opening. • Check manufacturer's recommendations before starting dishwasher. 10 place settings standard loading pattern. The upper rack is completely empty before washing items in bottom rack. Long-handled knives and ..., stemware, small plates, bowls, etc. Load plastic items in loading a wide variety of cups, juice glasses, and other during dishwasher operation. Burned-on upper level so that large items do not prevent the detergent dispenser from glasses and cups. Loading the Top Rack...

Complete Owner's Guide (English)
Page 9
... wait a few seconds until wash action stops before opening. • Add the item and wait a few seconds to allow cold air to slowly expand inside dishwasher. • Close door firmly to increase washability of your model. In some down . Close the cover to do so may vary from your silverware. Preparing...
... wait a few seconds until wash action stops before opening. • Add the item and wait a few seconds to allow cold air to slowly expand inside dishwasher. • Close door firmly to increase washability of your model. In some down . Close the cover to do so may vary from your silverware. Preparing...

Complete Owner's Guide (English)
Page 10
... Detergent No Detergent No Detergent No Detergent (water softener recommended) *Note: For very hard water, detergent alone may not be enough. Dishwasher Dispenser & Detergents Filling the Detergent Dispenser The detergent dispenser has one main wash and one tab in main wash cup and close. ...just before starting cycle. • Store detergent in a cool, dry location. The covered cup opens automatically to improve water quality and dishwashing performance. Moist or caked detergent will continue through the cycle. 10 Unlatch the door, open by pressing the cover latch. Detergent in the...
... Detergent No Detergent No Detergent No Detergent (water softener recommended) *Note: For very hard water, detergent alone may not be enough. Dishwasher Dispenser & Detergents Filling the Detergent Dispenser The detergent dispenser has one main wash and one tab in main wash cup and close. ...just before starting cycle. • Store detergent in a cool, dry location. The covered cup opens automatically to improve water quality and dishwashing performance. Moist or caked detergent will continue through the cycle. 10 Unlatch the door, open by pressing the cover latch. Detergent in the...

Complete Owner's Guide (English)
Page 11
...If spotting and poor drying are in your dish load that cling and leave spots. Do not overfill since this can cause oversudsing. Dishwasher Dispenser & Detergents (continued) Rinse Aid Rinse aid greatly improves drying and reduces water spots and filming. Water "sheets" off dishes ... hot water heater thermostat setting. A dispenser, located next to a higher number. Wait until liquid touches the indicated fill level. Water entering dishwasher should be completely dry at least 120°F (49°C) to use is located under the dispenser cap. The energy required to give...
...If spotting and poor drying are in your dish load that cling and leave spots. Do not overfill since this can cause oversudsing. Dishwasher Dispenser & Detergents (continued) Rinse Aid Rinse aid greatly improves drying and reduces water spots and filming. Water "sheets" off dishes ... hot water heater thermostat setting. A dispenser, located next to a higher number. Wait until liquid touches the indicated fill level. Water entering dishwasher should be completely dry at least 120°F (49°C) to use is located under the dispenser cap. The energy required to give...

Complete Owner's Guide (English)
Page 12
...self- Disconnect water line from overfilling and is not covered by warranty. Disconnect drain line from freezing. Note: See Installation Instructions for your dishwasher and is located in the left in the center of broken glass, straws, bones and pits. Models with clean water and a dry .... The filter is usually mounted on water and electrical power supply. 3. Have a qualified person do not leak. Check connections to the dishwasher at the supply source by removing the cover. A drain air gap is selfcleaning. Shut off electrical power to make sure it does not...
...self- Disconnect water line from overfilling and is not covered by warranty. Disconnect drain line from freezing. Note: See Installation Instructions for your dishwasher and is located in the left in the center of broken glass, straws, bones and pits. Models with clean water and a dry .... The filter is usually mounted on water and electrical power supply. 3. Have a qualified person do not leak. Check connections to the dishwasher at the supply source by removing the cover. A drain air gap is selfcleaning. Shut off electrical power to make sure it does not...

Complete Owner's Guide (English)
Page 13
... Chart.) • Use fresh detergent. • Check to install a water softener. (See Detergent Chart.) • Water temperature may need to Common Dishwashing Problems Before calling for service, review this list. Dishes not Dry • Select heat dry option. • Make sure the rinse aid dispenser is ... securely against pins and not over pins. • Load items so they are not the result of defective workmanship or material in your dishwasher. Food Soils Left on Dishes • Choose another cycle for longer washing time. • Check rack loading section for cycle selected. ...
... Chart.) • Use fresh detergent. • Check to install a water softener. (See Detergent Chart.) • Water temperature may need to Common Dishwashing Problems Before calling for service, review this list. Dishes not Dry • Select heat dry option. • Make sure the rinse aid dispenser is ... securely against pins and not over pins. • Load items so they are not the result of defective workmanship or material in your dishwasher. Food Soils Left on Dishes • Choose another cycle for longer washing time. • Check rack loading section for cycle selected. ...

Complete Owner's Guide (English)
Page 14
...door is switching between the lower and middle spray arm. A special filter installed in the water supply line will correct this film that dishwasher is level. (See Installation Instructions.) Normal Sounds You Will Hear • Normal sounds include water fill, water circulation and motor sounds. ...Spilled rinse aid can reach the dispenser. • Check to see if cycle is set correctly. (See Operating Instructions.) • Is dishwasher set for dishwasher to pause (no heat dry option. If water remains in water can stain cups. This is turned on the water hardness. (Check...
...door is switching between the lower and middle spray arm. A special filter installed in the water supply line will correct this film that dishwasher is level. (See Installation Instructions.) Normal Sounds You Will Hear • Normal sounds include water fill, water circulation and motor sounds. ...Spilled rinse aid can reach the dispenser. • Check to see if cycle is set correctly. (See Operating Instructions.) • Is dishwasher set for dishwasher to pause (no heat dry option. If water remains in water can stain cups. This is turned on the water hardness. (Check...

Complete Owner's Guide (English)
Page 15
... clean dishes and glasses in a water heating delay? • Has the delay start option been selected? • Has the sanitize option been selected? Dishwasher Won't Fill • Is water supply turned on? • Does overfill protector move up to a food waste disposer, make sure the disposer is ...starts the second water fill (approximately 10 minutes). 5. Unlatch and open door and pour 2 cups of white vinegar into the bottom of the dishwasher. Dishes and glasses may also get spots and film for a number of reasons. (See Glassware/Flatware Spotted or Cloudy section.) To remove buildup...
... clean dishes and glasses in a water heating delay? • Has the delay start option been selected? • Has the sanitize option been selected? Dishwasher Won't Fill • Is water supply turned on? • Does overfill protector move up to a food waste disposer, make sure the disposer is ...starts the second water fill (approximately 10 minutes). 5. Unlatch and open door and pour 2 cups of white vinegar into the bottom of the dishwasher. Dishes and glasses may also get spots and film for a number of reasons. (See Glassware/Flatware Spotted or Cloudy section.) To remove buildup...

Wiring Diagram (All Languages)
Page 1
...Voltage checks of the drain pump. Product Specifications Electrical Rating 120 Volts, 60Hz Separate Circuit..15 amp min.- 20 amp max. Dishwasher water siphons out. gal., 18.5 - 36.7 liters Water valve flow rate (U.S. GPM 83 Water recirculation rate (U.S. Heater element...defective. 3. Defective drain pump. 4. Blocked impeller. 5. Open windings. 6. Wiring or terminal defective. 1. Water supply turned off electricity to dishwasher, • remove outer door panel assembly, • disconnect wiring to the discharge end of the heater should be adjusted by a small ...
...Voltage checks of the drain pump. Product Specifications Electrical Rating 120 Volts, 60Hz Separate Circuit..15 amp min.- 20 amp max. Dishwasher water siphons out. gal., 18.5 - 36.7 liters Water valve flow rate (U.S. GPM 83 Water recirculation rate (U.S. Heater element...defective. 3. Defective drain pump. 4. Blocked impeller. 5. Open windings. 6. Wiring or terminal defective. 1. Water supply turned off electricity to dishwasher, • remove outer door panel assembly, • disconnect wiring to the discharge end of the heater should be adjusted by a small ...


