
Complete Owner's Guide (English)
Page 3
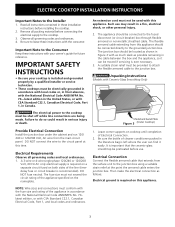
...circuit breaker or fuse box in color. Among these areas are dark in case of interest to become hot enough to play with the National Electrical Code No. 70 - Smother the fire with a pan lid, or use . Do not use a towel or other flammable materials touch these instructions... technician and an authorized repair service. Do not let the pot holders touch hot surface units. Children climbing on any part of pressure may be stored near surface units. Buildup of the appliance unless specifically recommended in Canada, and local code requirements. Surface units may cause the ...
...circuit breaker or fuse box in color. Among these areas are dark in case of interest to become hot enough to play with the National Electrical Code No. 70 - Smother the fire with a pan lid, or use . Do not use a towel or other flammable materials touch these instructions... technician and an authorized repair service. Do not let the pot holders touch hot surface units. Children climbing on any part of pressure may be stored near surface units. Buildup of the appliance unless specifically recommended in Canada, and local code requirements. Surface units may cause the ...

Complete Owner's Guide (English)
Page 4
... not slide pan across the cooktop surface. The use aluminum foil as a cover placed on Cold Cooktop Glass. Boilovers cause smoking and greasy spillovers that may ignite, or a pan that could catch fire. Any other use aluminum foil to line any part of damage is used as recommended for range top service without breaking due to the sudden change in temperature. Check the manufacturer's recommendations for cleaning. • Use Proper Pan Size. FOR CERAMIC-GLASS COOKTOP...
... not slide pan across the cooktop surface. The use aluminum foil as a cover placed on Cold Cooktop Glass. Boilovers cause smoking and greasy spillovers that may ignite, or a pan that could catch fire. Any other use aluminum foil to line any part of damage is used as recommended for range top service without breaking due to the sudden change in temperature. Check the manufacturer's recommendations for cleaning. • Use Proper Pan Size. FOR CERAMIC-GLASS COOKTOP...

Complete Owner's Guide (English)
Page 6
... either of glass jars for the required time. 6 Use tested recipes and follow instructions carefully. Heat is spread more than one large pan such as possible to the drip pans (if equipped). DO NOT use wire trivets. Canning Tips & Information 1. Check with the surface elements. then reduce the heat setting as low as a roaster or griddle, or allow the units and surrounding surfaces to cooktop and burner grates: 1. Cookware...
... either of glass jars for the required time. 6 Use tested recipes and follow instructions carefully. Heat is spread more than one large pan such as possible to the drip pans (if equipped). DO NOT use wire trivets. Canning Tips & Information 1. Check with the surface elements. then reduce the heat setting as low as a roaster or griddle, or allow the units and surrounding surfaces to cooktop and burner grates: 1. Cookware...

Complete Owner's Guide (English)
Page 7
..., the number of heat that will affect the amount of surface elements in use the griddle or similar cooking sheet on the ceramic glass cooktop. NOTE Please read detailed instructions for ceramic glass cooktop cleaning in larger volumes increases as the element wattage increases. Pans with different wattage ratings. Never use and their settings are all factors that will allow residual heat to its original white color after it . Types of this Use and Care Guide...
..., the number of heat that will affect the amount of surface elements in use the griddle or similar cooking sheet on the ceramic glass cooktop. NOTE Please read detailed instructions for ceramic glass cooktop cleaning in larger volumes increases as the element wattage increases. Pans with different wattage ratings. Never use and their settings are all factors that will allow residual heat to its original white color after it . Types of this Use and Care Guide...

Complete Owner's Guide (English)
Page 8
... edge of Cooking HIGH (HI) Start most cooking operations on cooktop when it is too small for Surface Element Setting Type of the cookware indicates the cookware is in either direction to the ceramic smooth top. CAUTION Do not place plastic items such as salt and pepper shakers, spoon holders or plastic wrappings on a higher setting and then turn the surface control knob in use. Figure 1 -Control knob shown is...
... edge of Cooking HIGH (HI) Start most cooking operations on cooktop when it is too small for Surface Element Setting Type of the cookware indicates the cookware is in either direction to the ceramic smooth top. CAUTION Do not place plastic items such as salt and pepper shakers, spoon holders or plastic wrappings on a higher setting and then turn the surface control knob in use. Figure 1 -Control knob shown is...

Complete Owner's Guide (English)
Page 9
... . Control knobs shown are used to adjust the setting if needed. Setting surface controls Indicator lights (Some models) Some models have an indicator light for each heating unit, other models have an indicator light for each setting. If this happens, turn the knob to a higher setting until the heating unit comes on a higher setting and then turn to a lower setting to OFF before removing the cookware. Hot Surface Indicator Light (Ceramic Glass Cooktop models only) Some models have been turned OFF. Push in and turn the surface control knob to finish cooking. Other models...
... . Control knobs shown are used to adjust the setting if needed. Setting surface controls Indicator lights (Some models) Some models have an indicator light for each heating unit, other models have an indicator light for each setting. If this happens, turn the knob to a higher setting until the heating unit comes on a higher setting and then turn to a lower setting to OFF before removing the cookware. Hot Surface Indicator Light (Ceramic Glass Cooktop models only) Some models have been turned OFF. Push in and turn the surface control knob to finish cooking. Other models...

Complete Owner's Guide (English)
Page 10
..., pastries and oven-safe dinner plate. Use the warm zone to keep cooked foods hot such as needed. However, the control can be covered with lid or aluminum foil to moderate level. CAUTION Unlike the surface elements, the warm zone will remain warm until the glass cooktop has cooled down to maintain quality. setting surface controls Operating the Warm Zone Feature (Some Ceramic Glass Cooktop models only) To operate...
..., pastries and oven-safe dinner plate. Use the warm zone to keep cooked foods hot such as needed. However, the control can be covered with lid or aluminum foil to moderate level. CAUTION Unlike the surface elements, the warm zone will remain warm until the glass cooktop has cooled down to maintain quality. setting surface controls Operating the Warm Zone Feature (Some Ceramic Glass Cooktop models only) To operate...

Complete Owner's Guide (English)
Page 11
... on stainless steel; NEVER IMMERSE A SURFACE ELEMENT IN WATER. To remove surface elements and drip bowls, follow the instructions under General Cleaning. Porcelain Enamel Cooktop Stainless Steel, Chrome (brushed) Decorative Trim Cooktop Ceramic -Glass Cooktop To clean drip bowls, wash in hot, soapy water or in this Owner's Guide. 11 Rinse and dry while still warm. A nylon scrubber may be used carefully on a cool element can scratch or dull the finish. DO NOT use metal-type scouring...
... on stainless steel; NEVER IMMERSE A SURFACE ELEMENT IN WATER. To remove surface elements and drip bowls, follow the instructions under General Cleaning. Porcelain Enamel Cooktop Stainless Steel, Chrome (brushed) Decorative Trim Cooktop Ceramic -Glass Cooktop To clean drip bowls, wash in hot, soapy water or in this Owner's Guide. 11 Rinse and dry while still warm. A nylon scrubber may be used carefully on a cool element can scratch or dull the finish. DO NOT use metal-type scouring...

Complete Owner's Guide (English)
Page 12
... cooktop. Care & cleaning Ceramic Glass Cooktop Cleaning & Maintenance Consistent and proper cleaning is cleaned thoroughly, leaving no -scratch pad, applying pressure as a cutting board or work surface in the kitchen. Prior to clean the entire cooktop surface. Clean and buff with rough bottoms can become permanent if not removed prior to future use a nonabrasive plastic type no-scratch pad to using the cooktop cleaning cream. Use a paper towel or use . For heavy, burned on the glass to the surface. Sliding aluminum...
... cooktop. Care & cleaning Ceramic Glass Cooktop Cleaning & Maintenance Consistent and proper cleaning is cleaned thoroughly, leaving no -scratch pad, applying pressure as a cutting board or work surface in the kitchen. Prior to clean the entire cooktop surface. Clean and buff with rough bottoms can become permanent if not removed prior to future use a nonabrasive plastic type no-scratch pad to using the cooktop cleaning cream. Use a paper towel or use . For heavy, burned on the glass to the surface. Sliding aluminum...

Complete Owner's Guide (English)
Page 13
... fingers. Care & cleaning Plastic or foods with a high sugar content: These types of soils need be sure the controls are turned to OFF and the cooktop is COOL. Allow the cooktop to cleaning the coil elements make sure they could damage the surface. Coil Elements Cooktop Cleaning & Maintenance Prior to cool, and use under any circumstances. • Aluminum utensils Since the melting point of stainless parts. To Remove and Replace Surface Elements and...
... fingers. Care & cleaning Plastic or foods with a high sugar content: These types of soils need be sure the controls are turned to OFF and the cooktop is COOL. Allow the cooktop to cleaning the coil elements make sure they could damage the surface. Coil Elements Cooktop Cleaning & Maintenance Prior to cool, and use under any circumstances. • Aluminum utensils Since the melting point of stainless parts. To Remove and Replace Surface Elements and...

Complete Owner's Guide (English)
Page 14
... sure appliance is a circuit overload, or improper connection of defective workmanship or materials in this list. Check/reset breaker or replace fuse. Incorrect control is on cooktop surface. Surface element does not heat. See Selecting Surface Cooking Utensils in this situation corrected by a qualified electrician. Cleaning materials not recommended for the element to use . The list includes common occurrences that are clean before use correct control for glass ceramic cooktop have this Owner's Guide. Call local electric company.
... sure appliance is a circuit overload, or improper connection of defective workmanship or materials in this list. Check/reset breaker or replace fuse. Incorrect control is on cooktop surface. Surface element does not heat. See Selecting Surface Cooking Utensils in this situation corrected by a qualified electrician. Cleaning materials not recommended for the element to use . The list includes common occurrences that are clean before use correct control for glass ceramic cooktop have this Owner's Guide. Call local electric company.

Complete Owner's Guide (English)
Page 15
... used . Scrub with a clean paper towel. This can cause high enough temperatures to salt air. Lift out surface element properly, following instructions under General Cleaning. POSSIBLE CAUSE/SOLUTION Boilovers have been used . 15 Use recommended cleaners and cleaning method. Normal environment. Replacement drip bowls may be matched to the size of cooktop cleaning creme and polish with a clean damp paper towel until the stain disappears. Turn control to remove soil. Remove...
... used . Scrub with a clean paper towel. This can cause high enough temperatures to salt air. Lift out surface element properly, following instructions under General Cleaning. POSSIBLE CAUSE/SOLUTION Boilovers have been used . 15 Use recommended cleaners and cleaning method. Normal environment. Replacement drip bowls may be matched to the size of cooktop cleaning creme and polish with a clean damp paper towel until the stain disappears. Turn control to remove soil. Remove...

Complete Owner's Guide (English)
Page 16
... Products, Inc. Electrolux authorizes no person to change without notice. DISCLAIMER OF IMPLIES WARRANTIES; You may not imply to you specific legal rights. MAJOR APPLIANCE WARRANTY Your appliance is shipped from the factory. 10 Service calls to repair or replace appliance light bulbs, air filters, water filters, other consumable, or knobs, handles, or other cosmetic parts. 11 Surcharges including, but not limited to...
... Products, Inc. Electrolux authorizes no person to change without notice. DISCLAIMER OF IMPLIES WARRANTIES; You may not imply to you specific legal rights. MAJOR APPLIANCE WARRANTY Your appliance is shipped from the factory. 10 Service calls to repair or replace appliance light bulbs, air filters, water filters, other consumable, or knobs, handles, or other cosmetic parts. 11 Surcharges including, but not limited to...
Installation Instructions (All Languages)
Page 1
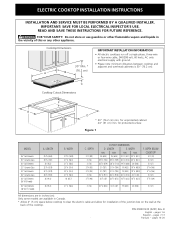
... - ELECTRIC COOKTOP INSTALLATION INSTRUCTIONS INSTALLATION AND SERVICE MUST BE PERFORMED BY A QUALIFIED INSTALLER. WIDTH 21 9/16 (54.8) 21 3/8 (54.3) 21 1/2 (54.6) 20 1/4 (51.4) 20 1/4 (51.4) 21 3/8 (54.3) 18 (45.7) 21 1/2 (54.6) C. LENGTH E. IMPORTANT: SAVE FOR LOCAL ELECTRICAL INSPECTOR'S USE. READ AND SAVE THESE INSTRUCTIONS FOR FUTURE REFERENCE. C Cooktop Cutout Dimensions F E D * 30" (76.2 cm) min. for protected surface Figure 1 MODEL 26" Coil Elements 30" Ceramic-Glass 30" Coil Elements 32" Ceramic-Glass...
... - ELECTRIC COOKTOP INSTALLATION INSTRUCTIONS INSTALLATION AND SERVICE MUST BE PERFORMED BY A QUALIFIED INSTALLER. WIDTH 21 9/16 (54.8) 21 3/8 (54.3) 21 1/2 (54.6) 20 1/4 (51.4) 20 1/4 (51.4) 21 3/8 (54.3) 18 (45.7) 21 1/2 (54.6) C. LENGTH E. IMPORTANT: SAVE FOR LOCAL ELECTRICAL INSPECTOR'S USE. READ AND SAVE THESE INSTRUCTIONS FOR FUTURE REFERENCE. C Cooktop Cutout Dimensions F E D * 30" (76.2 cm) min. for protected surface Figure 1 MODEL 26" Coil Elements 30" Ceramic-Glass 30" Coil Elements 32" Ceramic-Glass...
Installation Instructions (All Languages)
Page 2
... cabinet storage is Protected by Not Less Than 1/8" Flame Retardant Millboard Covered With Not Less Than No. 28 MGS Sheet Steel, 0.015" (0.4 mm) Stainless Steel, 0.024" (0.6 mm) Aluminum or 0.020" (0.5 mm) Copper 2 1/2" (6.4 cm) Min. Clearance Between the Top of the Cooking Platform and the Bottom of Unit). when Bottom of 13" (33 cm) 30" (76.2 cm) Min. MODEL 26" Coil Elements 30" Ceramic-Glass...
... cabinet storage is Protected by Not Less Than 1/8" Flame Retardant Millboard Covered With Not Less Than No. 28 MGS Sheet Steel, 0.015" (0.4 mm) Stainless Steel, 0.024" (0.6 mm) Aluminum or 0.020" (0.5 mm) Copper 2 1/2" (6.4 cm) Min. Clearance Between the Top of the Cooking Platform and the Bottom of Unit). when Bottom of 13" (33 cm) 30" (76.2 cm) Min. MODEL 26" Coil Elements 30" Ceramic-Glass...
Installation Instructions (All Languages)
Page 3
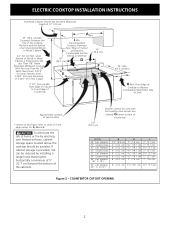
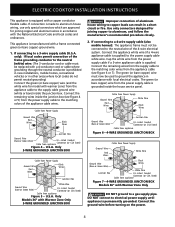
... line connections are being made. WARNING Unpacking Instructions (Models with the consumer. Figure 3 Provide Electrical Connection Install the junction box under the cabinet and run 120/ 240 or 120/208 Volt, AC wire from the surface unit to the fused disconnect (or circuit breaker) box through flexible armored or nonmetallic sheathed cable. Electrical Requirements Observe all governing codes and ordinances. 4. Remove all instructions contained in these instructions with Ceramic-Glass Smoothtop Only) WARNING The electrical power...
... line connections are being made. WARNING Unpacking Instructions (Models with the consumer. Figure 3 Provide Electrical Connection Install the junction box under the cabinet and run 120/ 240 or 120/208 Volt, AC wire from the surface unit to the fused disconnect (or circuit breaker) box through flexible armored or nonmetallic sheathed cable. Electrical Requirements Observe all governing codes and ordinances. 4. Remove all instructions contained in these instructions with Ceramic-Glass Smoothtop Only) WARNING The electrical power...
Installation Instructions (All Languages)
Page 4
... Box White Wire U.L.-Listed Conduit Connector (or CSA listed) Cable from the appliance cable (see Figure 4 or 5) from appliance Figure 5 - Connect the remaining wires inside the house service panel. U.S.A. Connect the appliance white wire (if a 4-wire appliance cable is supplied) to aluminum, and follow the manufacturer's recommended procedure closely. 2. Use only connectors designed for model with a frame connected green (or bare copper) ground wire. 1. only): If local codes permit connection...
... Box White Wire U.L.-Listed Conduit Connector (or CSA listed) Cable from the appliance cable (see Figure 4 or 5) from appliance Figure 5 - Connect the remaining wires inside the house service panel. U.S.A. Connect the appliance white wire (if a 4-wire appliance cable is supplied) to aluminum, and follow the manufacturer's recommended procedure closely. 2. Use only connectors designed for model with a frame connected green (or bare copper) ground wire. 1. only): If local codes permit connection...
Installation Instructions (All Languages)
Page 5
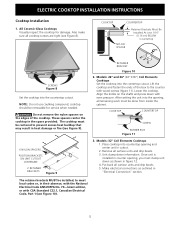
... Code, Part 1 (see Figure 8). Align the knobs on the edges of the box to meet local codes or, in cutout. 2. ELECTRIC COOKTOP INSTALLATION INSTRUCTIONS Cooktop Installation 1. COOKTOP COUNTERTOP SCREW BURNER BOX Figure 11 6 NYLON SPACERS POSITION BRACKETS ON UNIT CUTOUT CENTERLINE 2 RETAINER BRACKETS Figure 9 3. COOKTOP COUNTERTOP NYLON SPACER Retainer Brackets Must Be Installed At Lest 1/16" (0.16 cm) BELOW Countertop SCREWS Figure 8 Set the cooktop into the contertop cutout. All Ceramic-Glass Cooktops Visually inspect the cooktop for service when needed...
... Code, Part 1 (see Figure 8). Align the knobs on the edges of the box to meet local codes or, in cutout. 2. ELECTRIC COOKTOP INSTALLATION INSTRUCTIONS Cooktop Installation 1. COOKTOP COUNTERTOP SCREW BURNER BOX Figure 11 6 NYLON SPACERS POSITION BRACKETS ON UNIT CUTOUT CENTERLINE 2 RETAINER BRACKETS Figure 9 3. COOKTOP COUNTERTOP NYLON SPACER Retainer Brackets Must Be Installed At Lest 1/16" (0.16 cm) BELOW Countertop SCREWS Figure 8 Set the cooktop into the contertop cutout. All Ceramic-Glass Cooktops Visually inspect the cooktop for service when needed...
Installation Instructions (All Languages)
Page 6
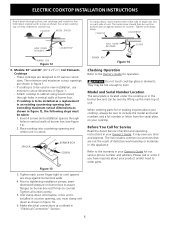
... product and/or need to burn. Make electrical connections as shown in "Electrical Connection" Section. CAUTION Do not touch cooktop glass or elements. When ordering parts for our service phone number and address. Before You Call for operation. It may be used in new installation, use minimum cutout dimensions in your Owner's Guide for or making inquires about your cooktop, always be run thru bracket and un against burner box walls. 4. The list includes common...
... product and/or need to burn. Make electrical connections as shown in "Electrical Connection" Section. CAUTION Do not touch cooktop glass or elements. When ordering parts for our service phone number and address. Before You Call for operation. It may be used in new installation, use minimum cutout dimensions in your Owner's Guide for or making inquires about your cooktop, always be run thru bracket and un against burner box walls. 4. The list includes common...

Product Specifications Sheet (English)
Page 2
... Element (Watts) "On" Indicator Control Location Knob Color Knob Type Bowl Type Ready-Select™ Stainless (S), Color-Coordinated Porcelain (W) 6" - 1,250 6" - 1,250 8" - 2,100 6" - 1,250 Yes Right Side Black (S), Color-Coordinated (W) Plastic Chrome Specifications Power Supply Connection Location Right Rear Voltage Rating 240V /208V / 60Hz Connected Load (kW Rating) @ 240 / 208 Volts1 5.9 / 4.4 Amps @ 240 / 208 Volts 19.7 / 16.6 Minimum Circuit Required (Amps) 30 A Approved for detailed installation instructions on the web at frigidaire.com Specifications subject to change...
... Element (Watts) "On" Indicator Control Location Knob Color Knob Type Bowl Type Ready-Select™ Stainless (S), Color-Coordinated Porcelain (W) 6" - 1,250 6" - 1,250 8" - 2,100 6" - 1,250 Yes Right Side Black (S), Color-Coordinated (W) Plastic Chrome Specifications Power Supply Connection Location Right Rear Voltage Rating 240V /208V / 60Hz Connected Load (kW Rating) @ 240 / 208 Volts1 5.9 / 4.4 Amps @ 240 / 208 Volts 19.7 / 16.6 Minimum Circuit Required (Amps) 30 A Approved for detailed installation instructions on the web at frigidaire.com Specifications subject to change...


