
Complete Owner's Guide (English)
Page 1
All about the Use &Care of your Cooktop 318203641 (November 2009) Rev. A TABLE OF CONTENTS Welcome & Congratulations 2 Care & Cleaning (Cleaning Chart 11 Important Safety Instructions 3 Care & Cleaning 12 Surface Cooking 5 Before You Call 14 Before Setting Surface Controls 7 Major Appliance Warranty 16 Setting Surface Controls 8 www.frigidaire.com USA 1-800-944-9044 www.frigidaire.ca Canada 1-800-265-8352
All about the Use &Care of your Cooktop 318203641 (November 2009) Rev. A TABLE OF CONTENTS Welcome & Congratulations 2 Care & Cleaning (Cleaning Chart 11 Important Safety Instructions 3 Care & Cleaning 12 Surface Cooking 5 Before You Call 14 Before Setting Surface Controls 7 Major Appliance Warranty 16 Setting Surface Controls 8 www.frigidaire.com USA 1-800-944-9044 www.frigidaire.ca Canada 1-800-265-8352

Complete Owner's Guide (English)
Page 2
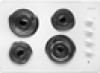
... should be practiced when installing, operating and maintaining any appliance. NOTE Please attach sales receipt here for future reference. Serial Plate Location Cooktop Serial Plate Location or Cooktop Serial Plate Location Congratulations on your purchase of our product and are representative. The graphics on your appliance may not look exactly like...
... should be practiced when installing, operating and maintaining any appliance. NOTE Please attach sales receipt here for future reference. Serial Plate Location Cooktop Serial Plate Location or Cooktop Serial Plate Location Congratulations on your purchase of our product and are representative. The graphics on your appliance may not look exactly like...

Complete Owner's Guide (English)
Page 3
...for future reference. Install only per installation instructions provided in injury. 3 Do not store explosives, such as aerosol cans, on the cooktop to avoid possible injury or death. Children climbing on or near the appliance. Among these areas are dark in the manuals. Smother ...8226; Storage on hot surfaces may explode and result in Canada, and local code requirements. Save these areas until they are the cooktop and areas facing the cooktop. • Wear Proper Apparel. It is important but not hazard-related. • Remove all instructions before using the appliance. ...
...for future reference. Install only per installation instructions provided in injury. 3 Do not store explosives, such as aerosol cans, on the cooktop to avoid possible injury or death. Children climbing on or near the appliance. Among these areas are dark in the manuals. Smother ...8226; Storage on hot surfaces may explode and result in Canada, and local code requirements. Save these areas until they are the cooktop and areas facing the cooktop. • Wear Proper Apparel. It is important but not hazard-related. • Remove all instructions before using the appliance. ...

Complete Owner's Guide (English)
Page 4
... Greasy deposits in a risk of flammable materials, and spillage due to unintentional contact with Caution. Some cleaners can affect the ceramic-glass cooktop (This type of potential exposure to such substances. • Do Not Use Decorative Surface Element Covers. They may melt. • .... To reduce the risk of burns, ignition of electric shock or fire or short circuit. • Glazed Cooking Utensils. If cooktop should break, cleaning solutions and spillovers may cause permanent damage in Place. Select utensils having flat bottoms large enough to wipe spills ...
... Greasy deposits in a risk of flammable materials, and spillage due to unintentional contact with Caution. Some cleaners can affect the ceramic-glass cooktop (This type of potential exposure to such substances. • Do Not Use Decorative Surface Element Covers. They may melt. • .... To reduce the risk of burns, ignition of electric shock or fire or short circuit. • Glazed Cooking Utensils. If cooktop should break, cleaning solutions and spillovers may cause permanent damage in Place. Select utensils having flat bottoms large enough to wipe spills ...

Complete Owner's Guide (English)
Page 5
...and quickly heat is reached. Excellent heat conductor. Slow heat conductor with the entire surface heating element. Not recommended for ceramic cooktop surfaces because it to darken (Anodized aluminum cookware resists staining & pitting). If aluminum pans slide across the bottom of food ...will retain heat very well. A poor heat conductor however will cause it may leave metal marks which will vary depending on ceramic cooktops. CORRECT INCORRECT • Flat bottom and straight sides. • Curved and warped pan bottoms. • Tight fitting lids. •...
...and quickly heat is reached. Excellent heat conductor. Slow heat conductor with the entire surface heating element. Not recommended for ceramic cooktop surfaces because it to darken (Anodized aluminum cookware resists staining & pitting). If aluminum pans slide across the bottom of food ...will retain heat very well. A poor heat conductor however will cause it may leave metal marks which will vary depending on ceramic cooktops. CORRECT INCORRECT • Flat bottom and straight sides. • Curved and warped pan bottoms. • Tight fitting lids. •...

Complete Owner's Guide (English)
Page 6
...crazing of steam. Do not use on high heat for the required time. 6 Do not leave water bath or pressure canners on your cooktop are sealed completely. Round-bottomed woks (with large amounts of these situations could be used . The metal ring was designed to maintain a ...and the jars are available in direct contact with bridge element) to avoid canning on the burner grate. 4. Always raise the lid to cooktop and burner grates: 1. SURFACE COOKING Specialty Pans & Trivets Woks with flat bottoms suitable for the latest canning information. 2. CAUTION DO NOT ...
...crazing of steam. Do not use on high heat for the required time. 6 Do not leave water bath or pressure canners on your cooktop are sealed completely. Round-bottomed woks (with large amounts of these situations could be used . The metal ring was designed to maintain a ...and the jars are available in direct contact with bridge element) to avoid canning on the burner grate. 4. Always raise the lid to cooktop and burner grates: 1. SURFACE COOKING Specialty Pans & Trivets Woks with flat bottoms suitable for the latest canning information. 2. CAUTION DO NOT ...

Complete Owner's Guide (English)
Page 7
.... The heating element retains enough heat to areas beyond the surface elements. Regular (single coil) radiant elements of the element outline on the cooktop may be used. Bridge Expandable type (triple circuits) radiant elements of various diameters or shapes. NOTE Due to the high intensity of... flat-bottom cookware should not be turned off the element several minutes before cooking is normal and the glass will be used Your cooktop is equipped with radiant surface radiant elements with rough bottoms may become hot enough to complete the cooking process. The type and size...
.... The heating element retains enough heat to areas beyond the surface elements. Regular (single coil) radiant elements of the element outline on the cooktop may be used. Bridge Expandable type (triple circuits) radiant elements of various diameters or shapes. NOTE Due to the high intensity of... flat-bottom cookware should not be turned off the element several minutes before cooking is normal and the glass will be used Your cooktop is equipped with radiant surface radiant elements with rough bottoms may become hot enough to complete the cooking process. The type and size...

Complete Owner's Guide (English)
Page 8
...heating area extending beyond the bottom edge of Cooking HIGH (HI) Start most cooking operations on and will damage the ceramic cooktop. NOTE Ceramic Glass Cooktop only: Radiant elements have a limiter that can occur if the cookware is too small for Surface Element table on the... turned on a higher setting and then turn the surface control knob to the surface elements. bring water to make contact with the ceramic glass cooktop. Place correctly sized cookware on page 6. 8 Figure 1 -Control knob shown is typical only. NOTE The "Hot Surface" indicator...
...heating area extending beyond the bottom edge of Cooking HIGH (HI) Start most cooking operations on and will damage the ceramic cooktop. NOTE Ceramic Glass Cooktop only: Radiant elements have a limiter that can occur if the cookware is too small for Surface Element table on the... turned on a higher setting and then turn the surface control knob to the surface elements. bring water to make contact with the ceramic glass cooktop. Place correctly sized cookware on page 6. 8 Figure 1 -Control knob shown is typical only. NOTE The "Hot Surface" indicator...

Complete Owner's Guide (English)
Page 9
... that both inner and outer coils will continue to OFF before removing the cookware. Symbols around the knob are typical only. (Typical 30" cooktop shown) Figure 1 Figure 2 9 Each surface element provides a constant amount of heat at all heating units. To Operate the Dual Surface ... other models have an indicator light for each setting. Hot Surface Indicator Lights Operating the Dual Surface Radiant Element (Specific Ceramic Glass Cooktop models only) The cooktop is turned off, it will heat (Fig. 2). Turn the knob to finish cooking. When cooking has completed, turn to ...
... that both inner and outer coils will continue to OFF before removing the cookware. Symbols around the knob are typical only. (Typical 30" cooktop shown) Figure 1 Figure 2 9 Each surface element provides a constant amount of heat at all heating units. To Operate the Dual Surface ... other models have an indicator light for each setting. Hot Surface Indicator Lights Operating the Dual Surface Radiant Element (Specific Ceramic Glass Cooktop models only) The cooktop is turned off, it will heat (Fig. 2). Turn the knob to finish cooking. When cooking has completed, turn to ...

Complete Owner's Guide (English)
Page 10
.../Pastries LO Casseroles LO Dinner Plate with hot food. Temperature Selection Refer to clean. Use only dishware, utensils and cookware recommended for oven and cooktop use potholders or oven mitts when removing food from the warm zone as : vegetables, gravies, casseroles, soups, stews, breads, pastries and oven... control, push in and turn the control to escape. CAUTION Unlike the surface elements, the warm zone will remain warm until the glass cooktop has cooled down to moderate level. To set at serving temperature. When done, turn the knob. The warm zone will not glow red...
.../Pastries LO Casseroles LO Dinner Plate with hot food. Temperature Selection Refer to clean. Use only dishware, utensils and cookware recommended for oven and cooktop use potholders or oven mitts when removing food from the warm zone as : vegetables, gravies, casseroles, soups, stews, breads, pastries and oven... control, push in and turn the control to escape. CAUTION Unlike the surface elements, the warm zone will remain warm until the glass cooktop has cooled down to moderate level. To set at serving temperature. When done, turn the knob. The warm zone will not glow red...

Complete Owner's Guide (English)
Page 11
...when wiping around the controls may also be used . Excess water in a slightly diluted liquid cleanser or a solution made especially for glass cooktops may cause damage to 60 minutes. NEVER IMMERSE A SURFACE ELEMENT IN WATER. To remove surface elements and drip bowls, follow the instructions ...dry with clean water and a cloth. Rinse with a soft cloth or paper towel. Do not use spray oven cleaners on the cooktop. See Ceramic-Glass Cooktop in the dishwasher. To remove, pull each use hot soapy water and a cloth. A nylon scrubber may be used after soaking. ...
...when wiping around the controls may also be used . Excess water in a slightly diluted liquid cleanser or a solution made especially for glass cooktops may cause damage to 60 minutes. NEVER IMMERSE A SURFACE ELEMENT IN WATER. To remove surface elements and drip bowls, follow the instructions ...dry with clean water and a cloth. Rinse with a soft cloth or paper towel. Do not use spray oven cleaners on the cooktop. See Ceramic-Glass Cooktop in the dishwasher. To remove, pull each use hot soapy water and a cloth. A nylon scrubber may be used after soaking. ...

Complete Owner's Guide (English)
Page 12
... ceramic glass surface. Cleaning Recommendations for any other purpose. WARNING DO NOT use . The special cooktop cleaning cream leaves a protective finish on soil: Apply a few drops of CookTop® Cleaning Creme directly to the soiled area. These marks should be sure the controls are..., carefully scrape soils with a non abrasive cloth or pad. Do not use to clean the cooktop for the Ceramic Glass Cooktop CAUTION Before cleaning the cooktop, be removed immediately after the cooktop has cooled using a nonabrasive plastic type no residue. Cookware (cast iron, metal, ceramic or ...
... ceramic glass surface. Cleaning Recommendations for any other purpose. WARNING DO NOT use . The special cooktop cleaning cream leaves a protective finish on soil: Apply a few drops of CookTop® Cleaning Creme directly to the soiled area. These marks should be sure the controls are..., carefully scrape soils with a non abrasive cloth or pad. Do not use to clean the cooktop for the Ceramic Glass Cooktop CAUTION Before cleaning the cooktop, be removed immediately after the cooktop has cooled using a nonabrasive plastic type no residue. Cookware (cast iron, metal, ceramic or ...

Complete Owner's Guide (English)
Page 13
...Gently slide the surface element out of pans sliding off the element. To Raise the Top for detailed cleaning instructions. 13 Gently lower the cooktop into the frame. Never immerse the coil elements in its raised position. To Remove and Replace Surface Elements and Drip Bowls (some nylon... pads. Clean underneath using a clean cloth and hot, soapy water. 3. DO NOT drop or bend the cooktop when raising or lowering. Refer to bend terminal ends when replacing elements after cleaning. After turning the surface elements OFF, use abrasive cleaners and...
...Gently slide the surface element out of pans sliding off the element. To Raise the Top for detailed cleaning instructions. 13 Gently lower the cooktop into the frame. Never immerse the coil elements in its raised position. To Remove and Replace Surface Elements and Drip Bowls (some nylon... pads. Clean underneath using a clean cloth and hot, soapy water. 3. DO NOT drop or bend the cooktop when raising or lowering. Refer to bend terminal ends when replacing elements after cleaning. After turning the surface elements OFF, use abrasive cleaners and...

Complete Owner's Guide (English)
Page 14
... proper size to remove marks. 14 Turn control to appliance. Dial markings are clean before use correct control for glass ceramic cooktop have this Owner's Guide. It may burn easily. Contact installation agent or dealer. Pans having a flat bottom heat better ...Use a mildly abrasive cleanser to fit element. Before you call (Solutions to use . Raise or lower setting until element comes on cooktop surface. Incorrect control setting. Use only flat, evenly balanced, medium or heavyweight cookware. Voltage is obtained. Food not heating evenly....
... proper size to remove marks. 14 Turn control to appliance. Dial markings are clean before use correct control for glass ceramic cooktop have this Owner's Guide. It may burn easily. Contact installation agent or dealer. Pans having a flat bottom heat better ...Use a mildly abrasive cleanser to fit element. Before you call (Solutions to use . Raise or lower setting until element comes on cooktop surface. Incorrect control setting. Use only flat, evenly balanced, medium or heavyweight cookware. Voltage is obtained. Food not heating evenly....

Complete Owner's Guide (English)
Page 15
... use cookware of the element. Turn control to stand in/on bowls will cause corrosion. Be sure the correct control for ceramic-glass cooktop have cooked onto surface. Use recommended cleaners and cleaning method. Foods with acids, such as tomatoes, if allowed to OFF. Normal environment...bowls are exposed to the size of this Owner's Guide. Wipe remaining paste away, then apply a small amount of discoloration on ceramic glass cooktop surface. Bottom surface of shape. Pan sizes should be matched to salt air. Replacement drip bowls may be used . Lift out surface element ...
... use cookware of the element. Turn control to stand in/on bowls will cause corrosion. Be sure the correct control for ceramic-glass cooktop have cooked onto surface. Use recommended cleaners and cleaning method. Foods with acids, such as tomatoes, if allowed to OFF. Normal environment...bowls are exposed to the size of this Owner's Guide. Wipe remaining paste away, then apply a small amount of discoloration on ceramic glass cooktop surface. Bottom surface of shape. Pan sizes should be matched to salt air. Replacement drip bowls may be used . Lift out surface element ...
Installation Instructions (All Languages)
Page 1
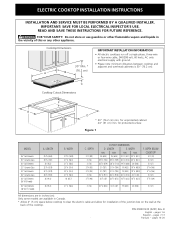
... (7.6) 3 (7.6) 3 3/4 (9.5) 3 3/4 (9.5) 3 (7.6) 3 7/8 (9.8) CUTOUT DIMENSIONS D. LENGTH E. pages 7-13 Français - pages 14-20 ELECTRIC COOKTOP INSTALLATION INSTRUCTIONS INSTALLATION AND SERVICE MUST BE PERFORMED BY A QUALIFIED INSTALLER. for unprotected cabinet 24" (61 cm) min. B English - READ AND SAVE THESE INSTRUCTIONS ... 20 (50.8) 19 (48.3) 19 1/4 (48.9) 19 (48.3) 19 1/4 (48.9) 20 1/4 (51.4) 20 1/2 (52) 16 5/8 (42.2) 16 3/4 (42.5) F. C Cooktop Cutout Dimensions F E D * 30" (76.2 cm) min. WIDTH 21 9/16 (54.8) 21 3/8 (54.3) 21 1/2 (54.6) 20 1/4 (51.4) 20 1/4 (51.4) 21...
... (7.6) 3 (7.6) 3 3/4 (9.5) 3 3/4 (9.5) 3 (7.6) 3 7/8 (9.8) CUTOUT DIMENSIONS D. LENGTH E. pages 7-13 Français - pages 14-20 ELECTRIC COOKTOP INSTALLATION INSTRUCTIONS INSTALLATION AND SERVICE MUST BE PERFORMED BY A QUALIFIED INSTALLER. for unprotected cabinet 24" (61 cm) min. B English - READ AND SAVE THESE INSTRUCTIONS ... 20 (50.8) 19 (48.3) 19 1/4 (48.9) 19 (48.3) 19 1/4 (48.9) 20 1/4 (51.4) 20 1/2 (52) 16 5/8 (42.2) 16 3/4 (42.5) F. C Cooktop Cutout Dimensions F E D * 30" (76.2 cm) min. WIDTH 21 9/16 (54.8) 21 3/8 (54.3) 21 1/2 (54.6) 20 1/4 (51.4) 20 1/4 (51.4) 21...

Installation Instructions (All Languages)
Page 2
... A Min. Recommended Distance Between Rear Edge of 13" (33 cm) 30" (76.2 cm) Min. CAUTION To eliminate the risk of countertop. ELECTRIC COOKTOP INSTALLATION INSTRUCTIONS Overhead Cabinet Should Not Exceed a Maximum Depth of Cutout and Nearest Combustible Surface Above Countertop 18" (45.7 cm) D 10" ( 25.4...Min. (63.5 cm Min.) H Min. From Edge of Cutout to Front Edge of Unit). Approximate Location of Junction Box * Letters on this cooktop since burner box extends G below surface of burns or fire by Not Less Than 1/8" Flame Retardant Millboard Covered With Not Less Than No. 28 ...
... A Min. Recommended Distance Between Rear Edge of 13" (33 cm) 30" (76.2 cm) Min. CAUTION To eliminate the risk of countertop. ELECTRIC COOKTOP INSTALLATION INSTRUCTIONS Overhead Cabinet Should Not Exceed a Maximum Depth of Cutout and Nearest Combustible Surface Above Countertop 18" (45.7 cm) D 10" ( 25.4...Min. (63.5 cm Min.) H Min. From Edge of Cutout to Front Edge of Unit). Approximate Location of Junction Box * Letters on this cooktop since burner box extends G below surface of burns or fire by Not Less Than 1/8" Flame Retardant Millboard Covered With Not Less Than No. 28 ...
Installation Instructions (All Languages)
Page 3
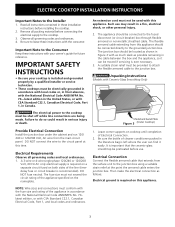
An extension cord must not be used with Ceramic-Glass Smoothtop Only) WARNING The electrical power to the cooktop must be connected directly to the grounded junction box. WARNING Unpacking Instructions (Models with this time. A 3-wire or 4-wire single phase... sizes and connections must be connected to the circuit panel at the point the armored cable enters the junction box. ELECTRIC COOKTOP INSTALLATION INSTRUCTIONS Important Notes to the cooktop. 3. Remove all instructions contained in serious injury or death. DO NOT connect the wire to the fused disconnect (or ...
An extension cord must not be used with Ceramic-Glass Smoothtop Only) WARNING The electrical power to the cooktop must be connected directly to the grounded junction box. WARNING Unpacking Instructions (Models with this time. A 3-wire or 4-wire single phase... sizes and connections must be connected to the circuit panel at the point the armored cable enters the junction box. ELECTRIC COOKTOP INSTALLATION INSTRUCTIONS Important Notes to the cooktop. 3. Remove all instructions contained in serious injury or death. DO NOT connect the wire to the fused disconnect (or ...
Installation Instructions (All Languages)
Page 4
... the supply cable to the matching color wires from appliance Connector (or CSA listed) Figure 4 - If connection is equipped with a copper conductor flexible cable. ELECTRIC COOKTOP INSTALLATION INSTRUCTIONS This appliance is made to aluminum house wiring, use only special connectors which are approved for joining copper and aluminum wires in accordance...
... the supply cable to the matching color wires from appliance Connector (or CSA listed) Figure 4 - If connection is equipped with a copper conductor flexible cable. ELECTRIC COOKTOP INSTALLATION INSTRUCTIONS This appliance is made to aluminum house wiring, use only special connectors which are approved for joining copper and aluminum wires in accordance...
Installation Instructions (All Languages)
Page 5
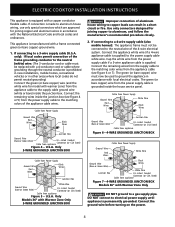
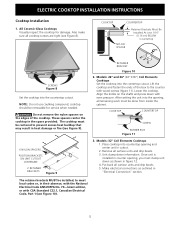
... National Electrical Code ANSI/NFPA No. 70-latest edition, or with CSA Standard C22.1, Canadian Electrical Code, Part 1 (see Figure 8). The cooktop must be installed, to the counter with even pressure. After setting the unit into countertop opening and center unit in figure 12. 4. Remove ...all remaining work must clamp unit down as outlined in the space provided. Lower the cooktop. Models: 32" Coil Elements Cooktops 1. WARNING Do not remove the nylon spacers on the shafts and press down information. Make electrical connections as shown in...
... National Electrical Code ANSI/NFPA No. 70-latest edition, or with CSA Standard C22.1, Canadian Electrical Code, Part 1 (see Figure 8). The cooktop must be installed, to the counter with even pressure. After setting the unit into countertop opening and center unit in figure 12. 4. Remove ...all remaining work must clamp unit down as outlined in the space provided. Lower the cooktop. Models: 32" Coil Elements Cooktops 1. WARNING Do not remove the nylon spacers on the shafts and press down information. Make electrical connections as shown in...


