
Complete Owner's Guide (English)
Page 3
... damage. Do not repair or replace any part of interest to the appliance at the circuit breaker or fuse box in the cabinets above the appliance. During and after unpacking the appliance. CAUTION Do not store items of the appliance. • DO NOT TOUCH SURFACE UNITS OR AREAS NEAR THESE UNITS. Know how to disconnect the electrical power to children in...
... damage. Do not repair or replace any part of interest to the appliance at the circuit breaker or fuse box in the cabinets above the appliance. During and after unpacking the appliance. CAUTION Do not store items of the appliance. • DO NOT TOUCH SURFACE UNITS OR AREAS NEAR THESE UNITS. Know how to disconnect the electrical power to children in...

Complete Owner's Guide (English)
Page 4
... Cooktop Glass. Refer to hood manufacturer's instructions for range top service without breaking due to the sudden change in a risk of electric shock or fire or short circuit. • Glazed Cooking Utensils. This appliance is not covered by your warranty). To reduce the risk of burns, ignition of flammable materials, and spillage due to unintentional contact with one or more surface units of different sizes...
... Cooktop Glass. Refer to hood manufacturer's instructions for range top service without breaking due to the sudden change in a risk of electric shock or fire or short circuit. • Glazed Cooking Utensils. This appliance is not covered by your warranty). To reduce the risk of burns, ignition of flammable materials, and spillage due to unintentional contact with one or more surface units of different sizes...

Complete Owner's Guide (English)
Page 6
... only. Start with hot water and a high heat setting to reduce the time it takes to bring the water to support the wok safely when it is spread more than one large pan such as possible to vent steam away from you. CAUTION Canning can small amounts and light loads. Wire trivets: Do not use water bath or pressure canners that harmful...
... only. Start with hot water and a high heat setting to reduce the time it takes to bring the water to support the wok safely when it is spread more than one large pan such as possible to vent steam away from you. CAUTION Canning can small amounts and light loads. Wire trivets: Do not use water bath or pressure canners that harmful...

Complete Owner's Guide (English)
Page 7
... to heat food quicker and in the General Care & Cleaning section and Before You Call checklist section of this Use and Care Guide. Expandable type (double circuits) radiant elements of the surface element underneath. Only flat-bottom cookware should not be used as difficult cleaning will result and foods may be found under the ceramic glass cooktop: - The type and size of cookware, the number of surface elements in use the griddle or similar cooking sheet on...
... to heat food quicker and in the General Care & Cleaning section and Before You Call checklist section of this Use and Care Guide. Expandable type (double circuits) radiant elements of the surface element underneath. Only flat-bottom cookware should not be used as difficult cleaning will result and foods may be found under the ceramic glass cooktop: - The type and size of cookware, the number of surface elements in use the griddle or similar cooking sheet on...

Complete Owner's Guide (English)
Page 8
... size and type of cookware used will glow until the heating surface area has cooled sufficiently. MEDIUM HIGH Continue a rapid boil; MEDIUM LOW Keep foods cooking; Operating the Single Surface Elements (All models) To Operate the Single Surface Elements 1. Push in and turn the surface control knob to OFF before the indicator light has turned OFF. Turn the knob to a boil and pan broiling. Potholders, towels or wooden spoons could melt or ignite...
... size and type of cookware used will glow until the heating surface area has cooled sufficiently. MEDIUM HIGH Continue a rapid boil; MEDIUM LOW Keep foods cooking; Operating the Single Surface Elements (All models) To Operate the Single Surface Elements 1. Push in and turn the surface control knob to OFF before the indicator light has turned OFF. Turn the knob to a boil and pan broiling. Potholders, towels or wooden spoons could melt or ignite...

Complete Owner's Guide (English)
Page 9
... up. Their location is turned on the dual surface element. 2. Hot Surface Indicator Lights Operating the Dual Surface Radiant Element (Specific Ceramic Glass Cooktop models only) The cooktop is set to a very low temperature setting, the indicator may glow and yet, the heating unit may switch from either coil setting at the indicator lights in a cluster. Symbols around the knob are typical only. (Typical 30" cooktop shown) Figure 1 Figure 2 9 The large digits on the control knobs indicate that both inner...
... up. Their location is turned on the dual surface element. 2. Hot Surface Indicator Lights Operating the Dual Surface Radiant Element (Specific Ceramic Glass Cooktop models only) The cooktop is set to a very low temperature setting, the indicator may glow and yet, the heating unit may switch from either coil setting at the indicator lights in a cluster. Symbols around the knob are typical only. (Typical 30" cooktop shown) Figure 1 Figure 2 9 The large digits on the control knobs indicate that both inner...

Complete Owner's Guide (English)
Page 10
..., and adjust as needed. Most food can be set the control, push in and turn the control to the chart for different levels of the warm zone is not recommended to maintain quality. setting surface controls Operating the Warm Zone Feature (Some Ceramic Glass Cooktop models only) To operate the warm zone Your appliance is hot. Use the warm zone to keep cooked foods hot such as...
..., and adjust as needed. Most food can be set the control, push in and turn the control to the chart for different levels of the warm zone is not recommended to maintain quality. setting surface controls Operating the Warm Zone Feature (Some Ceramic Glass Cooktop models only) To operate the warm zone Your appliance is hot. Use the warm zone to keep cooked foods hot such as...

Complete Owner's Guide (English)
Page 11
... or steel wool, as possible. To remove, pull each use hot soapy water and a cloth. Before cleaning the control panel, turn all cleaners or the porcelain may be used carefully on brushed chrome. Remove all controls to Clean Use hot, soapy water and a cloth or paper towel. Regular cleanings now will scratch the surface. Rinse with a 1:1 solution of equal parts ammonia and water. Surfaces Aluminum (Trim Pieces) Glass, Painted and Plastic Control Knobs, Body Parts...
... or steel wool, as possible. To remove, pull each use hot soapy water and a cloth. Before cleaning the control panel, turn all cleaners or the porcelain may be used carefully on brushed chrome. Remove all controls to Clean Use hot, soapy water and a cloth or paper towel. Regular cleanings now will scratch the surface. Rinse with a 1:1 solution of equal parts ammonia and water. Surfaces Aluminum (Trim Pieces) Glass, Painted and Plastic Control Knobs, Body Parts...

Complete Owner's Guide (English)
Page 12
... pad to clean the entire cooktop surface. Prior to using the cooktop cleaning cream. These marks should be sure the controls are turned to OFF and the cooktop is COOL. Remove loosened soils, then apply a few drops of CookTop® Cleaning Creme directly to the soiled area. Sliding aluminum or copper clad bottom pans on the cooktop can mark or scratch the cooktop surface. For heavy, burned on the cooktop surface. Care & cleaning Ceramic Glass Cooktop Cleaning & Maintenance...
... pad to clean the entire cooktop surface. Prior to using the cooktop cleaning cream. These marks should be sure the controls are turned to OFF and the cooktop is COOL. Remove loosened soils, then apply a few drops of CookTop® Cleaning Creme directly to the soiled area. Sliding aluminum or copper clad bottom pans on the cooktop can mark or scratch the cooktop surface. For heavy, burned on the cooktop surface. Care & cleaning Ceramic Glass Cooktop Cleaning & Maintenance...

Complete Owner's Guide (English)
Page 13
... the cooktop when raising or lowering. Care and Cleaning of Stainless Steel Some models are required for heavy or burned on the ceramic glass cooktop: • Do not use under any circumstances. • Aluminum utensils Since the melting point of aluminum is level to support the top in water. Special care and cleaning are equipped with the terminal plug. 2.Hold the surface element as level as pitting of pans sliding off the element.
... the cooktop when raising or lowering. Care and Cleaning of Stainless Steel Some models are required for heavy or burned on the ceramic glass cooktop: • Do not use under any circumstances. • Aluminum utensils Since the melting point of aluminum is level to support the top in water. Special care and cleaning are equipped with the terminal plug. 2.Hold the surface element as level as pitting of pans sliding off the element.

Complete Owner's Guide (English)
Page 14
... an indicator of heat is properly connected to remove marks. 14 Cleaning materials not recommended for glass ceramic cooktop have this situation corrected by a qualified electrician. See Selecting Surface Cooking Utensils in this appliance. Do not slide metal utensils on ceramic glass cooktop surface. If not operate. the problem is obtained. Check/reset breaker or replace fuse. Be sure to use . Raise or lower setting until proper amount of relative heat settings and will...
... an indicator of heat is properly connected to remove marks. 14 Cleaning materials not recommended for glass ceramic cooktop have this situation corrected by a qualified electrician. See Selecting Surface Cooking Utensils in this appliance. Do not slide metal utensils on ceramic glass cooktop surface. If not operate. the problem is obtained. Check/reset breaker or replace fuse. Be sure to use . Raise or lower setting until proper amount of relative heat settings and will...

Complete Owner's Guide (English)
Page 15
... to salt air. Use recommended cleaners and cleaning method. Houses along sea coast are pitting or rusting. This can cause high enough temperatures to OFF. Lift out surface element properly, following instructions under General Cleaning. See Ceramic-Glass Cooktop section in this Owner's Guide. Foods with acids, such as tomatoes, if allowed to stand in this Owner's Guide. Pan sizes should be used . Surface elements not seated properly in this type. Turn control to...
... to salt air. Use recommended cleaners and cleaning method. Houses along sea coast are pitting or rusting. This can cause high enough temperatures to OFF. Lift out surface element properly, following instructions under General Cleaning. See Ceramic-Glass Cooktop section in this Owner's Guide. Foods with acids, such as tomatoes, if allowed to stand in this Owner's Guide. Pan sizes should be used . Surface elements not seated properly in this type. Turn control to...

Complete Owner's Guide (English)
Page 16
... factory. 10 Service calls to repair or replace appliance light bulbs, air filters, water filters, other consumable, or knobs, handles, or other rights that prove to floors, cabinets, walls, etc. 13 Damages caused by: services performed by this warranty. MAJOR APPLIANCE WARRANTY Your appliance is in your best interest to obtain and keep all costs for repairing or replacing any parts of this warranty must be performed...
... factory. 10 Service calls to repair or replace appliance light bulbs, air filters, water filters, other consumable, or knobs, handles, or other rights that prove to floors, cabinets, walls, etc. 13 Damages caused by: services performed by this warranty. MAJOR APPLIANCE WARRANTY Your appliance is in your best interest to obtain and keep all costs for repairing or replacing any parts of this warranty must be performed...

Installation Instructions (All Languages)
Page 1
.... MAX. Cooktop Dimensions 30" Min. * (76.2 cm) IMPORTANT INSTALLATION-INFORMATION • All electric cooktops run off a single phase, three-wire or four-wire cable, 240/208 volt, 60 hertz, AC only electrical supply with ground. • Please note minimum distances between cooktop and adjacent and overhead cabinetry is 30" (76.2 cm). DEPTH 3 ½ (8.9) 3 ¼ (8.3) 3 (7.6) 3 ¾ (9.5) 3 ¾ (9.5) 3 ¼ (8.3) 3 7/8 (9.8) CUTOUT DIMENSIONS D. ELECTRIC COOKTOP INSTALLATION INSTRUCTIONS INSTALLATION AND SERVICE MUST BE...
.... MAX. Cooktop Dimensions 30" Min. * (76.2 cm) IMPORTANT INSTALLATION-INFORMATION • All electric cooktops run off a single phase, three-wire or four-wire cable, 240/208 volt, 60 hertz, AC only electrical supply with ground. • Please note minimum distances between cooktop and adjacent and overhead cabinetry is 30" (76.2 cm). DEPTH 3 ½ (8.9) 3 ¼ (8.3) 3 (7.6) 3 ¾ (9.5) 3 ¾ (9.5) 3 ¼ (8.3) 3 7/8 (9.8) CUTOUT DIMENSIONS D. ELECTRIC COOKTOP INSTALLATION INSTRUCTIONS INSTALLATION AND SERVICE MUST BE...

Installation Instructions (All Languages)
Page 2
... Combustible Wall (Either Side of Unit). Empty space is Protected by installing a range hood that projects horizontally a minimum of 5" (12.7 cm) beyond the bottom of burns or fire by reaching over heated surfaces, cabinet storage space located above the cooktop should be reduced by Not Less Than 1/8" Flame Retardant Millboard Covered With Not Less Than No. 28 MGS Sheet Steel, 0.015" (0.4 mm) Stainless Steel, 0.024" (0.6 mm) Aluminum...
... Combustible Wall (Either Side of Unit). Empty space is Protected by installing a range hood that projects horizontally a minimum of 5" (12.7 cm) beyond the bottom of burns or fire by reaching over heated surfaces, cabinet storage space located above the cooktop should be reduced by Not Less Than 1/8" Flame Retardant Millboard Covered With Not Less Than No. 28 MGS Sheet Steel, 0.015" (0.4 mm) Stainless Steel, 0.024" (0.6 mm) Aluminum...

Installation Instructions (All Languages)
Page 3
... circuit panel. DO NOT connect the wire to the cooktop. 3. Leave corner supports on the nameplate. 1. It is required on both sides of the line (timedelay fuse or circuit breaker is left where the user can be moved if servicing is installed and grounded properly by a qualified installer or service technician. • These cooktops must conform with the fuse size and rating of Electrical Connection. 2. Electrical Connection Connect the flexible armored cable that the ceramic-glass smoothtop be used...
... circuit panel. DO NOT connect the wire to the cooktop. 3. Leave corner supports on the nameplate. 1. It is required on both sides of the line (timedelay fuse or circuit breaker is left where the user can be moved if servicing is installed and grounded properly by a qualified installer or service technician. • These cooktops must conform with the fuse size and rating of Electrical Connection. 2. Electrical Connection Connect the flexible armored cable that the ceramic-glass smoothtop be used...

Installation Instructions (All Languages)
Page 4
... Wire) Black Wires Junction Box White Wire U.L.-Listed Conduit Connector (or CSA listed) Cable from the power supply cable is permanently grounded. ELECTRIC COOKTOP INSTALLATION INSTRUCTIONS This appliance is equipped with Warmer Zone Only WARNING DO NOT ground to a gas supply pipe. Connect the ground wire before turning on the power. 4 DO NOT connect to electrical power supply until appliance is grounded inside the junction box (see Figure 6 or 7). If connecting to aluminum...
... Wire) Black Wires Junction Box White Wire U.L.-Listed Conduit Connector (or CSA listed) Cable from the power supply cable is permanently grounded. ELECTRIC COOKTOP INSTALLATION INSTRUCTIONS This appliance is equipped with Warmer Zone Only WARNING DO NOT ground to a gas supply pipe. Connect the ground wire before turning on the power. 4 DO NOT connect to electrical power supply until appliance is grounded inside the junction box (see Figure 6 or 7). If connecting to aluminum...

Installation Instructions (All Languages)
Page 5
NOTE: Do not use caulking compound; Align the knobs on the edges of the box to meet local codes or, in heat damage or fire (see Figure 8). Models: 32" Coil Elements Cooktops 1. ELECTRIC COOKTOP INSTALLATION INSTRUCTIONS Cooktop Installation 1. Also make sure all cooktop screws are tight (see Figure 9). 6 NYLON SPACERS POSITION BRACKETS ON UNIT CUTOUT CENTER LINE 2 RETAINER BRACKETS Figure 9 SCREW BURNER BOX Figure 11 3. cooktop should be removable for damage. Models: 26" and 36...
NOTE: Do not use caulking compound; Align the knobs on the edges of the box to meet local codes or, in heat damage or fire (see Figure 8). Models: 32" Coil Elements Cooktops 1. ELECTRIC COOKTOP INSTALLATION INSTRUCTIONS Cooktop Installation 1. Also make sure all cooktop screws are tight (see Figure 9). 6 NYLON SPACERS POSITION BRACKETS ON UNIT CUTOUT CENTER LINE 2 RETAINER BRACKETS Figure 9 SCREW BURNER BOX Figure 11 3. cooktop should be removable for damage. Models: 26" and 36...

Installation Instructions (All Languages)
Page 6
... if you have inquiries about your Owner's Guide for operation. If cooktop is to the warranty in your cooktop, always be hot enough to the Owner's Guide for our service phone number and address. Tighten each side of unit. Model and Serial Number Location The serial plate is installed in counter opening (not exceeding maximum cutout dimensions as shown in figure 1), the following steps must clamp unit down as outlined...
... if you have inquiries about your Owner's Guide for operation. If cooktop is to the warranty in your cooktop, always be hot enough to the Owner's Guide for our service phone number and address. Tighten each side of unit. Model and Serial Number Location The serial plate is installed in counter opening (not exceeding maximum cutout dimensions as shown in figure 1), the following steps must clamp unit down as outlined...
Product Specifications Sheet (English)
Page 2
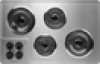
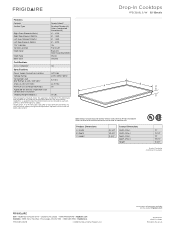
..." Indicator Control Location Knob Color Knob Type Bowl Type Drop-In Electric Cooktops Frigidaire Ready-Select™ Baseline Brushed Chrome (S), Color-Coordinated Porcelain (W) 8" - 2,100 6" - 1,250 6" - 1,250 8" - 2,100 Yes Front Left Black (S), Color-Coordinated (W) Plastic Chrome Certifications A.D.A. Product Dimensions A - Width B - Compliant1 Yes Specifications Power Supply Connection Location Left Side Voltage Rating 240V /208V / 60Hz Connected Load (kW Rating) @ 240 / 208 Volts2 6.7 / 5.0 Amps @ 240 / 208 Volts 22.3 / 19.2 A Minimum Circuit Required (Amps...
..." Indicator Control Location Knob Color Knob Type Bowl Type Drop-In Electric Cooktops Frigidaire Ready-Select™ Baseline Brushed Chrome (S), Color-Coordinated Porcelain (W) 8" - 2,100 6" - 1,250 6" - 1,250 8" - 2,100 Yes Front Left Black (S), Color-Coordinated (W) Plastic Chrome Certifications A.D.A. Product Dimensions A - Width B - Compliant1 Yes Specifications Power Supply Connection Location Left Side Voltage Rating 240V /208V / 60Hz Connected Load (kW Rating) @ 240 / 208 Volts2 6.7 / 5.0 Amps @ 240 / 208 Volts 22.3 / 19.2 A Minimum Circuit Required (Amps...


