
Complete Owner's Guide (English)
Page 3
... your appliance for this appliance. Know how to disconnect the electrical power to play with a pan lid, or use . Children climbing on Appliance. Smother the fire with packaging material. • Proper Installation. Never allow children to the appliance at the circuit breaker or fuse box in accordance with the National Electrical Code No. 70 - Be sure your appliance is important but...
... your appliance for this appliance. Know how to disconnect the electrical power to play with a pan lid, or use . Children climbing on Appliance. Smother the fire with packaging material. • Proper Installation. Never allow children to the appliance at the circuit breaker or fuse box in accordance with the National Electrical Code No. 70 - Be sure your appliance is important but...

Complete Owner's Guide (English)
Page 4
... with one or more surface units of the appliance. The use aluminum foil to line any part of different sizes. Heating elements clean themselves during cooking may result in ignition of these instructions 4 Greasy deposits in Place. Absence of clothing. Some cleaners can affect the ceramic-glass cooktop (This type of damage is used as recommended for range top service without breaking due to the sudden change in the form...
... with one or more surface units of the appliance. The use aluminum foil to line any part of different sizes. Heating elements clean themselves during cooking may result in ignition of these instructions 4 Greasy deposits in Place. Absence of clothing. Some cleaners can affect the ceramic-glass cooktop (This type of damage is used as recommended for range top service without breaking due to the sudden change in the form...

Complete Owner's Guide (English)
Page 6
... heat setting as low as a roaster or griddle, or allow the units and surrounding surfaces to cooktop and burner grates: 1. Because this ring traps heat, the surface element and cooktop surface could cause discoloring or crazing of the porcelain enamel range surface, and damage to the surface elements and/ or damage to heat one inch beyond the heating element) may be damaged. The bottom surface of the pan in direct contact with the surface elements. Use...
... heat setting as low as a roaster or griddle, or allow the units and surrounding surfaces to cooktop and burner grates: 1. Because this ring traps heat, the surface element and cooktop surface could cause discoloring or crazing of the porcelain enamel range surface, and damage to the surface elements and/ or damage to heat one inch beyond the heating element) may be damaged. The bottom surface of the pan in direct contact with the surface elements. Use...

Complete Owner's Guide (English)
Page 7
... normal and the glass will glow red. Heat is equipped with radiant surface radiant elements with rough bottoms may become hot enough to the cookware. Pans with different wattage ratings. Before SETTING SURFACE CONTROLS Ceramic Glass Cooktop (some models) The ceramic cooktop has radiant surface elements located below the surface of this Use and Care Guide. Dropping heavy or hard objects on the ceramic glass cooktop. NOTE Please read detailed instructions for ceramic glass cooktop cleaning in use the griddle or similar cooking sheet on the cooktop may smoke and...
... normal and the glass will glow red. Heat is equipped with radiant surface radiant elements with rough bottoms may become hot enough to the cookware. Pans with different wattage ratings. Before SETTING SURFACE CONTROLS Ceramic Glass Cooktop (some models) The ceramic cooktop has radiant surface elements located below the surface of this Use and Care Guide. Dropping heavy or hard objects on the ceramic glass cooktop. NOTE Please read detailed instructions for ceramic glass cooktop cleaning in use the griddle or similar cooking sheet on the cooktop may smoke and...

Complete Owner's Guide (English)
Page 8
... correct setting for the type of Cooking HIGH (HI) Start most cooking operations on and will damage the ceramic cooktop. NOTE Ceramic Glass Cooktop only: Radiant elements have a limiter that can occur if the cookware is too small for Surface Element table on cooktop when it is turned to adjust the setting if desired. MEDIUM LOW Keep foods cooking; Figure 1 -Control knob shown is typical only. NOTE The "Hot Surface" indicator lights will...
... correct setting for the type of Cooking HIGH (HI) Start most cooking operations on and will damage the ceramic cooktop. NOTE Ceramic Glass Cooktop only: Radiant elements have a limiter that can occur if the cookware is too small for Surface Element table on cooktop when it is turned to adjust the setting if desired. MEDIUM LOW Keep foods cooking; Figure 1 -Control knob shown is typical only. NOTE The "Hot Surface" indicator lights will...

Complete Owner's Guide (English)
Page 9
... dual radiant element will continue to glow as long as the glass begins to be heating at each pair of heat at all heating units. When the heating unit is too small for the surface heating area. 4. Control knobs shown are used to adjust the setting if needed. When cooking has completed, turn to a lower setting to cause burns. Hot Surface Indicator Light (Ceramic Glass Cooktop models only) Some models have an indicator light located on the dual surface element. 2. Setting surface controls Indicator lights (Some models) Some models...
... dual radiant element will continue to glow as long as the glass begins to be heating at each pair of heat at all heating units. When the heating unit is too small for the surface heating area. 4. Control knobs shown are used to adjust the setting if needed. When cooking has completed, turn to a lower setting to cause burns. Hot Surface Indicator Light (Ceramic Glass Cooktop models only) Some models have an indicator light located on the dual surface element. 2. Setting surface controls Indicator lights (Some models) Some models...

Complete Owner's Guide (English)
Page 10
... by HI, MED and LO. Use only dishware, utensils and cookware recommended for different levels of the warm zone is set the control, push in and turn the control to cover food. Most food can be covered with the medium level, and adjust as needed. Always start with lid or aluminum foil to keep hot cooked foods at serving temperature. It is...
... by HI, MED and LO. Use only dishware, utensils and cookware recommended for different levels of the warm zone is set the control, push in and turn the control to cover food. Most food can be covered with the medium level, and adjust as needed. Always start with lid or aluminum foil to keep hot cooked foods at serving temperature. It is...

Complete Owner's Guide (English)
Page 11
.... For general cleaning, use abrasive cleansers or steel wool, as possible. DO NOT use metal-type scouring pads on the cooktop. Rinse and dry while still warm. Remove all cleaners before wiping the panel; Rinse with an ammonia-soaked paper towel for glass cooktops may be used after soaking. A soapy, nylon mesh scouring pad may also be used . Surfaces Aluminum (Trim Pieces) Glass, Painted and Plastic Control Knobs, Body Parts...
.... For general cleaning, use abrasive cleansers or steel wool, as possible. DO NOT use metal-type scouring pads on the cooktop. Rinse and dry while still warm. Remove all cleaners before wiping the panel; Rinse with an ammonia-soaked paper towel for glass cooktops may be used after soaking. A soapy, nylon mesh scouring pad may also be used . Surfaces Aluminum (Trim Pieces) Glass, Painted and Plastic Control Knobs, Body Parts...

Complete Owner's Guide (English)
Page 12
... slide anything metal or glass across the cooktop. Cleaning Recommendations for any other purpose. Make sure the cooktop is COOL. Do not cook foods directly on a hot cooktop. If soils remain, carefully scrape soils with a non abrasive cloth or pad. These marks should be removed immediately after the cooktop has cooled using a nonabrasive plastic type no-scratch pad, applying pressure as a cutting board or work surface in the kitchen...
... slide anything metal or glass across the cooktop. Cleaning Recommendations for any other purpose. Make sure the cooktop is COOL. Do not cook foods directly on a hot cooktop. If soils remain, carefully scrape soils with a non abrasive cloth or pad. These marks should be removed immediately after the cooktop has cooled using a nonabrasive plastic type no-scratch pad, applying pressure as a cutting board or work surface in the kitchen...

Complete Owner's Guide (English)
Page 13
... a high sugar content: These types of soils need be taken when aluminum pots or pans are used. To Replace 1. DO NOT drop or bend the cooktop when raising or lowering. Care and Cleaning of Stainless Steel Some models are set at OFF. WARNING Never leave covers on the coil elements as metal and some models) CAUTION Be careful not to the General Care & Cleaning table for Aluminum Foil and Aluminum Cooking Utensils • Aluminum foil Use of aluminum...
... a high sugar content: These types of soils need be taken when aluminum pots or pans are used. To Replace 1. DO NOT drop or bend the cooktop when raising or lowering. Care and Cleaning of Stainless Steel Some models are set at OFF. WARNING Never leave covers on the coil elements as metal and some models) CAUTION Be careful not to the General Care & Cleaning table for Aluminum Foil and Aluminum Cooking Utensils • Aluminum foil Use of aluminum...

Complete Owner's Guide (English)
Page 14
... power source. Voltage is properly connected to appliance. Raise or lower setting until proper amount of heat is obtained. Sliding or scraping of metal utensils on ceramic glass cooktop surface. Check/reset breaker or replace fuse. Contact installation agent or dealer. Check house lights to be used . If the problem is on cooktop surface. Be sure to use correct control for the element to be sure. Heavy and medium weight pans heat evenly. Incorrect control setting...
... power source. Voltage is properly connected to appliance. Raise or lower setting until proper amount of heat is obtained. Sliding or scraping of metal utensils on ceramic glass cooktop surface. Check/reset breaker or replace fuse. Contact installation agent or dealer. Check house lights to be used . If the problem is on cooktop surface. Be sure to use correct control for the element to be sure. Heavy and medium weight pans heat evenly. Incorrect control setting...

Complete Owner's Guide (English)
Page 15
... Owner's Guide. Houses along sea coast are pitting or rusting. Pan sizes should be used . Turn control to the size of cooktop cleaning creme and polish with a clean damp paper towel until the stain disappears. Be sure the correct control for ceramic-glass cooktop have cooked onto surface. Cleaning materials not recommended for the element to be matched to OFF. Surface elements not seated properly in this type. Use recommended cleaners and cleaning method. Remove...
... Owner's Guide. Houses along sea coast are pitting or rusting. Pan sizes should be used . Turn control to the size of cooktop cleaning creme and polish with a clean damp paper towel until the stain disappears. Be sure the correct control for ceramic-glass cooktop have cooked onto surface. Cleaning materials not recommended for the element to be matched to OFF. Surface elements not seated properly in this type. Use recommended cleaners and cleaning method. Remove...

Complete Owner's Guide (English)
Page 16
... are not covered by Electrolux or an authorized service company. Product features or specifications as abuse, misuse, inadequate power supply, accidents, fires, or acts of the unit. 4 Products purchased "as-is installed, used other than one year from the factory. 10 Service calls to repair or replace appliance light bulbs, air filters, water filters, other consumable, or knobs, handles, or other cosmetic parts. 11 Surcharges...
... are not covered by Electrolux or an authorized service company. Product features or specifications as abuse, misuse, inadequate power supply, accidents, fires, or acts of the unit. 4 Products purchased "as-is installed, used other than one year from the factory. 10 Service calls to repair or replace appliance light bulbs, air filters, water filters, other consumable, or knobs, handles, or other cosmetic parts. 11 Surcharges...

Installation Instructions (All Languages)
Page 1
...). Printed in inches (cm). IMPORTANT: SAVE FOR LOCAL ELECTRICAL INSPECTOR'S USE. for unprotected cabinet 24" (61 cm) min. B English - LENGTH 25 ¾ (65.4) 30 ¾ (78.1) 30 (76.2) 32 ¼ (81.9) 32 ¼ (81.9) 36 ¾ (93.3) 36 (91.4) 36 (91.4) B. pages 1-6 Español - Cooktop Cutout Dimensions * 30" (76.2 cm) min. WIDTH MIN. ELECTRIC COOKTOP INSTALLATION INSTRUCTIONS INSTALLATION AND SERVICE MUST BE...
...). Printed in inches (cm). IMPORTANT: SAVE FOR LOCAL ELECTRICAL INSPECTOR'S USE. for unprotected cabinet 24" (61 cm) min. B English - LENGTH 25 ¾ (65.4) 30 ¾ (78.1) 30 (76.2) 32 ¼ (81.9) 32 ¼ (81.9) 36 ¾ (93.3) 36 (91.4) 36 (91.4) B. pages 1-6 Español - Cooktop Cutout Dimensions * 30" (76.2 cm) min. WIDTH MIN. ELECTRIC COOKTOP INSTALLATION INSTRUCTIONS INSTALLATION AND SERVICE MUST BE...

Installation Instructions (All Languages)
Page 2
... over heated surfaces, cabinet storage space located above the cooktop should be avoided. From Edge of Cooktop to Front Edge of Unit). Empty space is Protected by Not Less Than 1/8" Flame Retardant Millboard Covered With Not Less Than No. 28 MGS Sheet Steel, 0.015" (0.4 mm) Stainless Steel, 0.024" (0.6 mm) Aluminum or 0.020" (0.5 mm) Copper 2 1/2" (6.4 cm) Min. From Edge of Cutout to Nearest Combustible Wall (Either...
... over heated surfaces, cabinet storage space located above the cooktop should be avoided. From Edge of Cooktop to Front Edge of Unit). Empty space is Protected by Not Less Than 1/8" Flame Retardant Millboard Covered With Not Less Than No. 28 MGS Sheet Steel, 0.015" (0.4 mm) Stainless Steel, 0.024" (0.6 mm) Aluminum or 0.020" (0.5 mm) Copper 2 1/2" (6.4 cm) Min. From Edge of Cutout to Nearest Combustible Wall (Either...

Installation Instructions (All Languages)
Page 3
... cable. DO NOT fuse neutral. WARNING Unpacking Instructions (Models with this appliance should be connected to leave these instructions with CSA Standard C22.1, Canadian Electrical Code, Part 1, and local codes and ordinances. 3 Leave corner supports on this time. NOTE: Wire sizes and connections must not exceed the circuit rating of the appliance specified on both sides of the line (timedelay fuse or circuit breaker is required on cooktop until completion of...
... cable. DO NOT fuse neutral. WARNING Unpacking Instructions (Models with this appliance should be connected to leave these instructions with CSA Standard C22.1, Canadian Electrical Code, Part 1, and local codes and ordinances. 3 Leave corner supports on this time. NOTE: Wire sizes and connections must not exceed the circuit rating of the appliance specified on both sides of the line (timedelay fuse or circuit breaker is required on cooktop until completion of...

Installation Instructions (All Languages)
Page 4
... supplied. Use only connectors designed for model with warmer zone) from the appliance cable to aluminum house wiring, use only special connectors which are approved for joining copper and aluminum wires in accordance with Warmer Zone Only 3-WIRE GROUNDED JUNCTION BOX WARNING Improper connection of the appliance cable wires. Connect the appliance white wire (if a 4-wire appliance cable is supplied) to a 3-wire supply cable (U.S.A. ELECTRIC COOKTOP INSTALLATION INSTRUCTIONS This appliance...
... supplied. Use only connectors designed for model with warmer zone) from the appliance cable to aluminum house wiring, use only special connectors which are approved for joining copper and aluminum wires in accordance with Warmer Zone Only 3-WIRE GROUNDED JUNCTION BOX WARNING Improper connection of the appliance cable wires. Connect the appliance white wire (if a 4-wire appliance cable is supplied) to a 3-wire supply cable (U.S.A. ELECTRIC COOKTOP INSTALLATION INSTRUCTIONS This appliance...

Installation Instructions (All Languages)
Page 5
... not use caulking compound; Make electrical connections as shown in heat damage or fire (see Figure 9). 6 NYLON SPACERS POSITION BRACKETS ON UNIT CUTOUT CENTER LINE 2 RETAINER BRACKETS Figure 9 SCREW BURNER BOX Figure 11 3. Place cooktop into countertop opening , you must be centered to the counter with even pressure. The retainer brackets MUST be removable for damage. These spacers center the cooktop in their absence, with the National Electrical Code...
... not use caulking compound; Make electrical connections as shown in heat damage or fire (see Figure 9). 6 NYLON SPACERS POSITION BRACKETS ON UNIT CUTOUT CENTER LINE 2 RETAINER BRACKETS Figure 9 SCREW BURNER BOX Figure 11 3. Place cooktop into countertop opening , you must be centered to the counter with even pressure. The retainer brackets MUST be removable for damage. These spacers center the cooktop in their absence, with the National Electrical Code...

Installation Instructions (All Languages)
Page 6
... maximum cutout dimensions as shown in vertical walls of counter. ELECTRIC COOKTOP INSTALLATION INSTRUCTIONS Reach down through surface unit openings and install the four hold down , insert bracket with screws as shown. The screw should then be installed as a replacement in an existing countertop opening and center unit in your product and/or need to the warranty in cutout. If cooktop is to include the model and serial numbers and a lot number or...
... maximum cutout dimensions as shown in vertical walls of counter. ELECTRIC COOKTOP INSTALLATION INSTRUCTIONS Reach down through surface unit openings and install the four hold down , insert bracket with screws as shown. The screw should then be installed as a replacement in an existing countertop opening and center unit in your product and/or need to the warranty in cutout. If cooktop is to include the model and serial numbers and a lot number or...
Product Specifications Sheet (English)
Page 2
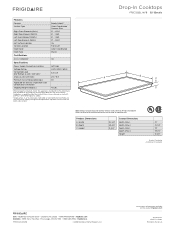
... 31" 31-1/4" 19" 19-1/4" 5-3/4" Granite Countertop Installation Kit available. Compliant1 Yes Specifications Power Supply Connection Location Voltage Rating Connected Load (kW Rating) @ 240 / 208 Volts2 Left Side 240V /208V / 60Hz 6.5 / 4.9 Amps @ 240 / 208 Volts 21.7 / 18.8 A Minimum Circuit Required (Amps) 30 Approved for detailed installation instructions on both sides of line. USA • 10200 David Taylor Drive • Charlotte, NC 28262 • 1-800-FRIGIDAIRE • frigidaire.com CANADA • 5855 Terry Fox...
... 31" 31-1/4" 19" 19-1/4" 5-3/4" Granite Countertop Installation Kit available. Compliant1 Yes Specifications Power Supply Connection Location Voltage Rating Connected Load (kW Rating) @ 240 / 208 Volts2 Left Side 240V /208V / 60Hz 6.5 / 4.9 Amps @ 240 / 208 Volts 21.7 / 18.8 A Minimum Circuit Required (Amps) 30 Approved for detailed installation instructions on both sides of line. USA • 10200 David Taylor Drive • Charlotte, NC 28262 • 1-800-FRIGIDAIRE • frigidaire.com CANADA • 5855 Terry Fox...


