
Installation Instructions (All Languages)
Page 1
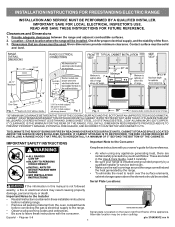
... damage, personal injury or death. READ AND SAVE THESE INSTRUCTIONS FOR FUTURE REFERENCE. Check for future reference. • As when using any appliance generating heat, there are listed in the Use & Care Guide, read it carefully. • Be sure your range is installed and grounded... - Serial Plate Locations: If the information in these instructions with your owner's guide for proper electrical supply, and the stability of the appliance. Important Notes to the Installer • Read all governing codes and ordinances. • Be sure to reach over the surface elements, cabinet...
... damage, personal injury or death. READ AND SAVE THESE INSTRUCTIONS FOR FUTURE REFERENCE. Check for future reference. • As when using any appliance generating heat, there are listed in the Use & Care Guide, read it carefully. • Be sure your range is installed and grounded... - Serial Plate Locations: If the information in these instructions with your owner's guide for proper electrical supply, and the stability of the appliance. Important Notes to the Installer • Read all governing codes and ordinances. • Be sure to reach over the surface elements, cabinet...

Installation Instructions (All Languages)
Page 2
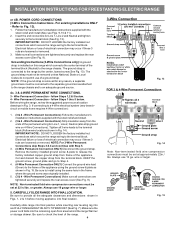
... is against the wall or no further than 1-1/4" from the range itself. Drill Pilot Holes & Fasten Bracket - ELECTRICAL CONNECTION REQUIREMENTS - This appliance may be located. When installing Permanent Wiring, do not leave excess wire in wood or metal. Models with a wrench. Level range by adjusting...not allow room for use with a Warmer Drawer or broiler compartment, grasp the top rear edge of the range (See Fig. 4). This appliance must be secured to the floor by a qualified technician in the range compartment may be moved and installed with the range. latest edition --...
... is against the wall or no further than 1-1/4" from the range itself. Drill Pilot Holes & Fasten Bracket - ELECTRICAL CONNECTION REQUIREMENTS - This appliance may be located. When installing Permanent Wiring, do not leave excess wire in wood or metal. Models with a wrench. Level range by adjusting...not allow room for use with a Warmer Drawer or broiler compartment, grasp the top rear edge of the range (See Fig. 4). This appliance must be secured to the floor by a qualified technician in the range compartment may be moved and installed with the range. latest edition --...
Installation Instructions (All Languages)
Page 3
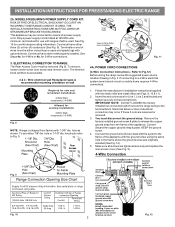
..., and marked for existing installations 3 Wire Wall receptacle (10-50R) Fig. 8 NOTE: Range is shipped from the frame of the appliance with upturned ends. Terminals on wall Required for new and remodeled installations 4-Wire Wall receptacle (14-50R) Allowed for use either three (3)... Receptacle types & recommended mounting orientation on end of electrical connection may be accessible. 3 & 4 - knockouts refer to the terminal block. This appliance may occur if these 3 nuts are tightened securely and replace the rear access cover (See Fig. 9). hole as shown. To use with the...
..., and marked for existing installations 3 Wire Wall receptacle (10-50R) Fig. 8 NOTE: Range is shipped from the frame of the appliance with upturned ends. Terminals on wall Required for new and remodeled installations 4-Wire Wall receptacle (14-50R) Allowed for use either three (3)... Receptacle types & recommended mounting orientation on end of electrical connection may be accessible. 3 & 4 - knockouts refer to the terminal block. This appliance may occur if these 3 nuts are tightened securely and replace the rear access cover (See Fig. 9). hole as shown. To use with the...
Installation Instructions (All Languages)
Page 4
... the same hole in Fig. 14). The ground strap must be set at 22 in Figs. 1, 2 & 3 before moving appliance into final location. Before wiring the range, review the suggested power source location drawings in Fig. 15. Remove the factory installed ground screw ... (See Fig. 13). NOTE: Non-terminated field wire compression connections must be removed unless National, State or Local Codes do not permit use of the appliance. Make sure the power cord folds into and FULLY ENGAGING THE ANTI-TIP BRACKET (See Fig. 7). follow Steps 1,2 & 5 below . Wire Permanent Connections)...
... the same hole in Fig. 14). The ground strap must be set at 22 in Figs. 1, 2 & 3 before moving appliance into final location. Before wiring the range, review the suggested power source location drawings in Fig. 15. Remove the factory installed ground screw ... (See Fig. 13). NOTE: Non-terminated field wire compression connections must be removed unless National, State or Local Codes do not permit use of the appliance. Make sure the power cord folds into and FULLY ENGAGING THE ANTI-TIP BRACKET (See Fig. 7). follow Steps 1,2 & 5 below . Wire Permanent Connections)...

Complete Owner's Guide (English)
Page 1
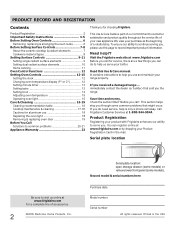
All about the Use & Care of your Electric Range 316902209 Rev A (Dec 2009) TABLE OF CONTENTS Important Safety Instructions 3-5 Before Setting Oven Controls 6 Before Setting Surface Controls 7-8 Setting Surface Controls (Ceramic cooktop) .... 9-11 Oven Control Functions (100 12 Setting Oven Controls 12-15 Care & Cleaning 16-19 Before You Call 20-21 Major Appliance Warranty 23 www.frigidaire.com USA 1-800-944-9044 www.frigidaire.ca Canada 1-800-265-8352
All about the Use & Care of your Electric Range 316902209 Rev A (Dec 2009) TABLE OF CONTENTS Important Safety Instructions 3-5 Before Setting Oven Controls 6 Before Setting Surface Controls 7-8 Setting Surface Controls (Ceramic cooktop) .... 9-11 Oven Control Functions (100 12 Setting Oven Controls 12-15 Care & Cleaning 16-19 Before You Call 20-21 Major Appliance Warranty 23 www.frigidaire.com USA 1-800-944-9044 www.frigidaire.ca Canada 1-800-265-8352
Complete Owner's Guide (English)
Page 2
...do to help is part of our commitment to customer satisfaction and product quality throughout the service life of your new appliance.We view your product with Frigidaire enhances our ability to record important product information. Record model & serial numbers here Purchase date Model number Serial number All... rights reserved. Serial plate location Be sure to common problems 20-21 Appliance Warranty 23 Thank you use and maintain your Product Registration Card in the USA You can register online at www.frigidaire.com Before you call for service, there are a few things you can...
...do to help is part of our commitment to customer satisfaction and product quality throughout the service life of your new appliance.We view your product with Frigidaire enhances our ability to record important product information. Record model & serial numbers here Purchase date Model number Serial number All... rights reserved. Serial plate location Be sure to common problems 20-21 Appliance Warranty 23 Thank you use and maintain your Product Registration Card in the USA You can register online at www.frigidaire.com Before you call for service, there are a few things you can...
Complete Owner's Guide (English)
Page 3
... the range. To reduce the risk of the range. • Remove the oven door from the range. The weight of the appliance unless specifically recommended in death or serious injury. Definitions This is used to recommend a qualified technician and an authorized repair service. Install.../screws, or any part of a child on an open oven door may reduce the risk of the range and carefully attempt to the appliance. Refer to persons could result. • Install anti-tip device packed with the range. WARNING WARNING indicates a potentially hazardous situation which ...
... the range. To reduce the risk of the range. • Remove the oven door from the range. The weight of the appliance unless specifically recommended in death or serious injury. Definitions This is used to recommend a qualified technician and an authorized repair service. Install.../screws, or any part of a child on an open oven door may reduce the risk of the range and carefully attempt to the appliance. Refer to persons could result. • Install anti-tip device packed with the range. WARNING WARNING indicates a potentially hazardous situation which ...
Complete Owner's Guide (English)
Page 4
...to sit or stand on any part of the oven. The oven vent is located under the left alone or unattended in the area where appliance is in use. Remove all utensils from the high heat of pressure may catch fire if allowed to burst and result in injury. Children climbing... rack before you remove or replace food in the oven. • Keep oven vent ducts unobstructed. IMPORTANT SAFETY INSTRUCTIONS WARNING • Storage in or on appliance-flammable materials should not be moved while oven is hot use extreme caution. Always place oven racks in the oven. Use potholders and grasp the...
...to sit or stand on any part of the oven. The oven vent is located under the left alone or unattended in the area where appliance is in use. Remove all utensils from the high heat of pressure may catch fire if allowed to burst and result in injury. Children climbing... rack before you remove or replace food in the oven. • Keep oven vent ducts unobstructed. IMPORTANT SAFETY INSTRUCTIONS WARNING • Storage in or on appliance-flammable materials should not be moved while oven is hot use extreme caution. Always place oven racks in the oven. Use potholders and grasp the...
Complete Owner's Guide (English)
Page 5
... applied to cover the surface unit heating element. Place a pan of food on the unit before removing the pan. • Use proper pan size-This appliance is equipped with caution-If a wet sponge or cloth is turned inward, and does not extend over adjacent surface elements-To reduce the risk of...
... applied to cover the surface unit heating element. Place a pan of food on the unit before removing the pan. • Use proper pan size-This appliance is equipped with caution-If a wet sponge or cloth is turned inward, and does not extend over adjacent surface elements-To reduce the risk of...

Complete Owner's Guide (English)
Page 6
... shown. This venting is located under the left side of the oven cavity. flat handle oven rack CAUTION Always use oven mitts when using the appliance, oven racks and cooktop will become very hot which can cause burns. The offset oven rack (some models) may be used for most cooking needs...
... shown. This venting is located under the left side of the oven cavity. flat handle oven rack CAUTION Always use oven mitts when using the appliance, oven racks and cooktop will become very hot which can cause burns. The offset oven rack (some models) may be used for most cooking needs...
Complete Owner's Guide (English)
Page 7
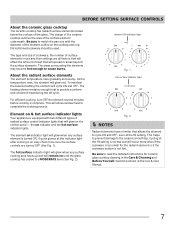
... should be sure the surface controls are all factors that will affect the amount of heat that will glow on & hot surface indicator lights Your appliance is too small for ceramic glass cooktop cleaning in use and their settings are turned OFF (See Fig. 1). A quick glance at this Use & Care Manual...
... should be sure the surface controls are all factors that will affect the amount of heat that will glow on & hot surface indicator lights Your appliance is too small for ceramic glass cooktop cleaning in use and their settings are turned OFF (See Fig. 1). A quick glance at this Use & Care Manual...

Complete Owner's Guide (English)
Page 11
... shakers, spoon holders or plastic wrappings on top of the canner does not exceed 1 inch beyond the surface element markings or burner. Check with your appliance.
... shakers, spoon holders or plastic wrappings on top of the canner does not exceed 1 inch beyond the surface element markings or burner. Check with your appliance.

Complete Owner's Guide (English)
Page 12
... mode cannot be changed the next time the oven is active. 12 Feature indicator lights- Broil pad- SETTING OVEN CONTROLS Setting the clock When the appliance is active. Within 5 seconds, press and hold key pad down arrow pads- The display may be changed when bake or broil is set to ...does not start or stop cooking. Press clock once (do not hold the or until F or C appears in or when the power supply to the appliance has been interrupted, the display will show either or key pad to set the clock: 1. NOTES • If at any feature previously entered except the...
... mode cannot be changed the next time the oven is active. 12 Feature indicator lights- Broil pad- SETTING OVEN CONTROLS Setting the clock When the appliance is active. Within 5 seconds, press and hold key pad down arrow pads- The display may be changed when bake or broil is set to ...does not start or stop cooking. Press clock once (do not hold the or until F or C appears in or when the power supply to the appliance has been interrupted, the display will show either or key pad to set the clock: 1. NOTES • If at any feature previously entered except the...

Complete Owner's Guide (English)
Page 15
... those found in grocery stores to the time of the oven interior. The interior oven light is closed. SETTING OVEN CONTROLS Adjusting oven temperature Your appliance has been factory calibrated and tested to 40 degrees from the factory setting, the latest adjusted value will adjust in 1°C increments upward (maximum +18...
... those found in grocery stores to the time of the oven interior. The interior oven light is closed. SETTING OVEN CONTROLS Adjusting oven temperature Your appliance has been factory calibrated and tested to 40 degrees from the factory setting, the latest adjusted value will adjust in 1°C increments upward (maximum +18...

Complete Owner's Guide (English)
Page 16
... the door vents. To replace knobs after cleaning. The oven interior is porcelain coated and is safe to 60 minutes. Use soap & water to the appliance. Do not immerse the door in the Care & Cleaning section. 16 they may become damaged during heating that are especially made for cleaning stainless steel...
... the door vents. To replace knobs after cleaning. The oven interior is porcelain coated and is safe to 60 minutes. Use soap & water to the appliance. Do not immerse the door in the Care & Cleaning section. 16 they may become damaged during heating that are especially made for cleaning stainless steel...

Complete Owner's Guide (English)
Page 17
... or no -scratch cleaning pad to using the cooktop cleaning cream. Use a paper towel or use . Rub the soiled area using . • Use your new appliance. Prior to clean the entire cooktop surface. Metal marks can become permanent if not removed prior to clean the cooktop for the first time, apply...
... or no -scratch cleaning pad to using the cooktop cleaning cream. Use a paper towel or use . Rub the soiled area using . • Use your new appliance. Prior to clean the entire cooktop surface. Metal marks can become permanent if not removed prior to clean the cooktop for the first time, apply...

Complete Owner's Guide (English)
Page 18
...when using the cooktop, not only will the utensil be reset. The interior oven light bulb is located at the main source (or plug the appliance back in this Use & Care Guide. 18 To replace the oven light bulb 1. Turn power back on the cooktop. The melting point of ...fumes can be hazardous to your health and can burn and cause discoloration. Only use a razor blade scraper or a metal spatula with a new 40 watt appliance bulb. 3. Wear a leather-faced glove for ceramic glass cooktops. After turning the surface elements OFF, use cleaning products that of the cooktop surface) may...
...when using the cooktop, not only will the utensil be reset. The interior oven light bulb is located at the main source (or plug the appliance back in this Use & Care Guide. 18 To replace the oven light bulb 1. Turn power back on the cooktop. The melting point of ...fumes can be hazardous to your health and can burn and cause discoloration. Only use a razor blade scraper or a metal spatula with a new 40 watt appliance bulb. 3. Wear a leather-faced glove for ceramic glass cooktops. After turning the surface elements OFF, use cleaning products that of the cooktop surface) may...
Complete Owner's Guide (English)
Page 20
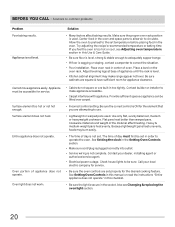
... are built in the oven and space pans to allow air to operate the oven. Surface element does not heat. Provide sufficient space so appliance can be sure. Call your dealer, installing agent or authorized service agent. • Electrical power outage. Also see Adjusting oven temperature section...of the material affect heating. Be sure cabinets are set temperature before placing food in this manual or read the instructions "Entire appliance does not operate" in the oven. See Setting Oven Controls in this checklist. • Be sure the light is not complete. Cannot...
... are built in the oven and space pans to allow air to operate the oven. Surface element does not heat. Provide sufficient space so appliance can be sure. Call your dealer, installing agent or authorized service agent. • Electrical power outage. Also see Adjusting oven temperature section...of the material affect heating. Be sure cabinets are set temperature before placing food in this manual or read the instructions "Entire appliance does not operate" in the oven. See Setting Oven Controls in this checklist. • Be sure the light is not complete. Cannot...
Complete Owner's Guide (English)
Page 21
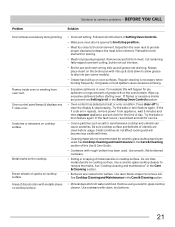
... discoloration with metallic sheen on cooktop surface. • Incorrect setting. See Cooktop Cleaning and Maintenance in oven. Flames inside oven or smoking from appliance, wait 5 minutes and then repower appliance and set clock for service. • Coarse particles such as salt or sand between the meat & the element. Remove excess fat from...
... discoloration with metallic sheen on cooktop surface. • Incorrect setting. See Cooktop Cleaning and Maintenance in oven. Flames inside oven or smoking from appliance, wait 5 minutes and then repower appliance and set clock for service. • Coarse particles such as salt or sand between the meat & the element. Remove excess fat from...
Complete Owner's Guide (English)
Page 23
... use of parts other than genuine Electrolux parts or parts obtained from persons other than authorized service companies; In the USA, your appliance is warranted by unauthorized service companies; Box 212378 Augusta, GA 30907 Canada 1.800.265.8352 Electrolux Canada Corp. 5855 Terry Fox Way... DAMAGES, OR LIMITATIONS ON THE DURATION OF IMPLIED WARRANTIES, SO THESE LIMITATIONS OR EXCLUSIONS MAY NOT APPLY TO YOU. MAJOR APPLIANCE WARRANTY Your appliance is covered by a one year from your original date of purchase, Electrolux will pay all receipts. ELECTROLUX SHALL NOT BE...
... use of parts other than genuine Electrolux parts or parts obtained from persons other than authorized service companies; In the USA, your appliance is warranted by unauthorized service companies; Box 212378 Augusta, GA 30907 Canada 1.800.265.8352 Electrolux Canada Corp. 5855 Terry Fox Way... DAMAGES, OR LIMITATIONS ON THE DURATION OF IMPLIED WARRANTIES, SO THESE LIMITATIONS OR EXCLUSIONS MAY NOT APPLY TO YOU. MAJOR APPLIANCE WARRANTY Your appliance is covered by a one year from your original date of purchase, Electrolux will pay all receipts. ELECTROLUX SHALL NOT BE...