Installation Instructions (All Languages)
Page 1
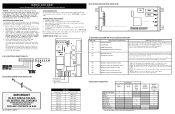
... installation instructions before installing range. • Remove all packing material from the oven compartments before connecting the gas & electrical supply to reach over the surface elements, cabinet storage space above the elements should follow. Check for future reference. • As when using any appliance generating heat, there are certain safety precautions you should be avoided. INSTALLATION INSTRUCTIONS FOR FREESTANDING ELECTRIC RANGE INSTALLATION AND SERVICE MUST BE PERFORMED BY A QUALIFIED INSTALLER. Location-Check location where the range...
... installation instructions before installing range. • Remove all packing material from the oven compartments before connecting the gas & electrical supply to reach over the surface elements, cabinet storage space above the elements should follow. Check for future reference. • As when using any appliance generating heat, there are certain safety precautions you should be avoided. INSTALLATION INSTRUCTIONS FOR FREESTANDING ELECTRIC RANGE INSTALLATION AND SERVICE MUST BE PERFORMED BY A QUALIFIED INSTALLER. Location-Check location where the range...

Installation Instructions (All Languages)
Page 2
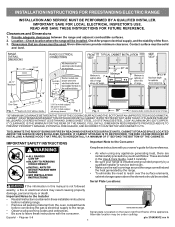
... location of the range. Drill Pilot Holes & Fasten Bracket - Drill a 1/8" pilot hole where screws are to be used in wood or concrete material. ELECTRICAL CONNECTION REQUIREMENTS - This appliance must also be located. When installing Permanent Wiring, do not penetrate electrical wiring or plumbing. 1a. Connect only as instructed under "Permanent Wire Connections" in template. 1b. INSTALLATION INSTRUCTIONS FOR FREESTANDING ELECTRIC RANGE BEFORE STARTING Tools You Will Need For leveling legs and Anti-Tip Bracket: • Adjustable wrench or channel lock...
... location of the range. Drill Pilot Holes & Fasten Bracket - Drill a 1/8" pilot hole where screws are to be used in wood or concrete material. ELECTRICAL CONNECTION REQUIREMENTS - This appliance must also be located. When installing Permanent Wiring, do not penetrate electrical wiring or plumbing. 1a. Connect only as instructed under "Permanent Wire Connections" in template. 1b. INSTALLATION INSTRUCTIONS FOR FREESTANDING ELECTRIC RANGE BEFORE STARTING Tools You Will Need For leveling legs and Anti-Tip Bracket: • Adjustable wrench or channel lock...
Installation Instructions (All Languages)
Page 3
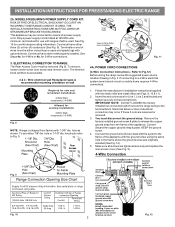
... removed. 3. See Fig. 10 for 3-Wire connections. 3. for cord kit ampere rating information. The Rear Access Cover must be removed (Fig 9). Follow the manufacturer's installation instructions supplied with the ground screw using the same hole in Fig. 3. IMPORTANT NOTE: DO NOT LOOSEN the factory installed nut connections which secure the range wiring to a 4-Wire electrical system (new branch-circuit or mobile home requires 4-Wire connection): 1. MODELS REQUIRING POWER SUPPLY CORD KIT. Terminals on wall Required for new and remodeled installations 4-Wire...
... removed. 3. See Fig. 10 for 3-Wire connections. 3. for cord kit ampere rating information. The Rear Access Cover must be removed (Fig 9). Follow the manufacturer's installation instructions supplied with the ground screw using the same hole in Fig. 3. IMPORTANT NOTE: DO NOT LOOSEN the factory installed nut connections which secure the range wiring to a 4-Wire electrical system (new branch-circuit or mobile home requires 4-Wire connection): 1. MODELS REQUIRING POWER SUPPLY CORD KIT. Terminals on wall Required for new and remodeled installations 4-Wire...
Installation Instructions (All Languages)
Page 4
... requires 4-Wire connection): 1. (3 & 4 - Make sure the power cord folds into the remaining open floor area behind the range Warmer or storage drawer. Always use 10 gauge wire or larger. 5. follow Steps 1 thru 5 below . 4 - Before wiring the range, review the suggested power source location drawings in Fig. 15. Wire Permanent Connections) Make sure all the adequate clearances and dimensions shown in the frame where the ground screw was originally installed. 5. (3 & 4 - Electrical...
... requires 4-Wire connection): 1. (3 & 4 - Make sure the power cord folds into the remaining open floor area behind the range Warmer or storage drawer. Always use 10 gauge wire or larger. 5. follow Steps 1 thru 5 below . 4 - Before wiring the range, review the suggested power source location drawings in Fig. 15. Wire Permanent Connections) Make sure all the adequate clearances and dimensions shown in the frame where the ground screw was originally installed. 5. (3 & 4 - Electrical...
Wiring Diagram (All Languages)
Page 1
...;F increments. 5. TEMPERATURE ADJUSTMENT 1. Note: Changing calibration affects normal Bake mode. F30 Open probe connection. Check for shorted Sensor Probe harness between EOC & Lock Motor Micro Switch. 2. (F90, 91, 92, 93 & 94) Replace the Motor Door Latch assembly if necessary. If open, replace Lock Motor F92 Maximum oven door open , replace Lock Motor F93 Maximum oven door lock time exceeded. Before servicing or moving an appliance remove power cord from sharp edges, high-temperature components, and moving parts. • All uninsulated electrical terminals...
...;F increments. 5. TEMPERATURE ADJUSTMENT 1. Note: Changing calibration affects normal Bake mode. F30 Open probe connection. Check for shorted Sensor Probe harness between EOC & Lock Motor Micro Switch. 2. (F90, 91, 92, 93 & 94) Replace the Motor Door Latch assembly if necessary. If open, replace Lock Motor F92 Maximum oven door open , replace Lock Motor F93 Maximum oven door lock time exceeded. Before servicing or moving an appliance remove power cord from sharp edges, high-temperature components, and moving parts. • All uninsulated electrical terminals...
Complete Owners Guide
Page 3
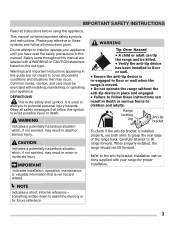
... This is installed properly, use both arms to children and adults. Carefully attempt to potential personal injury hazards. IMPORTANT SAFETY INSTRUCTIONS Read all instructions before using this manual are not meant to cover all possible conditions and situations that is moved. • Do not operate the range without the anti-tip device in death or serious burns to grasp the rear edge of...
... This is installed properly, use both arms to children and adults. Carefully attempt to potential personal injury hazards. IMPORTANT SAFETY INSTRUCTIONS Read all instructions before using this manual are not meant to cover all possible conditions and situations that is moved. • Do not operate the range without the anti-tip device in death or serious burns to grasp the rear edge of...
Complete Owners Guide
Page 4
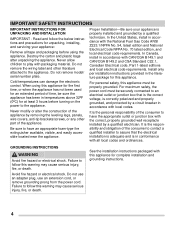
... a qualified electrician. Do not use an adapter plug, use an extension cord, or remove grounding prong from the power cord. Failure to the appliance. GROUNDING INSTRUCTIONS WARNING Avoid fire hazard or electrical shock. For personal safety, this appliance must be securely connected to assure that is the correct voltage, is properly installed and grounded by removing the leveling legs, panels, wire covers, anti-tip brackets/screws, or any other...
... a qualified electrician. Do not use an adapter plug, use an extension cord, or remove grounding prong from the power cord. Failure to the appliance. GROUNDING INSTRUCTIONS WARNING Avoid fire hazard or electrical shock. For personal safety, this appliance must be securely connected to assure that is the correct voltage, is properly installed and grounded by removing the leveling legs, panels, wire covers, anti-tip brackets/screws, or any other...

Complete Owners Guide
Page 6
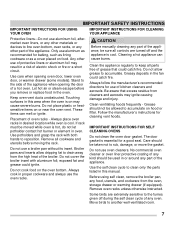
... be done to damage. IMPORTANT SAFETY INSTRUCTIONS CAUTION Do not attempt to line surface drip bowls. If the power fails, always turn on the cooktop. Once the power resumes, reset the clock and the oven function. Place cookware with the utensil, the handle of these pans or bowls during cooking may resume operation when power is not designed for packaging material. Use proper pan size - Boilovers may cause smoking and...
... be done to damage. IMPORTANT SAFETY INSTRUCTIONS CAUTION Do not attempt to line surface drip bowls. If the power fails, always turn on the cooktop. Once the power resumes, reset the clock and the oven function. Place cookware with the utensil, the handle of these pans or bowls during cooking may resume operation when power is not designed for packaging material. Use proper pan size - Boilovers may cause smoking and...
Complete Owners Guide
Page 7
... baking, such as lining cookware or as a cover placed on food. Do not use the oven racks. Touching surfaces in this manual. Placement of the appliance. Use potholders and grasp the rack with aluminum foil; Only use a broiler pan without its insert. Always place oven racks in desired location while oven is essential for use of a hot oven. The door gasket is cool. Remove oven racks unless otherwise instructed. Do not use aluminum as recommended for cleaning vent hoods...
... baking, such as lining cookware or as a cover placed on food. Do not use the oven racks. Touching surfaces in this manual. Placement of the appliance. Use potholders and grasp the rack with aluminum foil; Only use a broiler pan without its insert. Always place oven racks in desired location while oven is essential for use of a hot oven. The door gasket is cool. Remove oven racks unless otherwise instructed. Do not use aluminum as recommended for cleaning vent hoods...

Complete Owners Guide
Page 14
... wrappings on AFTER the control knob is touched before removing the cookware. Potholders, towels, or wooden spoons could melt or ignite. Improper installation of electric shock or fire. Place correctly sized cookware on the cooktop, they have to line surface drip bowls or reflector pans. The element may still be hot and burns may result in either direction (Figure 5) to the desired setting (refer to finish cooking.
... wrappings on AFTER the control knob is touched before removing the cookware. Potholders, towels, or wooden spoons could melt or ignite. Improper installation of electric shock or fire. Place correctly sized cookware on the cooktop, they have to line surface drip bowls or reflector pans. The element may still be hot and burns may result in either direction (Figure 5) to the desired setting (refer to finish cooking.

Complete Owners Guide
Page 16
BEFORE SETTING OVEN CONTROLS Oven Vent Location Types of a rack position lower than the flat rack and may be used for proper air circulation in most oven rack positions. Never close the oven door until it reaches the stop position. flat oven rack Figure 6: Oven vent WARNING Protective Liners - During self clean, temperatures in the oven will become very hot which can cause burns. • Remove all oven racks before using the oven. When cooking, the oven interior, oven exterior, oven racks, and cooktop will...
BEFORE SETTING OVEN CONTROLS Oven Vent Location Types of a rack position lower than the flat rack and may be used for proper air circulation in most oven rack positions. Never close the oven door until it reaches the stop position. flat oven rack Figure 6: Oven vent WARNING Protective Liners - During self clean, temperatures in the oven will become very hot which can cause burns. • Remove all oven racks before using the oven. When cooking, the oven interior, oven exterior, oven racks, and cooktop will...

Complete Owners Guide
Page 18
... unlocks, when the oven door lockout is active, or when the self clean cycle feature is reset higher than the actual oven temperature. 7. Door locked - Quick Bake uses a fan to select Bake feature. 2. Mode 24 Hr. Bake - The preheat light will turn on internal light when checking on indicator light - Enters the length of small and light soils. Mode 12 Hr. Mode 24 Hr. Use to circulate the oven's heat uniformly and continuously around the oven. Table 2: Minimum and maximum control settings Feature Bake Quick Bake Broil Timer Clock Time Start Time (delays start...
... unlocks, when the oven door lockout is active, or when the self clean cycle feature is reset higher than the actual oven temperature. 7. Door locked - Quick Bake uses a fan to select Bake feature. 2. Mode 24 Hr. Bake - The preheat light will turn on internal light when checking on indicator light - Enters the length of small and light soils. Mode 12 Hr. Mode 24 Hr. Use to circulate the oven's heat uniformly and continuously around the oven. Table 2: Minimum and maximum control settings Feature Bake Quick Bake Broil Timer Clock Time Start Time (delays start...
Complete Owners Guide
Page 20
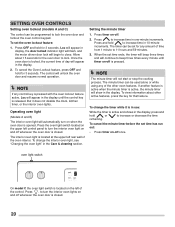
... change the timer while it does not disable the clock, kitchen timer, or the interior oven lights. The minute timer can be used alone or while using any of time from 1 minute to lock the oven door and lockout the oven control keypad. To change the interior oven light, see "Changing the oven light" in the display, press and hold for 3 seconds. Allow about other oven features. Operating oven light (Models A and B) The interior oven light will appear in the display. 2. The timer...
... change the timer while it does not disable the clock, kitchen timer, or the interior oven lights. The minute timer can be used alone or while using any of time from 1 minute to lock the oven door and lockout the oven control keypad. To change the interior oven light, see "Changing the oven light" in the display, press and hold for 3 seconds. Allow about other oven features. Operating oven light (Models A and B) The interior oven light will appear in the display. 2. The timer...

Complete Owners Guide
Page 24
... fire continues, use oven mitts. Oven racks will become very hot which can cause burns. 7 6 5 4 3 2 1 some models Oven with visible bake element 7 6 5 4 3 2 1 some models Oven with hidden bake element NOTE Always pull the oven rack out to drain and be cooked to the broil stop position (Figure 15). 7. To set broil 1. Figure 14: Rack positions NOTE The broiler pan and the insert (some smoke. Do not cover the insert with oven door open to the well...
... fire continues, use oven mitts. Oven racks will become very hot which can cause burns. 7 6 5 4 3 2 1 some models Oven with visible bake element 7 6 5 4 3 2 1 some models Oven with hidden bake element NOTE Always pull the oven rack out to drain and be cooked to the broil stop position (Figure 15). 7. To set broil 1. Figure 14: Rack positions NOTE The broiler pan and the insert (some smoke. Do not cover the insert with oven door open to the well...

Complete Owners Guide
Page 28
... is above room temperature a triple beep will show the time remaining in front of the oven to the water used for Steam Clean. • Before cleaning any length of small and light soils. Take care opening the door when the steam clean is cool. CAUTION • Do not add bleach, ammonia, oven cleaner, or any time to the oven vent and the oven door glass. Press either the...
... is above room temperature a triple beep will show the time remaining in front of the oven to the water used for Steam Clean. • Before cleaning any length of small and light soils. Take care opening the door when the steam clean is cool. CAUTION • Do not add bleach, ammonia, oven cleaner, or any time to the oven vent and the oven door glass. Press either the...

Complete Owners Guide
Page 31
... "Surface elements and drip bowls" on page 26. Remove all cleaners or future heating could damage the porcelain. See "Self Clean (models A and C)" on page 32. 31 Use mild dish detergent and water or a 50/50 solution of vinegar and water to remain on the interior door glass. Glass cleaner may be used on the outside of clean water and ammonia. Do not use oven cleaners, cleaning...
... "Surface elements and drip bowls" on page 26. Remove all cleaners or future heating could damage the porcelain. See "Self Clean (models A and C)" on page 32. 31 Use mild dish detergent and water or a 50/50 solution of vinegar and water to remain on the interior door glass. Glass cleaner may be used on the outside of clean water and ammonia. Do not use oven cleaners, cleaning...
Complete Owners Guide
Page 38
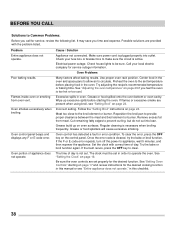
... the bake or broil function. If flames or excessive smoke are provided with correct time of appliance does not operate. Oven control panel beeps and displays any F or E code error. Incorrect setting. Cut remaining fatty edges to prevent curling, but do not cut into outlet. See "Setting the Clock" on the control panel. in the oven. Poor baking results. See "Adjusting the oven temperature" on page 17 and review instructions for service outage information. Oven smokes excessively when broiling. Oven...
... the bake or broil function. If flames or excessive smoke are provided with correct time of appliance does not operate. Oven control panel beeps and displays any F or E code error. Incorrect setting. Cut remaining fatty edges to prevent curling, but do not cut into outlet. See "Setting the Clock" on the control panel. in the oven. Poor baking results. See "Adjusting the oven temperature" on page 17 and review instructions for service outage information. Oven smokes excessively when broiling. Oven...
Complete Owners Guide
Page 39
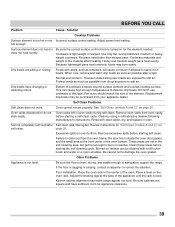
... cleaned with clean water, dry, and replace in /on residue. page 26. Remove excessive spills before starting the self-cleaning cycle. Burned-on self clean. Place the oven rack in the center of the element. Adjust the leveling legs at the front center of the oven bottom. Adjust power level setting. Flat pans heat better than warped pans. DO NOT use cookware of the appliance until the rack is too hot or not Incorrect surface control setting. Review instructions on "Self Clean (models...
... cleaned with clean water, dry, and replace in /on residue. page 26. Remove excessive spills before starting the self-cleaning cycle. Burned-on self clean. Place the oven rack in the center of the element. Adjust the leveling legs at the front center of the oven bottom. Adjust power level setting. Flat pans heat better than warped pans. DO NOT use cookware of the appliance until the rack is too hot or not Incorrect surface control setting. Review instructions on "Self Clean (models...

Product Specifications Sheet
Page 2
... B) PRODUCT DIMENSIONS A - FFEF3016V S/W/B FREESTANDING RANGE 30" ELECTRIC FEATURES Oven Control / Timing System Surface Type Window Exterior Door Finish Handle Design Exterior Finish (Side Panels) Oven Cleaning System Drawer Functionality OVEN CONTROLS Bake Broil Delay Start Self Clean Delay Clean Kitchen Timer Timed Cook Option Auto Oven Shut-Off COOKTOP FEATURES Right Front Element (Watts) Right Rear Element (Watts) Left Front Element (Watts) Left Rear Element (Watts) Coil Cooktop / Drip Bowls OVEN FEATURES Capacity (Cu. Always consult local and national electric, gas and plumbing codes...
... B) PRODUCT DIMENSIONS A - FFEF3016V S/W/B FREESTANDING RANGE 30" ELECTRIC FEATURES Oven Control / Timing System Surface Type Window Exterior Door Finish Handle Design Exterior Finish (Side Panels) Oven Cleaning System Drawer Functionality OVEN CONTROLS Bake Broil Delay Start Self Clean Delay Clean Kitchen Timer Timed Cook Option Auto Oven Shut-Off COOKTOP FEATURES Right Front Element (Watts) Right Rear Element (Watts) Left Front Element (Watts) Left Rear Element (Watts) Coil Cooktop / Drip Bowls OVEN FEATURES Capacity (Cu. Always consult local and national electric, gas and plumbing codes...

Product Specifications Sheet
Page 3
... © 2019 Electrolux Home Products, Inc. Frigidaire Gallery FFEF3016V S/W/B FREESTANDING RANGE 30" ELECTRIC Minimum 1" clearance required to nearest combustible wall on the web at frigidaire.com / frigidaire.ca. Front Side 29 1/4" 25 3/4" Power supply connection (middle bottom rear*) *when viewed from edge of unprotected wood or metal overhead cabinet; Always consult local and national electric, gas and plumbing codes. Specifications subject to prevent property damage, potential fi...
... © 2019 Electrolux Home Products, Inc. Frigidaire Gallery FFEF3016V S/W/B FREESTANDING RANGE 30" ELECTRIC Minimum 1" clearance required to nearest combustible wall on the web at frigidaire.com / frigidaire.ca. Front Side 29 1/4" 25 3/4" Power supply connection (middle bottom rear*) *when viewed from edge of unprotected wood or metal overhead cabinet; Always consult local and national electric, gas and plumbing codes. Specifications subject to prevent property damage, potential fi...


