Installation Instructions
Page 2
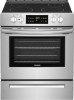
... Maximum mm) BEY2O9- N7/8D" THE BOTTOM OF THE CABINETSD.oor Open (759 mm) 6" (152 mm) 2-5/8" (67 mm) for models equipped with warmer drawers 3-1/2" (89 mm) for cabinets CLEARANCE BETWabEovEe rNangeTtHop.E TOP OF THE COOKING SURFACE AND THE BOTT2O5" M OF AN UNPROTECTED ... REACHING (OM12aV1x9imEmuRmm) HEATED STORAGE SPACE LOCATED SURFACE UNIT36S,1/C8"ABINET ABOVE THE S(9U14RmmF)A(3CmEm)UNITS SHOULD BE AVOIDED. for models equipped with storage drawers Wall Edge Fig. 3 2 30" ELECTRIC FRONT CONTROL FREESTANDING INSTALLATION INSTRUCTIONS 1. Check for electrical outlet location ...
... Maximum mm) BEY2O9- N7/8D" THE BOTTOM OF THE CABINETSD.oor Open (759 mm) 6" (152 mm) 2-5/8" (67 mm) for models equipped with warmer drawers 3-1/2" (89 mm) for cabinets CLEARANCE BETWabEovEe rNangeTtHop.E TOP OF THE COOKING SURFACE AND THE BOTT2O5" M OF AN UNPROTECTED ... REACHING (OM12aV1x9imEmuRmm) HEATED STORAGE SPACE LOCATED SURFACE UNIT36S,1/C8"ABINET ABOVE THE S(9U14RmmF)A(3CmEm)UNITS SHOULD BE AVOIDED. for models equipped with storage drawers Wall Edge Fig. 3 2 30" ELECTRIC FRONT CONTROL FREESTANDING INSTALLATION INSTRUCTIONS 1. Check for electrical outlet location ...
Installation Instructions
Page 4
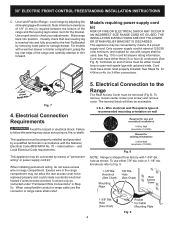
..., do not leave excess wire in Step 5c. Connect only as shown. Level range by means of wires must be used. For models with upturned ends. See Steps 5a. Electrical Connection Requirements Avoid fire hazard or electrical shock. and Local Electrical Code requirements. This appliance ...of "permanent wiring" or power supply cord kit." hole or 1-1/8" dia. Rear Access Cover Fig. 9 4 Use a spirit level to Fig. 9. Models requiring power supply cord kit RISK OF FIRE OR ELECTRICAL SHOCK MAY OCCUR IF AN INCORRECT SIZE RANGE CORD KIT IS USED, THE INSTALLATION INSTRUCTIONS...
..., do not leave excess wire in Step 5c. Connect only as shown. Level range by means of wires must be used. For models with upturned ends. See Steps 5a. Electrical Connection Requirements Avoid fire hazard or electrical shock. and Local Electrical Code requirements. This appliance ...of "permanent wiring" or power supply cord kit." hole or 1-1/8" dia. Rear Access Cover Fig. 9 4 Use a spirit level to Fig. 9. Models requiring power supply cord kit RISK OF FIRE OR ELECTRICAL SHOCK MAY OCCUR IF AN INCORRECT SIZE RANGE CORD KIT IS USED, THE INSTALLATION INSTRUCTIONS...

Installation Instructions
Page 5
... are tightened securely and replace the rear access cover (See Fig. 9). 5 NOTE: Internal white wire not present on all models. IMPORTANT NOTE: DO NOT LOOSEN the factory installed nut connections which secure the range wiring to the terminal block. Electrical failure or... If connecting to Fig. 13). 1. 30" ELECTRIC FRONT CONTROL FREESTANDING INSTALLATION INSTRUCTIONS Fig. 10 NOTE: Internal white wire not present on all models. Refer to the frame of the appliance. You must disconnect the ground strap. Remove the factory installed ground screw & plate to release the copper...
... are tightened securely and replace the rear access cover (See Fig. 9). 5 NOTE: Internal white wire not present on all models. IMPORTANT NOTE: DO NOT LOOSEN the factory installed nut connections which secure the range wiring to the terminal block. Electrical failure or... If connecting to Fig. 13). 1. 30" ELECTRIC FRONT CONTROL FREESTANDING INSTALLATION INSTRUCTIONS Fig. 10 NOTE: Internal white wire not present on all models. Refer to the frame of the appliance. You must disconnect the ground strap. Remove the factory installed ground screw & plate to release the copper...

Installation Instructions
Page 7
Install filler trim kit Note: Installation of the filler trim kit is off and the surfaces are cool. Door Handle Mounting Instructions (some models) 1. Still holding handle firmly against door, loosely tighten right Allen set screw (B) with the top of the filler trim with supplied Allen wrench. The door ...
Install filler trim kit Note: Installation of the filler trim kit is off and the surfaces are cool. Door Handle Mounting Instructions (some models) 1. Still holding handle firmly against door, loosely tighten right Allen set screw (B) with the top of the filler trim with supplied Allen wrench. The door ...

Installation Instructions
Page 8
... making inquires about your range. See pages 2 and 3 for cleaning instructions. Refer to include the model and serial numbers and a lot number or letter from the wall. Model and Serial Number Location The serial plate is necessary for servicing and cleaning. 30" ELECTRIC FRONT CONTROL...to disconnect the electrical supply. Finish removing the unit for cleaning or maintenance, disconnect the electrical power supply. Serial Plate Locations: Some models have a cool-air intake vent on the right-hand surface of defective workmanship or materials in your Use & Care Manual. If ...
... making inquires about your range. See pages 2 and 3 for cleaning instructions. Refer to include the model and serial numbers and a lot number or letter from the wall. Model and Serial Number Location The serial plate is necessary for servicing and cleaning. 30" ELECTRIC FRONT CONTROL...to disconnect the electrical supply. Finish removing the unit for cleaning or maintenance, disconnect the electrical power supply. Serial Plate Locations: Some models have a cool-air intake vent on the right-hand surface of defective workmanship or materials in your Use & Care Manual. If ...

Complete Owners Guide
Page 2
...for service, there are a few things you can register online at http://www.frigidaire.com or by dropping your product with Frigidaire enhances our ability to help us serve you through some models). 2 2017 Electrolux Home Products, Inc. All rights reserved. and Canada call ...section title "Before You Call". Printed in the U.S. Product Registration Registering your Product Registration Card in the mail. Record model & serial numbers here Purchase Date Frigidaire model number Thank you the range. You can do need service, help you . If You Received a Damaged Range... ...
...for service, there are a few things you can register online at http://www.frigidaire.com or by dropping your product with Frigidaire enhances our ability to help us serve you through some models). 2 2017 Electrolux Home Products, Inc. All rights reserved. and Canada call ...section title "Before You Call". Printed in the U.S. Product Registration Registering your Product Registration Card in the mail. Record model & serial numbers here Purchase Date Frigidaire model number Thank you the range. You can do need service, help you . If You Received a Damaged Range... ...

Complete Owners Guide
Page 4
Do not remove model/ serial number plate. For maximum safety, the power cord must be sure the appliance has been in accordance with all tape and packaging before turning ...
Do not remove model/ serial number plate. For maximum safety, the power cord must be sure the appliance has been in accordance with all tape and packaging before turning ...

Complete Owners Guide
Page 7
... or replace food in oven. Use care when opening the door of the appliance when opening oven door, lower oven door, or warmer drawer (some models). Do not place plastic or heatsensitive items on the oven bottom. Cleaning a hot appliance can melt or ignite. Be aware that could catch fire. Follow...
... or replace food in oven. Use care when opening the door of the appliance when opening oven door, lower oven door, or warmer drawer (some models). Do not place plastic or heatsensitive items on the oven bottom. Cleaning a hot appliance can melt or ignite. Be aware that could catch fire. Follow...

Complete Owners Guide
Page 13
... underneath. Figure 3: Indicator light A quick glance at this indicator light when cooking is finished is turned off . The elements on your cooktop depend on the model. • A single radiant element has one or more flexibility with the size of cookware. The HOT SURFACE indicator light will remain on after the burner...
... underneath. Figure 3: Indicator light A quick glance at this indicator light when cooking is finished is turned off . The elements on your cooktop depend on the model. • A single radiant element has one or more flexibility with the size of cookware. The HOT SURFACE indicator light will remain on after the burner...
Complete Owners Guide
Page 23
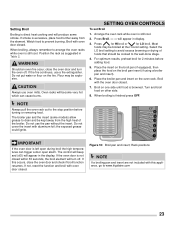
When broiling, always remember to www.frigidaire.com 23 Do not put water or flour on the broil pan insert (if using a broiler pan and insert). 6. SETTING OVEN CONTROLS To set Broil 1. ... while oven is not closed . If not, reset the function and broil with oven door closed within 30 seconds, the broil element will produce some models) allow grease to drain and be cooked to avoid excess browning or drying of foods that should be kept away from the element. Setting Broil...
When broiling, always remember to www.frigidaire.com 23 Do not put water or flour on the broil pan insert (if using a broiler pan and insert). 6. SETTING OVEN CONTROLS To set Broil 1. ... while oven is not closed . If not, reset the function and broil with oven door closed within 30 seconds, the broil element will produce some models) allow grease to drain and be cooked to avoid excess browning or drying of foods that should be kept away from the element. Setting Broil...

Wiring Diagram
Page 1
... all safety grounds prior to heat when the power is open . 2. Check/ reset ribbon harness connections between EOC & Sensor Probe connector. error or failure (some models). Check Sensor wiring harness between touch panel and EOC. 3. Advance motor until numeric digit(s) appear. If harness is overheating: 1. Never interfere with the proper installation...
... all safety grounds prior to heat when the power is open . 2. Check/ reset ribbon harness connections between EOC & Sensor Probe connector. error or failure (some models). Check Sensor wiring harness between touch panel and EOC. 3. Advance motor until numeric digit(s) appear. If harness is overheating: 1. Never interfere with the proper installation...
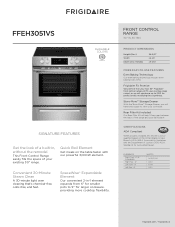
Product Specifications Sheet
Page 1
...DIMENSIONS Height (Max.) Width Depth (Incl. Convenient 30-Minute Steam Clean A 30-minute light oven cleaning that your new 30" Frigidaire® front control range will fit your existing range cutout, or we will have extra space to $100 for professionally modifying ...the countertop. Standards for larger cookware, providing more cooktop flexibility. FFEH3051VS AVAILABLE COLORS S Stainless SIGNATURE FEATURES Get the look of the range and your backsplash CERTIFICATIONS ADA Compliant When properly installed, this model is A.D.A.qualified based on the table faster with our powerful 3,000W...
...DIMENSIONS Height (Max.) Width Depth (Incl. Convenient 30-Minute Steam Clean A 30-minute light oven cleaning that your new 30" Frigidaire® front control range will fit your existing range cutout, or we will have extra space to $100 for professionally modifying ...the countertop. Standards for larger cookware, providing more cooktop flexibility. FFEH3051VS AVAILABLE COLORS S Stainless SIGNATURE FEATURES Get the look of the range and your backsplash CERTIFICATIONS ADA Compliant When properly installed, this model is A.D.A.qualified based on the table faster with our powerful 3,000W...
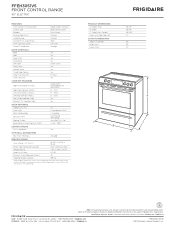
Product Specifications Sheet
Page 2
...model is A.D.A.-qualified based on the web at frigidaire.com / frigidaire.ca USA • 10200 David Taylor Drive • Charlotte, NC 28262 • 1-800-FRIGIDAIRE • frigidaire.com CANADA • 5855 Terry Fox Way • Mississauga, ON L5V 3E4 • 1-800-265-8352 • frigidaire.ca FFEH3051V... 03/19 © 2019 Electrolux Home Products, Inc. Refer to change. Height (Max.) B - Width C - Accessibility Guidelines and the Department of Justice's 2010 A.D.A. FFEH3051VS FRONT CONTROL RANGE 30" ELECTRIC FEATURES Oven ...
...model is A.D.A.-qualified based on the web at frigidaire.com / frigidaire.ca USA • 10200 David Taylor Drive • Charlotte, NC 28262 • 1-800-FRIGIDAIRE • frigidaire.com CANADA • 5855 Terry Fox Way • Mississauga, ON L5V 3E4 • 1-800-265-8352 • frigidaire.ca FFEH3051V... 03/19 © 2019 Electrolux Home Products, Inc. Refer to change. Height (Max.) B - Width C - Accessibility Guidelines and the Department of Justice's 2010 A.D.A. FFEH3051VS FRONT CONTROL RANGE 30" ELECTRIC FEATURES Oven ...


