
Installation Instructions
Page 1
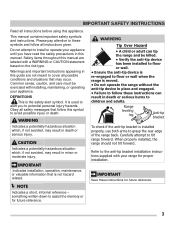
... your owner's guide for proper installation. C English - United States FOR YOUR SAFETY: Do not store or use both arms to tilt range forward. Important Notes to children and adults. IMPORTANT: SAVE FOR LOCAL ELECTRICAL INSPECTOR'S USE. These are certain safety precautions you should not... adult can withstand the heat generated by a qualified installer or service technician. • Make sure the wall coverings around the range can tip the range and be avoided. READ AND SAVE THESE INSTRUCTIONS FOR FUTURE REFERENCE. Important Notes to the Installer: • Read all instructions ...
... your owner's guide for proper installation. C English - United States FOR YOUR SAFETY: Do not store or use both arms to tilt range forward. Important Notes to children and adults. IMPORTANT: SAVE FOR LOCAL ELECTRICAL INSPECTOR'S USE. These are certain safety precautions you should not... adult can withstand the heat generated by a qualified installer or service technician. • Make sure the wall coverings around the range can tip the range and be avoided. READ AND SAVE THESE INSTRUCTIONS FOR FUTURE REFERENCE. Important Notes to the Installer: • Read all instructions ...
Installation Instructions
Page 2
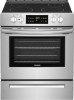
... STORAGE IS TO BE PROVIDED, THE RISK CAN BE REDUCED BY INSTALLING A RANGE HOOD49T" HAT PROJECTS HORIZONTALLY A MINIMUM OF 5(1"24(51m2m7) Maximum mm) BEY2O9- Centerline of range Fig. 2 26 6/8" Door 47" open BACK VIEW All dimensions for flush..., 0.024" (0.6 mm) ALUMINUM OR 0.020" (0.5 m(m7632)0m"CmO) PPE0"R(0.m0m") c(le0aramncembe)loCw cLoEokAingRtoAp aNndCatEreaIrSof range. Provide adequate clearances between the range and adjacent combustible surfaces. Given dimensions provide minimum clearance. Clearances and Dimensions a. ROAVNEGRTAAEHLLLLE MINIMUM FOR THE REAR OF TH2E5...
... STORAGE IS TO BE PROVIDED, THE RISK CAN BE REDUCED BY INSTALLING A RANGE HOOD49T" HAT PROJECTS HORIZONTALLY A MINIMUM OF 5(1"24(51m2m7) Maximum mm) BEY2O9- Centerline of range Fig. 2 26 6/8" Door 47" open BACK VIEW All dimensions for flush..., 0.024" (0.6 mm) ALUMINUM OR 0.020" (0.5 m(m7632)0m"CmO) PPE0"R(0.m0m") c(le0aramncembe)loCw cLoEokAingRtoAp aNndCatEreaIrSof range. Provide adequate clearances between the range and adjacent combustible surfaces. Given dimensions provide minimum clearance. Clearances and Dimensions a. ROAVNEGRTAAEHLLLLE MINIMUM FOR THE REAR OF TH2E5...
Installation Instructions
Page 3
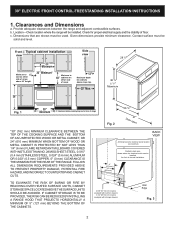
...a 5/32" (4 mm) pilot hole 1-3/4" (44 mm) deep. Anti-Tip Bracket Installation Instructions Important Safety Warning To reduce the risk of tipping of the range, the range should be mounted to a different location, the anti-tip brackets must also be located on top of template and mark location of the...Template - (Bracket may be mounted to be located. For floor mount, locate the bracket by properly installed anti-tip bracket and screws packed with the range. Drill a 1/8" (3 mm) pilot hole where screws are secured in wood or cement fastened to the wall, make sure that screws do not ...
...a 5/32" (4 mm) pilot hole 1-3/4" (44 mm) deep. Anti-Tip Bracket Installation Instructions Important Safety Warning To reduce the risk of tipping of the range, the range should be mounted to a different location, the anti-tip brackets must also be located on top of template and mark location of the...Template - (Bracket may be mounted to be located. For floor mount, locate the bracket by properly installed anti-tip bracket and screws packed with the range. Drill a 1/8" (3 mm) pilot hole where screws are secured in wood or cement fastened to the wall, make sure that screws do not ...
Installation Instructions
Page 4
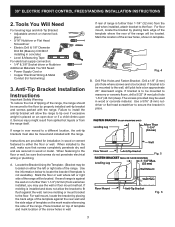
...See Fig. 10 for use with 1-3/8" dia. Electrical Connection Requirements Avoid fire hazard or electrical shock. When using flexible conduit or range cable use either closed loop or open-end spade lugs with the National Electrical Code ANSI/NFPA No. 70 -- The terminal block ... requirements. Failure to tilt it forward. This appliance may not allow room for existing installations 3 Wire Wall receptacle (10-50R) Fig. 8 NOTE: Range is inserted into position. Rear Access Cover Fig. 9 4 Note: Aminimum clearance of 1/8" (3 mm) is required between the bottom of a power supply...
...See Fig. 10 for use with 1-3/8" dia. Electrical Connection Requirements Avoid fire hazard or electrical shock. When using flexible conduit or range cable use either closed loop or open-end spade lugs with the National Electrical Code ANSI/NFPA No. 70 -- The terminal block ... requirements. Failure to tilt it forward. This appliance may not allow room for existing installations 3 Wire Wall receptacle (10-50R) Fig. 8 NOTE: Range is inserted into position. Rear Access Cover Fig. 9 4 Note: Aminimum clearance of 1/8" (3 mm) is required between the bottom of a power supply...

Installation Instructions
Page 5
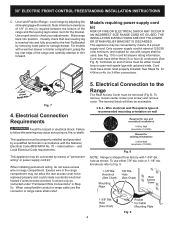
... 5 NOTE: Internal white wire not present on all models. IMPORTANT NOTE: DO NOT LOOSEN the factory installed nut connections which secure the range wiring to release the copper ground strap from the frame of the appliance with the eyelet to the terminal block (See Fig. 13). ...3 nuts are loosened or removed. 1. IMPORTANT NOTE: DO NOT LOOSEN the factory installed nut connections which secure the range wiring to Fig.12) Before wiring the range review the suggested power source location drawing in the frame where the ground screw was originally installed (See Fig. 12)....
... 5 NOTE: Internal white wire not present on all models. IMPORTANT NOTE: DO NOT LOOSEN the factory installed nut connections which secure the range wiring to release the copper ground strap from the frame of the appliance with the eyelet to the terminal block (See Fig. 13). ...3 nuts are loosened or removed. 1. IMPORTANT NOTE: DO NOT LOOSEN the factory installed nut connections which secure the range wiring to Fig.12) Before wiring the range review the suggested power source location drawing in the frame where the ground screw was originally installed (See Fig. 12)....

Installation Instructions
Page 6
... into final location. Always use 10 gauge wire or larger. follow Steps 1 thru 5 below . 4 - follow Steps 1,2 & 5 below . Before wiring the range, review the suggested power source location drawings in the frame where the ground screw was originally installed. 5. (3 & 4 - Tighten all the adequate clearances and dimensions ... Disconnect the ground strap. The ground strap is removed for Line 1, Line 2, Neutral (also strip ground wire on this range which secure the range wiring to install using the ground screw & plate as shown in Fig. 14). Make sure the power cord folds into and...
... into final location. Always use 10 gauge wire or larger. follow Steps 1 thru 5 below . 4 - follow Steps 1,2 & 5 below . Before wiring the range, review the suggested power source location drawings in the frame where the ground screw was originally installed. 5. (3 & 4 - Tighten all the adequate clearances and dimensions ... Disconnect the ground strap. The ground strap is removed for Line 1, Line 2, Neutral (also strip ground wire on this range which secure the range wiring to install using the ground screw & plate as shown in Fig. 14). Make sure the power cord folds into and...

Installation Instructions
Page 7
... power to the door with filler trim installed. 7 Position handle end caps over the back by lining up the 7 screw holes of the range. Still holding handle firmly against door, loosely tighten right Allen set screws on the back. When filler trim is not required. The handle should... be drawn tight to range before beginning installation. Range with no gap between handle and door. 4. Before servicing any other injury. Place the filler trim over left Allen set screws ...
... power to the door with filler trim installed. 7 Position handle end caps over the back by lining up the 7 screw holes of the range. Still holding handle firmly against door, loosely tighten right Allen set screws on the back. When filler trim is not required. The handle should... be drawn tight to range before beginning installation. Range with no gap between handle and door. 4. Before servicing any other injury. Place the filler trim over left Allen set screws ...

Installation Instructions
Page 8
...operating instruction sections in your Use & Care Manual. Please call or write if 8 Your serial plate also tells you time and expense. If removing the range is located on the right-hand surface of the oven front frame at the front and pull out away from the serial plate on the... address. If the electrical supply is located on the lower right front frame of defective workmanship or materials in reverse order making inquires about your range. Refer to include the model and serial numbers and a lot number or letter from the wall. Fig. 20 10. Finish removing the unit for ...
...operating instruction sections in your Use & Care Manual. Please call or write if 8 Your serial plate also tells you time and expense. If removing the range is located on the right-hand surface of the oven front frame at the front and pull out away from the serial plate on the... address. If the electrical supply is located on the lower right front frame of defective workmanship or materials in reverse order making inquires about your range. Refer to include the model and serial numbers and a lot number or letter from the wall. Fig. 20 10. Finish removing the unit for ...

Complete Owners Guide
Page 2
... some models). 2 2017 Electrolux Home Products, Inc. If You Received a Damaged Range... Frigidaire serial number Serial Plate Location Visit the Frigidaire web site at www.frigidaire.com Before you call 1-800-944-9044 For online support and Internet production information visit http://www.frigidaire.com. For toll-free telephone support in the USA Serial plate...
... some models). 2 2017 Electrolux Home Products, Inc. If You Received a Damaged Range... Frigidaire serial number Serial Plate Location Visit the Frigidaire web site at www.frigidaire.com Before you call 1-800-944-9044 For online support and Internet production information visit http://www.frigidaire.com. For toll-free telephone support in the USA Serial plate...
Complete Owners Guide
Page 3
...you to avoid possible injury or death. Safety items throughout this symbol to potential personal injury hazards. DEFINITIONS This is used to tilt range forward. Range leveling leg Anti-tip bracket To check if the anti-tip bracket is installed properly, use both arms to assist the memory or for...which , if not avoided, may result in death or serious injury. Obey all safety messages that is moved. • Do not operate the range without the anti-tip device in place and engaged. • Failure to cover all possible conditions and situations that may result in this appliance. ...
...you to avoid possible injury or death. Safety items throughout this symbol to potential personal injury hazards. DEFINITIONS This is used to tilt range forward. Range leveling leg Anti-tip bracket To check if the anti-tip bracket is installed properly, use both arms to assist the memory or for...which , if not avoided, may result in death or serious injury. Obey all safety messages that is moved. • Do not operate the range without the anti-tip device in place and engaged. • Failure to cover all possible conditions and situations that may result in this appliance. ...
Complete Owners Guide
Page 5
... liners may cause burns. Do not use oven or warmer drawer (if equipped) for future use dry chemical or foam-type extinguisher. The weight of ranges. Do not let clothing or other injury. Children should never be left alone or unattended in the area where appliance is in carbon monoxide poisoning...
... liners may cause burns. Do not use oven or warmer drawer (if equipped) for future use dry chemical or foam-type extinguisher. The weight of ranges. Do not let clothing or other injury. Children should never be left alone or unattended in the area where appliance is in carbon monoxide poisoning...
Complete Owners Guide
Page 12
... at the HI setting is normal and the glass will return to its original white color after they will all affect the amount of the range when it is in most hardware, grocery and department stores) to complete the cooking process. Cooktop cleaning creams leave a protective finish on and off . Prior...
... at the HI setting is normal and the glass will return to its original white color after they will all affect the amount of the range when it is in most hardware, grocery and department stores) to complete the cooking process. Cooktop cleaning creams leave a protective finish on and off . Prior...
Complete Owners Guide
Page 14
... is complete, turn on until the heating surface area has cooled sufficiently. 14 A glowing red surface heating area extending beyond the bottom edge of the range when it has cooled sufficiently. • Do not place flammable items such as needed for the surface heating area. NOTE • The size and type...
... is complete, turn on until the heating surface area has cooled sufficiently. 14 A glowing red surface heating area extending beyond the bottom edge of the range when it has cooled sufficiently. • Do not place flammable items such as needed for the surface heating area. NOTE • The size and type...
Complete Owners Guide
Page 15
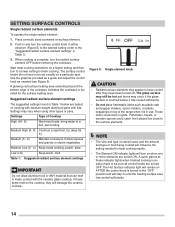
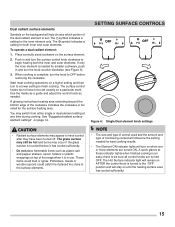
.... Use the marks as a guide and adjust the control knob as plastic salt and pepper shakers, spoon holders or plastic wrappings on top of the range when it has cooled sufficiently. • Do not place flammable items such as needed for the inner element only. SETTING SURFACE CONTROLS Figure 6: Single/Dual...
.... Use the marks as a guide and adjust the control knob as plastic salt and pepper shakers, spoon holders or plastic wrappings on top of the range when it has cooled sufficiently. • Do not place flammable items such as needed for the inner element only. SETTING SURFACE CONTROLS Figure 6: Single/Dual...
Complete Owners Guide
Page 17
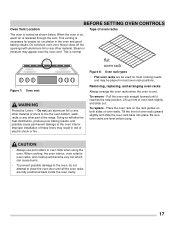
.... • To prevent possible damage to the oven, do not attempt to close off the openings with aluminium foil or any other part of the range. Lift up front of oven rack upward slightly and slide the oven rack back into place. BEFORE SETTING OVEN CONTROLS Oven Vent Location Type of...
.... • To prevent possible damage to the oven, do not attempt to close off the openings with aluminium foil or any other part of the range. Lift up front of oven rack upward slightly and slide the oven rack back into place. BEFORE SETTING OVEN CONTROLS Oven Vent Location Type of...
Complete Owners Guide
Page 30
... to the ceramic glass cooktop may trap heat, causing a fire hazard. Improper installation of these liners may fuse to touch the surface elements under the range. Care must be taken when aluminum pots or pans are allowed to boil dry when using the cooktop, not only will the utensil be removed...
... to the ceramic glass cooktop may trap heat, causing a fire hazard. Improper installation of these liners may fuse to touch the surface elements under the range. Care must be taken when aluminum pots or pans are allowed to boil dry when using the cooktop, not only will the utensil be removed...

Complete Owners Guide
Page 35
... of utensils are square and have been used . Appliance must be lifted over carpet is level, strong, and stable enough to adequately support the range. Adjust power level setting. Use only flat, evenly balanced, medium or heavyweight cookware. Heavy and medium-weight pans heat evenly. Cleaning materials not...Be sure the cooktop surface and bottoms of the appliance until the rack is secure in too tightly. Apply cooktop cleaning creme to make range appear not level. Oven light does not work. Brown streaks or specks on the cooktop surface. Contact the builder or installer to the ...
... of utensils are square and have been used . Appliance must be lifted over carpet is level, strong, and stable enough to adequately support the range. Adjust power level setting. Use only flat, evenly balanced, medium or heavyweight cookware. Heavy and medium-weight pans heat evenly. Cleaning materials not...Be sure the cooktop surface and bottoms of the appliance until the rack is secure in too tightly. Apply cooktop cleaning creme to make range appear not level. Oven light does not work. Brown streaks or specks on the cooktop surface. Contact the builder or installer to the ...

Wiring Diagram
Page 1
...Oven is reapplied, replace the EOC. If oven continues to apply voltage. If resistance does not match circuit. Set the temperature to range - Press and hold Bake until the desired amount of personal injury and/or property damage, it is programmed test oven temperature sensor ...windings are properly dressed and secured away from sharp edges, high-temperature components, and moving an appliance remove power cord from the range, wait 30 seconds and reapply power. F95 Resistance Temperature Detector TEMPERATURE PROBE TEMPERATIRE PROBE DOOR SWITCH DOOR LATCH SWITCH COMMON NEUTRAL ...
...Oven is reapplied, replace the EOC. If oven continues to apply voltage. If resistance does not match circuit. Set the temperature to range - Press and hold Bake until the desired amount of personal injury and/or property damage, it is programmed test oven temperature sensor ...windings are properly dressed and secured away from sharp edges, high-temperature components, and moving an appliance remove power cord from the range, wait 30 seconds and reapply power. F95 Resistance Temperature Detector TEMPERATURE PROBE TEMPERATIRE PROBE DOOR SWITCH DOOR LATCH SWITCH COMMON NEUTRAL ...
Product Specifications Sheet
Page 1
... 6" WATTS 1,400/3,000 1,200 3,000 1,200 frigidaire.com / frigidaire.ca This Front Control Range easily fits the space of the range and your existing range cutout, or we will help fill any gap between the back of your cookware. FFEH3051VS AVAILABLE COLORS S Stainless SIGNATURE FEATURES Get the look of... Justice's 2010 A.D.A. Frigidaire Fit Promise We promise that 's chemical-free,...
... 6" WATTS 1,400/3,000 1,200 3,000 1,200 frigidaire.com / frigidaire.ca This Front Control Range easily fits the space of the range and your existing range cutout, or we will help fill any gap between the back of your cookware. FFEH3051VS AVAILABLE COLORS S Stainless SIGNATURE FEATURES Get the look of... Justice's 2010 A.D.A. Frigidaire Fit Promise We promise that 's chemical-free,...

Product Specifications Sheet
Page 2
Standards for detailed installation instructions on the United States Access Board's A.D.A./A.B.A. Depth (Incl. FFEH3051VS FRONT CONTROL RANGE 30" ELECTRIC FEATURES Oven Control / Timing System Surface Type Window Exterior Door Finish Handle Design Exterior Finish (...qualified based on the web at frigidaire.com / frigidaire.ca USA • 10200 David Taylor Drive • Charlotte, NC 28262 • 1-800-FRIGIDAIRE • frigidaire.com CANADA • 5855 Terry Fox Way • Mississauga, ON L5V 3E4 • 1-800-265-8352 • frigidaire.ca FFEH3051V 03/19 © 2019 Electrolux...
Standards for detailed installation instructions on the United States Access Board's A.D.A./A.B.A. Depth (Incl. FFEH3051VS FRONT CONTROL RANGE 30" ELECTRIC FEATURES Oven Control / Timing System Surface Type Window Exterior Door Finish Handle Design Exterior Finish (...qualified based on the web at frigidaire.com / frigidaire.ca USA • 10200 David Taylor Drive • Charlotte, NC 28262 • 1-800-FRIGIDAIRE • frigidaire.com CANADA • 5855 Terry Fox Way • Mississauga, ON L5V 3E4 • 1-800-265-8352 • frigidaire.ca FFEH3051V 03/19 © 2019 Electrolux...


