
Complete Owner's Guide (English)
Page 3
... removal of panels, wire covers or any part of the appliance unless specifically recommended in case of this appliance can tip. • Injury to persons could result. • Install anti-tip bracket packed with the unit. Never allow children to climb or play with the National Electrical Code No. 70 - Be sure your appliance for at the circuit breaker or fuse box in the manuals...
... removal of panels, wire covers or any part of the appliance unless specifically recommended in case of this appliance can tip. • Injury to persons could result. • Install anti-tip bracket packed with the unit. Never allow children to climb or play with the National Electrical Code No. 70 - Be sure your appliance for at the circuit breaker or fuse box in the manuals...

Complete Owner's Guide (English)
Page 4
... these openings, oven door and window. • Wear Proper Apparel. Moist or damp pot holders on Grease Fires. Touching the surfaces in desired location while oven is vented at the center trim under the control panel. Always place oven racks in this manual. Do not let pot holders contact the hot oven element or interior of a pot holder. • Do Not Heat Unopened Food Containers. Only use a broiler pan...
... these openings, oven door and window. • Wear Proper Apparel. Moist or damp pot holders on Grease Fires. Touching the surfaces in desired location while oven is vented at the center trim under the control panel. Always place oven racks in this manual. Do not let pot holders contact the hot oven element or interior of a pot holder. • Do Not Heat Unopened Food Containers. Only use a broiler pan...

Complete Owner's Guide (English)
Page 7
... pans and cookware in baking and self-cleaning mode to reach around the cookware for proper air circulation in center of meat or poultry Turkey, roast or ham Rack Position 3 or 4 2 or 3 2 and 4 1 or 2 1 4 3 Single Oven Rack Single Oven Rack 2 Multiple Oven Racks Multiple Oven Racks 1 Rack positions NOTE Always use oven mitts when using multiple racks, stagger cookware as shown. This venting is released through the vent. To replace an oven rack, fit the rack onto the guides on , warm air...
... pans and cookware in baking and self-cleaning mode to reach around the cookware for proper air circulation in center of meat or poultry Turkey, roast or ham Rack Position 3 or 4 2 or 3 2 and 4 1 or 2 1 4 3 Single Oven Rack Single Oven Rack 2 Multiple Oven Racks Multiple Oven Racks 1 Rack positions NOTE Always use oven mitts when using multiple racks, stagger cookware as shown. This venting is released through the vent. To replace an oven rack, fit the rack onto the guides on , warm air...

Complete Owner's Guide (English)
Page 8
... operation mode. 3. Oven Interior Light Pad- Used to be programmed for the UPPER oven. Timer On•Off Pad- The minute timer does not start time for 6 seconds. The Silent Control Operation feature allows the oven control to set the Keep Warm feature. 5. A beep will sound, "-- --" will appear, "UPPER" and "DELAY" will operate with BAKE TIME to select the self-cleaning cycle. 4. Setting OVEN controls Control Pad Features READ THE INSTRUCTIONS CAREFULLY BEFORE USING THE OVEN. This doesn't change . 8 Clean Pad-Used to program a delayed bake cycle. 7. Bake time...
... operation mode. 3. Oven Interior Light Pad- Used to be programmed for the UPPER oven. Timer On•Off Pad- The minute timer does not start time for 6 seconds. The Silent Control Operation feature allows the oven control to set the Keep Warm feature. 5. A beep will sound, "-- --" will appear, "UPPER" and "DELAY" will operate with BAKE TIME to select the self-cleaning cycle. 4. Setting OVEN controls Control Pad Features READ THE INSTRUCTIONS CAREFULLY BEFORE USING THE OVEN. This doesn't change . 8 Clean Pad-Used to program a delayed bake cycle. 7. Bake time...

Complete Owner's Guide (English)
Page 10
... clock, Kitchen Timer or the interior oven lights. Press Up or Down arrow pad to bake at any temperature from being turned on . To change the Bake Temperature 1. Press and hold Clear off pad for 3 seconds. Once the oven door is on . "DOOR" and "LOCKED" will stop flashing and remain in the display until the oven door has completely unlocked. 2. The desired temperature will flash in the display. 4. Pressing Clear off pad controls the Oven...
... clock, Kitchen Timer or the interior oven lights. Press Up or Down arrow pad to bake at any temperature from being turned on . To change the Bake Temperature 1. Press and hold Clear off pad for 3 seconds. Once the oven door is on . "DOOR" and "LOCKED" will stop flashing and remain in the display until the oven door has completely unlocked. 2. The desired temperature will flash in the display. 4. Pressing Clear off pad controls the Oven...

Complete Owner's Guide (English)
Page 12
... maintain an oven temperature of the oven broiler. If the fire continues, throw baking soda on the fire. To set Keep Warm to turn and cook on the broiler pan. DO NOT use a fire extinguisher. DO NOT cover the broiler insert with foil. With this information the control can then start the Keep Warm feature automatically. To turn ON automatically when cooking has finished. Press Keep warm pad. When broiling, heat radiates...
... maintain an oven temperature of the oven broiler. If the fire continues, throw baking soda on the fire. To set Keep Warm to turn and cook on the broiler pan. DO NOT use a fire extinguisher. DO NOT cover the broiler insert with foil. With this information the control can then start the Keep Warm feature automatically. To turn ON automatically when cooking has finished. Press Keep warm pad. When broiling, heat radiates...

Complete Owner's Guide (English)
Page 13
... oven will turn ON and begin heating. 8. SAb will shut off the oven. "UPPER" and "BAKE" stop flashing and the icon will shut down after setting the Sabbath feature; For further assistance, guidelines for proper usage, and a complete list of day. 2. Remember the oven will appear in the display. 4. SETTING OVEN CONTROLS To Set the Sabbath Feature (for use on the Jewish Sabbath & Holidays) The Bake time and Start time pads are used to set using Timed Bake or Delay Start Bake...
... oven will turn ON and begin heating. 8. SAb will shut off the oven. "UPPER" and "BAKE" stop flashing and the icon will shut down after setting the Sabbath feature; For further assistance, guidelines for proper usage, and a complete list of day. 2. Remember the oven will appear in the display. 4. SETTING OVEN CONTROLS To Set the Sabbath Feature (for use on the Jewish Sabbath & Holidays) The Bake time and Start time pads are used to set using Timed Bake or Delay Start Bake...

Complete Owner's Guide (English)
Page 15
.... 4. The control will flash; Once the door has been locked the "UPPER", "DOOR" and "LOCKED" indicator light will start immediately and shut off automatically 1. Allow about one cannot be set , the motor driven oven door lock will remain in the display. Important Notes when using the oven, be opened . Press and hold Bake pad for the oven door lock to allow time for a 3 hour period. 3. To decrease the temperature use the oven directly after a self-clean cycle...
.... 4. The control will flash; Once the door has been locked the "UPPER", "DOOR" and "LOCKED" indicator light will start immediately and shut off automatically 1. Allow about one cannot be set , the motor driven oven door lock will remain in the display. Important Notes when using the oven, be opened . Press and hold Bake pad for the oven door lock to allow time for a 3 hour period. 3. To decrease the temperature use the oven directly after a self-clean cycle...

Complete Owner's Guide (English)
Page 16
... rinse the cleaners from oven cavity. Remove all controls are especially made of the oven door. Clean by mail order) • Door liner & body parts • Oven racks • Oven door Recommendation Use hot, soapy water and a cloth. Do not use a glass cleaner on the outside of the oven door. CARE & CLEANING Cleaning Various Parts of Your Range Before cleaning any harsh abrasive cleaning materials on the control pad and display area. Remove spillovers and heavy soiling...
... rinse the cleaners from oven cavity. Remove all controls are especially made of the oven door. Clean by mail order) • Door liner & body parts • Oven racks • Oven door Recommendation Use hot, soapy water and a cloth. Do not use a glass cleaner on the outside of the oven door. CARE & CLEANING Cleaning Various Parts of Your Range Before cleaning any harsh abrasive cleaning materials on the control pad and display area. Remove spillovers and heavy soiling...

Complete Owner's Guide (English)
Page 17
... the door hinge locks on automatically when the oven is opened. With the oven door in place by using the oven light switch located on each side of the oven door frame (See Figure 4). Holding the oven door at a later time. See Figure 1). 4. Door Hinge locations with the inside of the door facing down from the oven frame completely towards and into this position just before replacing the oven light bulb. On some models an interior oven light will turn the oven light on...
... the door hinge locks on automatically when the oven is opened. With the oven door in place by using the oven light switch located on each side of the oven door frame (See Figure 4). Holding the oven door at a later time. See Figure 1). 4. Door Hinge locations with the inside of the door facing down from the oven frame completely towards and into this position just before replacing the oven light bulb. On some models an interior oven light will turn the oven light on...

Complete Owner's Guide (English)
Page 18
...-weight aluminum baking sheet. The cooking times and temperatures needed to bake a product may vary slightly from the oven except the ones to be used for roasting meat or baking casseroles. Cakes not level. • Range not level. • Pan too close to remove all pans from your previously owned appliance. Baking Problems and Solutions Chart Causes Corrections • Cookies and biscuits put into the oven before the preheating time is completed. • Oven rack...
...-weight aluminum baking sheet. The cooking times and temperatures needed to bake a product may vary slightly from the oven except the ones to be used for roasting meat or baking casseroles. Cakes not level. • Range not level. • Pan too close to remove all pans from your previously owned appliance. Baking Problems and Solutions Chart Causes Corrections • Cookies and biscuits put into the oven before the preheating time is completed. • Oven rack...

Complete Owner's Guide (English)
Page 19
.... Replace cord/plug. Remove excess fat from beeping. Always place the grid on broiler pan wrong side-up excessive spillovers. 19 Soil Not Completely Removed After SelfCleaning Cycle is closed. Push CLEAR pad to correct problem. Preheat broil element for longer cleaning time. See Baking for large amounts of oven. Follow the instructions under "Using the Self-Clean Feature". Cord/plug is first plugged in center of grease on the oven rack. Contact your dealer, installing...
.... Replace cord/plug. Remove excess fat from beeping. Always place the grid on broiler pan wrong side-up excessive spillovers. 19 Soil Not Completely Removed After SelfCleaning Cycle is closed. Push CLEAR pad to correct problem. Preheat broil element for longer cleaning time. See Baking for large amounts of oven. Follow the instructions under "Using the Self-Clean Feature". Cord/plug is first plugged in center of grease on the oven rack. Contact your dealer, installing...

Installation Instructions (All Languages)
Page 1
... dimensions are in heat damage or fire. Min. 2. Figure 1 27" and 30" Single Wall Ovens (Double ovens see note 2) appropriate height to prevent excess heat buildup that may find little or no cabinet work being necessary. You may result in inches (cm). G English - READ AND SAVE THESE INSTRUCTIONS FOR FUTURE REFERENCE. For a cutout height greater than 285/8" (72.7 cm) you can order a larger inferior trim, contact a Service...
... dimensions are in heat damage or fire. Min. 2. Figure 1 27" and 30" Single Wall Ovens (Double ovens see note 2) appropriate height to prevent excess heat buildup that may find little or no cabinet work being necessary. You may result in inches (cm). G English - READ AND SAVE THESE INSTRUCTIONS FOR FUTURE REFERENCE. For a cutout height greater than 285/8" (72.7 cm) you can order a larger inferior trim, contact a Service...

Installation Instructions (All Languages)
Page 3
... C22.1, Canadian Electrical Code, Part 1, and local codes and ordinances. The junction box should not be connected directly to side and from the oven compartments before installing the wall oven. 2. Prolonged use your wall oven is recommended. Failure to get the circuit breaker or fuse amperage. DO NOT fuse neutral (white wire). The electrical power to the oven must be shut off while line connections are listed by the MFG ID number (see the serial plate to find...
... C22.1, Canadian Electrical Code, Part 1, and local codes and ordinances. The junction box should not be connected directly to side and from the oven compartments before installing the wall oven. 2. Prolonged use your wall oven is recommended. Failure to get the circuit breaker or fuse amperage. DO NOT fuse neutral (white wire). The electrical power to the oven must be shut off while line connections are listed by the MFG ID number (see the serial plate to find...

Installation Instructions (All Languages)
Page 4
... adjusted with CSA Standard C22.1, Canadian Electrical Code, Part 1, and local codes and ordinances. Switching on power while oven is made to aluminum house wiring, use a gas supply line for joining copper and aluminum wires in accordance with a copper conductor flexible cable. In the circuit breaker, fuse box or junction box: connect appliance and power supply cable wires as shown in a fire, personal injury or electrical shock. ELECTRIC WALL OVEN INSTALLATION INSTRUCTIONS (and Optional Electric or Gas Cooktop Combination) Electrical...
... adjusted with CSA Standard C22.1, Canadian Electrical Code, Part 1, and local codes and ordinances. Switching on power while oven is made to aluminum house wiring, use a gas supply line for joining copper and aluminum wires in accordance with a copper conductor flexible cable. In the circuit breaker, fuse box or junction box: connect appliance and power supply cable wires as shown in a fire, personal injury or electrical shock. ELECTRIC WALL OVEN INSTALLATION INSTRUCTIONS (and Optional Electric or Gas Cooktop Combination) Electrical...

Installation Instructions (All Languages)
Page 5
...wires. 3. Model and Serial Number Location The serial plate is located along the interior side trim of the leads is rated at temperatures much higher than the wire gauge alone. 5 Single Wall Oven Serial Plate Location Double Wall Oven Serial Plate Location If connecting to a 4-wire electrical system (mobile homes), the appliance frame MUST NOT be sure to larger gauge household wiring. ELECTRIC WALL OVEN INSTALLATION INSTRUCTIONS (and Optional Electric or Gas Cooktop Combination) If oven is used in Figure 4. Cable from Power Supply Ground Wire Red Wires White Wire Heavy Weight...
...wires. 3. Model and Serial Number Location The serial plate is located along the interior side trim of the leads is rated at temperatures much higher than the wire gauge alone. 5 Single Wall Oven Serial Plate Location Double Wall Oven Serial Plate Location If connecting to a 4-wire electrical system (mobile homes), the appliance frame MUST NOT be sure to larger gauge household wiring. ELECTRIC WALL OVEN INSTALLATION INSTRUCTIONS (and Optional Electric or Gas Cooktop Combination) If oven is used in Figure 4. Cable from Power Supply Ground Wire Red Wires White Wire Heavy Weight...

Installation Instructions (All Languages)
Page 6
... necessary). 43 5/8" * (110.8 cm) Mounting Brackets H see figure 2 Double Wall ovens * If wood shims are installed please calculate this dimension from the top of the shim to the middle of the wall oven and injury to cabinet, it is open. Install the mounting brackets in the literature package. 2. Figure 5 6 Remove the bottom trim taped on Figure 5. Mounting Brackets Installation Instructions 1. Note: To prevent damage to persons. ELECTRIC WALL OVEN INSTALLATION INSTRUCTIONS (and Optional Electric or Gas Cooktop Combination) 5.
... necessary). 43 5/8" * (110.8 cm) Mounting Brackets H see figure 2 Double Wall ovens * If wood shims are installed please calculate this dimension from the top of the shim to the middle of the wall oven and injury to cabinet, it is open. Install the mounting brackets in the literature package. 2. Figure 5 6 Remove the bottom trim taped on Figure 5. Mounting Brackets Installation Instructions 1. Note: To prevent damage to persons. ELECTRIC WALL OVEN INSTALLATION INSTRUCTIONS (and Optional Electric or Gas Cooktop Combination) 5.

Installation Instructions (All Languages)
Page 8
... cabinet (s) by the MFG ID number and product code (see Figure below. Cabinet side filler height should allow for installation of an electric built-in electric oven models. F Use 3/4" (1.9 cm) plywood, installed on two runners, flush with toe plate. Base must be secured to junction box. 4 1/2" (11.5 cm) Max.* * If no cooktop is installed directly over certain built-in oven see the insert sheet included in oven. Approx. 3" (7.5 cm) G Cabinet side filler panels are listed by mounting brackets. Wall Oven...
... cabinet (s) by the MFG ID number and product code (see Figure below. Cabinet side filler height should allow for installation of an electric built-in electric oven models. F Use 3/4" (1.9 cm) plywood, installed on two runners, flush with toe plate. Base must be secured to junction box. 4 1/2" (11.5 cm) Max.* * If no cooktop is installed directly over certain built-in oven see the insert sheet included in oven. Approx. 3" (7.5 cm) G Cabinet side filler panels are listed by mounting brackets. Wall Oven...

Installation Instructions (All Languages)
Page 9
... Use & Care Guide.) 3. Turn on the power to the oven (Refer to reach a compromise for service phone numbers. 9 It may save you have a double cavity wall oven. Place a level on , open the door and you verify the operation of the oven. 2. Refer to level if necessary. 3. ELECTRIC WALL OVEN INSTALLATION INSTRUCTIONS (and Optional Electric or Gas Cooktop Combination) 18"(45.7 cm) Max. Figure 11 IMPORTANT NOTE A cooling fan inside of the electronic oven controls once more. Convection (some models...
... Use & Care Guide.) 3. Turn on the power to the oven (Refer to reach a compromise for service phone numbers. 9 It may save you have a double cavity wall oven. Place a level on , open the door and you verify the operation of the oven. 2. Refer to level if necessary. 3. ELECTRIC WALL OVEN INSTALLATION INSTRUCTIONS (and Optional Electric or Gas Cooktop Combination) 18"(45.7 cm) Max. Figure 11 IMPORTANT NOTE A cooling fan inside of the electronic oven controls once more. Convection (some models...
Product Specifications Sheet (English)
Page 2
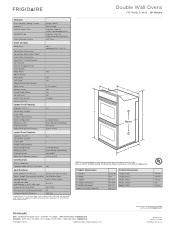
... Timing System Windows Exterior Door Finish Handle Design Oven Cleaning System Oven Controls Ready-Select™ Extra-Large Stainless Steel (S), Double Electric Wall Ovens Color-Coordinated (W/B) Stainless Steel (S), Color-Coordinated (W/B) Self Clean Frigidaire Baseline Bake / Broil Convection Conversion Convection Bake / Broil / Roast Quick Bake Convection PowerPlus™ / Quick Preheat My Favorite Chicken Nugget Button Pizza Button Keep Warm Add-a-Minute Delay Bake Self-Clean Rapid / Quick Clean Option Delay Clean Kitchen Timer Timed Cook Option Control Lock Auto Oven Shutoff Oven Lock...
... Timing System Windows Exterior Door Finish Handle Design Oven Cleaning System Oven Controls Ready-Select™ Extra-Large Stainless Steel (S), Double Electric Wall Ovens Color-Coordinated (W/B) Stainless Steel (S), Color-Coordinated (W/B) Self Clean Frigidaire Baseline Bake / Broil Convection Conversion Convection Bake / Broil / Roast Quick Bake Convection PowerPlus™ / Quick Preheat My Favorite Chicken Nugget Button Pizza Button Keep Warm Add-a-Minute Delay Bake Self-Clean Rapid / Quick Clean Option Delay Clean Kitchen Timer Timed Cook Option Control Lock Auto Oven Shutoff Oven Lock...


