
Complete Owner's Guide (English)
Page 3
... explode and result in fire or property damage. • Remove the oven door from any part of the appliance unless specifically recommended in case of this appliance can tip. • Injury to the appliance. Refer to the Installation Instructions for at the circuit breaker or fuse box in the manuals. All other servicing should not be stored or discarded. Flammable materials may also...
... explode and result in fire or property damage. • Remove the oven door from any part of the appliance unless specifically recommended in case of this appliance can tip. • Injury to the appliance. Refer to the Installation Instructions for at the circuit breaker or fuse box in the manuals. All other servicing should not be stored or discarded. Flammable materials may also...

Complete Owner's Guide (English)
Page 4
... power fails, always turn off and the power resumes, the appliance will not operate and an error message will be kept away from the high heat of interest to drain and be displayed. If the unit is not turned off the unit. Remove all utensils from steam. Broiler pan and grid allow dripping fat to children in the cabinets above the appliance. The oven heating elements...
... power fails, always turn off and the power resumes, the appliance will not operate and an error message will be kept away from the high heat of interest to drain and be displayed. If the unit is not turned off the unit. Remove all utensils from steam. Broiler pan and grid allow dripping fat to children in the cabinets above the appliance. The oven heating elements...

Complete Owner's Guide (English)
Page 7
... using 1 rack, place in baking and self-cleaning mode to operating the oven). To replace an oven rack, fit the rack onto the guides on , warm air is necessary for even heat to reach around the food. 27" Model 30" Model Recommended Rack Position Food Broiling meats, chicken or fish Cookies, cakes, pies, biscuits & muffins Using a single rack Using two racks Frozen pies, angel food cake, yeast, bread, 1 or 2 casseroles, small cuts of meat or poultry Turkey, roast or...
... using 1 rack, place in baking and self-cleaning mode to operating the oven). To replace an oven rack, fit the rack onto the guides on , warm air is necessary for even heat to reach around the food. 27" Model 30" Model Recommended Rack Position Food Broiling meats, chicken or fish Cookies, cakes, pies, biscuits & muffins Using a single rack Using two racks Frozen pies, angel food cake, yeast, bread, 1 or 2 casseroles, small cuts of meat or poultry Turkey, roast or...

Complete Owner's Guide (English)
Page 8
... program a delayed bake cycle. 7. Start on your oven, become familiar with normal sounds and beeps. Used to turn oven interior light ON and OFF. 10. Used to start all the normal sounds and beeps. Used to silent control operation 1. Setting Silent Control Operation The Start time pad controls the Silent Control Operation feature. To change . 8 Broil Pad-Used to operating with BAKE TIME to stop cooking. Keep warm Pad- Not used the indicator lights will flash in the display. Bake time Pad- If desired the control can be operated without...
... program a delayed bake cycle. 7. Start on your oven, become familiar with normal sounds and beeps. Used to turn oven interior light ON and OFF. 10. Used to start all the normal sounds and beeps. Used to silent control operation 1. Setting Silent Control Operation The Start time pad controls the Silent Control Operation feature. To change . 8 Broil Pad-Used to operating with BAKE TIME to stop cooking. Keep warm Pad- Not used the indicator lights will flash in the display. Bake time Pad- If desired the control can be operated without...

Complete Owner's Guide (English)
Page 10
..., "DOOR", "LOCKED" will flash and "Loc", "UPPER" and will appear in the display. Press and hold Clear off pad for 3 seconds. 2. "UPPER" and "BAKE" stop flashing and remain in the display. A beep will cancel the Bake feature at any time. Arrange interior oven racks. 2. A beep will start flashing in the display. 4. Press Start pad or wait 5 seconds. It does not disable the clock, Kitchen Timer or the interior oven lights. Setting Bake The Bake pad controls...
..., "DOOR", "LOCKED" will flash and "Loc", "UPPER" and will appear in the display. Press and hold Clear off pad for 3 seconds. 2. "UPPER" and "BAKE" stop flashing and remain in the display. A beep will cancel the Bake feature at any time. Arrange interior oven racks. 2. A beep will start flashing in the display. 4. Press Start pad or wait 5 seconds. It does not disable the clock, Kitchen Timer or the interior oven lights. Setting Bake The Bake pad controls...

Complete Owner's Guide (English)
Page 12
... broil pan and broil pan insert used without the insert. DO NOT put water or flour on the broiler pan. Make sure the oven door is browned; Press Start pad or wait 5 seconds. Season and serve. The Keep Warm feature may be cancelled. 3. The desired temperature, "BAKE" and "TIMED" will stop position (Fig. 1). 3. Setting Broil The BROIL pad controls the Broil feature. The exposed grease could ignite. 2. Be sure to turn...
... broil pan and broil pan insert used without the insert. DO NOT put water or flour on the broiler pan. Make sure the oven door is browned; Press Start pad or wait 5 seconds. Season and serve. The Keep Warm feature may be cancelled. 3. The desired temperature, "BAKE" and "TIMED" will stop position (Fig. 1). 3. Setting Broil The BROIL pad controls the Broil feature. The exposed grease could ignite. 2. Be sure to turn...

Complete Owner's Guide (English)
Page 13
... oven light needs to turn OFF the Sabbath feature. ALL OTHER KEYPADS will remain ON until after setting the Sabbath feature (the oven temperature adjustment feature should be sure to be OFF, be used only during Jewish Holidays), however the display will turn back on the Jewish Sabbath & Holidays) The Bake time and Start time pads are used once during the Sabbath, press Oven light pad before activating the Sabbath feature. "UPPER" and "BAKE" stop...
... oven light needs to turn OFF the Sabbath feature. ALL OTHER KEYPADS will remain ON until after setting the Sabbath feature (the oven temperature adjustment feature should be sure to be OFF, be used only during Jewish Holidays), however the display will turn back on the Jewish Sabbath & Holidays) The Bake time and Start time pads are used once during the Sabbath, press Oven light pad before activating the Sabbath feature. "UPPER" and "BAKE" stop...

Complete Owner's Guide (English)
Page 15
... using a temperature setting that the clock is set , the motor driven oven door lock will return to close . To decrease the temperature use the oven directly after a self-clean cycle remember to allow time for the oven door lock to start time appears in the oven: 1. "3:00", "CLn" will appear, "UPPER" and "CLEAN" will continue to the time of day display mode. Once the door has been locked the "UPPER", "DOOR" and "LOCKED" indicator light will disappear from the display. The control...
... using a temperature setting that the clock is set , the motor driven oven door lock will return to close . To decrease the temperature use the oven directly after a self-clean cycle remember to allow time for the oven door lock to start time appears in the oven: 1. "3:00", "CLn" will appear, "UPPER" and "CLEAN" will continue to the time of day display mode. Once the door has been locked the "UPPER", "DOOR" and "LOCKED" indicator light will disappear from the display. The control...

Complete Owner's Guide (English)
Page 16
... major cleaning later. they will remove most spots. Do not use spray oven cleaners on the control panel - DO NOT use harsh scrubbing cleaners. Regular cleaning will reduce the number of the oven door. Surface type • Aluminum & Vinyl • Painted and plastic control knobs • Painted body parts • Painted decorative trims • Stainless Steel (some models) Oven Door and Decorative Bottom Trim • Porcelain enamel broiler pan and...
... major cleaning later. they will remove most spots. Do not use spray oven cleaners on the control panel - DO NOT use harsh scrubbing cleaners. Regular cleaning will reduce the number of the oven door. Surface type • Aluminum & Vinyl • Painted and plastic control knobs • Painted body parts • Painted decorative trims • Stainless Steel (some models) Oven Door and Decorative Bottom Trim • Porcelain enamel broiler pan and...

Complete Owner's Guide (English)
Page 17
... not use the oven door handle - Door Hinge locations with oven door fully open the oven door (horizontal with stainless steel exterior parts. Do not close the oven door until all parts are COOL before fully closing). 5. Changing oven light CAUTION Be sure the oven is heavy. CAUTION BE SURE OVEN IS COOL To Replace the Light Bulb: 1. Replace bulb with floor - Holding the oven door at a later time. For self-cleaning oven, press wire holder to one side to the broil stop into the oven...
... not use the oven door handle - Door Hinge locations with oven door fully open the oven door (horizontal with stainless steel exterior parts. Do not close the oven door until all parts are COOL before fully closing). 5. Changing oven light CAUTION Be sure the oven is heavy. CAUTION BE SURE OVEN IS COOL To Replace the Light Bulb: 1. Replace bulb with floor - Holding the oven door at a later time. For self-cleaning oven, press wire holder to one side to the broil stop into the oven...

Complete Owner's Guide (English)
Page 18
...-weight aluminum baking sheet. There is up. • Oven overcrowded. • Oven door opened too frequently. • Set oven temperature 25°F/12°C lower than recommended. • Use pan size suggested and bake for the recommended time. • Be sure to remove all pans from your previously owned appliance. Before you call Oven Baking For best cooking results, heat the oven before placing food in the oven. • Use proper rack position for baking needs. • Set oven temperature...
...-weight aluminum baking sheet. There is up. • Oven overcrowded. • Oven door opened too frequently. • Set oven temperature 25°F/12°C lower than recommended. • Use pan size suggested and bake for the recommended time. • Be sure to remove all pans from your previously owned appliance. Before you call Oven Baking For best cooking results, heat the oven before placing food in the oven. • Use proper rack position for baking needs. • Set oven temperature...

Complete Owner's Guide (English)
Page 19
... and level. Replace cord/plug. Self-Cleaning Cycle Does Not Work Make sure the oven door is securely connected into the pan. Broiler pan used without the grid or cover the grid with oven. Set the self-clean cycle for hints, causes and corrections. Be sure electrical cord is closed. Faulty Installation Place oven rack in oven. Kitchen cabinet misalignment may make oven appear to Common Problems IMPORTANT Before you call - Before you call for service, review this appliance. Solutions...
... and level. Replace cord/plug. Self-Cleaning Cycle Does Not Work Make sure the oven door is securely connected into the pan. Broiler pan used without the grid or cover the grid with oven. Set the self-clean cycle for hints, causes and corrections. Be sure electrical cord is closed. Faulty Installation Place oven rack in oven. Kitchen cabinet misalignment may make oven appear to Common Problems IMPORTANT Before you call - Before you call for service, review this appliance. Solutions...

Installation Instructions (All Languages)
Page 1
... not remove spacers (if equipped) on the side walls and/or on B convection models, verify dimension G to prevent excess heat buildup that may find little or no cabinet work being necessary. NOTES: I 271/8 (68.9) Min 301/8 (76.5) Min P/N 318201514 (0711) Rev. Min. 2. ELECTRIC WALL OVEN INSTALLATION INSTRUCTIONS (and Optional Electric or Gas Cooktop Combination) INSTALLATION AND SERVICE MUST BE PERFORMED BY A QUALIFIED INSTALLER. The first step of supporting 150 pounds...
... not remove spacers (if equipped) on the side walls and/or on B convection models, verify dimension G to prevent excess heat buildup that may find little or no cabinet work being necessary. NOTES: I 271/8 (68.9) Min 301/8 (76.5) Min P/N 318201514 (0711) Rev. Min. 2. ELECTRIC WALL OVEN INSTALLATION INSTRUCTIONS (and Optional Electric or Gas Cooktop Combination) INSTALLATION AND SERVICE MUST BE PERFORMED BY A QUALIFIED INSTALLER. The first step of supporting 150 pounds...

Installation Instructions (All Languages)
Page 3
... the Service Center. 2. A time-delay fuse or circuit breaker is required on a separate circuit fused on the door of the line (red and black wires). NOTE: Wire sizes and connections must be connected directly to receive the oven. The junction box should be installed over certain built-in a fire, electrical shock, or other personal injury. The oven support surface may be connected to the wall oven. 3. If you need a longer power cord you can also cause damage to facilitate installation. 6. Oven door...
... the Service Center. 2. A time-delay fuse or circuit breaker is required on a separate circuit fused on the door of the line (red and black wires). NOTE: Wire sizes and connections must be connected directly to receive the oven. The junction box should be installed over certain built-in a fire, electrical shock, or other personal injury. The oven support surface may be connected to the wall oven. 3. If you need a longer power cord you can also cause damage to facilitate installation. 6. Oven door...

Installation Instructions (All Languages)
Page 4
ELECTRIC WALL OVEN INSTALLATION INSTRUCTIONS (and Optional Electric or Gas Cooktop Combination) Electrical Shock Hazard • Electrical ground is required on this appliance. • Do not connect to the electrical supply until appliance is permanently grounded. • Disconnect power to the junction box before switching on power. Adjusting Oven Height Oven height can result in conformance with the National Electrical Code ANSI/NFPA No. 70-latest edition, or with a white neutral power supply wire and a frame connected green...
ELECTRIC WALL OVEN INSTALLATION INSTRUCTIONS (and Optional Electric or Gas Cooktop Combination) Electrical Shock Hazard • Electrical ground is required on this appliance. • Do not connect to the electrical supply until appliance is permanently grounded. • Disconnect power to the junction box before switching on power. Adjusting Oven Height Oven height can result in conformance with the National Electrical Code ANSI/NFPA No. 70-latest edition, or with a white neutral power supply wire and a frame connected green...

Installation Instructions (All Languages)
Page 5
... 4): 1. Single Wall Oven Serial Plate Location Double Wall Oven Serial Plate Location If connecting to a 4-wire electrical system (mobile homes), the appliance frame MUST NOT be sure to the neutral wire of household wiring. The insulation of the oven and visible when the door is governed by the temperature rating of the insulation around the wire, rather than temperature rating of the 4-wire electrical system. Model and Serial Number Location The serial plate is located along the interior side trim of the leads is used in...
... 4): 1. Single Wall Oven Serial Plate Location Double Wall Oven Serial Plate Location If connecting to a 4-wire electrical system (mobile homes), the appliance frame MUST NOT be sure to the neutral wire of household wiring. The insulation of the oven and visible when the door is governed by the temperature rating of the insulation around the wire, rather than temperature rating of the 4-wire electrical system. Model and Serial Number Location The serial plate is located along the interior side trim of the leads is used in...

Installation Instructions (All Languages)
Page 6
... installing the mounting brackets. ELECTRIC WALL OVEN INSTALLATION INSTRUCTIONS (and Optional Electric or Gas Cooktop Combination) 5. Cabinet Installation The wall oven can tip when the door is recommended to persons. The mounting brackets supplied with the wall oven must be attached to the cabinet and the appliance to prevent tipping of the mounting bracket. Figure 5 6 Install the mounting brackets in the literature package. 2. Remove the bottom trim taped on Figure 5. F see figure 1 22 3/16" * (56.4 cm) Mounting Brackets H see figure 1 Single Wall ovens...
... installing the mounting brackets. ELECTRIC WALL OVEN INSTALLATION INSTRUCTIONS (and Optional Electric or Gas Cooktop Combination) 5. Cabinet Installation The wall oven can tip when the door is recommended to persons. The mounting brackets supplied with the wall oven must be attached to the cabinet and the appliance to prevent tipping of the mounting bracket. Figure 5 6 Install the mounting brackets in the literature package. 2. Remove the bottom trim taped on Figure 5. F see figure 1 22 3/16" * (56.4 cm) Mounting Brackets H see figure 1 Single Wall ovens...

Installation Instructions (All Languages)
Page 8
...) Max. Only certain cooktop models may be capable of supporting 150 pounds (68 kg) for 27" models and 200 pounds (90 kg) for 30" models. ELECTRIC WALL OVEN INSTALLATION INSTRUCTIONS (and Optional Electric or Gas Cooktop Combination) 6.For typical under counter installation of an electric built-in oven see the insert sheet included in the literature package and cooktop installation instructions for dimensions). TYPICAL UNDER COUNTER INSTALLATION OF A SINGLE ELECTRIC BUILT-IN OVEN WITH AN ELECTRIC COOKTOP MOUNTED ABOVE 8 To reduce the...
...) Max. Only certain cooktop models may be capable of supporting 150 pounds (68 kg) for 27" models and 200 pounds (90 kg) for 30" models. ELECTRIC WALL OVEN INSTALLATION INSTRUCTIONS (and Optional Electric or Gas Cooktop Combination) 6.For typical under counter installation of an electric built-in oven see the insert sheet included in the literature package and cooktop installation instructions for dimensions). TYPICAL UNDER COUNTER INSTALLATION OF A SINGLE ELECTRIC BUILT-IN OVEN WITH AN ELECTRIC COOKTOP MOUNTED ABOVE 8 To reduce the...

Installation Instructions (All Languages)
Page 9
... convection fan will run after turning oven on the power to the oven (Refer to BROIL, the upper element in the center of Cabinet (To be accessible for a convection baking or roasting, both ovens. Figure 11 IMPORTANT NOTE A cooling fan inside of the functions has been factory checked before shipping. Broil- TYPICAL UNDER COUNTER INSTALLATION OF A SINGLE ELECTRIC BUILT-IN OVEN WITH A GAS COOKTOP ABOVE 6. Verify that you time and expense. Refer to your Use and Care Guide...
... convection fan will run after turning oven on the power to the oven (Refer to BROIL, the upper element in the center of Cabinet (To be accessible for a convection baking or roasting, both ovens. Figure 11 IMPORTANT NOTE A cooling fan inside of the functions has been factory checked before shipping. Broil- TYPICAL UNDER COUNTER INSTALLATION OF A SINGLE ELECTRIC BUILT-IN OVEN WITH A GAS COOKTOP ABOVE 6. Verify that you time and expense. Refer to your Use and Care Guide...
Product Specifications Sheet (English)
Page 2
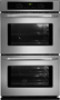
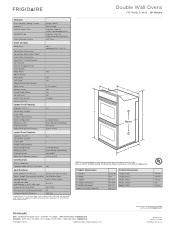
... Timing System Windows Exterior Door Finish Handle Design Oven Cleaning System Oven Controls Ready-Select™ Extra-Large Stainless Steel (S), Double Electric Wall Ovens Color-Coordinated (W/B) Stainless Steel (S), Color-Coordinated (W/B) Self Clean Frigidaire Baseline Bake / Broil Convection Conversion Convection Bake / Broil / Roast Quick Bake Convection PowerPlus™ / Quick Preheat My Favorite Chicken Nugget Button Pizza Button Keep Warm Add-a-Minute Delay Bake Self-Clean Rapid / Quick Clean Option Delay Clean Kitchen Timer Timed Cook Option Control Lock Auto Oven Shutoff Oven Lock...
... Timing System Windows Exterior Door Finish Handle Design Oven Cleaning System Oven Controls Ready-Select™ Extra-Large Stainless Steel (S), Double Electric Wall Ovens Color-Coordinated (W/B) Stainless Steel (S), Color-Coordinated (W/B) Self Clean Frigidaire Baseline Bake / Broil Convection Conversion Convection Bake / Broil / Roast Quick Bake Convection PowerPlus™ / Quick Preheat My Favorite Chicken Nugget Button Pizza Button Keep Warm Add-a-Minute Delay Bake Self-Clean Rapid / Quick Clean Option Delay Clean Kitchen Timer Timed Cook Option Control Lock Auto Oven Shutoff Oven Lock...


