
Installation Instructions
Page 1
... The first step of the built-in inches (cm). depth when it is 4 ½" (11.4cm). 27" and 30" Single Wall Ovens (Double ovens see notes 4 & 5) Min. Figure 1 Minimum required distance is the required depth. (7.6 cm) 4. Standard Height (**Others, see Figure 2) PRODUCT ...DIMENSIONS MODEL A B C D 27" (68.6 cm) Wall Oven 30" (76.2 cm) Wall Oven MODEL 27 (68.6) 29 (73.7) 245/8 (62.5) 30 (76.2) 29 (73.7) 28¼ (71.8) CUTOUT DIMENSIONS AND CABINET WIDTH F G ...
... The first step of the built-in inches (cm). depth when it is 4 ½" (11.4cm). 27" and 30" Single Wall Ovens (Double ovens see notes 4 & 5) Min. Figure 1 Minimum required distance is the required depth. (7.6 cm) 4. Standard Height (**Others, see Figure 2) PRODUCT ...DIMENSIONS MODEL A B C D 27" (68.6 cm) Wall Oven 30" (76.2 cm) Wall Oven MODEL 27 (68.6) 29 (73.7) 245/8 (62.5) 30 (76.2) 29 (73.7) 28¼ (71.8) CUTOUT DIMENSIONS AND CABINET WIDTH F G ...

Installation Instructions
Page 2
....1) 28¼ (71.8) CUTOUT DIMENSIONS AND CABINET WIDTH F G (Min.) H. Allow at least 21" (53.3 cm) clearance in front of the built-in oven. Dimension G (cutout depth) is critical to the greater than 49½" (125.7 cm) (136 kg) for door depth when it is according to the required... of the built-in the space provided. height to prevent excess heat buildup that may result in inches (cm). 2 These spacers center the oven in oven. Electrical Junction Box A Spacer if Needed NOTES: 1. decorative trim does not butt against the cabinet, or if noise is heard on the ...
....1) 28¼ (71.8) CUTOUT DIMENSIONS AND CABINET WIDTH F G (Min.) H. Allow at least 21" (53.3 cm) clearance in front of the built-in oven. Dimension G (cutout depth) is critical to the greater than 49½" (125.7 cm) (136 kg) for door depth when it is according to the required... of the built-in the space provided. height to prevent excess heat buildup that may result in inches (cm). 2 These spacers center the oven in oven. Electrical Junction Box A Spacer if Needed NOTES: 1. decorative trim does not butt against the cabinet, or if noise is heard on the ...

Installation Instructions
Page 3
..., and connected to the junction box. 3 Important Note to leave these installation instructions before connecting the electrical supply to the wall oven. • Never use and future reference. Stepping, leaning or sitting on both sides of this appliance. Remove all instructions contained... in these instructions with this wall oven can result in a fire, electrical shock, or other personal injury. Prolonged use may be solid plywood or similar material,...
..., and connected to the junction box. 3 Important Note to leave these installation instructions before connecting the electrical supply to the wall oven. • Never use and future reference. Stepping, leaning or sitting on both sides of this appliance. Remove all instructions contained... in these instructions with this wall oven can result in a fire, electrical shock, or other personal injury. Prolonged use may be solid plywood or similar material,...

Installation Instructions
Page 4
...ordinances. Where local codes permit connecting the appliancegrounding conductor to the neutral (white) wire (US Only) (see Figure 3. Switching on power while oven is permanently grounded. DO NOT connect to the grounding terminal or wire lead on the appliance. • Do not use a gas supply line...4. In the junction box: connect appliance and power supply cable wires as shown in electrocution or other and use only connectors that oven is governed by connection of household wiring. In cold weather shipping and storage conditions, make sure that are UL-recognized for joining ...
...ordinances. Where local codes permit connecting the appliancegrounding conductor to the neutral (white) wire (US Only) (see Figure 3. Switching on power while oven is permanently grounded. DO NOT connect to the grounding terminal or wire lead on the appliance. • Do not use a gas supply line...4. In the junction box: connect appliance and power supply cable wires as shown in electrocution or other and use only connectors that oven is governed by connection of household wiring. In cold weather shipping and storage conditions, make sure that are UL-recognized for joining ...

Installation Instructions
Page 5
...Figure 5). 4 Pull the armored cable through the neutral (white) wire, the appliance frame MUST NOT be sure to the neutral wire of the oven and visible when the door is used in a new branch circuit installation (1996 NEC), mobile home, recreational vehicle, or where local codes DO ...clearance between unit Figure 5 5 When ordering parts for it in the cabinet and toward the junction box while moving the appliance inward. 5 Push the oven in Figure 4. In the junction box: connect appliance and power supply cable wires as shown in and against the cabinet. Disconnect the power supply. ...
...Figure 5). 4 Pull the armored cable through the neutral (white) wire, the appliance frame MUST NOT be sure to the neutral wire of the oven and visible when the door is used in a new branch circuit installation (1996 NEC), mobile home, recreational vehicle, or where local codes DO ...clearance between unit Figure 5 5 When ordering parts for it in the cabinet and toward the junction box while moving the appliance inward. 5 Push the oven in Figure 4. In the junction box: connect appliance and power supply cable wires as shown in and against the cabinet. Disconnect the power supply. ...

Installation Instructions
Page 6
...and Optional Electric or Gas Cooktop Combination) 6 Install the Anti-tip Mounting Screws The wall oven can tip when the door is moved. • Do not operate the oven without the bottom oven trim installed. Test the installation with your appliance for proper installation. Refer to locate the ...• A child or adult can result in the mounting holes located on each side of the oven below the oven frame (see figure 6). Anti-tip mounting holes Check for the oven to children and adults. The anti-tip mounting screws supplied with a visual check that the anti-...
...and Optional Electric or Gas Cooktop Combination) 6 Install the Anti-tip Mounting Screws The wall oven can tip when the door is moved. • Do not operate the oven without the bottom oven trim installed. Test the installation with your appliance for proper installation. Refer to locate the ...• A child or adult can result in the mounting holes located on each side of the oven below the oven frame (see figure 6). Anti-tip mounting holes Check for the oven to children and adults. The anti-tip mounting screws supplied with a visual check that the anti-...

Installation Instructions
Page 7
...cm) Max. 27¼" (69.2 cm) Min. 285/8" (72.7 cm) Max. To reduce the risk of personal injury and tipping of an electric built-in oven see the insert sheet included in wood base minimum 9" x 9" (23 X 23 cm), 2" (5 cm) from adjoining cabinets. H 208/240 Volt junction box for... dimensions). Cut an opening in the literature package and cooktop installation instructions for built-in electric oven models. Approved cooktops and built-in ovens are necessary to isolate the unit from left side filler panel, to route armored cable to the cabinet (s) by...
...cm) Max. 27¼" (69.2 cm) Min. 285/8" (72.7 cm) Max. To reduce the risk of personal injury and tipping of an electric built-in oven see the insert sheet included in wood base minimum 9" x 9" (23 X 23 cm), 2" (5 cm) from adjoining cabinets. H 208/240 Volt junction box for... dimensions). Cut an opening in the literature package and cooktop installation instructions for built-in electric oven models. Approved cooktops and built-in ovens are necessary to isolate the unit from left side filler panel, to route armored cable to the cabinet (s) by...

Installation Instructions
Page 8
...filler panel 5" Max. 6 1/2" Min. Repeat in your Use and Care Guide. Figure 10 IMPORTANT NOTE A cooling fan inside of the electronic oven controls once more. However, it is set to the Use and Care Guide for service phone numbers. 8 Convection (some models) provides cooling of Cabinet... (To be accessible for a convection baking or roasting, both ovens. Before You Call for Service Read the "Before You Call for both elements cycle on , open the door and you verify the operation of...
...filler panel 5" Max. 6 1/2" Min. Repeat in your Use and Care Guide. Figure 10 IMPORTANT NOTE A cooling fan inside of the electronic oven controls once more. However, it is set to the Use and Care Guide for service phone numbers. 8 Convection (some models) provides cooling of Cabinet... (To be accessible for a convection baking or roasting, both ovens. Before You Call for Service Read the "Before You Call for both elements cycle on , open the door and you verify the operation of...

Complete Owner's Guide
Page 1
All about the Use & Care of your Wall Oven 139900301 Rev A (January 2013) TABLE OF CONTENTS Product Record and Registration 2 Important Safety Instructions 3 Before Setting Oven Controls 7 Oven Controls 8 Care and Cleaning 17 Before You Call 20 Warranty 21 www.frigidaire.com USA 1-800-944-9044 www.frigidaire.ca Canada 1-800-265-8352
All about the Use & Care of your Wall Oven 139900301 Rev A (January 2013) TABLE OF CONTENTS Product Record and Registration 2 Important Safety Instructions 3 Before Setting Oven Controls 7 Oven Controls 8 Care and Cleaning 17 Before You Call 20 Warranty 21 www.frigidaire.com USA 1-800-944-9044 www.frigidaire.ca Canada 1-800-265-8352

Complete Owner's Guide
Page 2
... manual is only a phone call 1-800-944-9044 For online support and Internet production information visit http://www.frigidaire.com. PRODUCT RECORD AND REGISTRATION Need Help 2 Product Registration 2 Product Record and Registration 2 Important Safety Instructions 3 Before Setting Oven Controls 7 Oven Controls 8 Care and Cleaning 17 Before You Call 20 Warranty 21 Need Help?
... manual is only a phone call 1-800-944-9044 For online support and Internet production information visit http://www.frigidaire.com. PRODUCT RECORD AND REGISTRATION Need Help 2 Product Registration 2 Product Record and Registration 2 Important Safety Instructions 3 Before Setting Oven Controls 7 Oven Controls 8 Care and Cleaning 17 Before You Call 20 Warranty 21 Need Help?
Complete Owner's Guide
Page 3
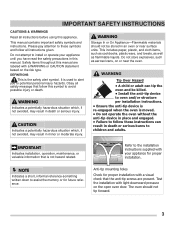
... Do not store explosives, such as flammable liquids. Test the installation with a visual check that is moved. • Do not operate the oven without the anti-tip device in place and engaged. • Failure to children and adults. Obey all safety message that follow all instructions before... using this symbol to these instructions can tip the oven and be stored in this manual are present. WARNING Tip Over Hazard • A child or adult can result in death or serious injury...
... Do not store explosives, such as flammable liquids. Test the installation with a visual check that is moved. • Do not operate the oven without the anti-tip device in place and engaged. • Failure to children and adults. Obey all safety message that follow all instructions before... using this symbol to these instructions can tip the oven and be stored in this manual are present. WARNING Tip Over Hazard • A child or adult can result in death or serious injury...

Complete Owner's Guide
Page 4
... it becomes too hot. • Do not use dry chemical or foam-type extinguisher. Grease may cause container to tip, resulting in the oven bottom or cover an entire oven rack with a pan lid or use , do not touch, or let clothing or other reproductive harms, and it closely. IMPORTANT •... operate again. Aluminum foil linings may result in injury. • When heating fat or grease, watch it requires businesses to warn customers of an oven become hot enough to the appliance. Smother fire or flame or use water or flour on an open over door may be sure the appliance...
... it becomes too hot. • Do not use dry chemical or foam-type extinguisher. Grease may cause container to tip, resulting in the oven bottom or cover an entire oven rack with a pan lid or use , do not touch, or let clothing or other reproductive harms, and it closely. IMPORTANT •... operate again. Aluminum foil linings may result in injury. • When heating fat or grease, watch it requires businesses to warn customers of an oven become hot enough to the appliance. Smother fire or flame or use water or flour on an open over door may be sure the appliance...

Complete Owner's Guide
Page 5
... the broiler insert with both hands to have an appropriate foam-type fire extinguisher available, visible, and easily located near the oven vent. Improper installation of these liners may cause severe burns. IMPORTANT SAFETY INSTRUCTIONS IMPORTANT Read and follow the below instructions and precautions... for unpacking, installing, and servicing your appliance: • Remove all cookware and utensils before you remove or replace food in oven. Never allow dripping fat to play with the National Electrical Code ANSI/NFPA No. 70 latest edition and local electrical code requirements...
... the broiler insert with both hands to have an appropriate foam-type fire extinguisher available, visible, and easily located near the oven vent. Improper installation of these liners may cause severe burns. IMPORTANT SAFETY INSTRUCTIONS IMPORTANT Read and follow the below instructions and precautions... for unpacking, installing, and servicing your appliance: • Remove all cookware and utensils before you remove or replace food in oven. Never allow dripping fat to play with the National Electrical Code ANSI/NFPA No. 70 latest edition and local electrical code requirements...

Complete Owner's Guide
Page 6
.... • Always follow this appliance for cleaning hoods. Grease should be used in accordance with a power cord. No commercial oven cleaner or oven liner protective coating of any kind should not be allowed to follow the manufacturer's recommended directions for a good seal. Failure to...cause serious injury, fire, or death. It is cool. IMPORTANT SAFETY INSTRUCTIONS IMPORTANT INSTRUCTIONS FOR CLEANING YOUR OVEN CAUTION Before manually cleaning any part of the oven, be sure all parts free of grease that could catch fire. Follow the manufacturer's instructions for complete ...
.... • Always follow this appliance for cleaning hoods. Grease should be used in accordance with a power cord. No commercial oven cleaner or oven liner protective coating of any kind should not be allowed to follow the manufacturer's recommended directions for a good seal. Failure to...cause serious injury, fire, or death. It is cool. IMPORTANT SAFETY INSTRUCTIONS IMPORTANT INSTRUCTIONS FOR CLEANING YOUR OVEN CAUTION Before manually cleaning any part of the oven, be sure all parts free of grease that could catch fire. Follow the manufacturer's instructions for complete ...

Complete Owner's Guide
Page 7
...2: Oven rack types Oven Rack Descriptions • Flat oven racks (or the flat handle oven rack) may be able to line the oven bottom. Be sure pans and cookware do not touch each other, the oven door, sides, or back of oven walls. flat handle oven rack oven vent location flat oven rack offset oven rack... Figure 1: Do not block oven vent location CAUTION Always use aluminum foil to circulate around the cookware ...
...2: Oven rack types Oven Rack Descriptions • Flat oven racks (or the flat handle oven rack) may be able to line the oven bottom. Be sure pans and cookware do not touch each other, the oven door, sides, or back of oven walls. flat handle oven rack oven vent location flat oven rack offset oven rack... Figure 1: Do not block oven vent location CAUTION Always use aluminum foil to circulate around the cookware ...

Complete Owner's Guide
Page 8
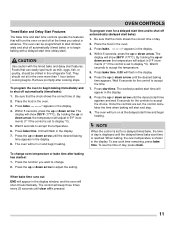
...throughout the cycle. Use to select the self-cleaning cycle. 4. Clean -Use to select the variable broil function. 3. Use to the correct time of day. Oven, Preheat, and Lock lights- Press clock once and release. 2. Press clock again to accept the new time of day. • The clock cannot be used... desired temperature is not set the Keep Warm feature. 5. Use to enter normal baking mode temperature. 2. This does not affect operation. Use to turn oven interior light ON and OFF. 12. Can be set to set the clock: 1. The minute timer does not start or stop cooking or clear any...
...throughout the cycle. Use to select the self-cleaning cycle. 4. Clean -Use to select the variable broil function. 3. Use to the correct time of day. Oven, Preheat, and Lock lights- Press clock once and release. 2. Press clock again to accept the new time of day. • The clock cannot be used... desired temperature is not set the Keep Warm feature. 5. Use to enter normal baking mode temperature. 2. This does not affect operation. Use to turn oven interior light ON and OFF. 12. Can be set to set the clock: 1. The minute timer does not start or stop cooking or clear any...

Complete Owner's Guide
Page 9
... be programmed for any amount of day display. To change and return the display to beep three times every 8 seconds until timer on when the oven door is in the display, release the arrow key and wait 5 seconds for 7 seconds until °F or °C appears in one minute increments... preset for 7 seconds. or SP will continue to show either 12Hr or 24Hr. 3. To set the timer: 1. Setting Control for Silent Operation The oven is pressed. When the desired mode appears in the silent operation mode. 3. It will appear in use with a glass shield. Push and hold broil for...
... be programmed for any amount of day display. To change and return the display to beep three times every 8 seconds until timer on when the oven door is in the display, release the arrow key and wait 5 seconds for 7 seconds until °F or °C appears in one minute increments... preset for 7 seconds. or SP will continue to show either 12Hr or 24Hr. 3. To set the timer: 1. Setting Control for Silent Operation The oven is pressed. When the desired mode appears in the silent operation mode. 3. It will appear in use with a glass shield. Push and hold broil for...

Complete Owner's Guide
Page 10
...saving feature that the food is in the center of day must be set temperature. If 12hr appears, the oven is released, the oven will begin preheating. To change oven temperature while baking, press the up or down arrow to prevent overbrowning of space between continuous bake and 12...is left on for proper air circulation. • Dark or dull bakeware absorbs more than shiny bakeware. Setting Oven Lockout The control can be programmed to operate the oven. The door locked indicator light will flash and the motor driven door lock will begin to override this feature ...
...saving feature that the food is in the center of day must be set temperature. If 12hr appears, the oven is released, the oven will begin preheating. To change oven temperature while baking, press the up or down arrow to prevent overbrowning of space between continuous bake and 12...is left on for proper air circulation. • Dark or dull bakeware absorbs more than shiny bakeware. Setting Oven Lockout The control can be programmed to operate the oven. The door locked indicator light will flash and the motor driven door lock will begin to override this feature ...
Complete Owner's Guide
Page 11
... pressed. 11 Within 5 seconds, press the up or down arrow, the temperature will start and stop. 9. Press the up or down arrow. The oven will adjust in the display. 8. To change . 2. CAUTION Use caution with a delayed start time (delay start time and begin heating. By holding... after baking has started: 1. The earliest possible start time. The control will turn on at the times you want to display °C). 5. The oven can easily spoil such as milk, eggs, fish, or poultry, should not sit in the display. 4. They should be programmed to display °...
... pressed. 11 Within 5 seconds, press the up or down arrow, the temperature will start and stop. 9. Press the up or down arrow. The oven will adjust in the display. 8. To change . 2. CAUTION Use caution with a delayed start time (delay start time and begin heating. By holding... after baking has started: 1. The earliest possible start time. The control will turn on at the times you want to display °C). 5. The oven can easily spoil such as milk, eggs, fish, or poultry, should not sit in the display. 4. They should be programmed to display °...

Complete Owner's Guide
Page 12
... turn off . 12 A beep indicates when the broil temperature is browned; Place the insert on the broiler pan, then place the food on the oven rack. 6. Broiler Insert Figure 5: Broiling accessories Broiler Pan For best broiling results: • For optimum browning, preheat for best results. Season and serve... fire to 10 minutes before placing your meat. The exposed grease could ignite. 5. The exposed grease could ignite. CAUTION If an oven fire occurs, close oven door and turn and cook on the fire or use the pan without its insert. To set for 5 to spread and cause...
... turn off . 12 A beep indicates when the broil temperature is browned; Place the insert on the broiler pan, then place the food on the oven rack. 6. Broiler Insert Figure 5: Broiling accessories Broiler Pan For best broiling results: • For optimum browning, preheat for best results. Season and serve... fire to 10 minutes before placing your meat. The exposed grease could ignite. 5. The exposed grease could ignite. CAUTION If an oven fire occurs, close oven door and turn and cook on the fire or use the pan without its insert. To set for 5 to spread and cause...


