
Complete Owners Guide
Page 1
useFR&EcEaZErRe Introduction 2 Important Safety information 3 Features 5 Installation 7 Door Removal/Reversal (some models)......8 Door Handle Installation (some models).....11 Controls and Settings 12 Storage Features 13 Care and Cleaning 14 Troubleshooting 16 Warranty 17 Frigidaire.com USA 1-800-374-4432 A12735802 (July 2019) Frigidaire.ca Canada 1-800-265-8352
useFR&EcEaZErRe Introduction 2 Important Safety information 3 Features 5 Installation 7 Door Removal/Reversal (some models)......8 Door Handle Installation (some models).....11 Controls and Settings 12 Storage Features 13 Care and Cleaning 14 Troubleshooting 16 Warranty 17 Frigidaire.com USA 1-800-374-4432 A12735802 (July 2019) Frigidaire.ca Canada 1-800-265-8352
Complete Owners Guide
Page 2
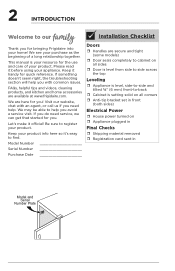
... for quick reference. Model Number Serial Number Purchase Date Installation Checklist Doors ˆˆ Handles are secure and tight (some models) ˆˆ Door seals completely to cabinet on ˆˆ Appliance plugged in Final Checks ˆˆ Shipping material removed ˆˆ Registration card sent in front (both sides) Electrical Power ˆˆ House power turned on all sides ˆˆ Door is level from side to...
... for quick reference. Model Number Serial Number Purchase Date Installation Checklist Doors ˆˆ Handles are secure and tight (some models) ˆˆ Door seals completely to cabinet on ˆˆ Appliance plugged in Final Checks ˆˆ Shipping material removed ˆˆ Registration card sent in front (both sides) Electrical Power ˆˆ House power turned on all sides ˆˆ Door is level from side to...

Complete Owners Guide
Page 3
IMPORTANT SAFETY INFORMATION 3 WARNING CAUTION Please read all instructions before attempting to service this or any other appliance. It is used . Obey all staples from the carton. Consult repair manual/owner's guide before using this symbol to avoid possible injury or death. Follow handling instructions carefully. WARNING WARNING WARNING! DANGER DANGER Risk of potential personal injury hazards. Child Safety This appliance is important but not hazard...
IMPORTANT SAFETY INFORMATION 3 WARNING CAUTION Please read all instructions before attempting to service this or any other appliance. It is used . Obey all staples from the carton. Consult repair manual/owner's guide before using this symbol to avoid possible injury or death. Follow handling instructions carefully. WARNING WARNING WARNING! DANGER DANGER Risk of potential personal injury hazards. Child Safety This appliance is important but not hazard...

Complete Owners Guide
Page 4
... if they will operate properly. IMPORTANT Turning the appliance controls to "off" will disable your old appliance: • Remove door. • Leave shelves in place so children may not easily climb inside. • Have refrigerant removed by a qualified service technician. • Unplug the appliance before cleaning and before replacing the AC LED light bulb to the light bulb and other electrical components. Always grip the plug firmly, and...
... if they will operate properly. IMPORTANT Turning the appliance controls to "off" will disable your old appliance: • Remove door. • Leave shelves in place so children may not easily climb inside. • Have refrigerant removed by a qualified service technician. • Unplug the appliance before cleaning and before replacing the AC LED light bulb to the light bulb and other electrical components. Always grip the plug firmly, and...

Complete Owners Guide
Page 5
... model 5 E D F C B A H A Green LED Power On Light B Wire Freezer Basket C Freezer Control *D Freezer Shelf G E LED Light Bulb *F Fixed Door Bins G Magnet (Door Open Sensor) *H Freezer Shelf IMPORTANT Cleaning your fingers. These products can damage the surface of your appliance. See the CARE & CLEANING section in the STORAGE FEATURES section of liquid dish soap over the adhesive with a soft cloth. Rinse with warm water and dry with your Appliance Remove tape and glue residue from surfaces before using...
... model 5 E D F C B A H A Green LED Power On Light B Wire Freezer Basket C Freezer Control *D Freezer Shelf G E LED Light Bulb *F Fixed Door Bins G Magnet (Door Open Sensor) *H Freezer Shelf IMPORTANT Cleaning your fingers. These products can damage the surface of your appliance. See the CARE & CLEANING section in the STORAGE FEATURES section of liquid dish soap over the adhesive with a soft cloth. Rinse with warm water and dry with your Appliance Remove tape and glue residue from surfaces before using...

Complete Owners Guide
Page 6
6 FEATURES IMPORTANT Moving your appliance and may be purchased at Frigidaire.com or by calling 1-800-374-4432 (Frigidaire.ca or 1-800-265-8352 in Canada) or from an authorized seller. Always pull the appliance straight out when moving the appliance for your Appliance ... moving it as floor damage could occur. Be sure to cover the floor with cardboard or hardboard to move it . IMPORTANT Accessories are available for cleaning or service, raise the anti-tip bracket (see "Setting the anti-tip bracket").
6 FEATURES IMPORTANT Moving your appliance and may be purchased at Frigidaire.com or by calling 1-800-374-4432 (Frigidaire.ca or 1-800-265-8352 in Canada) or from an authorized seller. Always pull the appliance straight out when moving the appliance for your Appliance ... moving it as floor damage could occur. Be sure to cover the floor with cardboard or hardboard to move it . IMPORTANT Accessories are available for cleaning or service, raise the anti-tip bracket (see "Setting the anti-tip bracket").

Complete Owners Guide
Page 7
... equipped with the door hinge side against a wall, you may have to do so will result in this Use & Care Guide. Failure to allow additional space for ease of the cabinet. Use the appliance only as instructed in injury. ⅜" (10 mm) 1" (25 mm) Freezer ⅜" ⅜" (10 mm) (10 mm) Setting the anti-tip bracket: Models are located on each...
... equipped with the door hinge side against a wall, you may have to do so will result in this Use & Care Guide. Failure to allow additional space for ease of the cabinet. Use the appliance only as instructed in injury. ⅜" (10 mm) 1" (25 mm) Freezer ⅜" ⅜" (10 mm) (10 mm) Setting the anti-tip bracket: Models are located on each...
Complete Owners Guide
Page 8
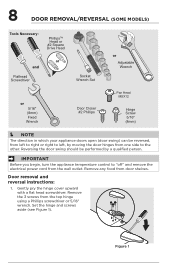
... Set or Adjustable Wrench or 5/16" (8mm) Fixed Wrench Door Closer #2 Phillips Pan Head MSX12 Hinge Screw 5/16" (8mm) NOTE The direction in which your appliance doors open (door swing) can be performed by moving the door hinges from one side to "off" and remove the electrical power cord from the wall outlet. IMPORTANT Before you begin, turn the appliance temperature control to the other. Reversing the door...
... Set or Adjustable Wrench or 5/16" (8mm) Fixed Wrench Door Closer #2 Phillips Pan Head MSX12 Hinge Screw 5/16" (8mm) NOTE The direction in which your appliance doors open (door swing) can be performed by moving the door hinges from one side to "off" and remove the electrical power cord from the wall outlet. IMPORTANT Before you begin, turn the appliance temperature control to the other. Reversing the door...
Complete Owners Guide
Page 9
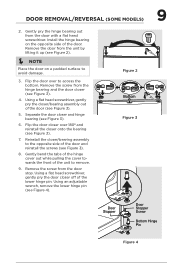
... over to avoid damage. 3. Using an adjustable wrench, remove the lower hinge pin (see Figure 3). 5. Remove the door from the door with a flat head screwdriver. Using a flat head screwdriver, gently pry the closer/bearing assembly out of the door. Gently pry the hinge bearing out from the unit by lifting it up (see Figure 3). 7. DOOR REMOVAL/REVERSAL (SOME MODELS) 2. Gently bend the tabs...
... over to avoid damage. 3. Using an adjustable wrench, remove the lower hinge pin (see Figure 3). 5. Remove the door from the door with a flat head screwdriver. Using a flat head screwdriver, gently pry the closer/bearing assembly out of the door. Gently pry the hinge bearing out from the unit by lifting it up (see Figure 3). 7. DOOR REMOVAL/REVERSAL (SOME MODELS) 2. Gently bend the tabs...

Complete Owners Guide
Page 10
... reinstall the door, place door on lower hinge pin at 90° and rotate to the closed position, (see Figure 5). 11. Plug in electrical power cord (see Figure 7). 90° Figure 6 Figure 7 Flip door stop over the hinge into the outer hole and tighten with an adjustable wrench. Figure 5 13. 10 DOOR REMOVAL/REVERSAL (SOME MODELS) 10. Replace the hinge cover. Attach the upper hinge using the three...
... reinstall the door, place door on lower hinge pin at 90° and rotate to the closed position, (see Figure 5). 11. Plug in electrical power cord (see Figure 7). 90° Figure 6 Figure 7 Flip door stop over the hinge into the outer hole and tighten with an adjustable wrench. Figure 5 13. 10 DOOR REMOVAL/REVERSAL (SOME MODELS) 10. Replace the hinge cover. Attach the upper hinge using the three...

Complete Owners Guide
Page 11
Follow instructions in the Use & Care Guide to installing the handle. Freezer Upper End Cap Door Door Freezer Lower End Cap Additionally, before installing the door handle, make sure the door swing is correct. Position freezer handle end caps over upper and lower pre-installed shoulder bolts (A) that are fastened into door, ensuring the holes for the set screws (B) with supplied Allen wrench. Your model will have either a right-hand or left...
Follow instructions in the Use & Care Guide to installing the handle. Freezer Upper End Cap Door Door Freezer Lower End Cap Additionally, before installing the door handle, make sure the door swing is correct. Position freezer handle end caps over upper and lower pre-installed shoulder bolts (A) that are fastened into door, ensuring the holes for the set screws (B) with supplied Allen wrench. Your model will have either a right-hand or left...

Complete Owners Guide
Page 12
...; For colder temperatures, adjust the knob towards Coldest. • For warmer temperatures, adjust the knob towards Cold. If the light goes out, refer to operate with food. 12 CONTROLS AND SETTINGS Cool Down Period To ensure safe food storage, allow the Appliance to "Appliance does not run" in small increments, allowing the temperature to OFF. Appliance Control NOTE When first turning appliance on, adjust control to electrical power. Door Ajar Alert This alert will sound.
...; For colder temperatures, adjust the knob towards Coldest. • For warmer temperatures, adjust the knob towards Cold. If the light goes out, refer to operate with food. 12 CONTROLS AND SETTINGS Cool Down Period To ensure safe food storage, allow the Appliance to "Appliance does not run" in small increments, allowing the temperature to OFF. Appliance Control NOTE When first turning appliance on, adjust control to electrical power. Door Ajar Alert This alert will sound.
Complete Owners Guide
Page 13
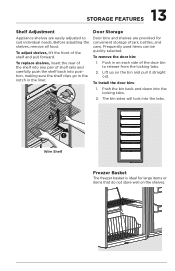
... locking tabs. 2. Wire Shelf Freezer Basket The freezer basket is ideal for convenient storage of jars, bottles, and cans. To adjust shelves, lift the front of shelf rails and carefully push the shelf back into any pair of the shelf and pull forward. Door bins and shelves are easily adjusted to release from the locking tabs. 2. Push in the liner. 1. To install the door bins: 1. To remove the door bin: To replace shelves...
... locking tabs. 2. Wire Shelf Freezer Basket The freezer basket is ideal for convenient storage of jars, bottles, and cans. To adjust shelves, lift the front of shelf rails and carefully push the shelf back into any pair of the shelf and pull forward. Door bins and shelves are easily adjusted to release from the locking tabs. 2. Push in the liner. 1. To install the door bins: 1. To remove the door bin: To replace shelves...

Complete Owners Guide
Page 14
... the electrical power cord from side to side may damage flooring. • Damp objects stick to cold metal surfaces. Do not use CHLORIDE or cleaners with wet or damp hands. 14 CARE AND CLEANING Protecting your investment Keeping your temperature controls to turn off cooling, power to lights and other sharp instruments which can scratch the appliance surface. • Do not remove the serial plate...
... the electrical power cord from side to side may damage flooring. • Damp objects stick to cold metal surfaces. Do not use CHLORIDE or cleaners with wet or damp hands. 14 CARE AND CLEANING Protecting your investment Keeping your temperature controls to turn off cooling, power to lights and other sharp instruments which can scratch the appliance surface. • Do not remove the serial plate...

Complete Owners Guide
Page 15
... the grain to wring excess water out of warm water. Replacing Light Bulbs • Unplug appliance • Wear gloves • Remove light cover • Replace old bulb • Replace light cover • Plug in 1 qt of sponge or cloth before cleaning around controls, light bulb or any electrical part. 15 CARE AND CLEANING Care & Cleaning Tips Part What To Use Tips and Precautions Interior & • Soap and water Door Liner • Baking soda and water Use 2 tbsp of baking soda...
... the grain to wring excess water out of warm water. Replacing Light Bulbs • Unplug appliance • Wear gloves • Remove light cover • Replace old bulb • Replace light cover • Plug in 1 qt of sponge or cloth before cleaning around controls, light bulb or any electrical part. 15 CARE AND CLEANING Care & Cleaning Tips Part What To Use Tips and Precautions Interior & • Soap and water Door Liner • Baking soda and water Use 2 tbsp of baking soda...

Complete Owners Guide
Page 16
... freezer temperatures and adjust the temperature control as needed. See "Setting the antitip bracket" in this list. Appliance does not run. • Ensure plug is reaching the appliance. • Contact a qualified service dealer. • See "Appliance does not run" above. Odors in defrost cycle. Cabinet light not working. • Replace light bulb. • Ensure plug is turned to stabilize. This section will help you ! 1-800-374-4432 (United States) Frigidaire...
... freezer temperatures and adjust the temperature control as needed. See "Setting the antitip bracket" in this list. Appliance does not run. • Ensure plug is reaching the appliance. • Contact a qualified service dealer. • See "Appliance does not run" above. Odors in defrost cycle. Cabinet light not working. • Replace light bulb. • Ensure plug is turned to stabilize. This section will help you ! 1-800-374-4432 (United States) Frigidaire...

Complete Owners Guide
Page 17
... owner to establish the warranty period should service be obtained by contacting Electrolux at the addresses or phone numbers below. Products purchased "as removal of trim, cupboards, shelves, etc., which do not involve malfunction or defects in materials or workmanship, or for service calls to repair or replace appliance light bulbs, air filters, water filters, other consumables, or knobs, handles, or other than in your best interest to any parts...
... owner to establish the warranty period should service be obtained by contacting Electrolux at the addresses or phone numbers below. Products purchased "as removal of trim, cupboards, shelves, etc., which do not involve malfunction or defects in materials or workmanship, or for service calls to repair or replace appliance light bulbs, air filters, water filters, other consumables, or knobs, handles, or other than in your best interest to any parts...

Complete Owners Guide
Page 18
home welcome Our home is your registration card for more information.) Frigidaire.com 1-800-374-4432 Frigidaire.ca 1-800-265-8352 Visit us if you need help with any of these things: owner support accessories service registration (See your home.
home welcome Our home is your registration card for more information.) Frigidaire.com 1-800-374-4432 Frigidaire.ca 1-800-265-8352 Visit us if you need help with any of these things: owner support accessories service registration (See your home.

Wiring Diagram
Page 1
... 115V 50g SERVICE DATA SHEET A14365701 AUTOMATIC DEFROST UPRIGHT FREEZER - To activate manual defrost: • Using a permanent magnet, activate the magnetic switch 5 times in 2 seconds, holding the forth activation against the magnetic switch until a long beep is heard and the interior AC LED Light bulb turns on time, with a maximum of electrical shock. For complete performance data by model, refer to diagnose individual electrical circuits. SERVICE MODE DIAGNOSTIC TESTS...
... 115V 50g SERVICE DATA SHEET A14365701 AUTOMATIC DEFROST UPRIGHT FREEZER - To activate manual defrost: • Using a permanent magnet, activate the magnetic switch 5 times in 2 seconds, holding the forth activation against the magnetic switch until a long beep is heard and the interior AC LED Light bulb turns on time, with a maximum of electrical shock. For complete performance data by model, refer to diagnose individual electrical circuits. SERVICE MODE DIAGNOSTIC TESTS...

Wiring Diagram
Page 2
Wiring Diagram A14353601
Wiring Diagram A14353601


